Clipboard
The Clipboard is a user interface element that allows users to select records while searching and browsing, and add them to a list (the “clipboard”), for later review or further action. All users can also perform exports of Clipboard results via the user interface - for more information, see:
Currently the Clipboard is only available for use with archival descriptions, authority records, and archival institutions. Clipboard pin icons are also available on the Inventory list page, and the Description updates page. For more information, see:
The clipboard is session-based, meaning that adding results to the
clipboard and then logging in/out (which starts a new session) or closing your
browser without first saving the clipboard results will result in all pinned
items being lost. However, users can now save clipboards and reload the
clipboard results in a future session if desired. An administrator can
also determine how long saved clipboards are stored in the database before being
purged, via a setting found in  Admin > Settings > Global - see:
Saved clipboard maximum age.
Admin > Settings > Global - see:
Saved clipboard maximum age.
Important
The session is renewed when logging in or out of the application - so unless you save your clipboard, you might lose your results if you log in or log out!
The following sections will introduce you to the Clipboard and the Clipboard menu in the AtoM header bar, as well as how the Clipboard can be used.
Jump to:
- Clipboard menu
- Pinning records to the clipboard
- Using the clipboard page
- Using the clipboard to export records
- Saving your clipboard for another session
- Loading a saved clipboard
See also
Clipboard menu
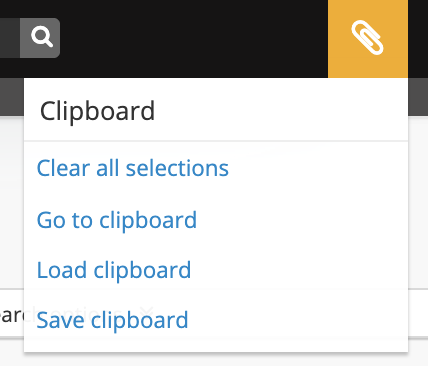
The Clipboard has its own menu icon in the AtoM header bar, visible to
all users. It is represented by the  paperclip icon. Clicking on the
Clipboard icon in the header bar will reveal a drop-down menu with a
count of the objects currently pinned to the clipboard, as well as options to
either clear all current selections from the clipboard, or to go the
Clipboard’s view page:
paperclip icon. Clicking on the
Clipboard icon in the header bar will reveal a drop-down menu with a
count of the objects currently pinned to the clipboard, as well as options to
either clear all current selections from the clipboard, or to go the
Clipboard’s view page:
When records have been pinned to the the Clipboard, the menu will show a count of pinned items as you move around the application, for reference:

The count is also shown in the drop-down menu, where it will identify the different entity types:
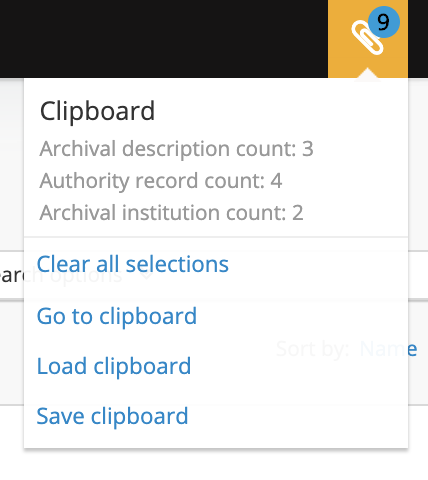
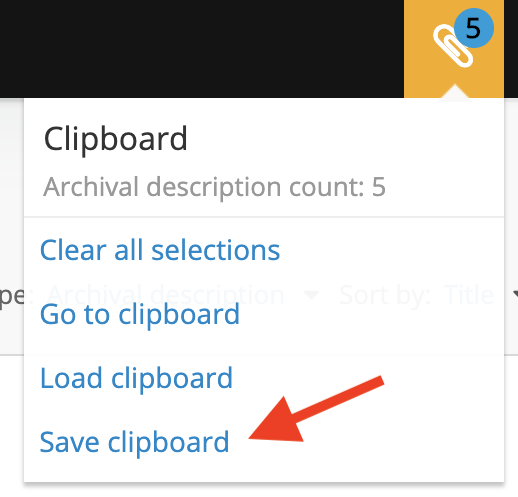
The menu has four options. The “Clear selections” option will remove all items (across all entity types) currently pinned to the clipboard. On the clipboard page, they won’t be cleared until you refresh the browser, giving you an opportunity to repin them if you’ve removed them by accident - however, anywhere else in the application, this removal will be immediate. The “Go to clipboard” option in the menu will take you to the Cliboard page, described in more detail below: Using the clipboard page. The “Save clipboard” option will allow you to save your selections and return to them at a future session, and the “Load clipbaord” option will load a previously saved selection. For more information on these options, see below:
Pinning records to the clipboard
Users can add or “pin” an archival description, an authority record, and/or an archival institution record to the clipboard for review or further action from 2 places:
- Any search or browse result page where the desired record appears
- Any view page of a record that is a supported entity on the clipboard (e.g. the view pages for archival descriptions, authority records, and repository records)
You can add as many results as you want to the clipboard at a time - the Clipboard will paginate if there are more than the global setting for results per page.
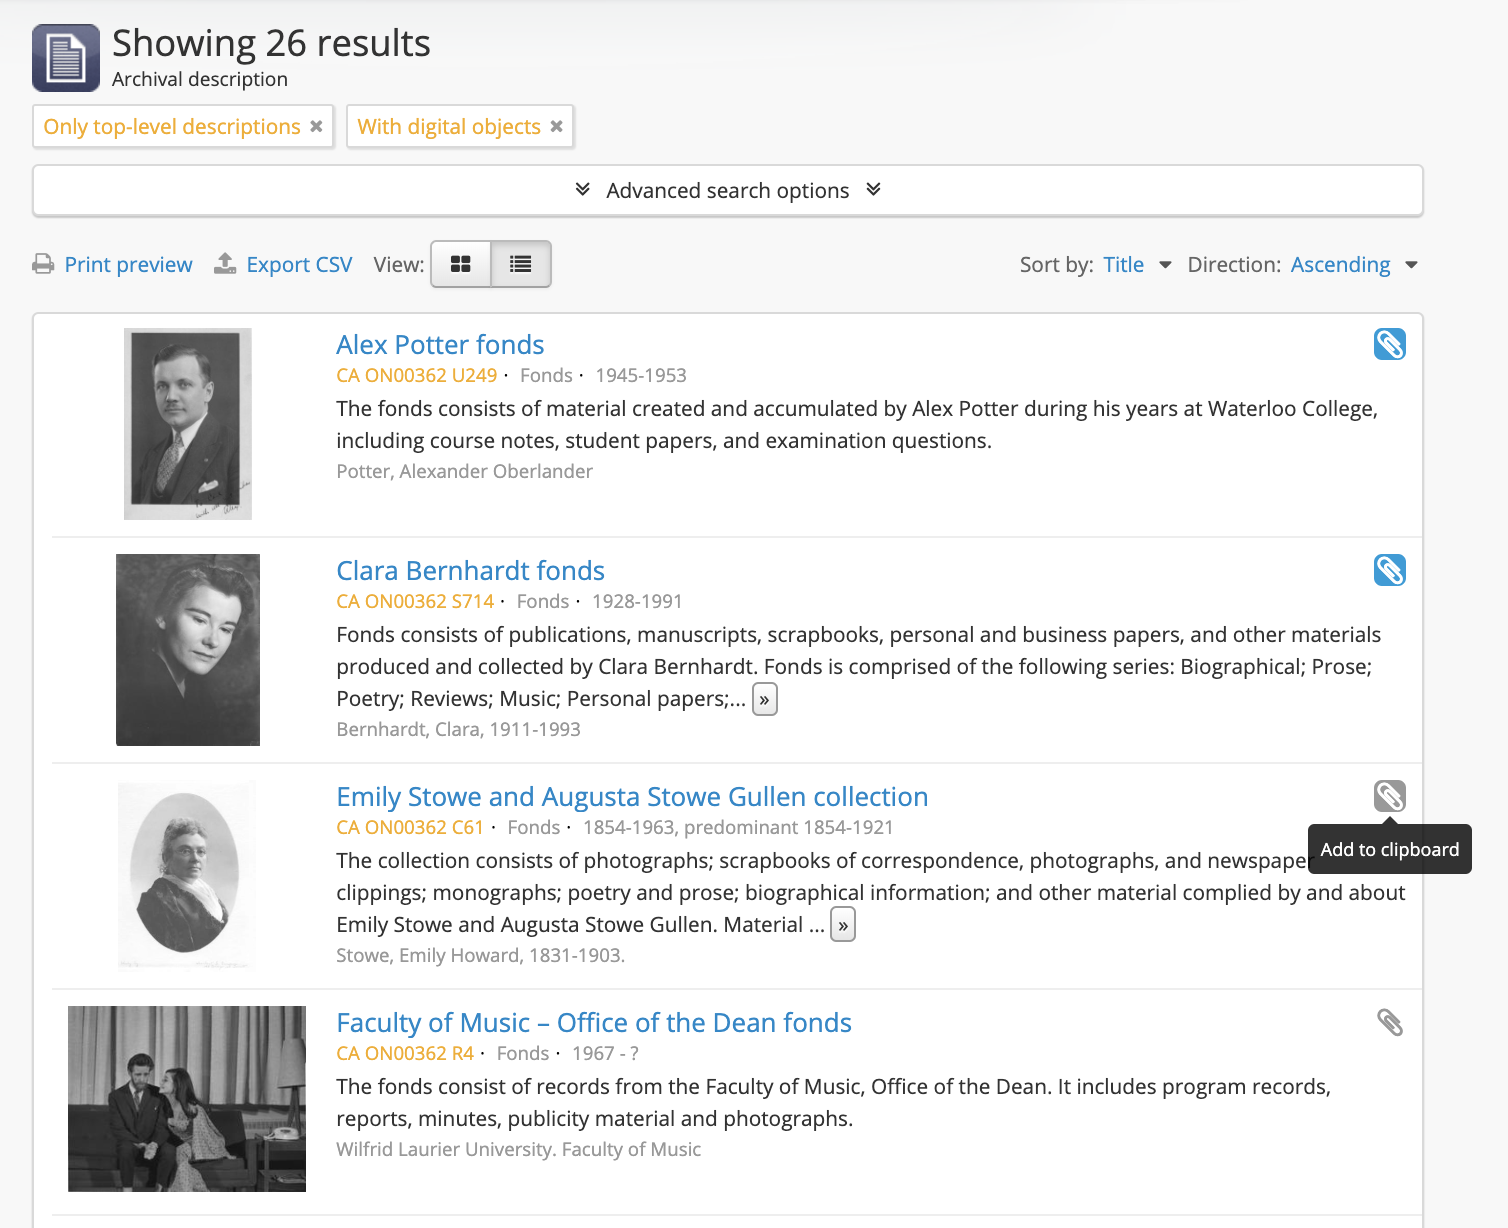
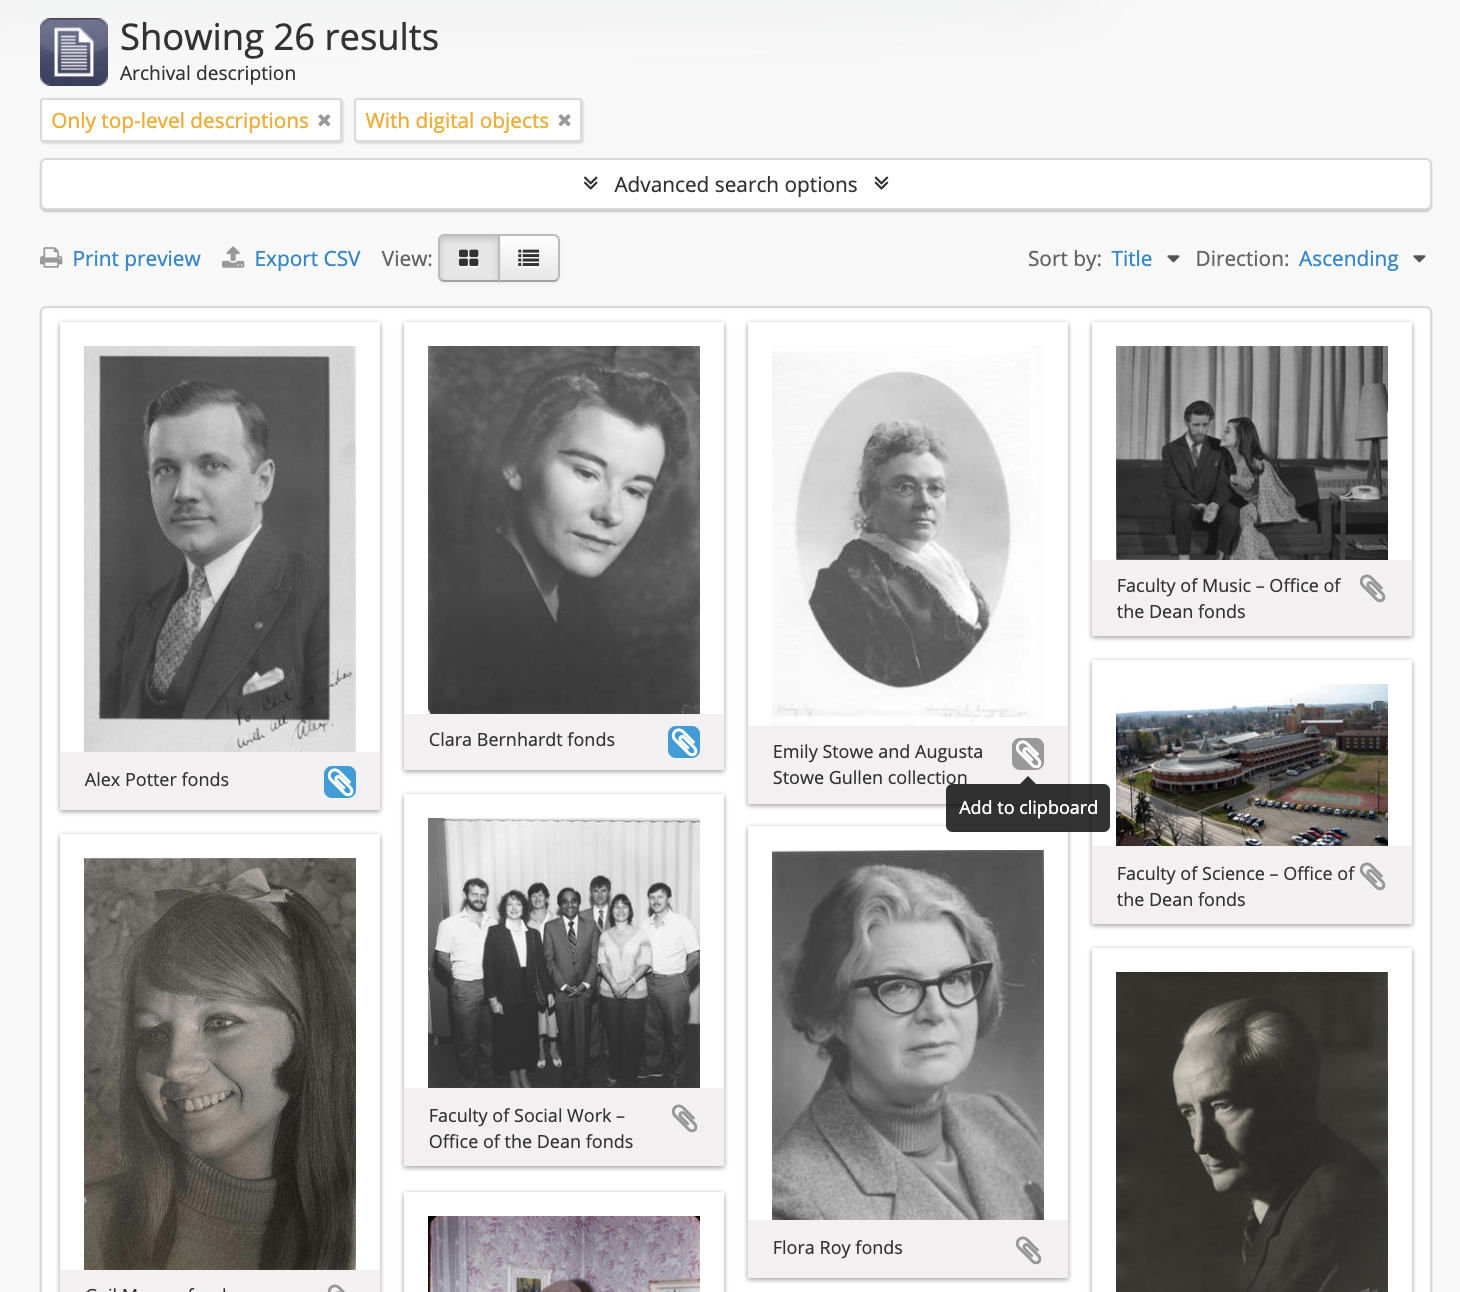
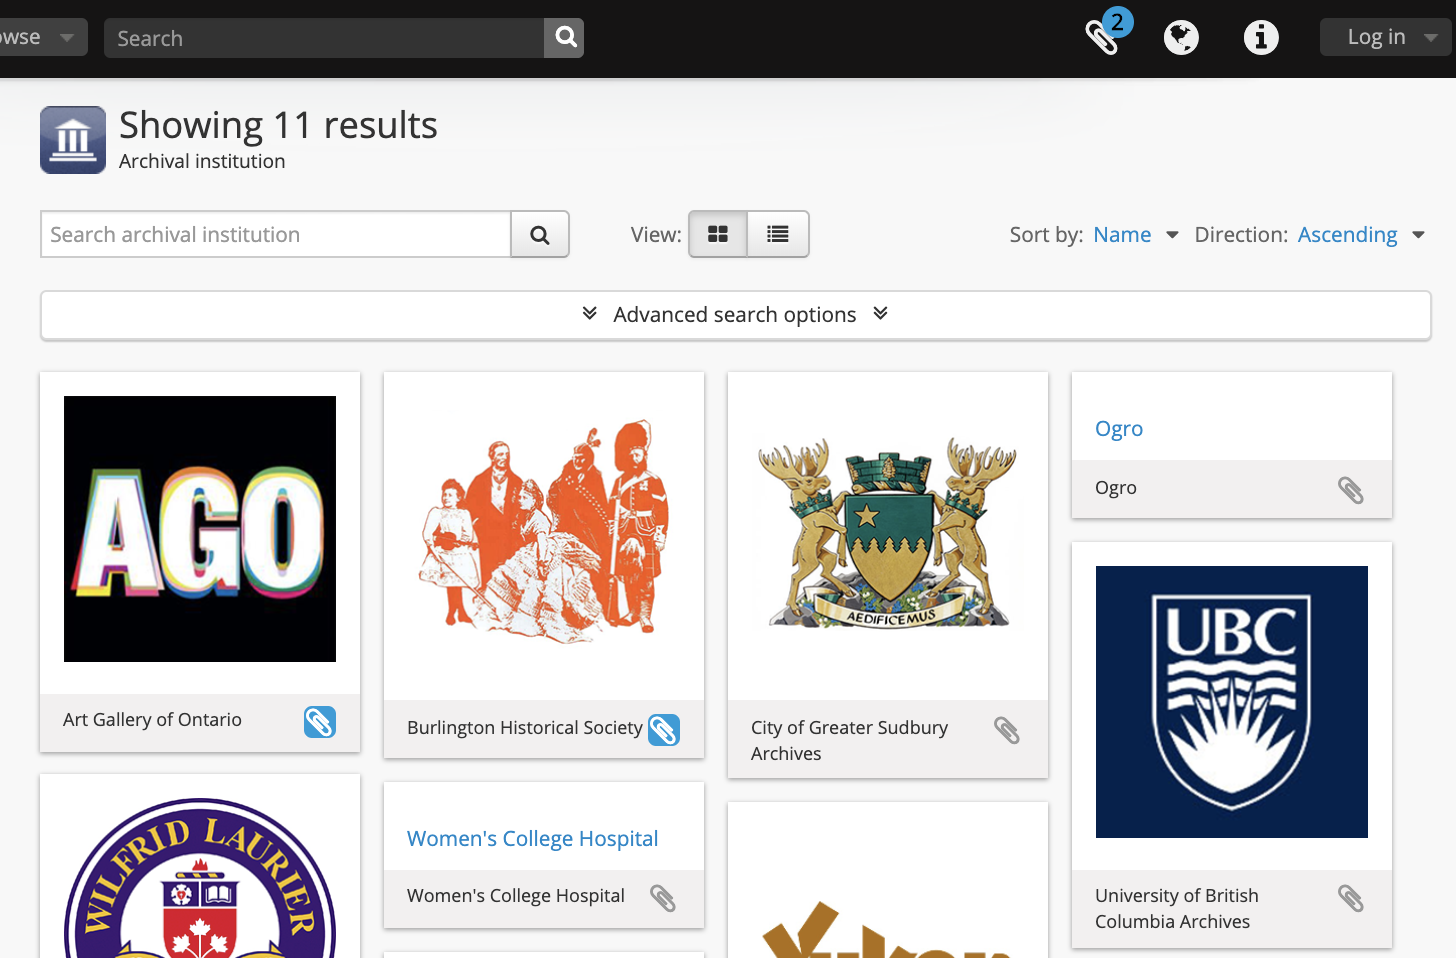
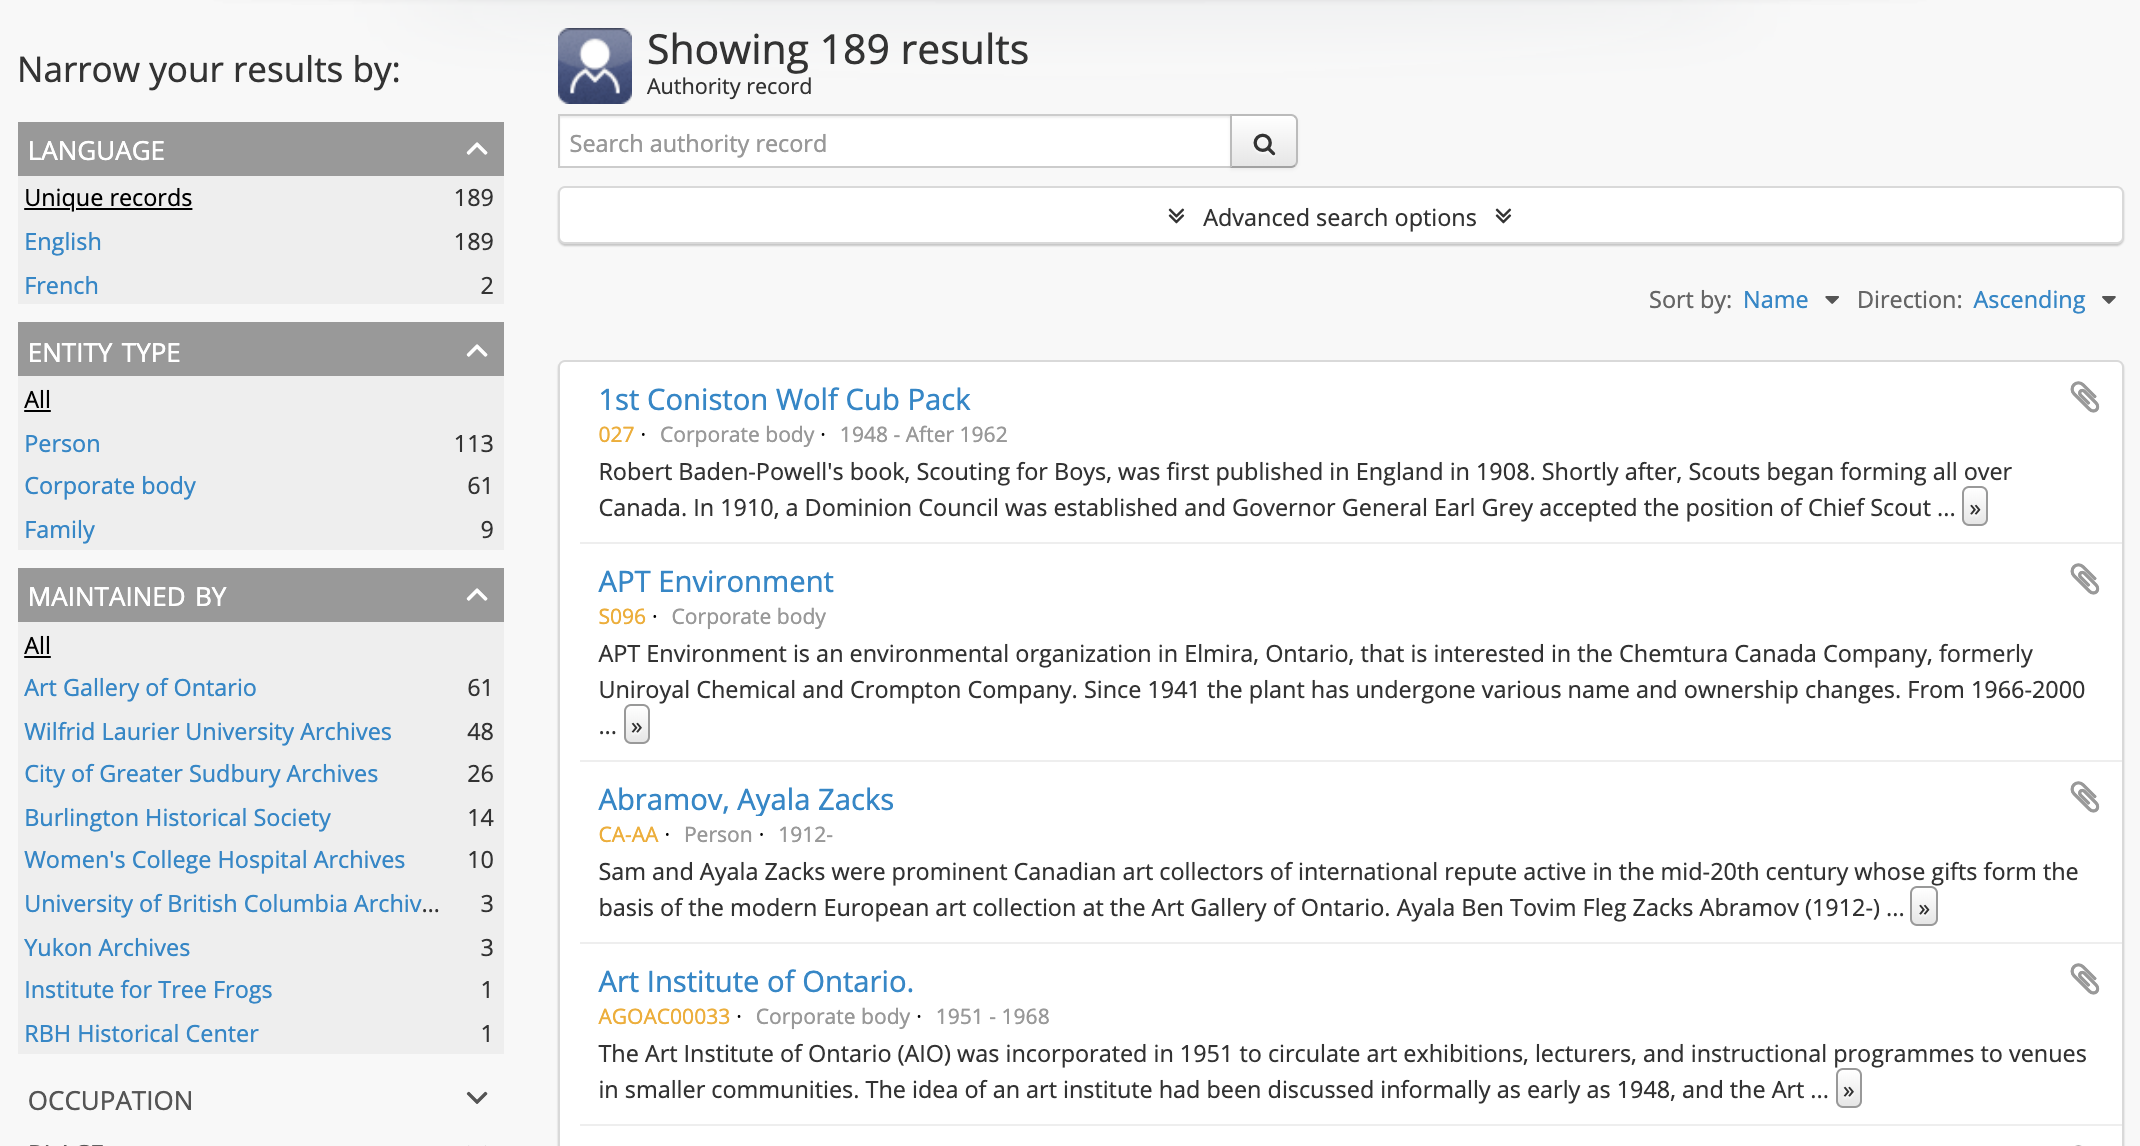
When they are not selected, the clip icons are represented in light grey. When a user hovers over one, its background will turn grey, and a tooltip will appear. When a result has been selected and pinned to the clipboard by clicking on the clip icon, it will appear blue to indicate that the item is now pinned.
Search / browse pages
On the archival description results stubs that appear in search and browse pages, a “paper clip” icon (similar to the one used in the clipboard menu) appears in the upper-right corner of the results stub. Click on this icon to add the result to the Clipboard.
If you are using the “card view”, such as when browsing digital objects, the clipboard link appears on the bottom right of the card:
For archival institution records, there are also two views - the card view and the table view. See Browse archival institutions for more information. On the table view, the clipboard link appears on the right side of the table:

If you are using the “card view”, the clipboard link appears on the bottom right of the card:
On authority record search and browse pages, the clipboard links appear on the right side of the results stubs:
View pages
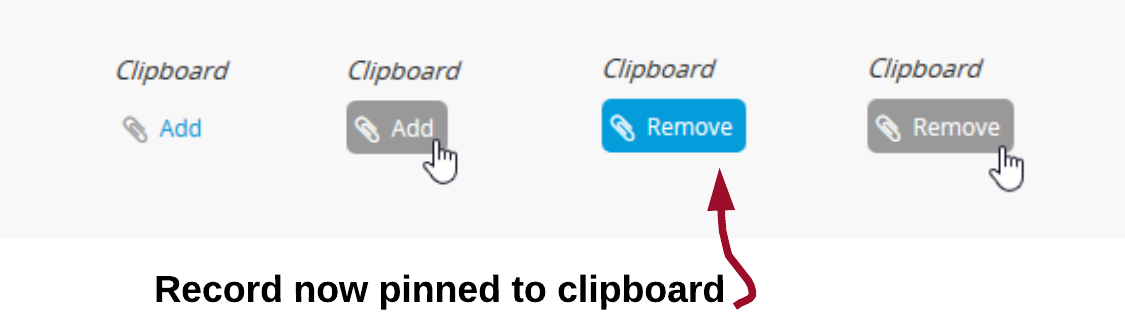
On the view page for an archival description, authority record, or archival institution record, the option to pin the current record to the clipboard is found in the right-hand context menu, under a “Clipboard” heading. When the item has not yet been pinned to the clipboard, the text link in the sidebar will read “Add”. Click the link to add the current description to the clipboard. Once selected, the link, now outlined in blue to indicate the item is pinned, will read “Remove” - click the link again to remove the item from the clipboard.
Using the clipboard page
When you’ve selected the records that you want, you can navigate to the Clipboard using the “Go to clipboard” link in the Clipboard menu, found in the AtoM header bar at the top of the page.
On load, you’ll see results stubs for the descriptions you’ve pinned. If there are more than 10 results, a pager will appear.
Tip
10 results per page is the default global setting in AtoM, but an
administrator can change this value via Admin >
Settings. For more information, see: Results per page.
The Clipboard page will only display one entity type at a time - by default when first arriving on the page, archival description results will be displayed. You can switch to view other entity types using the Entity type drop-down menu at the top of the results:
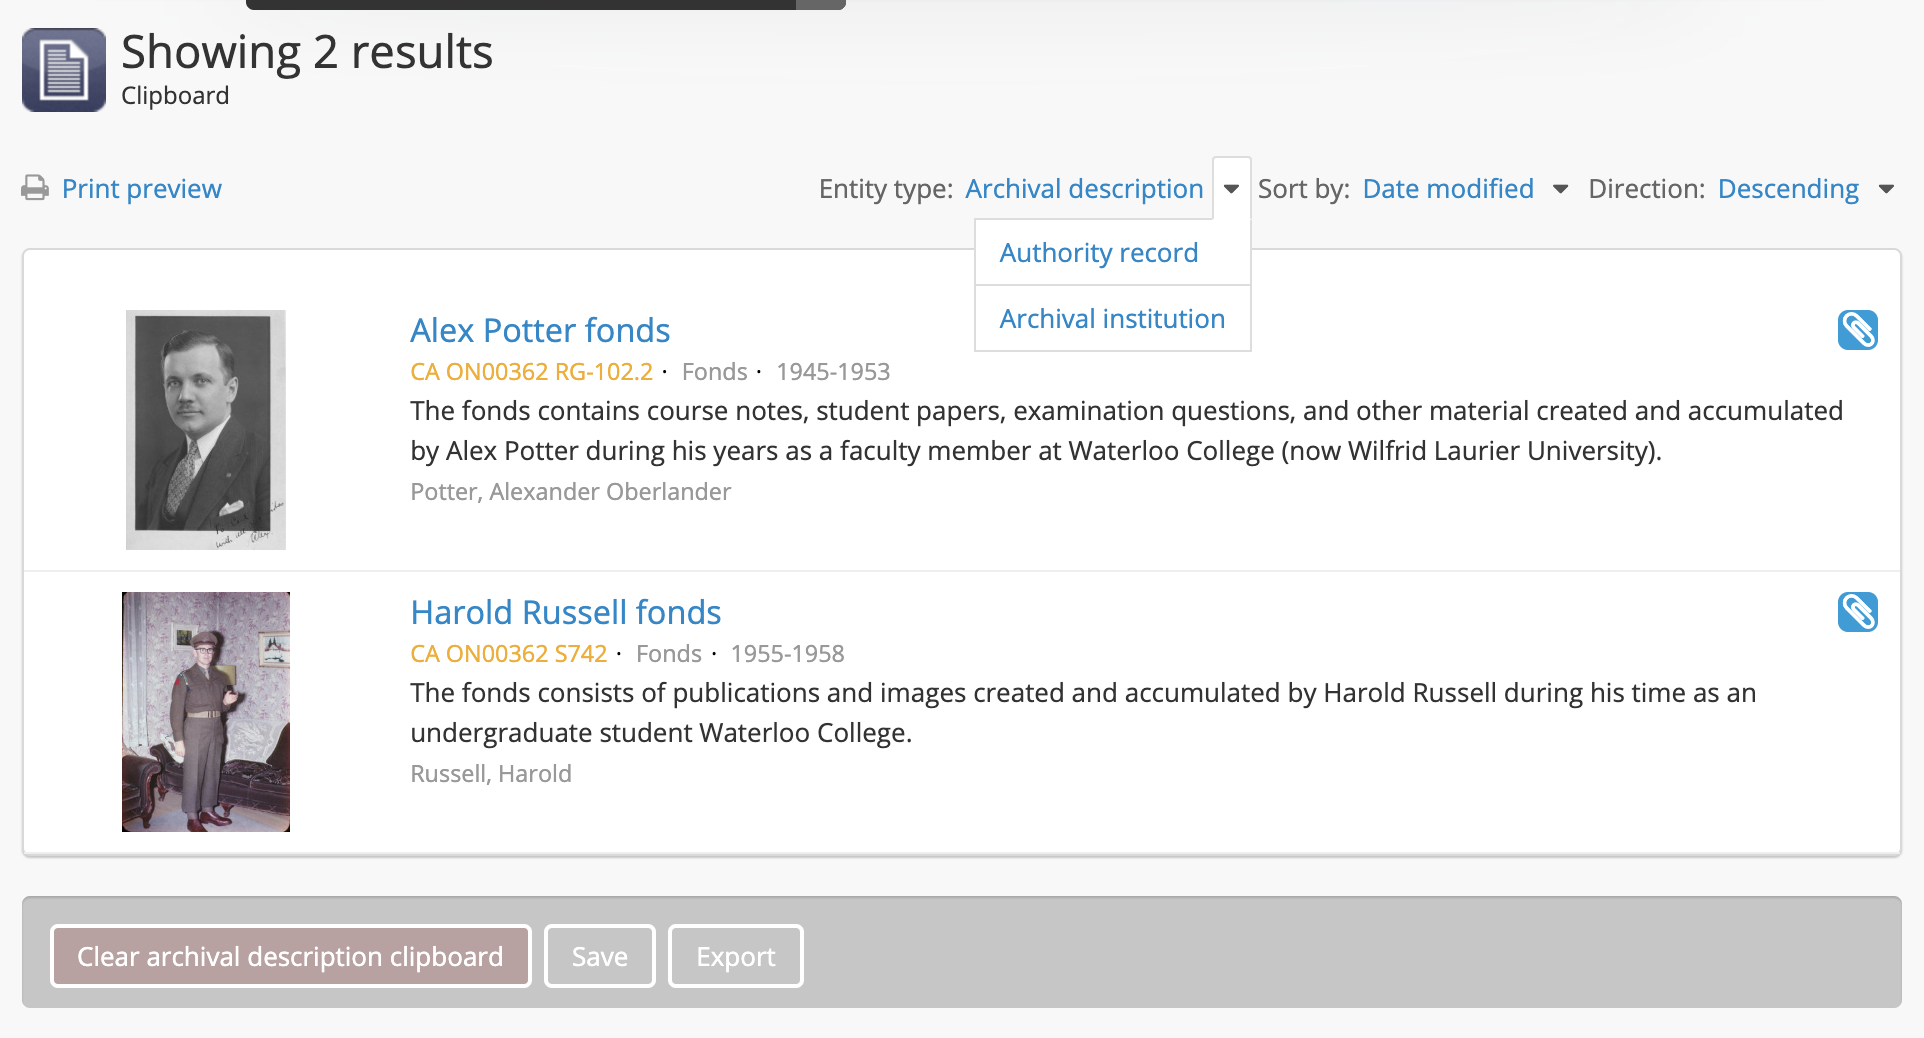
When a new entity is selected, AtoM will reload the page and display the clipped items for that entity. For example, here is the view page for authority records pinned to the clipboard:
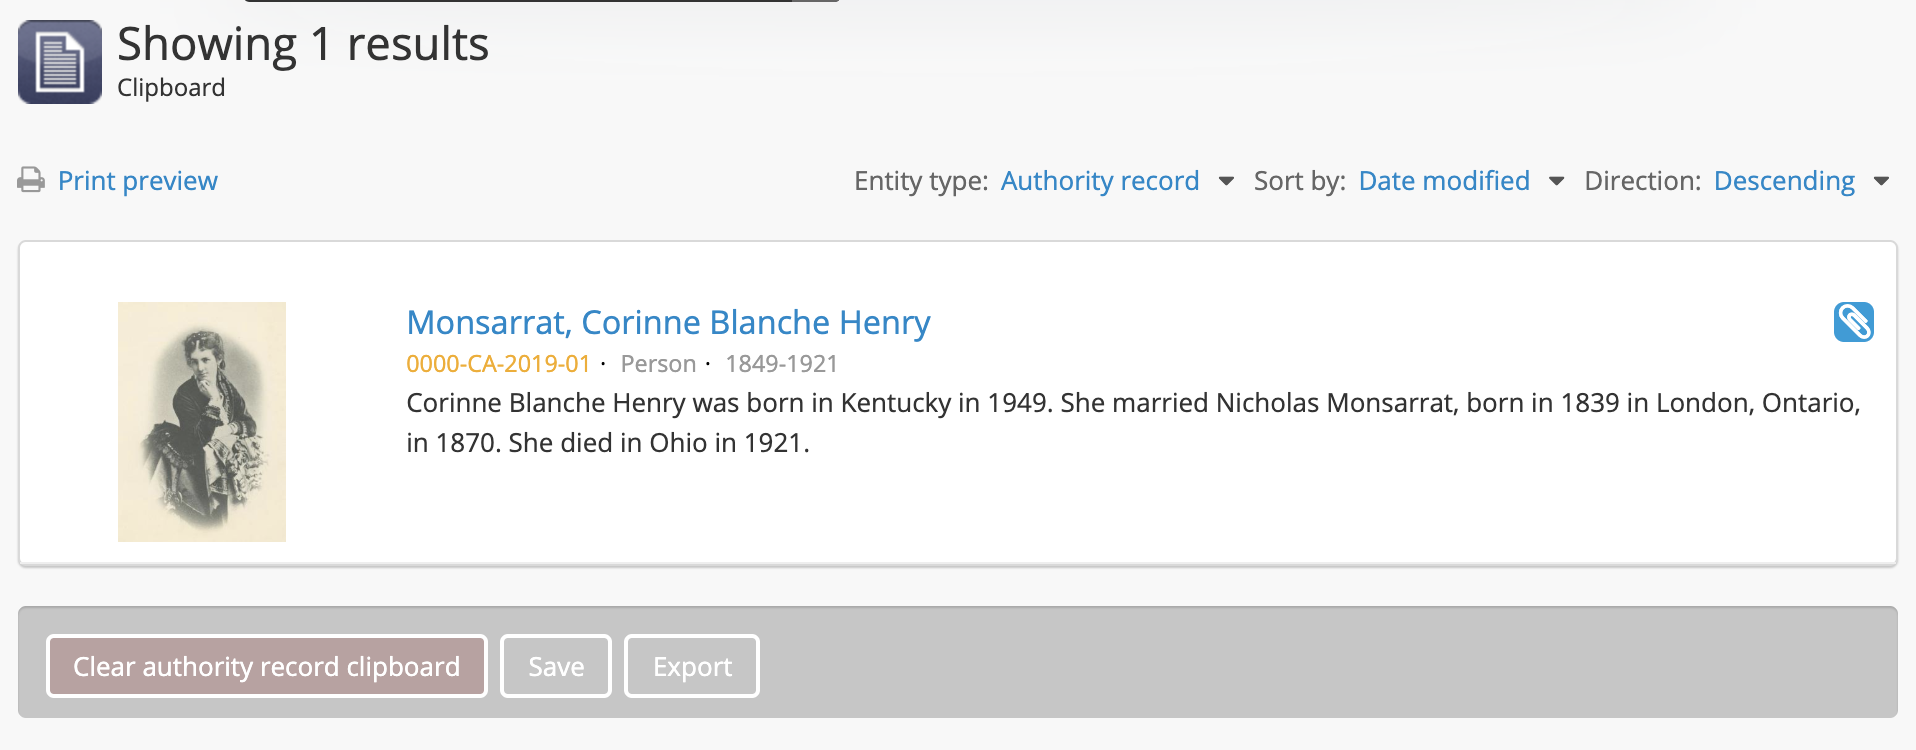
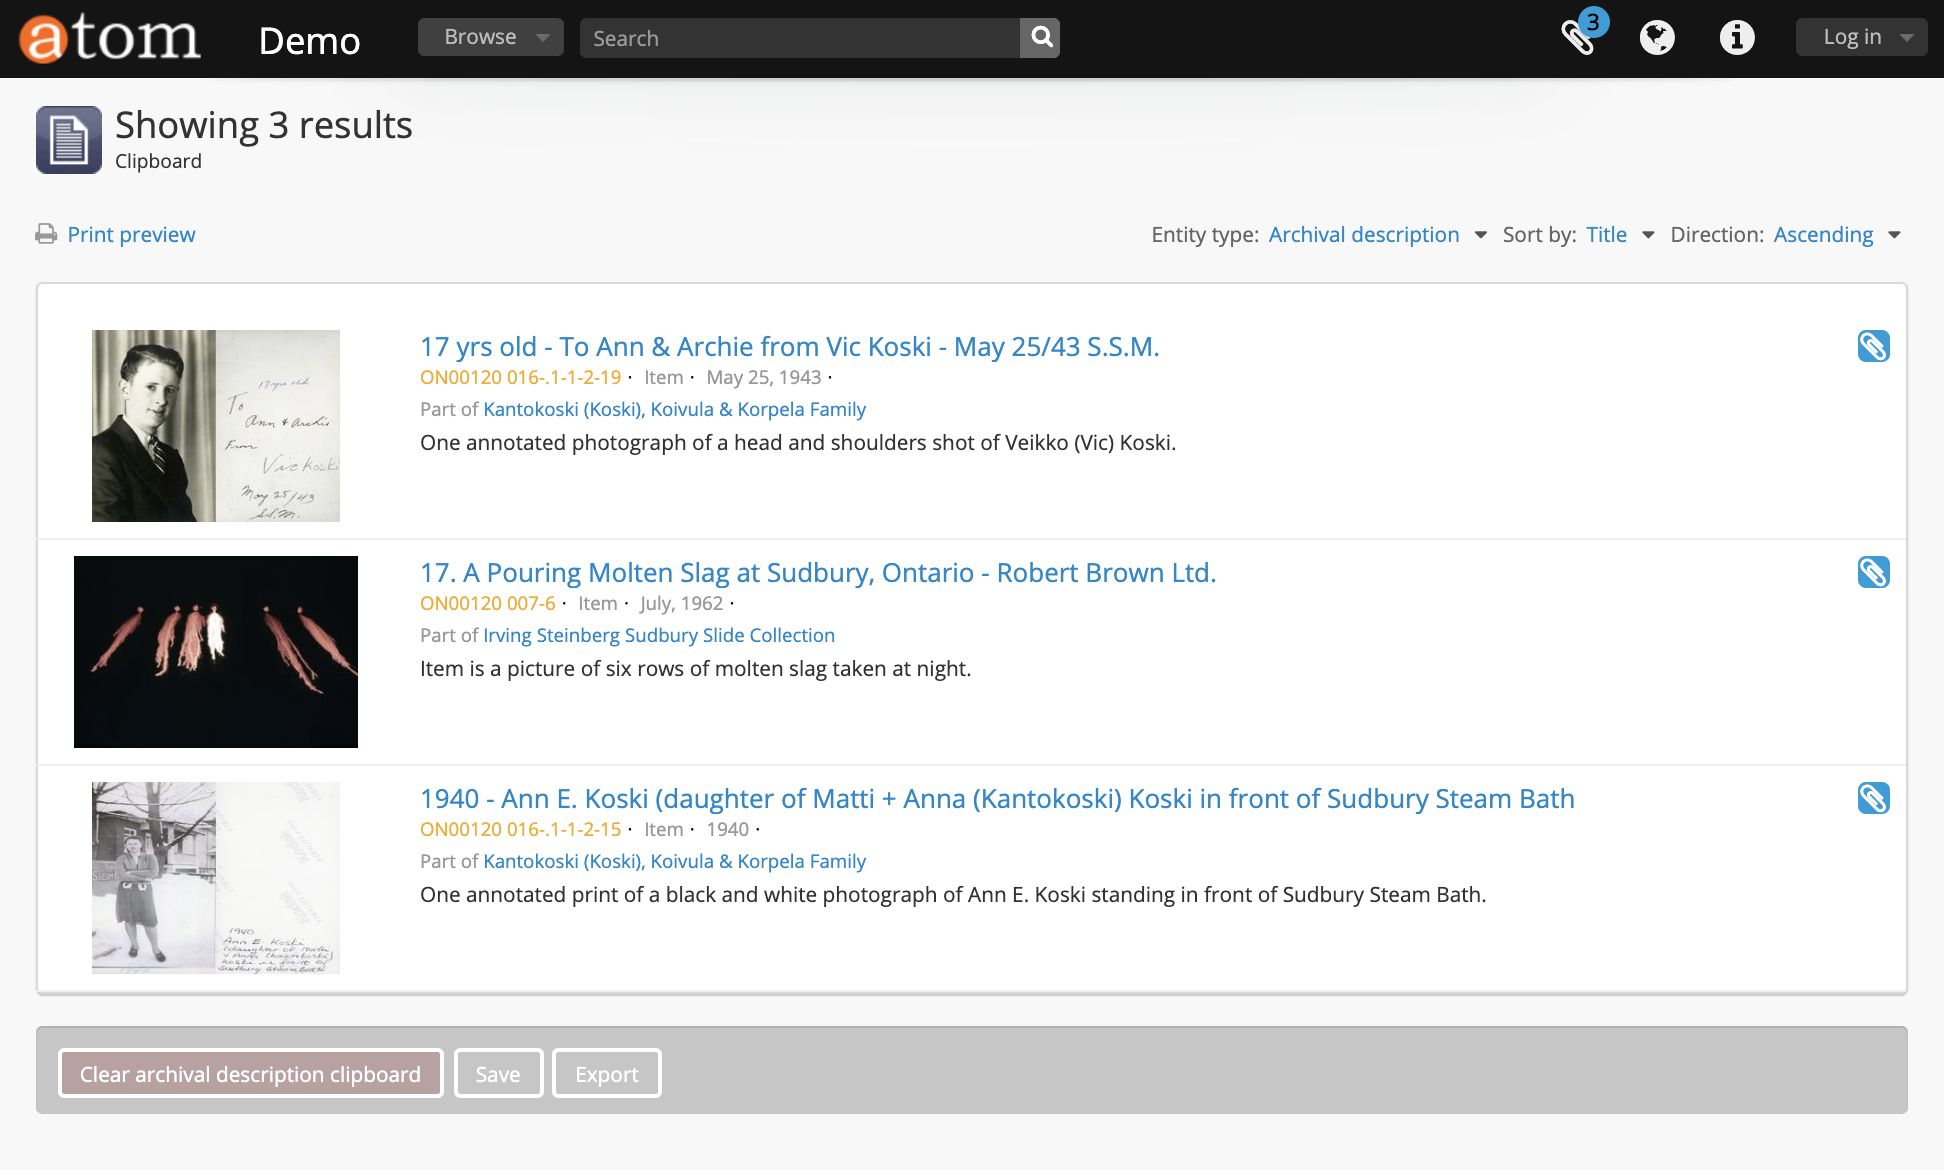
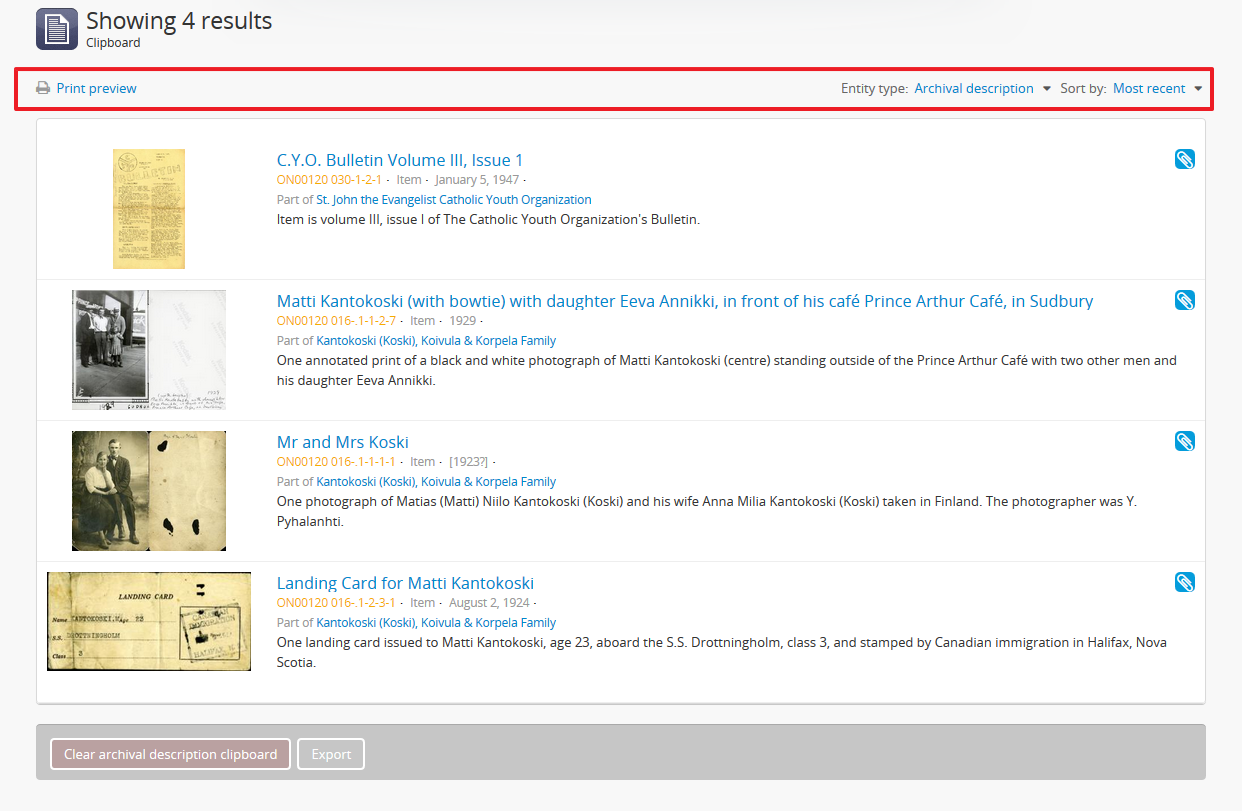
A count of the results attached to the clipboard for the current entity will appear at the top of the page (tip: remember you can always see the global count, and a breakdown of each entity, in the clipboard menu drop-down). Below this, and above the Clipboard results, are several action links - A print preview button on the far left, A Sort buttons on the far right, and the Entity type drop-down menu.
At the bottom of the page, in the button block there is an option to
clear results. This button behaves differently than the option in the
clipboard menu - it will only clear results for the current entity
(e.g. archival description, authority record, or repository record), leaving
other entity records pinned to the clipboard.
Authenticated (i.e. logged in) users will also see an Export button in the button block - for more information on exporting from the clipboard, see: Export Clipboard results in CSV format.
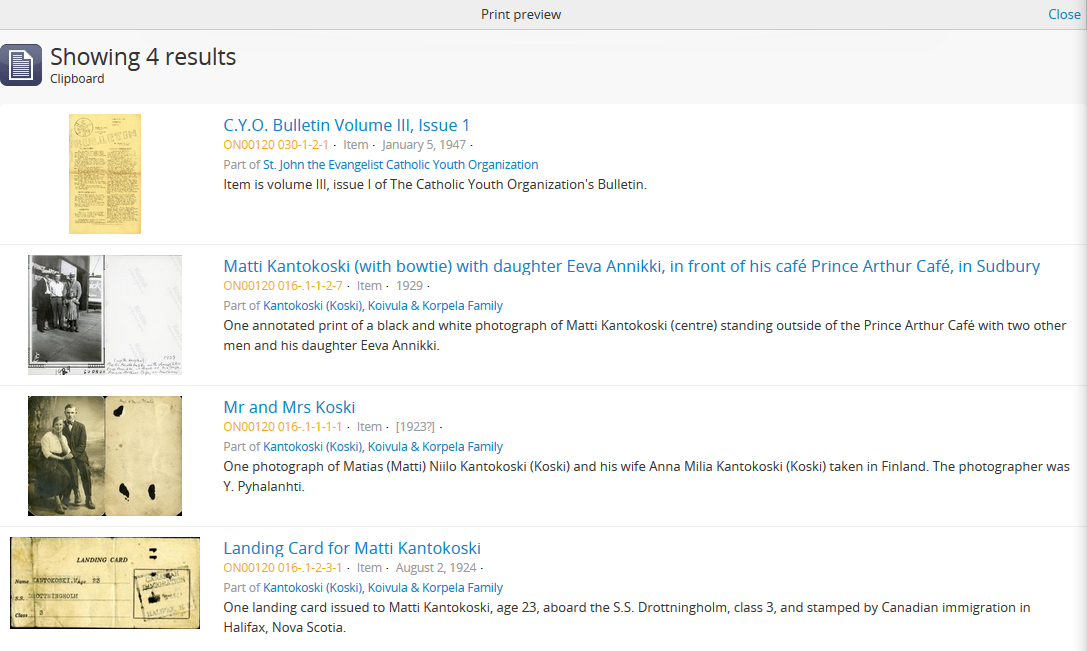
Print preview
Clicking this option will display a printer-optimized version of the page, with all buttons removed. Note that you will still need to use your browser’s built-in print options for actual printing.
Sort button
These buttons will allow you to sort your pinned results a number of different ways. For more information, see: Sort buttons.
Export CSV
Authenticated users (e.g. those logged in) can generate a CSV export of their clipboard results. When ready, the CSV is made available on the Jobs page. For more information, see: Export Clipboard results in CSV format.
Pinning and unpinning results on the clipboard
Elsewhere in AtoM, when you unpin a result you have previously pinned to the Clipboard, it will be immediately removed. However, on the Clipboard page, an extra step is included, to allow you to better review your changes to the Clipboard results. When a result is unpinned, AtoM will provide you with a warning at the top of the page, but the result will stay visible until the page reloads, in case you removed it by accident:
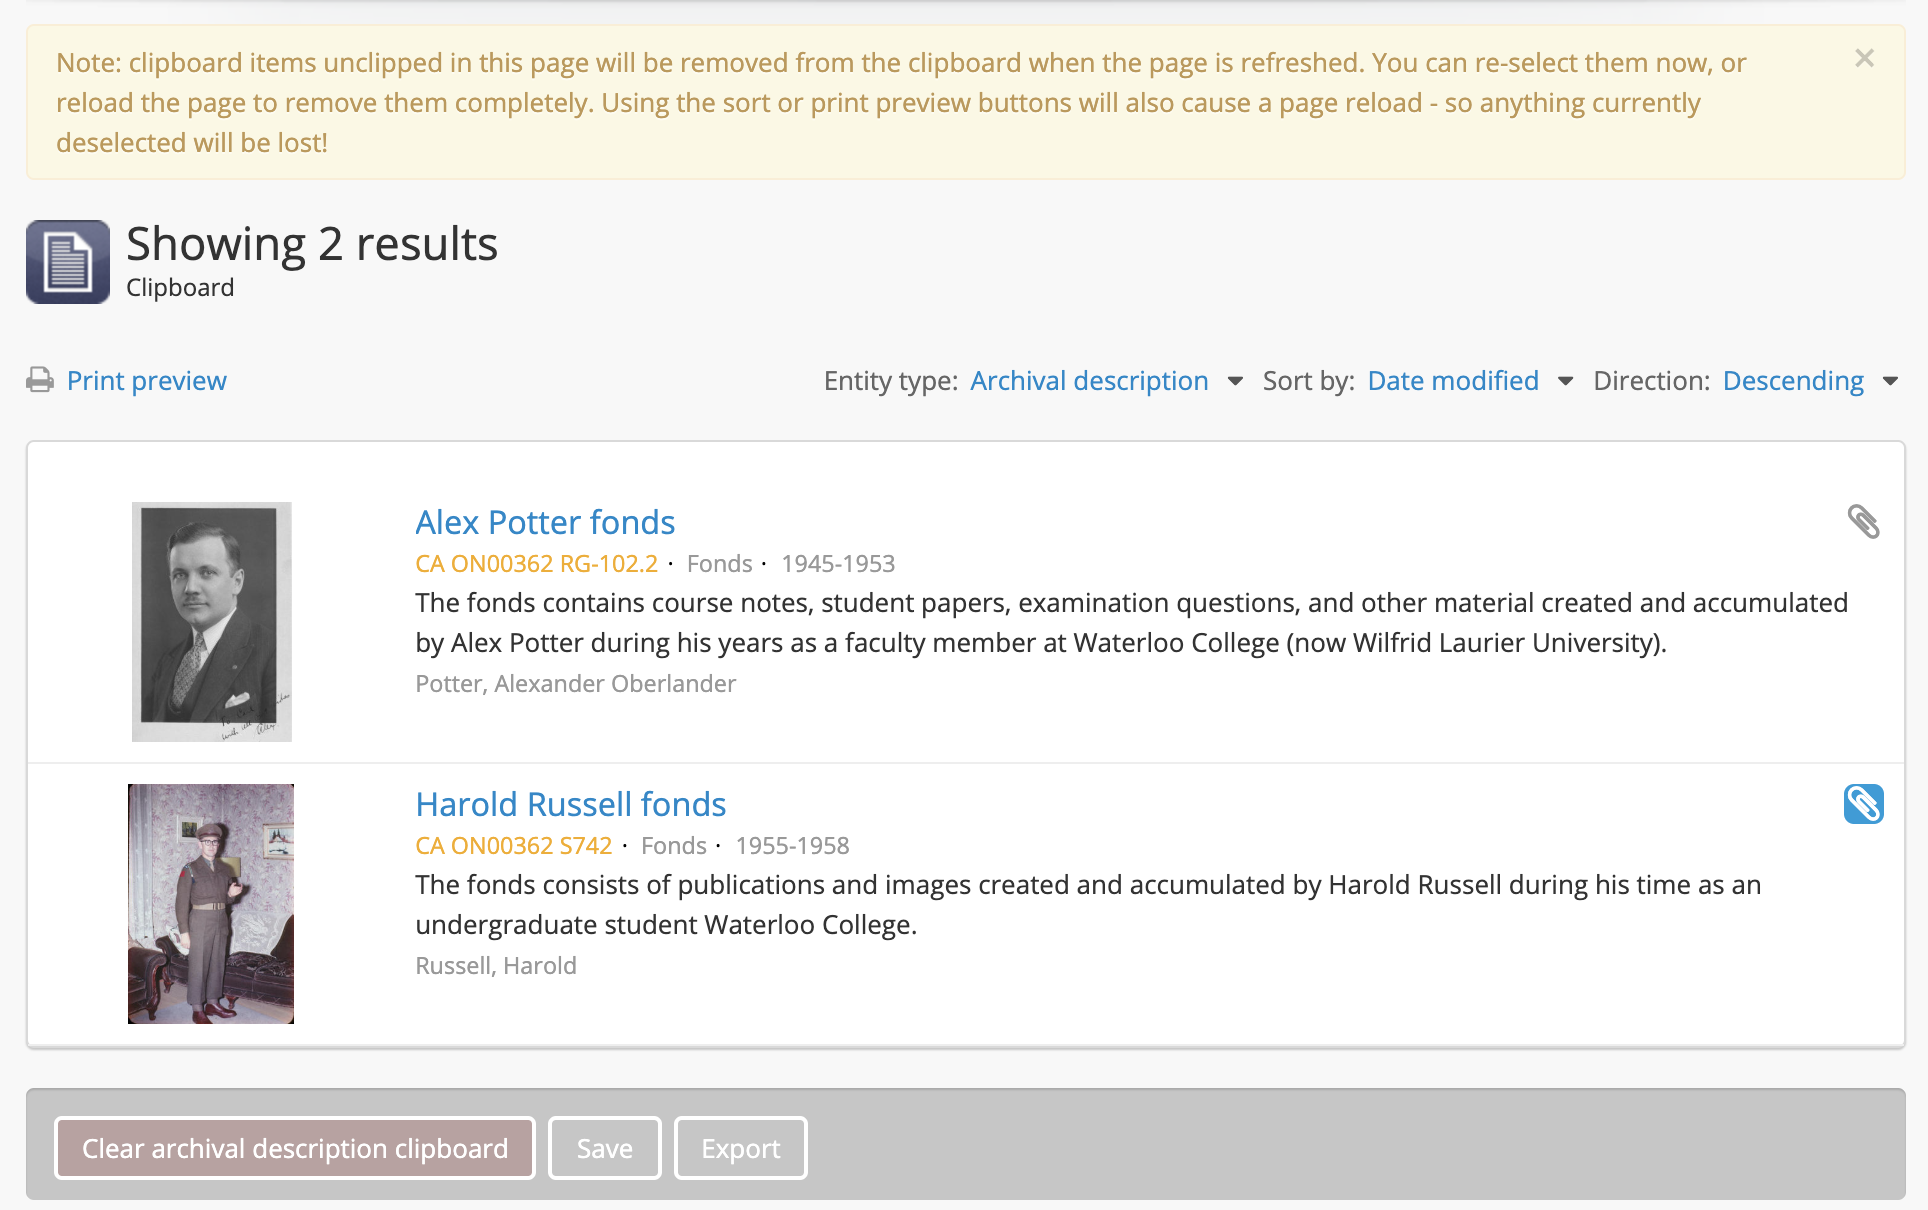
The warning reads:
Note: clipboard items unclipped in this page will be removed from the clipboard when the page is refreshed. You can re-select them now, or reload the page to remove them completely. Using the sort or print preview buttons will also cause a page reload - so anything currently deselected will be lost!
You can re-add results at this point, by clicking on the paperclip icon next to the result again if desired. If you use any of the options on the page (Print preview, Export, or change the sort order with the sort button), the page will reload - so your unpinned results will be lost. If you manually refresh your browser, this will also cause results unpinned on the Clipboard page to be permanently removed. To re-add lost results after a reload, you will have to return to either the relevant record’s view page, or find it again via Search or Browse and re-add it to the clipboard.
To remove all results at once, you can either use the “Clear selections”
option found in the Clipboard menu in the AtoM header bar (see
above, Clipboard menu), or you can use the “Clear” button found in
the button block located at the bottom of the Clipboard page.
Important
Remember, the Clear option in the Clipboard menu will remove all
results from all entity types at once, without warning. The Clear button on
the bottom of the Clipboard page will only remove the current entity
type - so if you clear archival descriptions, your authority records and
institution records will still be pinned.

You will still be provided with the warning when using these options on the Clipboard page - but be aware: using the “Clear selections” option in the Clipboard menu when elsewhere in the application will immediately remove all results!
See also
Using the clipboard to export records
The clipboard has been configured so that all users, whether anonymous (i.e. public) or authenticated (i.e. logged in), can export records, in both CSV and XML formats, depending on the formats supported in AtoM for export.
Documentation on how to export records using the clipboard is maintained in the general Import/export documentation. For more information, see:
Saving your clipboard for another session
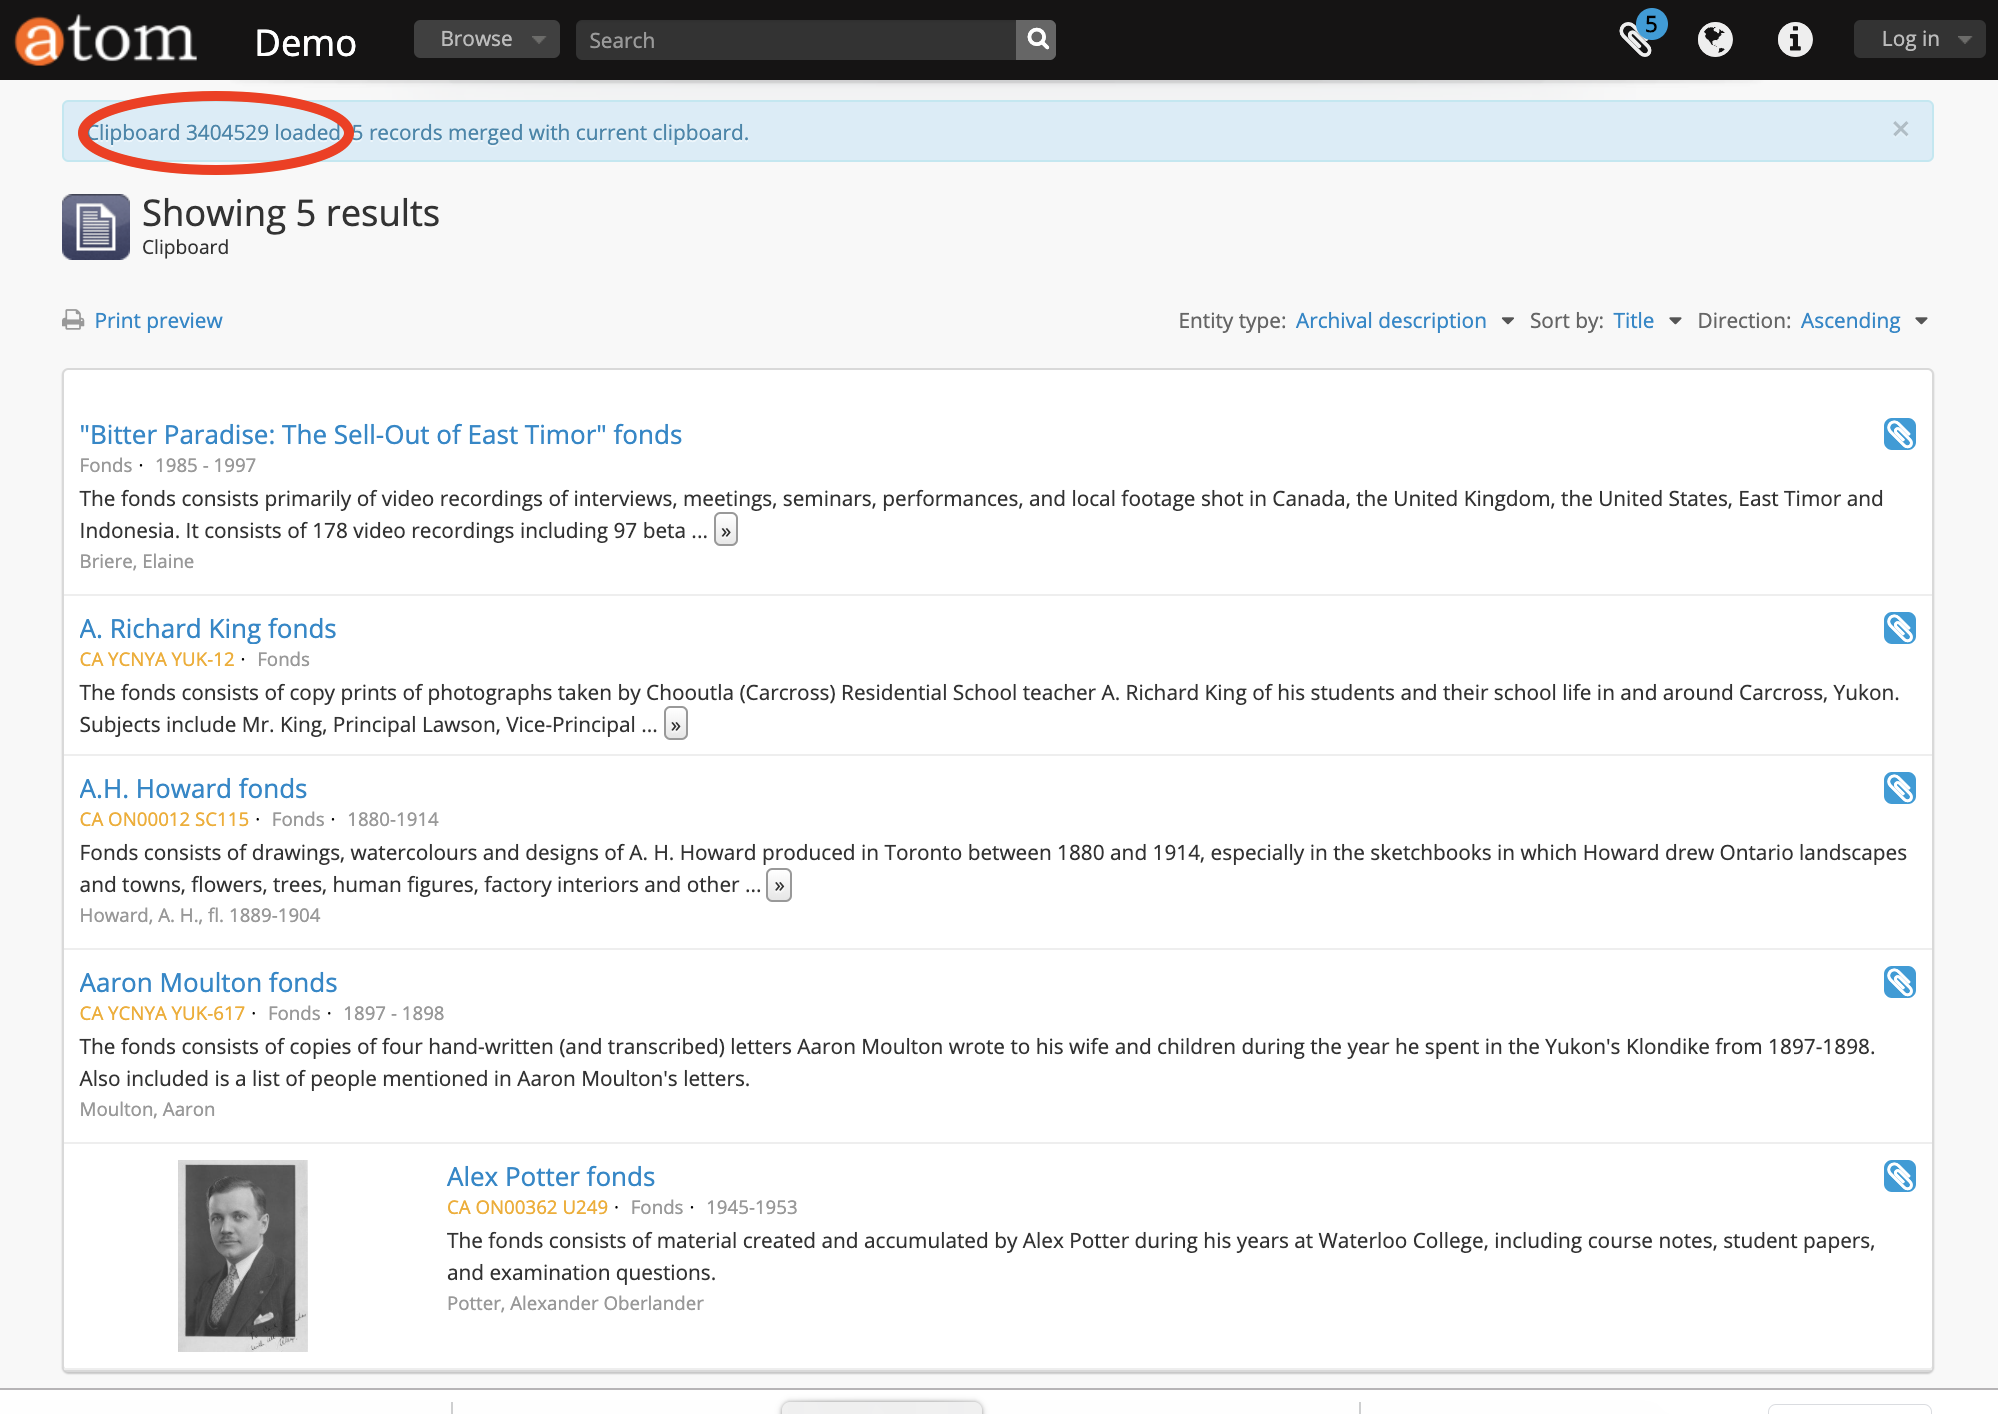
With the release of 2.5, all users are now able to save a clipboard, close the browser, and return at a later time to continue to use the saved entries. On save, AtoM will generate a unique ID number that will be used to load the clipboard in the future. This means a saved clipboard could potentially be used to support reference requests - for example, a researcher identifies records of interest, adds them to the clipboard and saves, and then sends the saved clipboard ID to the reference archivist. The archivist is then able to load the saved clipboard and see the records of interest for retrieval, which can be made available when a researcher visit is scheduled.
Important
To avoid having AtoM’s database grow indefinitely when the clipboard is
used heavily, saved clipboards are not stored indefinitely. Instead, an
administrator can configure how many days saved clipboards are
stored before being purged from the database, via a setting in
Admin > Settings > Global. See:
By default in new installations, this setting is set to 0 days - make sure you configure this setting before using the “Save clipboard” option, to ensure that saved results are not lost!
To save and reload Clipboard results:
When you are ready to leave your current session, click on the clipboard menu button and choose “Save clipboard”.
Alternatively, you can also click the “Save” button in the button block at the bottom of the Clipboard page.
When saved, AtoM will load the Clipboard view page and generate a message with an ID number of your saved session and prompt you to record the number for later.
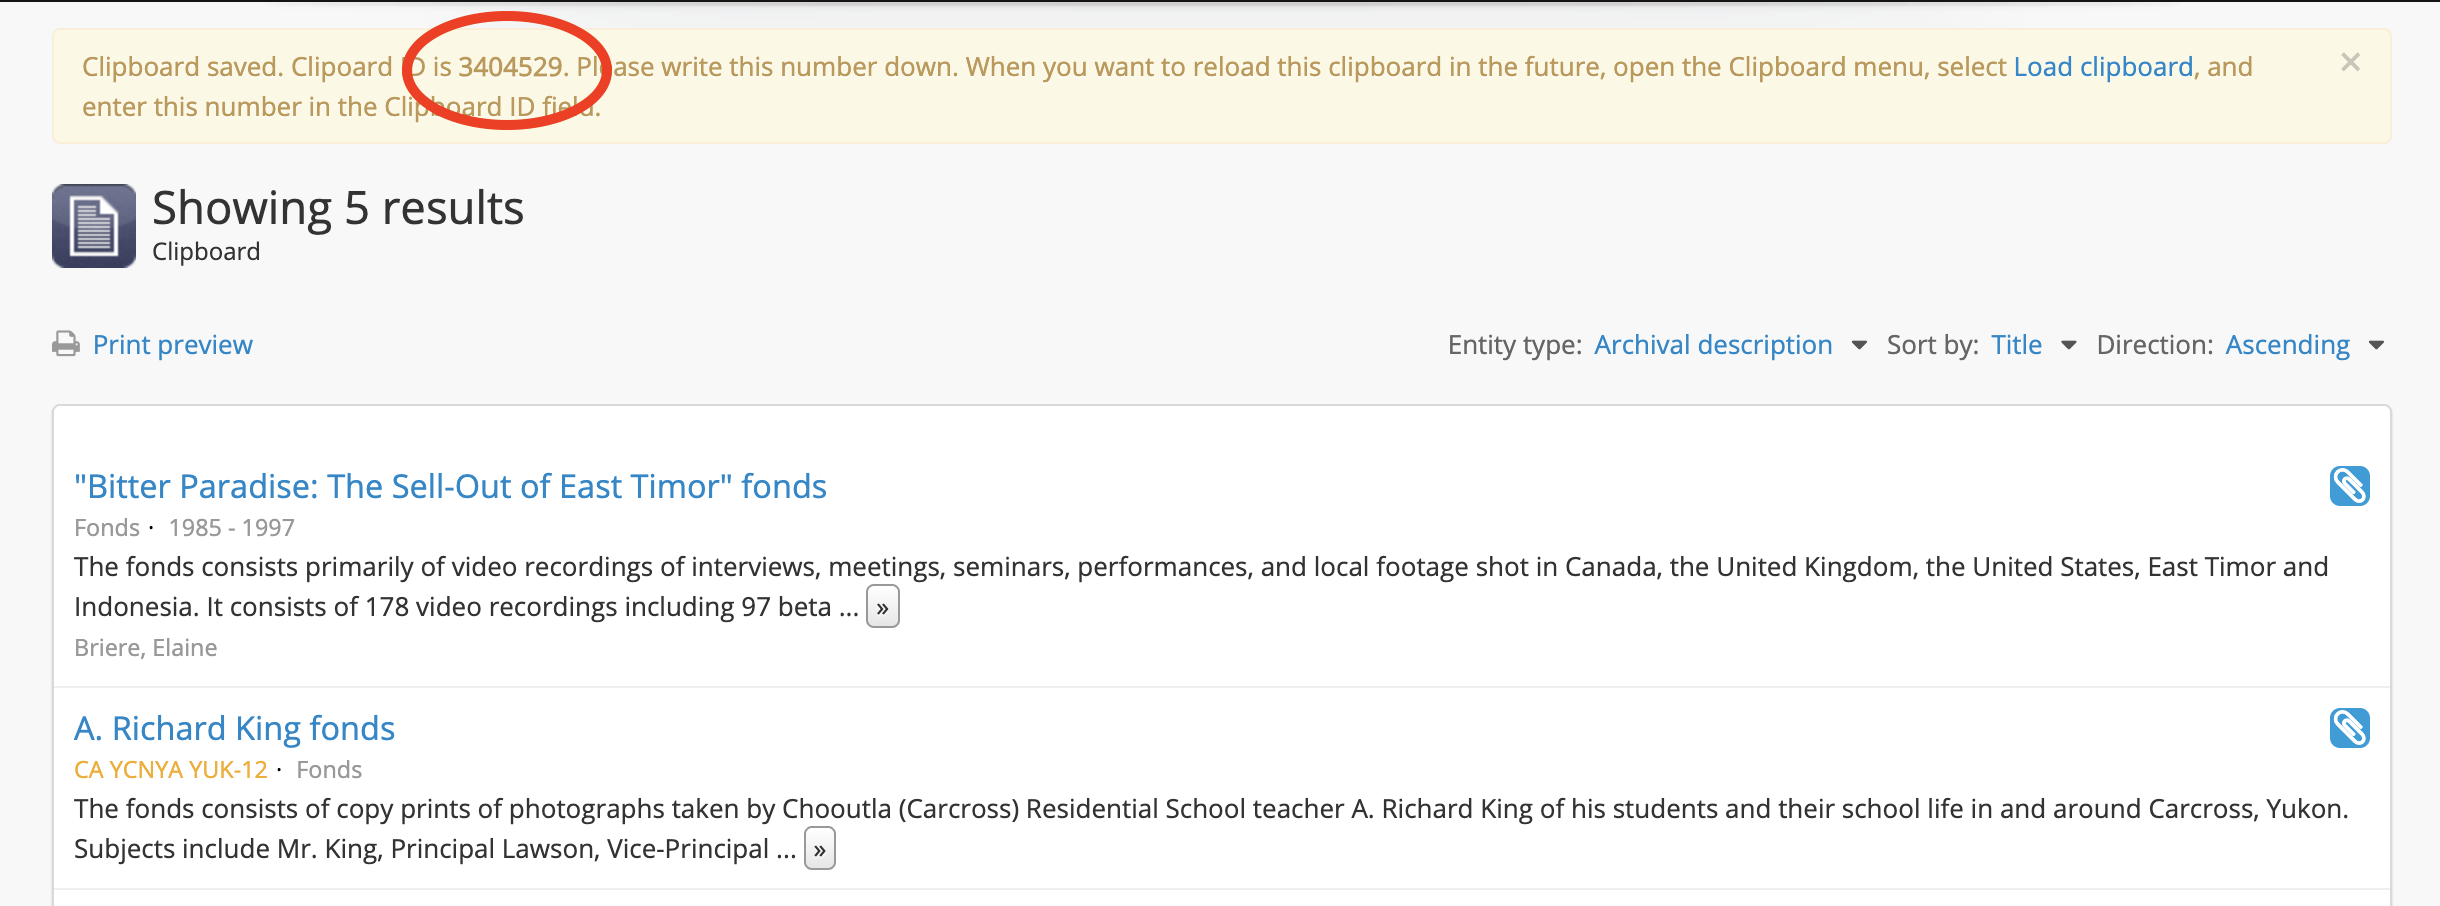
Important
Be sure to save this number for future reference! You won’t be able to reload your clipboard without it.
Once you’ve recorded the saved clipboard’s ID, you can now exit your browser. See below for instructions on how to load your clipboard during a future session.
See also
Loading a saved clipboard
When reloading a saved clipboard, users have the option to either overwrite/replace any records currently pinned to the clipboard with the saved records, or merge the two clipboard result sets together. This merge option can allow for asynchronous collaboration between two AtoM users - for example, two different researchers coordinating to pin records of interest in different sessions and then combining the results, or two different archivists working on arrangement and description sharing work in progress.
Important
To avoid having AtoM’s database grow indefinitely when the clipboard is
used heavily, saved clipboards are not stored indefinitely. Instead, an
administrator can configure how many days saved clipboards are
stored before being purged from the database, via a setting in
Admin > Settings > Global. See:
By default in new installations, this setting is set to 0 days - make sure you configure this setting before using the “Save clipboard” option, to ensure that saved results are not lost!
To load a saved clipboard in AtoM:
When you return and want to see your saved clipboard, choose “Load clipboard” from the clipboard menu and enter your saved number into the “Clipboard ID” field.
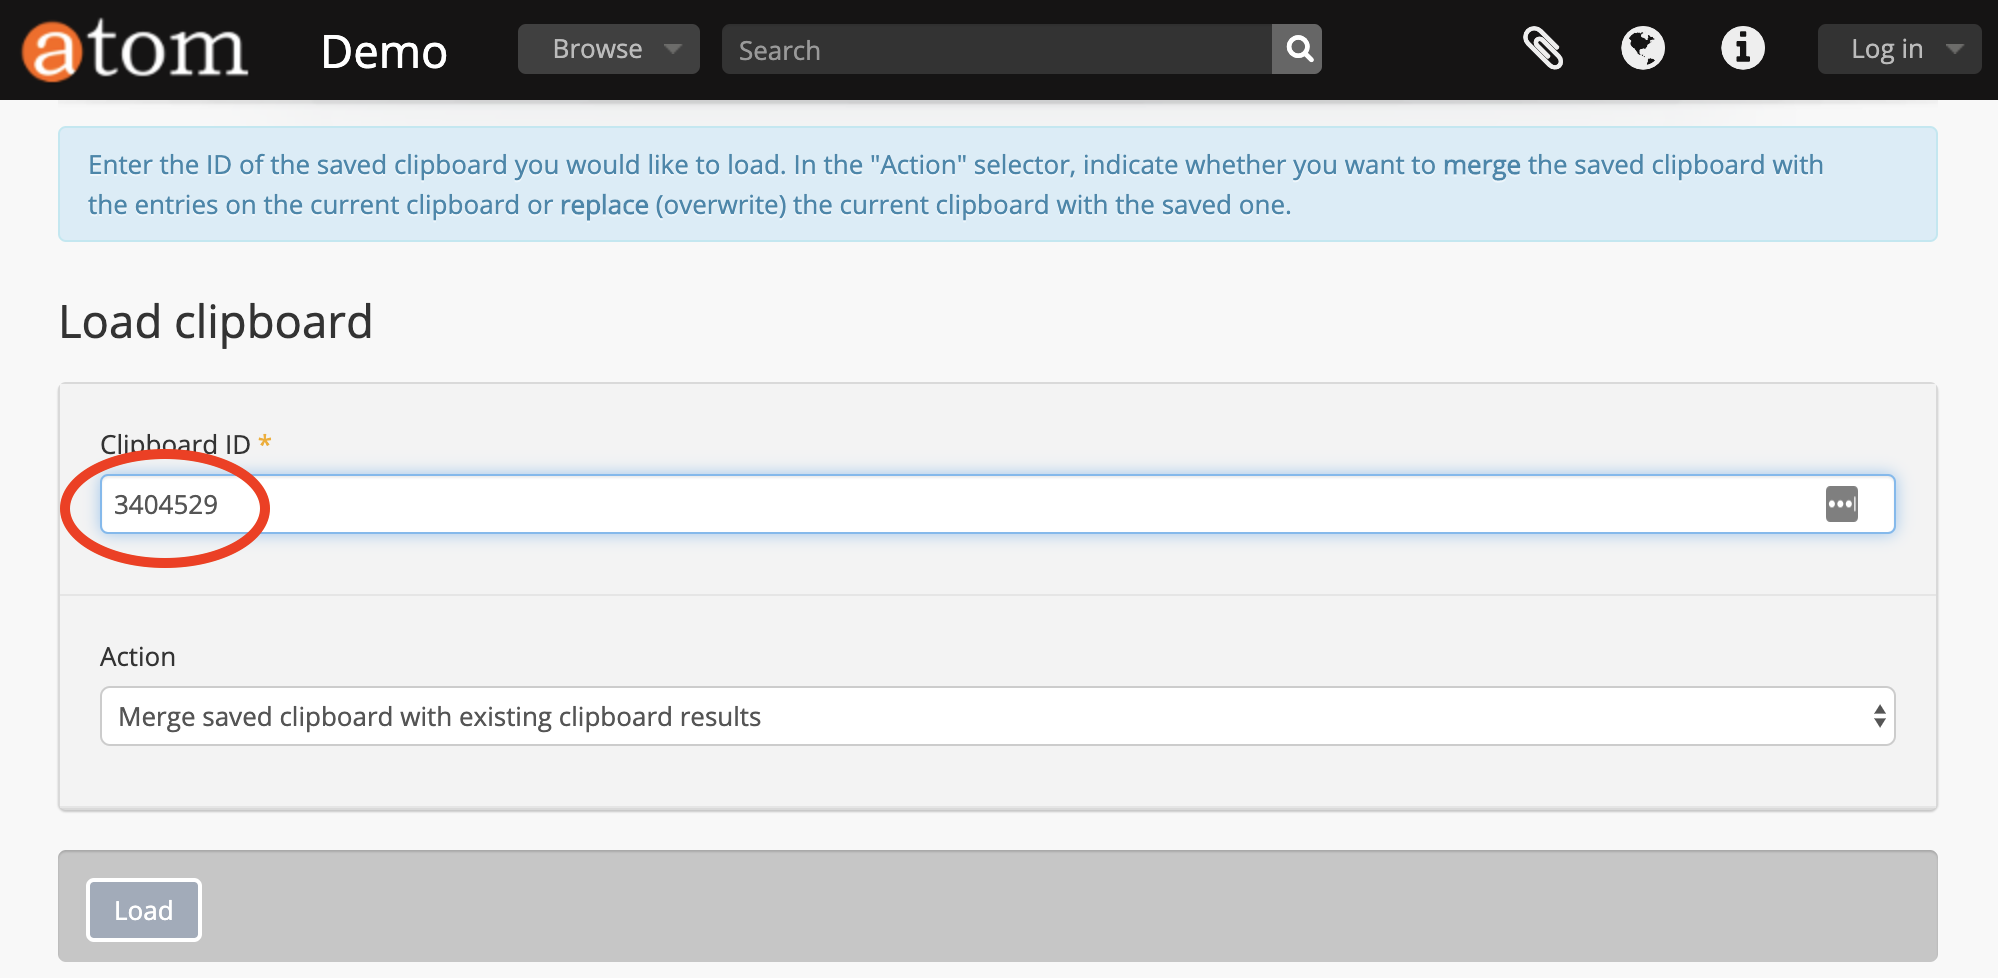
The “Action” menu is a drop-down menu that contains two options:
- Merge saved clipboard with existing results
- Replace existing results with saved clipboard
If you currently have 0 results on this session’s clipboard, it doesn’t matter which option you choose. However, if you have already pinned records to the clipboard during this session, AtoM will let you determine how it will handle loading the previously saved clipboard results.
If you would like to purge any records currently added to the clipboard and replace them with your previously saved results, choose “Replace existing results with saved clipboard.” Note that overwrites the current session, meaning that any records currently on the clipboard for this session will be lost when your saved clipboard is loaded.
If you would like to combine the current pinned records from this session with your saved clipboard results, choose “Merge saved clipboard with existing results.” On load, AtoM will combine the current session results with those from the saved clipboard. If the same record is found in both sessions, it will appear only once on the combined results
Once you’ve configured your preferences, click the “Load” button found in the button block at the bottom of the Load clipboard page.
Your previously saved results will load. Note that if you have saved entries from different entity types, they will all be present, though they may not be immediately visible - AtoM shows only one entity type at a time, and by default will show archival description results first. You can switch entity types using the drop-down menu found at the top right above the clipboard results.