Create physical storage location and Box label reports
This page of the user manual focuses on printing storage location reports, as well as Box label CSV files. To learn about linking physical storage location to an archival description please see Physical storage. For file and item report generation, see: File and item list reports and printing.
The following sections require administrator access and permissions. For more information on user roles and permissions, see:
Jump to:
- Create physical storage report via the Reports module
- Create physical storage report from the Manage menu
- Generate a box label report via the Reports module
Create physical storage report via the Reports module
Users can create a physical storage report from any archival description view page, assuming that physical locations have been associated with those archival descriptions. Reports generated will apply to any descendant records - i.e. lower-level descriptions from the current level. If you want a report for all lower-level descriptions, start from the top-level description and generate the report there.
Note
Physical storage location reports are only available to authenticated
(logged-in) users. However, all users can view and generate file and item
reports - see: File and item list reports and printing. Depending on a setting controlled
by an administrator in  Admin > Settings, these file and
item reports may or may not include physical storage information. For more
information, see: Generate archival description reports as public user.
Admin > Settings, these file and
item reports may or may not include physical storage information. For more
information, see: Generate archival description reports as public user.
Reports generated this way are particular to the selected archival unit - for storage location reports that show all related descriptions associated with a storage location, see below, Create physical storage report from the Manage menu.
Physical storage reports generated with this particular workflow in AtoM are generated asynchronously in the background using Gearman, AtoM’s job manager. You will need to make sure that Gearman is properly configured during installation to be able to generate reports - for more information, see: Asynchronous jobs and worker management. Additional information about the status of any report generation job can also be seen via Manage > Jobs - for more information on the Jobs management page in AtoM, see: Manage jobs.
To generate a physical storage report for an archival unit:
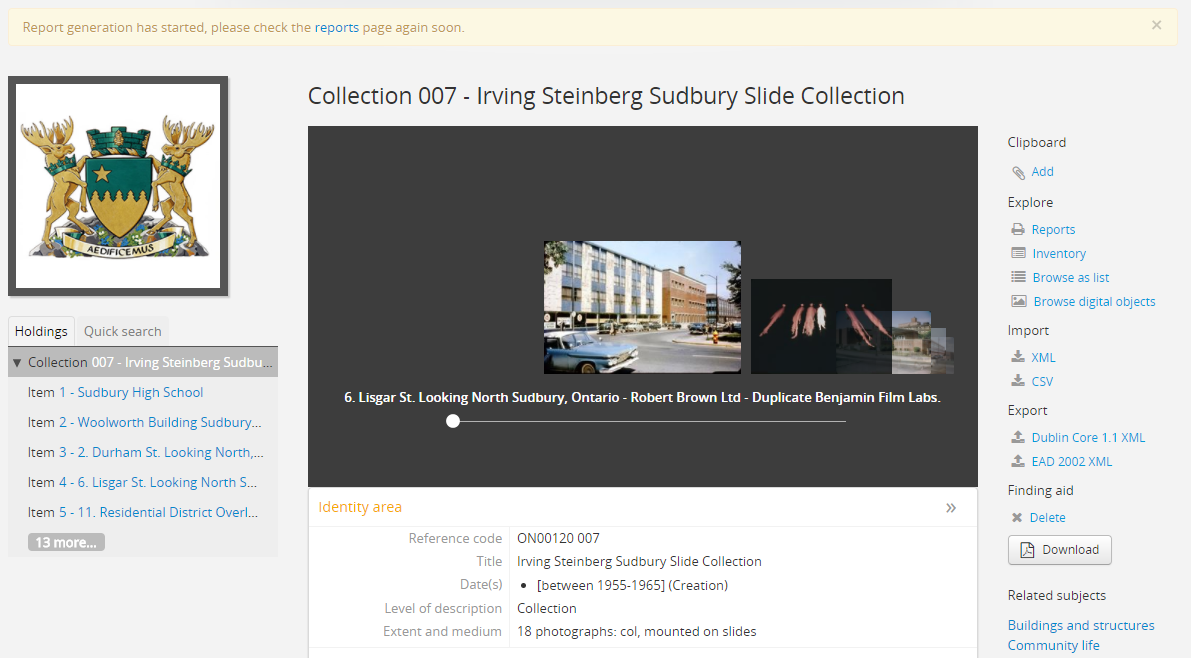
- Navigate to the highest level of description for which you wish to create a physical storage report (e.g, for the physical storage locations of an entire fonds, view the fonds level description, etc). You can do so by searching or browsing to find the description you want - for more information on navigation in AtoM, see: Access content.
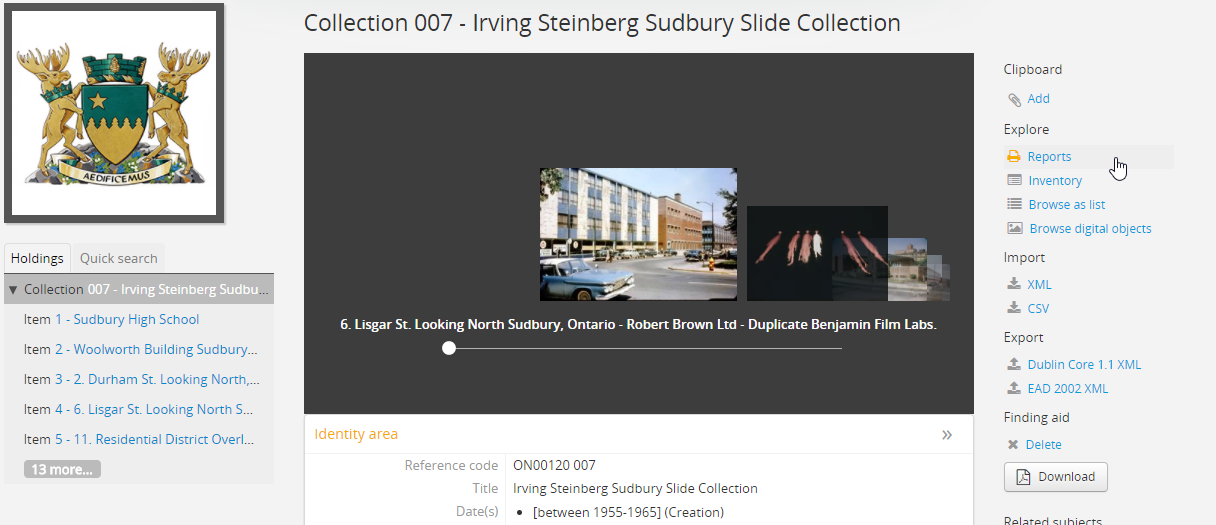
- On the view page of the archival description for which you
wish to generate a report, click on the
 Reports button, found in
the right-hand context menu under the “Explore” heading:
Reports button, found in
the right-hand context menu under the “Explore” heading:
AtoM will reload the page to display report generation options. Options avalailable will depend on a) whether you are authenticated (i.e. logged in), and b) the lower-level descriptions available in this archival unit. For more information on file and item list reports, see: File and item list reports and printing.
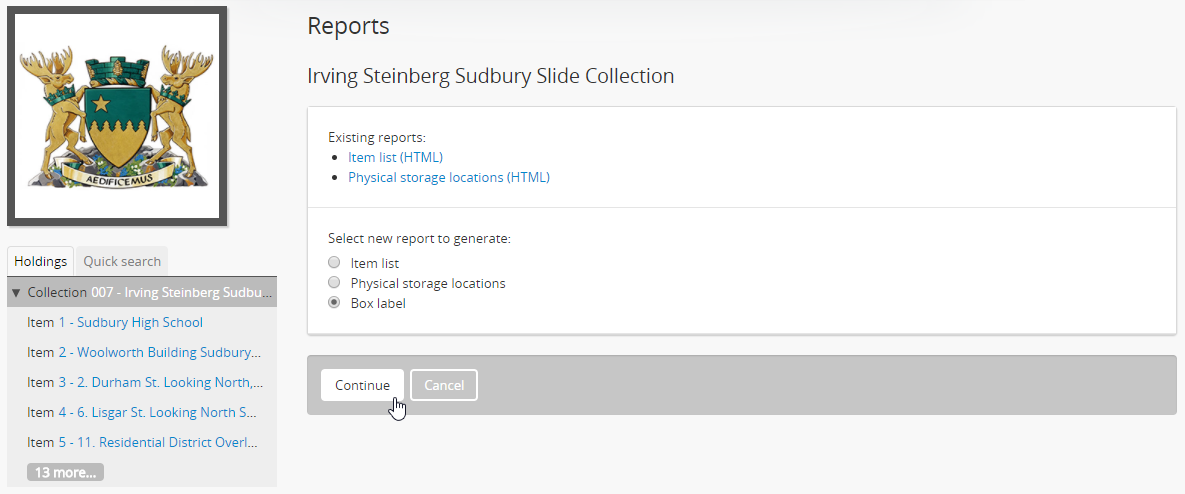
If there are existing reports previously generated, they will be available for immediate download or viewing. Click on one to view or download it:
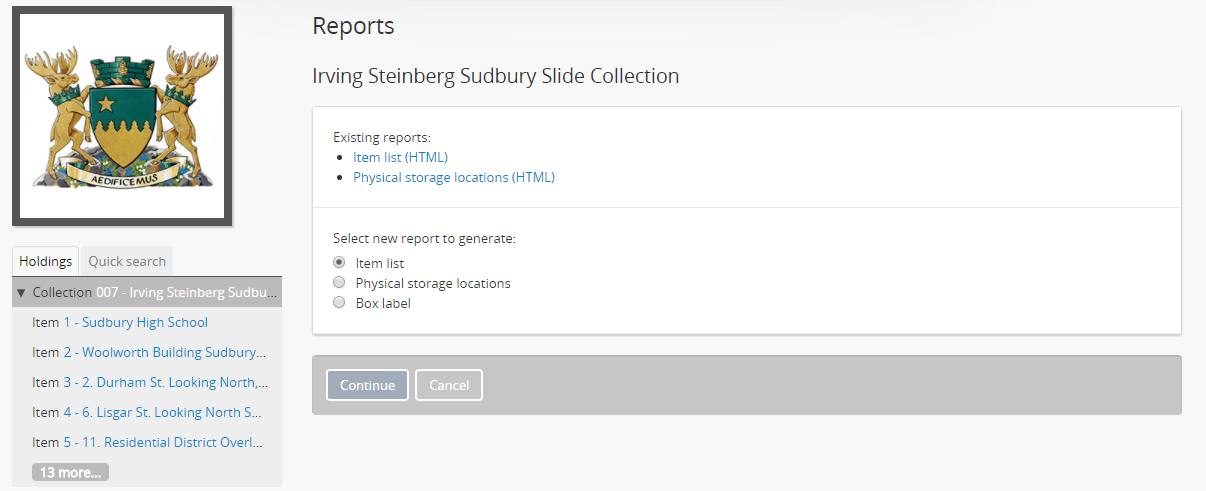
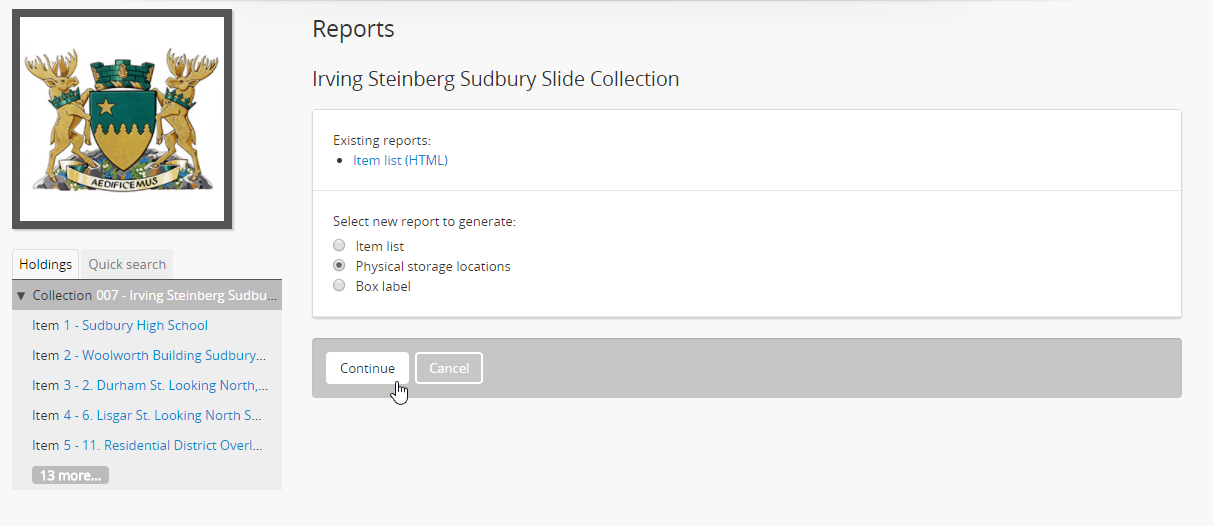
- To generate a new report, click on the Physical storage locations radio button, and then click the “Continue” button in the button block at the bottom of the page.
- Next AtoM will ask you what format you want the report to be generated in. Available options are CSV or HTML. The CSV option will be provided as a download to be viewed locally, while the HTML option will be opened immediately in your web browser, and can be used for printing (you can always save a local copy by right-clicking and using the “Save page” option).

Once you have selected a report format and clicked “Continue,” AtoM will reload the page and return you to the view page for the related archival description. A notification will appear at the top of the page, letting you know that report generation has started.
To check on the status and retrieve your report when it is ready, you can either click on the
Reports button in the right-hand
context menu again, or you can use the link to the reports page
provided in the notification. When completed, your reports will appear in
the “Existing reports” section of the Reports page, as shown in Step 5.
Tip
Logged in users can always check on the status of any job by navigating to the Manage > Jobs page. For more information, see: Manage jobs.
For HTML reports, clicking them will open them immediately in your web browser. You can use the “Back” button to return to the reports page, and if you wish to save a local copy, Right-click anywhere on the page and use the “Save as” option in your browser to save a local copy.
For CSV reports, clicking them will trigger a download. You will need a local application to view the file - we recommend a spreadsheet application such as LibreOffice Calc.
The example below shows a Physical storage report generated as HTML, and opened in a web browser. You can select “print” from your browser and print the report, or you can use your browser’s “Back” button to exit the report view page.
In the HTML report, users can click on a hyperlink container name and AtoM will take you to the related View physical storage screen.
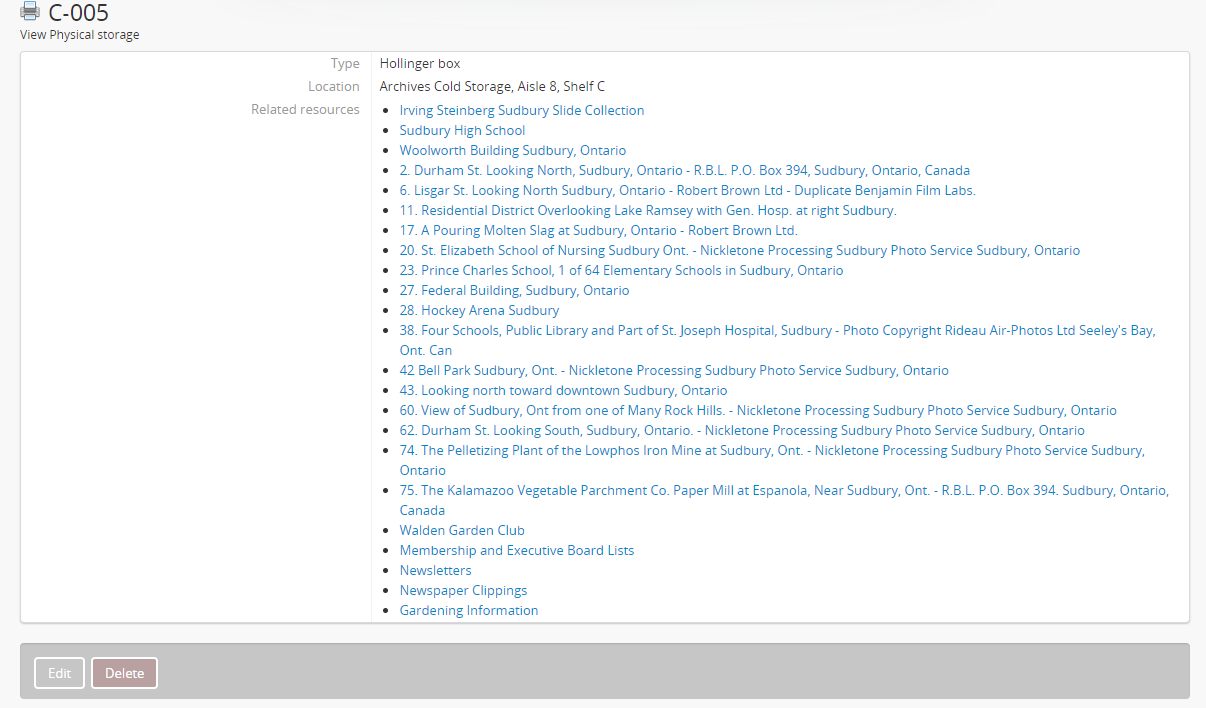
You can choose to edit the physical storage by selecting the “edit” button in the button block,see Edit current container. You can choose to delete the physical storage by selecting the “delete” button in the button block. For more information on working with physical storage locations, see: Physical storage.
You can also click on the ![]() print icon in the title bar and AtoM will
take you to a print preview page, showing all the contents of that physical
storage location.
print icon in the title bar and AtoM will
take you to a print preview page, showing all the contents of that physical
storage location.
Alternatively, on the View physical storage screen you can click on the hyperlink associated with a specific record and AtoM will take you to the View archival description screen for that record.
Create physical storage report from the Manage menu
AtoM also provides a simple report that lists all archival description records associated with a particular storage location. This report is optimized for printing, and can be accessed via the Physical storage module.
See also
To view the physical storage report:
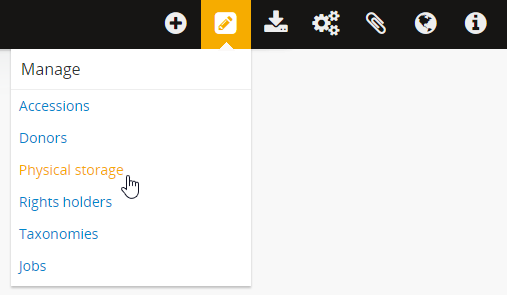
- Click on the “Manage” menu and Select “Physical storage” from the drop-down list.
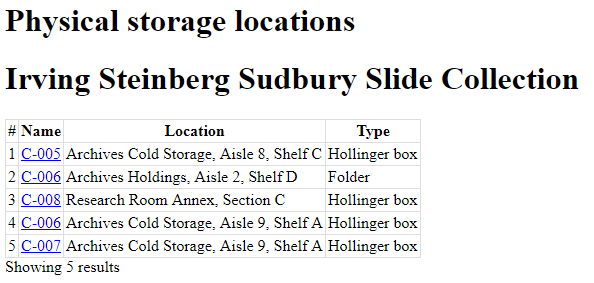
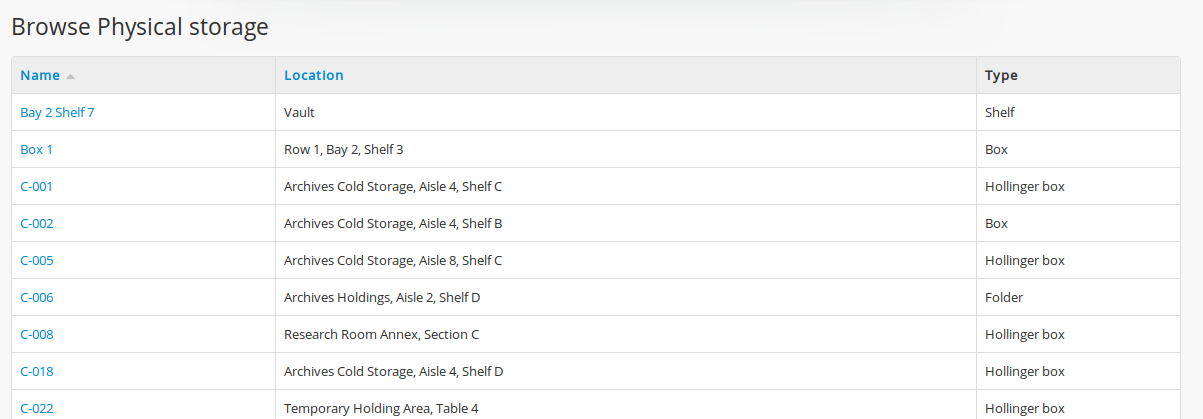
- AtoM will take you to the Browse physical storage screen. All containers are listed by name, location and type. You can sort by Name or Location.
- Click on the hyperlink container name and AtoM takes you to the View Physical storage screen.
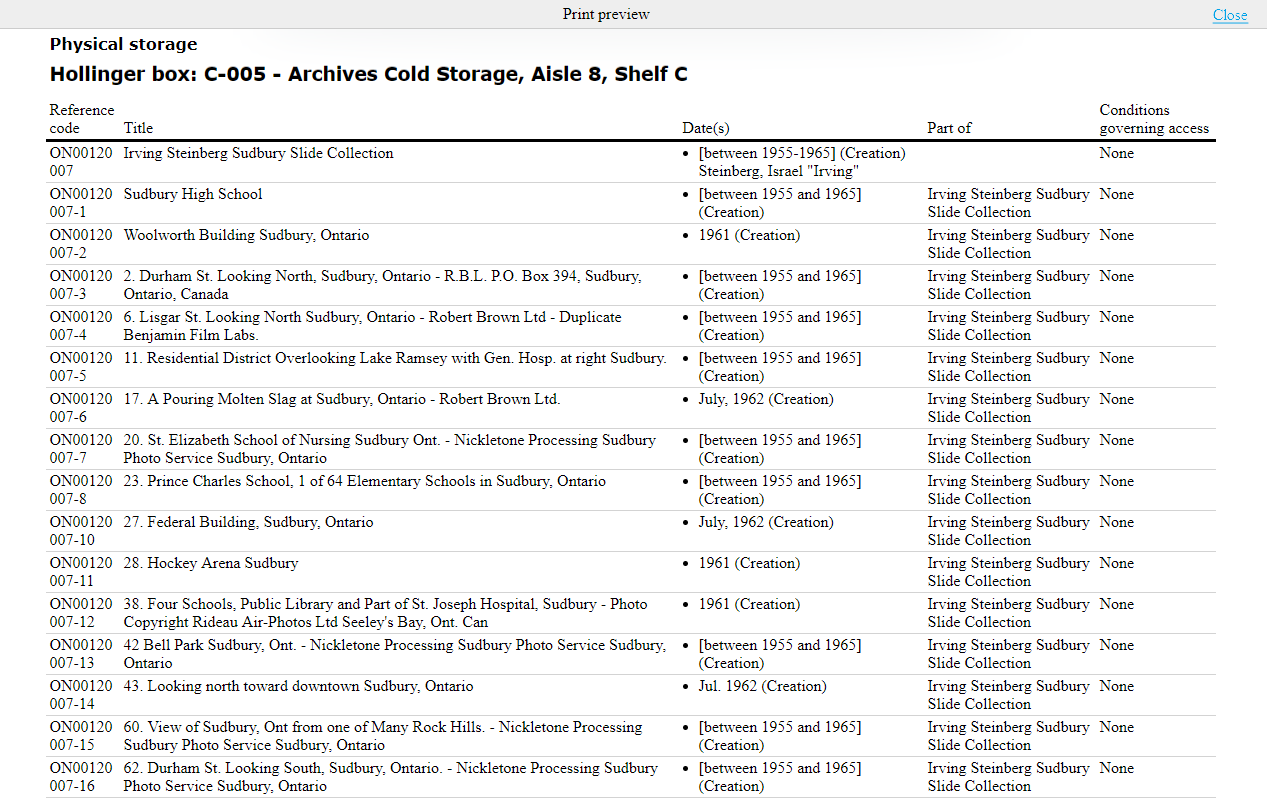
- To view the storage report, click on the
 print icon in the
title bar and AtoM will take you to a print preview page, showing all the
contents of that physical storage location.
print icon in the
title bar and AtoM will take you to a print preview page, showing all the
contents of that physical storage location.
Alternatively, on the View physical storage screen you can click on the hyperlink associated with a specific record and AtoM will take you to the View archival description screen for that record.
Generate a box label report via the Reports module
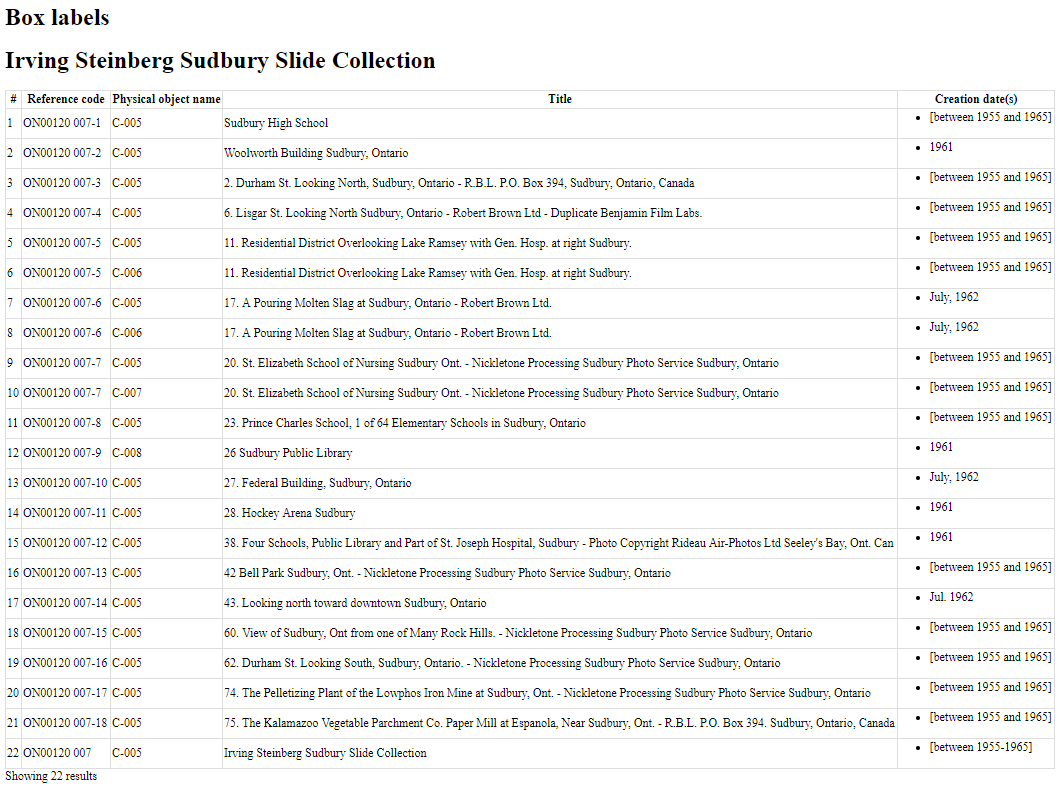
Users can create a simple physical storage report that can be used to create box labels for your physical storage, via the Reports module. The report includes columns for the following:
- Reference code
- Physical object name (i.e. container name)
- Title of the related archival description
- Creation date of the archival description
This report can be generated from any archival description view page, assuming that physical storage locations have been associated with those archival descriptions. Reports generated will apply to any descendant records - i.e. lower-level descriptions from the current level. If you want a report for all lower-level descriptions, start from the top-level description and generate the report there.
Note
Box label reports are only available to authenticated (logged-in) users.
However, all users can view and generate file and item reports - see:
File and item list reports and printing. Depending on a setting controlled by an
administrator in Admin > Settings, these file and
item reports may or may not include physical storage information. For more
information, see: Generate archival description reports as public user.
Reports generated this way are particular to the selected archival unit - for storage location reports that show all related descriptions associated with a storage location, see above, Create physical storage report from the Manage menu.
Box label reports in AtoM are generated asynchronously in the background using Gearman, AtoM’s job manager. You will need to make sure that Gearman is properly configured during installation to be able to generate reports - for more information, see: Asynchronous jobs and worker management. Additional information about the status of any report generation job can also be seen via Manage > Jobs - for more information on the Jobs management page in AtoM, see: Manage jobs.
To generate a box label report for an archival unit:
- Navigate to the highest level of description for which you wish to create a box label report (e.g, for the box labels of an entire fonds, view the fonds level description, etc). You can do so by searching or browsing to find the description you want - for more information on navigation in AtoM, see: Access content.
- On the view page of the archival description for which you
wish to generate a report, click on the Reports button, found in
the right-hand context menu under the “Explore” heading:
AtoM will reload the page to display report generation options. Options avalailable will depend on a) whether you are authenticated (i.e. logged in), and b) the lower-level descriptions available in this archival unit. For more information on file and item list reports, see: File and item list reports and printing.
If there are existing reports previously generated, they will be available for immediate download or viewing. Click on one to view or download it:
- To generate a new report, click on the Box labels radio button, and then click the “Continue” button in the button block at the bottom of the page.
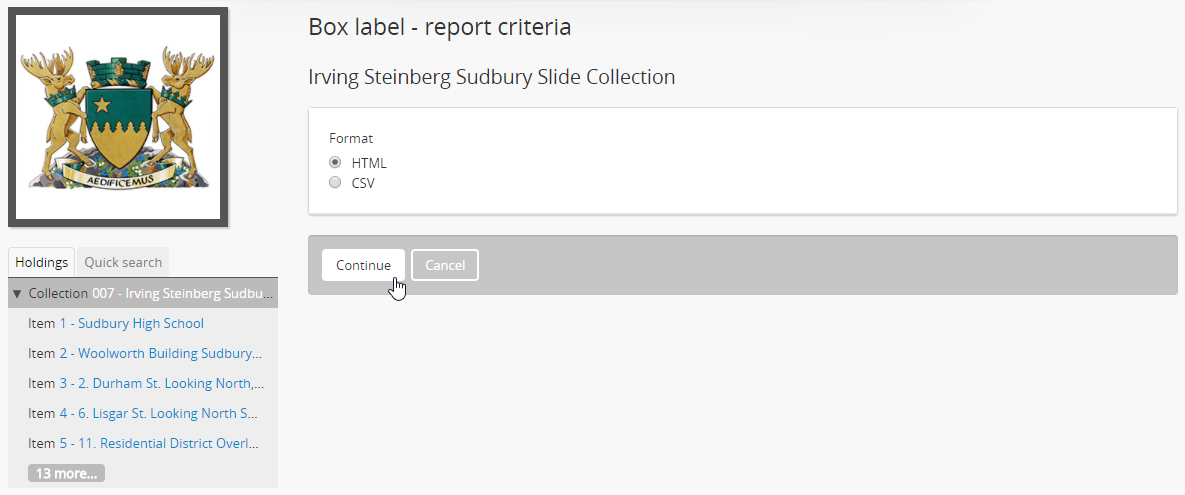
- Next AtoM will ask you what format you want the report to be generated in. Available options are CSV or HTML. The CSV option will be provided as a download to be viewed locally, while the HTML option will be opened immediately in your web browser, and can be used for printing (you can always save a local copy by right-clicking and using the “Save page” option).
Once you have selected a report format and clicked “Continue,” AtoM will reload the page and return you to the view page for the related archival description. A notification will appear at the top of the page, letting you know that report generation has started.
To check on the status and retrieve your report when it is ready, you can either click on the
Reports button in the right-hand
context menu again, or you can use the link to the reports page
provided in the notification. When completed, your reports will appear in
the “Existing reports” section of the Reports page, as shown in Step 3.
Tip
Logged in users can always check on the status of any job by navigating to the Manage > Jobs page. For more information, see: Manage jobs.
For HTML reports, clicking them will open them immediately in your web browser. You can use the “Back” button to return to the reports page, and if you wish to save a local copy, Right-click anywhere on the page and use the “Save as” option in your browser to save a local copy.
For CSV reports, clicking them will trigger a download. You will need a local application to view the file - we recommend a spreadsheet application such as LibreOffice Calc.
The example below shows a Box label report generated as HTML, and opened in a web browser. You can select “print” from your browser and print the report, or you can use your browser’s “Back” button to exit the report view page.