Upload and manage digital objects
Digital objects objects are computer files that can be uploaded into and displayed by AtoM; they can include scanned images, digital photographs, sound and moving image files, and other scanned or born-digital items. AtoM allows the user to link a single digital object to an archival description or an an authority record, or import multiple digital objects to new lower levels of description. In AtoM, there is a 1:1 relationship between a digital object and an information object - meaning every digital object must be associated with an archival description, typically at the file or item level (see level of description), or an authority record.
For every object uploaded, AtoM creates two derivative objects from the master: a thumbnail image and a reference display copy of the object. The master digital object is the unaltered version of a digital object that has been uploaded to AtoM. Note that only authenticated (i.e. logged-in) users may view master digital objects by default (though this can be changed by editing the permissions of unauthenticated users - for more information, see: Edit permissions).
Important
By default, all users can view the master digital object of an uploaded PDF, regardless of the “View master” settings in the Archival description permissions tab. This is because the reference display copy is not large enough to be useful without access to the full PDF, while the reference copy might be perfectly serviceable for an image (and restricting access to the master may be part of the required copyright conditions). Note that users could still restrict public access to uploaded PDFs using the PREMIS actionable rights module - for more information, see: Rights.
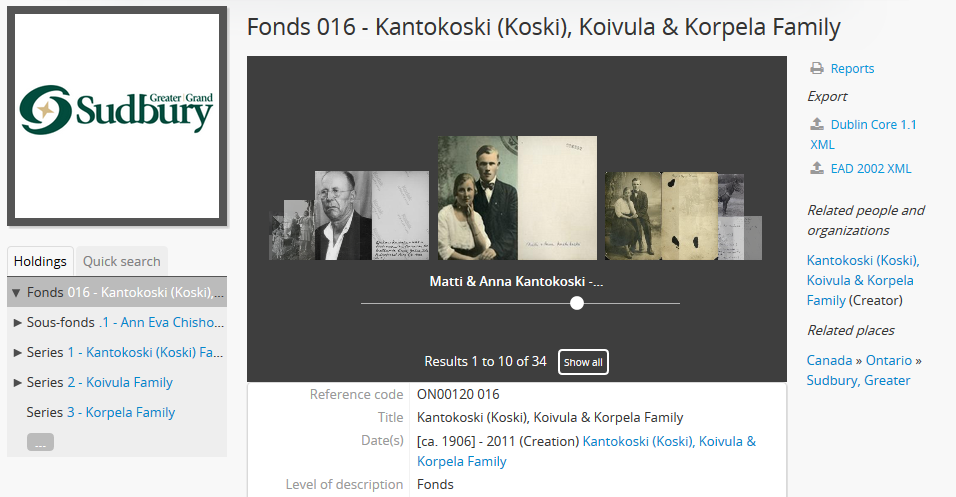
At higher levels of description, the view page of a parent record will include thumbnails of all digital objects registered at lower levels. The thumbnails are displayed using a carousel viewer so you can easily scroll through the set using your mouse or keyboard’s arrow keys. Clicking on a thumbnail will redirect you to the view page for the description associated with that digital object. If more than 10 digital objects appear at lower levels, AtoM will display the first 10 in the carousel and provide a link to a digital object browse page to explore the rest if desired. For more information, see the Carousel entry in Navigation in AtoM.
Tip
The digital object carousel can also be disabled by an administrator via Admin > Settings > Default page elements. For more information, see: Default page elements.
See below for more information on:
- Linking single digital objects to archival descriptions
- Linking single digital objects to authority records
- Uploading multiple digital objects
- Uploading PDFs
- Editing digital objects
- Add dynamic maps to your digital object metadata
- Edit the filename of a digital object linked to an archival description
- Deleting digital objects
- Adding a watermark to reference images
- Digital object storage
- Supported file formats
See also
Link a single digital object to an archival description
A single digital object can be linked directly to an existing archival description in AtoM via the “Link digital object” option. Users can either upload a digital object, or link to an existing resource available on the web. Instructions on how to do both are included below.
Note
Only one digital object can be linked to an archival description at a time. If you wish to upload or link multiple digital objects, you will need to create lower levels of description. AtoM includes a workflow to automate the creation of these lower levels - see Upload multiple digital objects to archival descriptions for more information.
To link a single digital object:
- Navigate to the view page of an existing archival description in AtoM. You can do this by browsing or by searching for a specific archival description - see Access content for more information on navigation in AtoM.
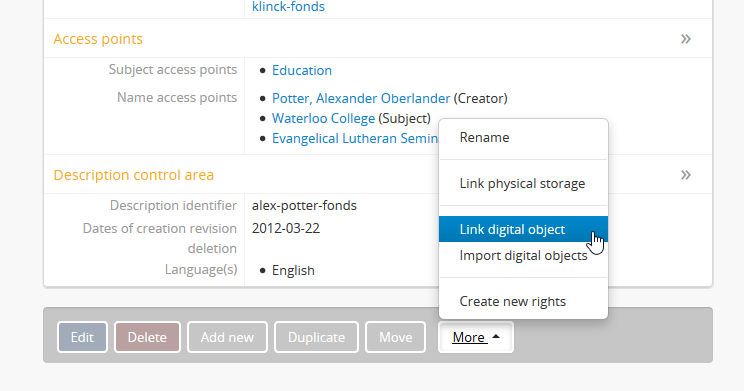
- Click on the “More” button in the button block; from the menu that appears, select “Link digital object”.
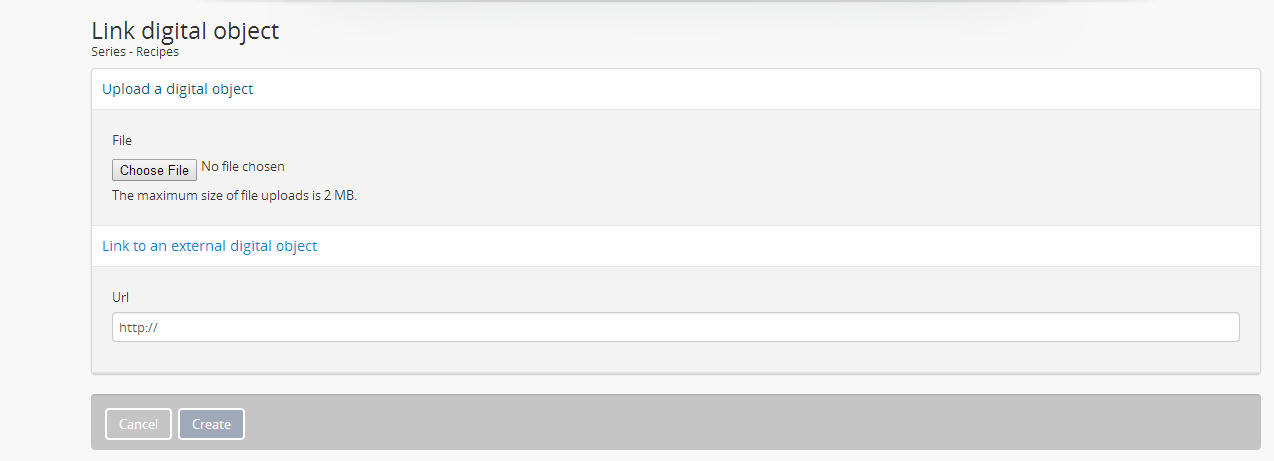
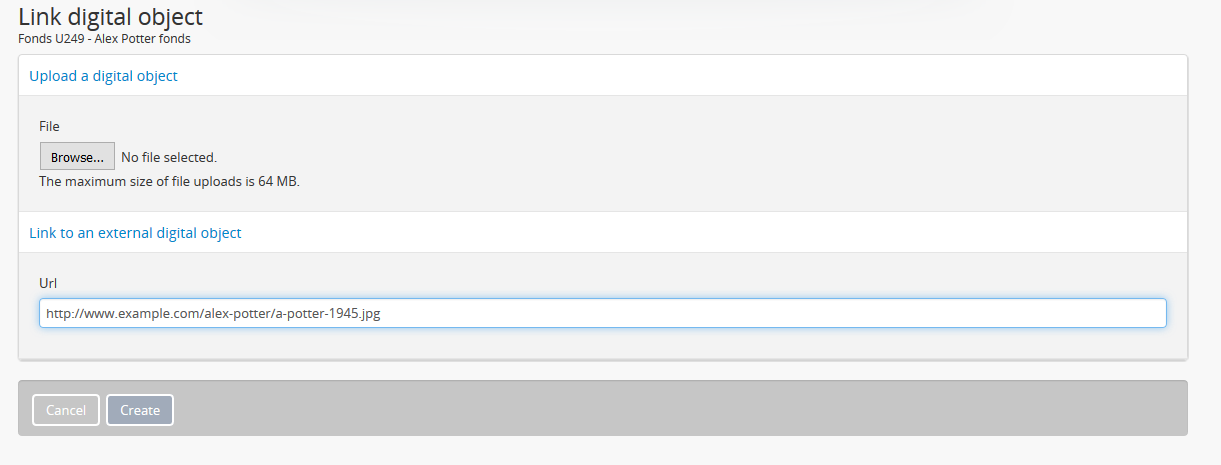
- AtoM will redirect you to the link digital object edit page. Users can either upload a digital object, or link to an existing digital object available on the internet.
- To upload a digital object locally, cick the “Choose File” button to navigate to and select a file on your computer or device. Click “Open” once the item has been selected from the window that will appear.
- To link to an object on the internet, enter the URL to the external object to which you wish to link.
Important
To link to a digital object via the web, you must enter a URL that ends with the file extension of the resource to which you are trying to link - for example, to link to an image, the URL should end with .jpg, .png, etc. You can usually get to this URL by clicking on the resource directly, or by right-clicking and selecting “View image” etc in your browser.
Click the “Create” button in the button block. When you return to the view page, the reference display copy will be displayed in the digital object field, above the other fields linked to that archival description.
Note
Users can view or play the reference display copy (depending on the type of digital object). Authenticated (i.e. logged-in) users can also download the master digital object.
Objects with multiple pages, such as multi-page TIFFs or PDF files, will by default be displayed with single-page reference display copies. To have them viewed with a pager to allow the user to browse through the pages, go to Admin > Settings > Global > Upload multi-page files as multiple descriptions and select “Yes”; this will also cause all pages of a multi- page object to appear individually as child records of the description to which the object was uploaded. (See: settings).
Tip
If you are comfortable with users accessing the master digital object (e.g. the original full-resolution upload) for viewing multi-page files such as PDFs in their browser, you can change the default permissions to grant anonymous users (e.g. unauthenticated, or not logged in) access to the master via Admin > Groups - select the “anonymous” group, edit the archival description permissions, and change the “Access master” field to “Grant”. Users will then be able to click on the reference display copy to view the original upload. For more information, see: Edit permissions.
You can upload any file format, but only supported formats can be viewed or played directly in AtoM. For a list of formats, see File formats. Formats that are not supported can still be uploaded: clicking the object will download it to the user’s desktop where (assuming the user has the required software) it can be viewed or played.
See below for more information on making changes to your digital object.
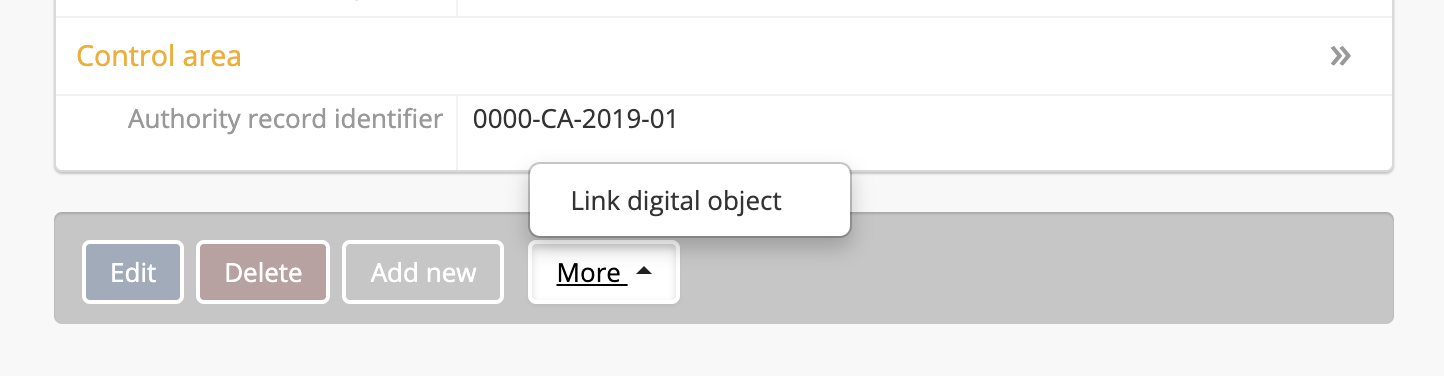
Link a single digital object to an authority record
The process to link a digital object to an authority record is similar:
- Navigate to the view page of an existing authority record in AtoM. You can do this by browsing or by searching for a specific authority record - see Access content for more information on navigation in AtoM.
- Click on the “More” button in the button block and select “Link digital object”.
- AtoM will redirect you to the link digital object edit page. Users can either upload a digital object, or link to an existing digital object available on the internet.
- To upload a digital object locally, cick the “Choose File” button to navigate to and select a file on your computer or device. Click “Open” once the item has been selected from the window that will appear.
- To link to an object on the internet, enter the URL to the external object to which you wish to link.
Important
To link to a digital object via the web, you must enter a URL that ends with the file extension of the resource to which you are trying to link - for example, to link to an image, the URL should end with .jpg, .png, etc. You can usually get to this URL by clicking on the resource directly, or by right-clicking and selecting “View image” etc in your browser.
Click the “Create” button in the button block. When you return to the view page, the reference display copy will be displayed in the digital object field, above the other fields linked to that authority record.
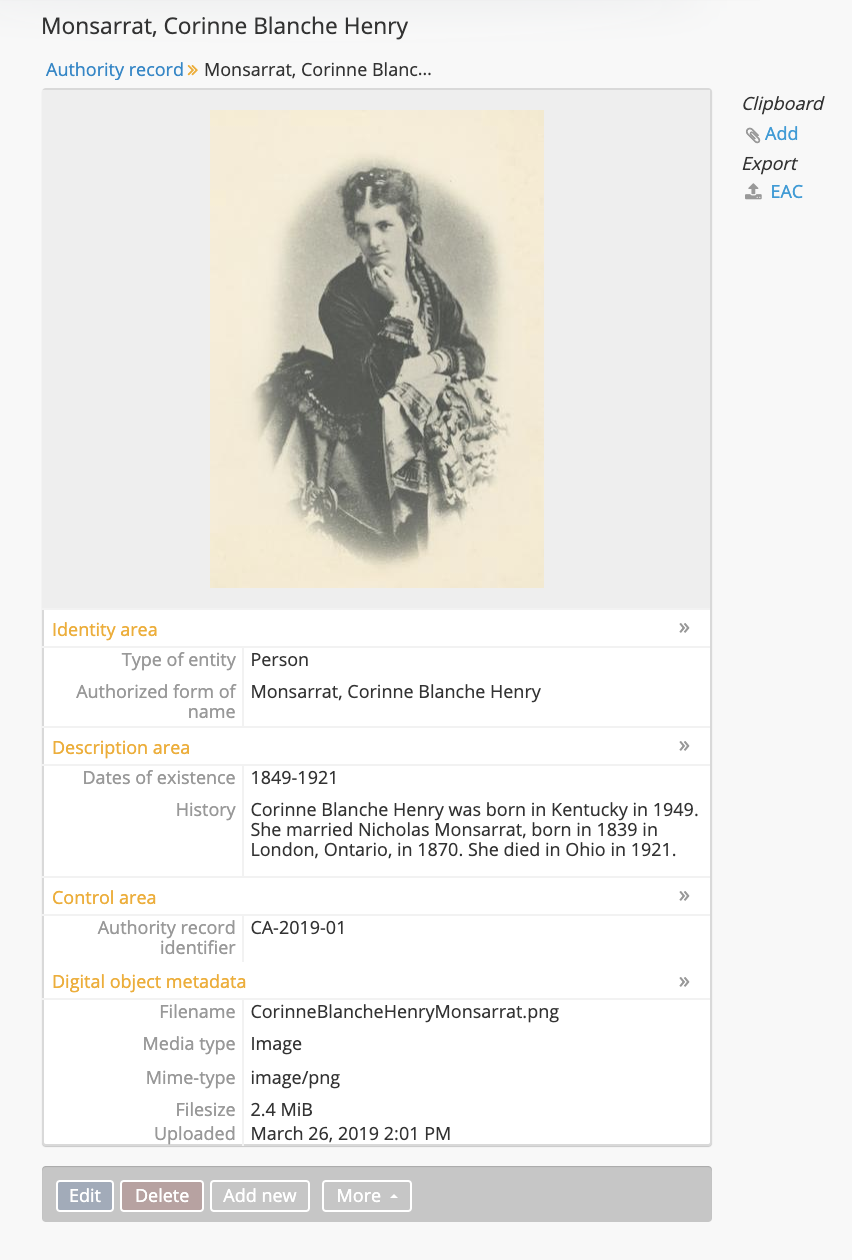
Note
Unauthenticated users (i.e. not logged in) cannot download digital objects associated with authority records.
As with archival descriptions, you can upload any file format to authority records, but only supported formats can be viewed or played directly in AtoM. For a list of formats, see File formats. Formats that are not supported can still be uploaded: clicking the object will download it to the user’s desktop where (assuming the user has the required software) it can be viewed or played.
See below for more information on making changes to your digital object.
Upload multiple digital objects to archival descriptions
In AtoM, there is a 1:1 relationship between archival descriptions and digital objects - that is, only one digital object may be associated with an archival description, and all digital objects require an associated description. However, to enable a rapid workflow where users can upload multiple digital objects without first having to create associated descriptions, AtoM includes an option to upload multiple digital objects at once, as children of a selected archival description. Users can choose what level of description is used when the placeholder descriptions are created; a title can also be added to each uploaded digital object, which will then be used as the title for the related description.
Note
The following workflow has been known to fail when using Firefox as your webbrowser. For this particular workflow, we recommend using another browser, such as Chrome.
To upload multiple digital objects in AtoM:
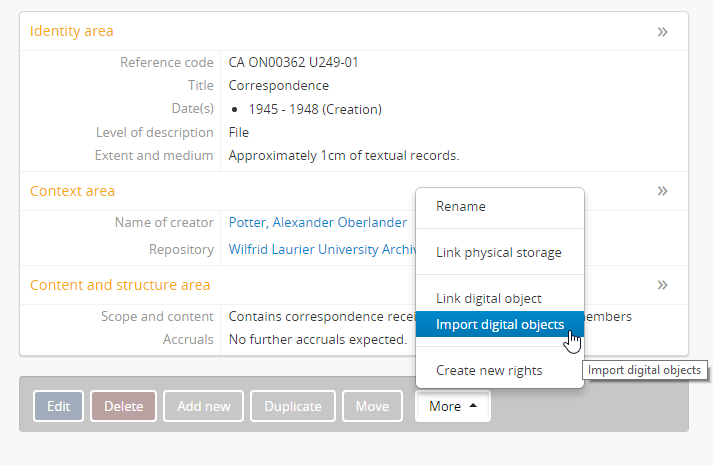
- Navigate to the view page of an existing archival description in AtoM. You can do this by browsing or by searching for a specific archival description - see Access content for more information on navigation in AtoM.
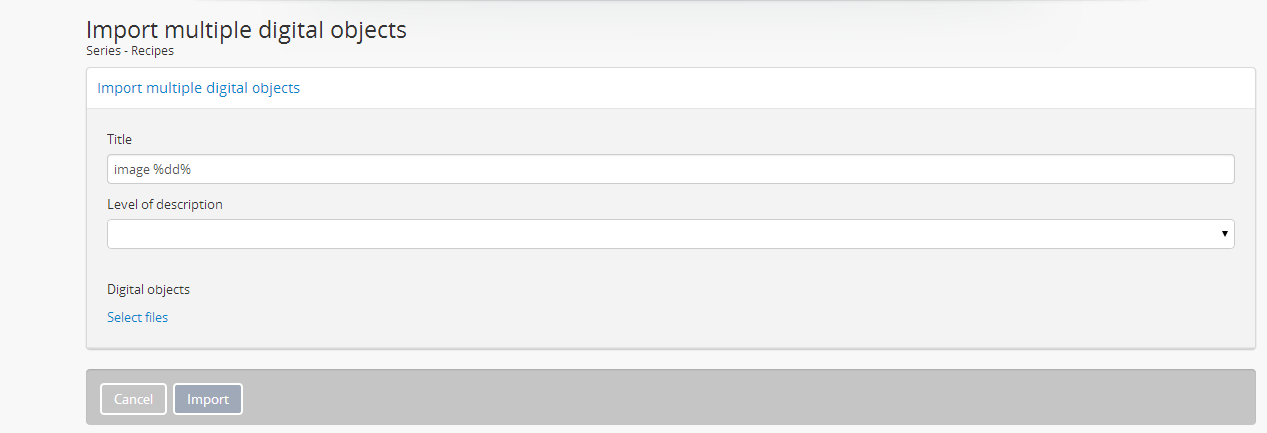
- Click on the “More” button in the button block; from the menu that appears, select “Import digital objects”.
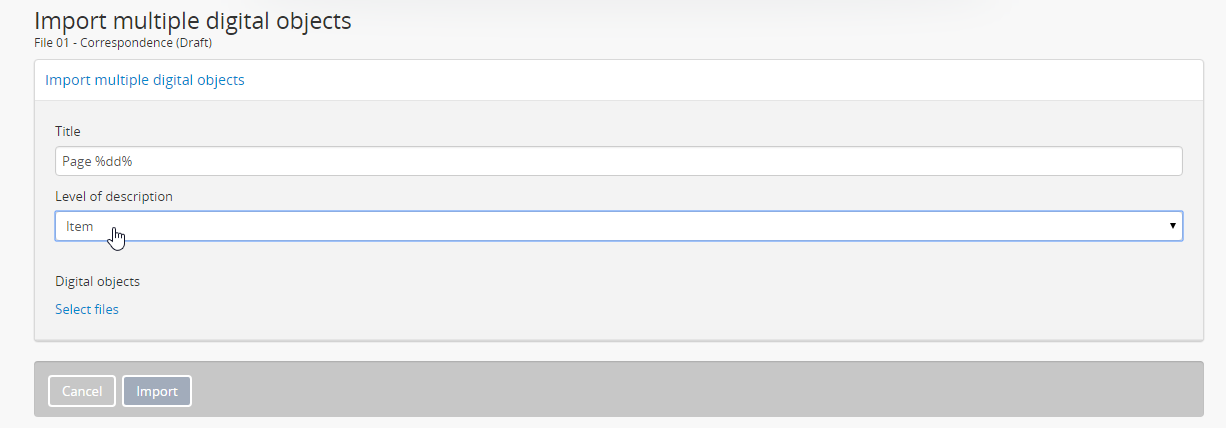
- Select a title for the objects - this will be used as the title for the associated archival description that will be created for each object uploaded. Each object will also have its own title field once selected, but if you do not wish to individually name each object, an automated title can be added to all objects using the title field at the top of the upload page. Currently the default is image 01, image 02, etc. (which will appear as a placeholder (i.e. image %dd%) in the “Title field”).
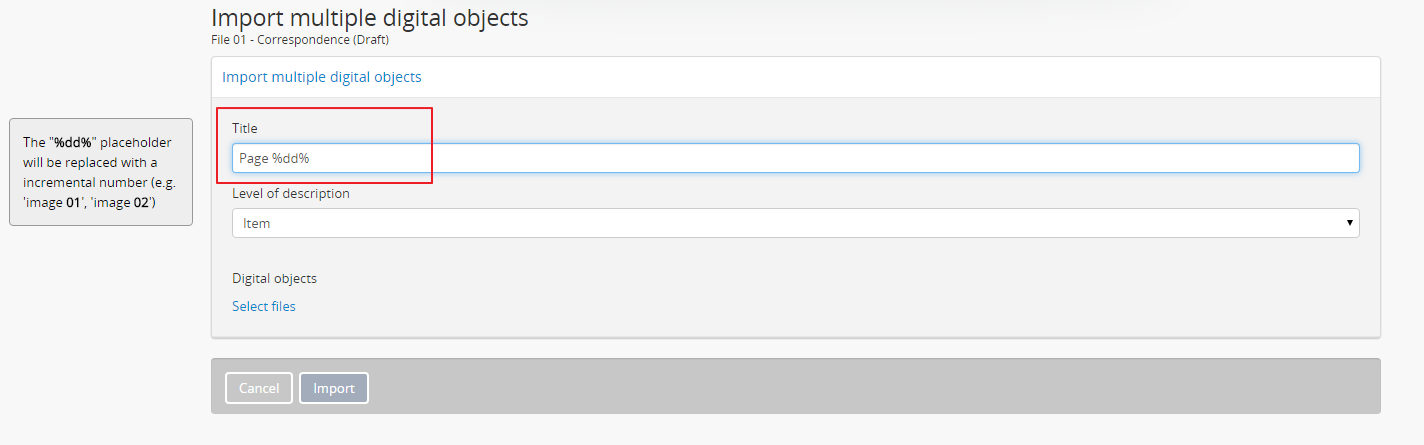
- Choose a level of description. Unlike the Link a single digital object to an archival description option, which attaches the digital object directly to the archival description at that level, the “Import multiple objects” option requires the user to designate a level of description (e.g.: Fonds, Subfonds, Collection, Series, Subseries, File, Item, Record group, Part, etc). This level of description will be used for the new children that are generated as part of the upload.
Tip
For users wishing to include multiple individual images as “views” of a single item, AtoM now includes “Part” as a level of description included at installation.
- Click the blue “Select files” link and select multiple files to upload.
- Once selected, the page will show previews of all the objects. If you like, you can edit the title for each object under to the preview. Remember, the title you enter here will be the title used for the associated archival description that will be created for each digital object uploaded.

- You can quit the upload process at any time by clicking the “Cancel” button in the button block; any digital objects already uploaded will not be saved. Note that simply navigating away from the page by any other means, without first clicking “Import” will also result in no new digital objects being uploaded.
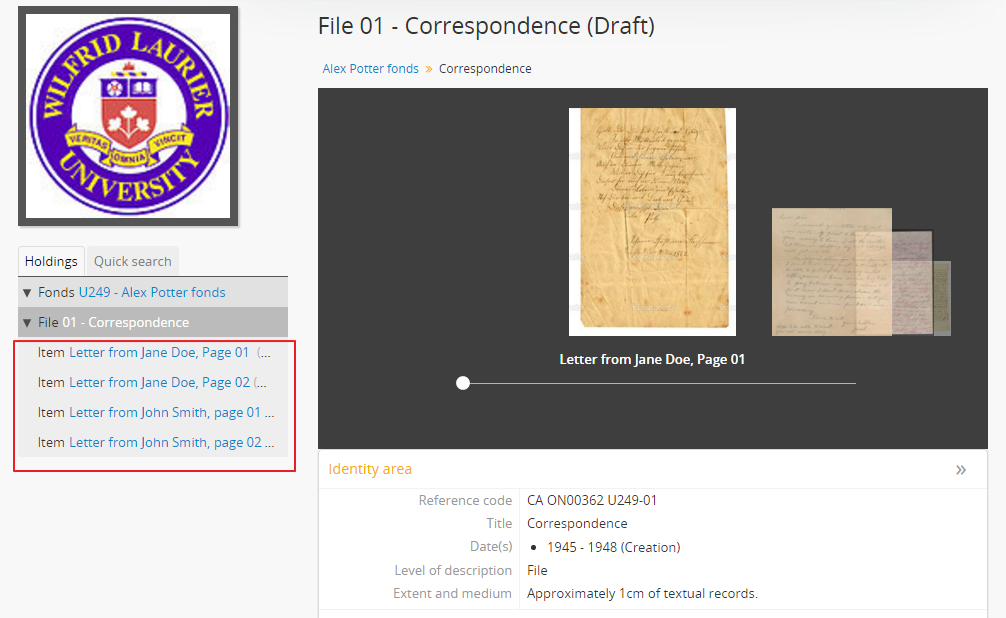
- Click the “Import” button in the button block when you are satisfied with your changes. When you return to the view page, you will see that the objects have all been attached to the archival description as child records of that description. If the digital object Carousel is enabled (see Default page elements for instructions on enabling or disabling the carousel), you will also see the thumbnails of your uploaded digital objects in the carousel.
Upload PDF
A user can link a single PDF and import multiple PDFs into AtoM. A full-text search of the content of the PDF is available through the main search box. PDFs that have a text layer will work, including all OCR PDFs and born-digital PDFs that include a text layer (e.g., exported Word documents) will work. Search results will refer users to the PDF that contains the search term(s), but will not reveal the location of the term(s) within the PDF.
Currently, AtoM 2.x truncates PDF text after the first 65,535 bytes.
As mentioned above, it is possible to upload multi-page TIFFs or PDF files to be displayed with a page viewer and to upload each page as a child object of the parent. To enable this feature, see settings.
Otherwise, the process for uploading PDFs is the same as described above.
Edit digital objects
Any digital object that has been uploaded and linked to an archival description or authority record can be edited at any time by an authenticated (i.e. logged-in) user.
To edit a digital object:
- Navigate to the view page of an existing archival description or authority record that has an associated digital object.
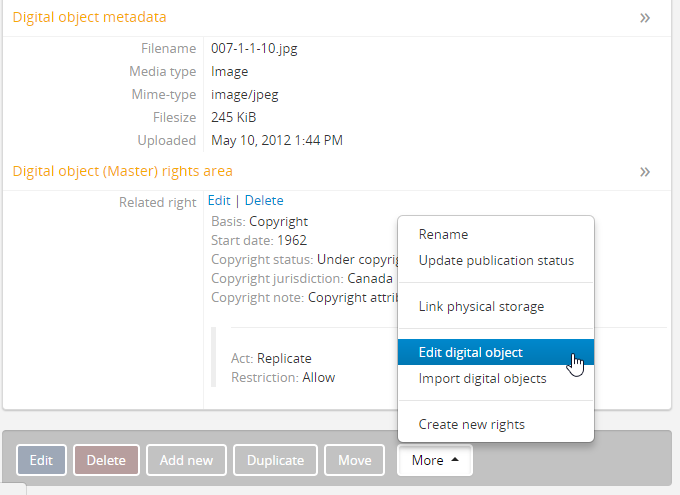
- Click on the “More” button in the button block; from the menu that appears, select “Edit digital object”.
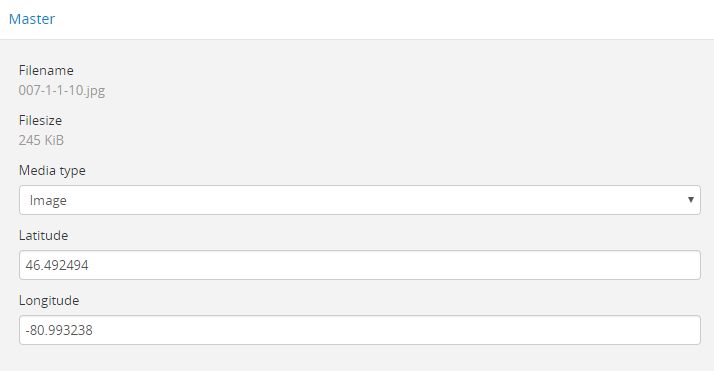
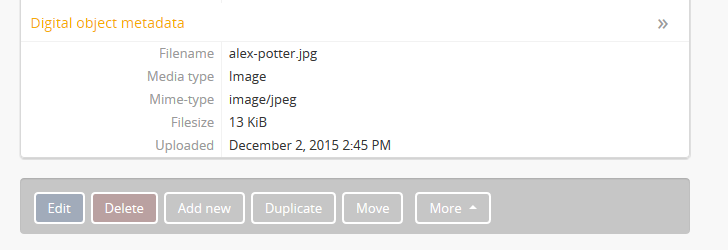
- You will be redirected to the digital object’s edit page. On this page, all representations (i.e. master representation, reference representation and thumbnail representation) of the digital object will be listed, along with information on their Filename, Filesize and Media Type.
- The Media type is used by the Media type facet in the search/browse pages - in some cases, AtoM might not properly detect the media type, and you can adjust it here for better results. Values include: Audio, Image, Video, Text, and Other. For more information on filter facets in AtoM, see: Facet filters.
- You can add alternative text to display if the image cannot be displayed in your browser.
- You can also add latitude and longitude values to the Master digital object’s metadata for basic geolocation support. This can configured to display a dynamic Google map in AtoM - for more information, see below:
Edit reference and thumbnail representations
- If you wish to use a different image as the thumbnail or reference version this is also performed from the Edit digital object screen. First click delete in Reference representation or Thumbnail area.
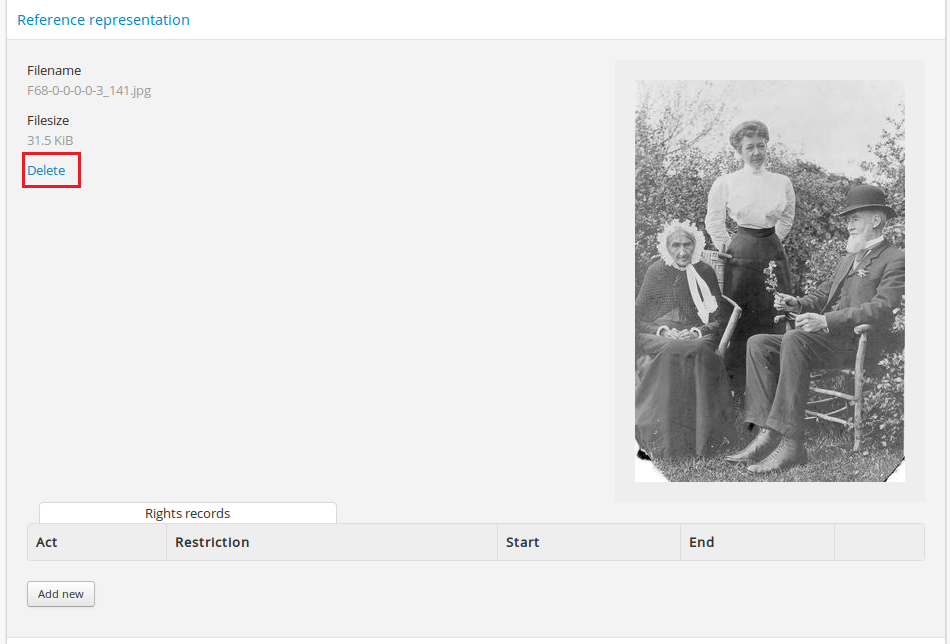
- AtoM will ask the user to confirm that they would like to delete the thumbnail/reference image. After confirming, the Edit digital object screen will allow the user to upload a new reference representation by clicking Browse and selecting a file from their computer, or auto-generate a new representation from the master image.

Save changes
- You can quit the edit process at any time by clicking the “Cancel” button in the button block; any edits made to digital objects will not be saved. Note that simply navigating away from the page by any other means, without first clicking “Save” will also result in no new digital objects being uploaded.
- Once all your changes have been made, click the “Save” button in the button block. You will be redirected back to the archival description’s view page.
All changes made can be edited once again, at any time, by following the steps outlined above.
Add dynamic maps to your digital object metadata
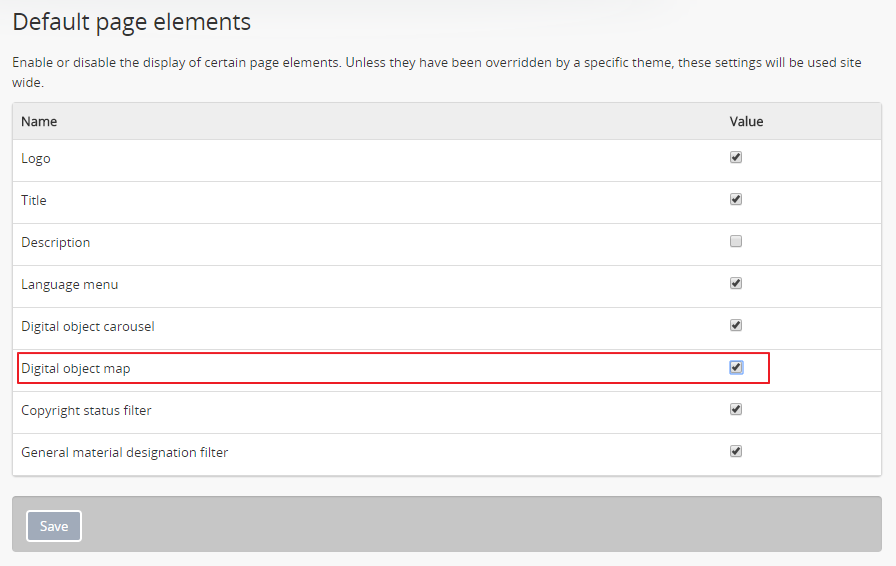
To support basic geolocation, AtoM has the ability to associate latitude and longitude coordinates with a digital object. If desired, you can also display a dynamic Google map in the digital object metadata area showing the location of the coordinates. To do so, an administrator will first need to configure certain settings so the map can be visible.
Enabling the display of digital object maps
Two separate settings must be changed to enable the display of the digital object maps in AtoM. First, in Admin > Settings > Global, an API key must be added to the Google Maps Javascript API key setting.
You can request a Google Maps API key free of charge - all you need is a Google account. For more information, see:
Additionally, in Admin > Settings > Default page elements, the “Digital obect map” setting checkbox must be checked. Remember to save your changes in the Settings area!
For more information, see:
Adding latitude and longitude values to a digital object
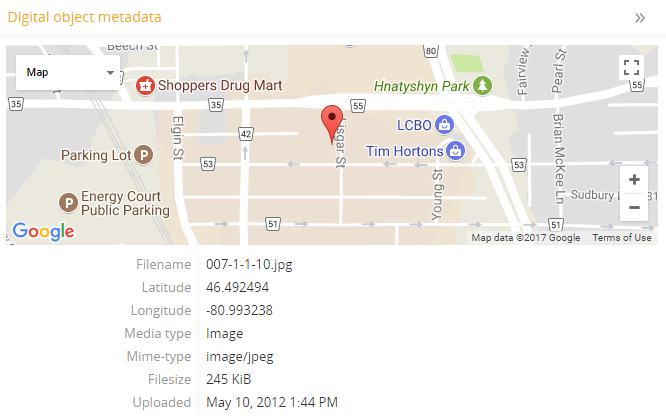
Once the above settings are configured, then any time a digital object has latitude and longitude values added to it, it will display a dynamic, zoomable map in the Digital object metadata area. To add your latitude and longitude values to an existing digital object (Examples show this process for archival description - the instructions are the same for authority record):
- Navigate to the archival description or authority record linked to the digital object you want to edit. You can do this by searching or browsing - for more information on navigation in AtoM, see: Access content.
- When you are on the view page of the related description, scroll down the button block at the bottom of the page, and in the “More” menu, select “Edit digital object”
- AtoM will redirect you to the edit page for the digital object. In the information area for the master digital object, add your latitude and longitude values to the fields provided.
Important
For all latitude and longitude fields in AtoM, you need to use the Signed degrees format (e.g. DDD.dddd) for the data to work! Degree and cardinal based formats (e.g. DDD MM SS + compass direction) will not work and the map will not be generated properly.
When only one field is provided, latitude values should be entered first, followed by a comma before the longitude values.
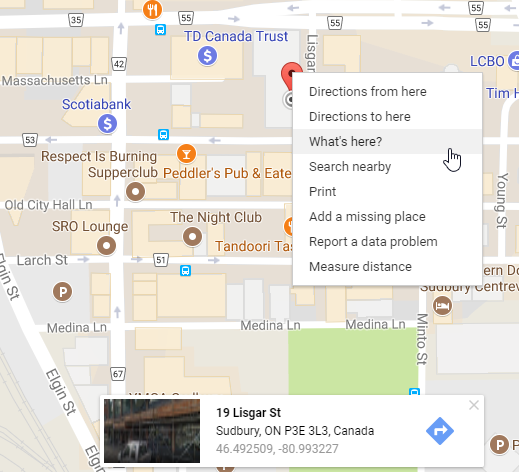
Here is an example of the latitude and longitude for Vancouver, BC, Canada:
Correct format: (signed degrees)
- 49.246292, -123.116226
Will not work in AtoM: (DMS cardinal)
- 49° 14’ 46.6512” N, 123° 6’ 58.4136” W
- When you save the record, AtoM will return you to the archival description’s view page. In the Digital object metadata area, you should now see a Google map showing your coordinates with a pin. You can zoom, pan, change the map type, and clik to view a full Google map in a new tab.
Tip
Not sure how to find out the coordinates of a location? You can use Google maps!
Find your location on a map - zoom in to make it as precise as possible. If you right-click and select the “What’s here?” option that will appear in the context menu that appears, Google Maps will display the latitude and longitude values, along with any addtional information it has:
You can then use this information in AtoM following the steps described above!
Edit the filename of a digital object linked to an archival description
For locally uploaded digital objects, you can edit the file name of the digital object after it has already been uploaded, using the “Rename” module. Once edited, AtoM will automatically update all related file paths to ensure that the link between the digital object and the associated archival description is maintained.
Note: this is not available for digital objects linked to authority records.
Important
This feature is best used for locally uploaded digital objects, not digital objects linked via URL to an external location, such as the web.
Technically the feature will work with external links, but all you are renaming in AtoM is the filename stored in the database associated with the master digital object, and the filenames of any locally generated derivatives such as the reference display copy and the thumbnail. When linking a digital object in AtoM via URL, the master is not stored in AtoM, but local derivatives are created for use in search/browse results and the view page of the linked description. For more on linking digital objects in AtoM, see above: Link a single digital object to an archival description. If you do edit the filename of an external linked digital object, AtoM will store the filename locally, and use it to update the filenames of the derivatives - but the external object will not be affected, and the link displayed in the digital object metadata area will be unchanged.
The Rename module used to edit the linked digital object filename can also be used to edit the title of the associated archival description, and its slug - detailed instructions on how to use it for these other purposes are included on the Archival Descriptions documentation page - see: Rename the title or slug of an archival description.
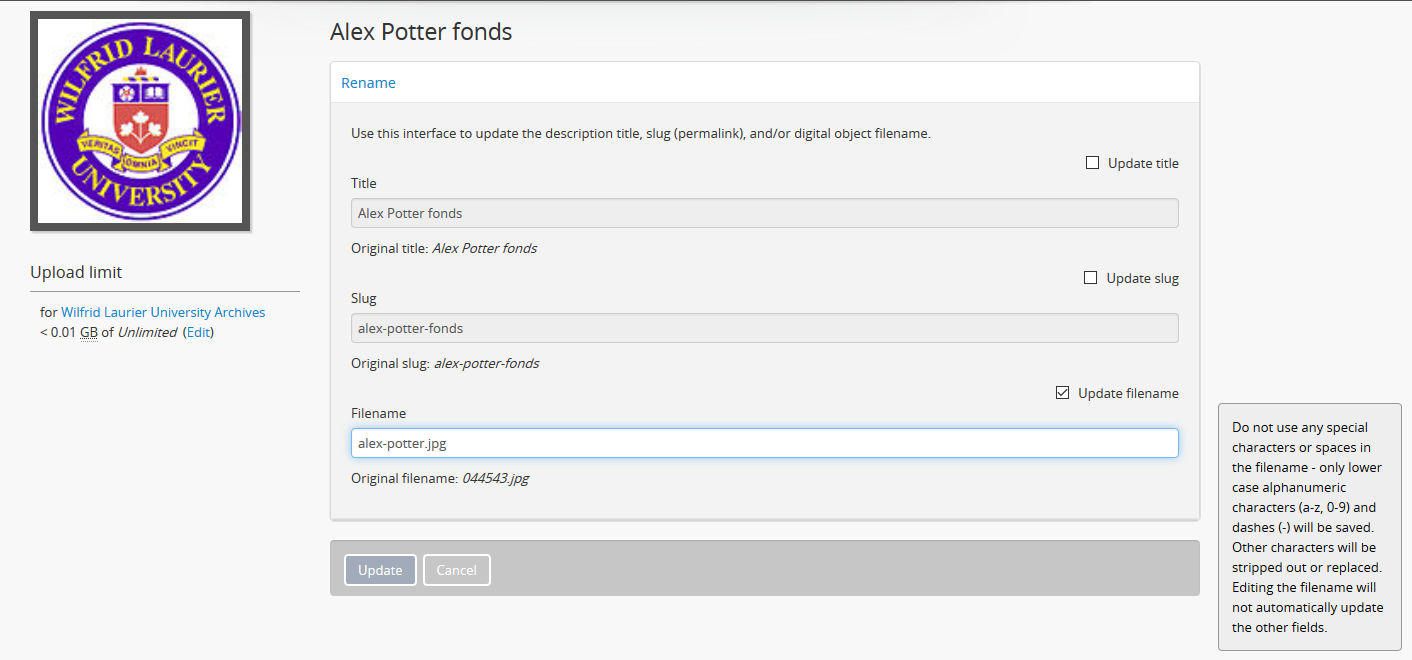
To change the filename of a linked digital object:
- Navigate to the view page of an existing archival description with a linked digital object in AtoM. You can do this by browsing or by searching for a specific archival description - see Access content for more information on navigation in AtoM.
- Scroll down to the button block at the bottom of the page, and click on the “More” button - a menu will open with further options. Click on “Rename” to open the Rename module.
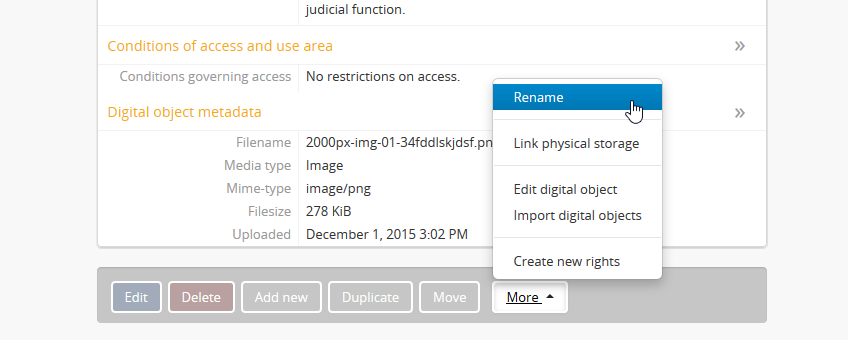
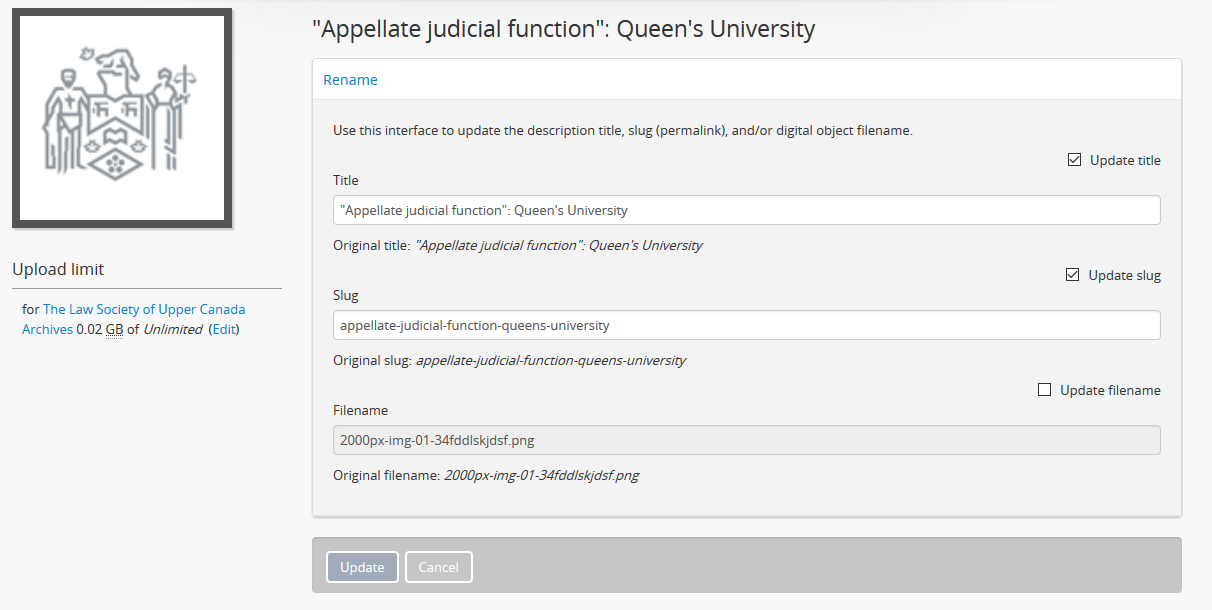
- AtoM will redirect you to the Rename module page. You will see 3 fields - one for the title of the description, one for the slug; the third field is for the filename of the digital object linked to the description.
See also
For more information on editing the slug and/or title of a description with the rename module, see: Rename the title or slug of an archival description.
- To the right of the edit fields, there is a checkbox corresponding to each field. By default, the title and slug checkboxes will be checked, and the filename field will be unchecked. The checkbox associated with a field must be checked to enable editing. You can uncheck these fields at any time to disable them - doing so will undo any changes made and prevent the field from updating when the “Update” button is clicked. To edit the filename of the linked digital object, check the “Update filename” box. You also might wish to uncheck the Title and Slug boxes, to prevent any accidental edits.
- Place your cursor in the filename field and make changes as necessary. For reference, the original value before your changes is displayed below the field.
Important
AtoM will automatically sanitize a filename you submit, including:
- Replacing spaces with hyphens
- Stripping uppercase characters to lower
- Removing special characters (e.g. ! @ # $ % ^ & etc)
- Removing stopwords (e.g. a, an, the, etc)
This is similar to how a slug is sanitized - for more information, see: Notes on slugs in AtoM.
However, unlike when editing a slug (see Rename the title or slug of an archival description), AtoM will not give you any warning or notification when making these changes after you submit the new filename. You will have to look at the digital object metadata area to review the sanitized filename, and repeat the above steps if needed.
We recommend using lowercase alphanumeric characters with no spaces or stopwords when choosing your new filename.
- If you do not wish to save your changes, you can click the “Cancel” button in the button block at the bottom of the Rename module page. Note that navigating away from the Rename page will also result in no changes being saved.
- When you are finished making your edits, save your changes by clicking the “Update” button located in the button block at the bottom of the Rename module page. AtoM will redirect you to the view page for the related archival description. A notification banner at the top of the page will let you know that the description has been updated.
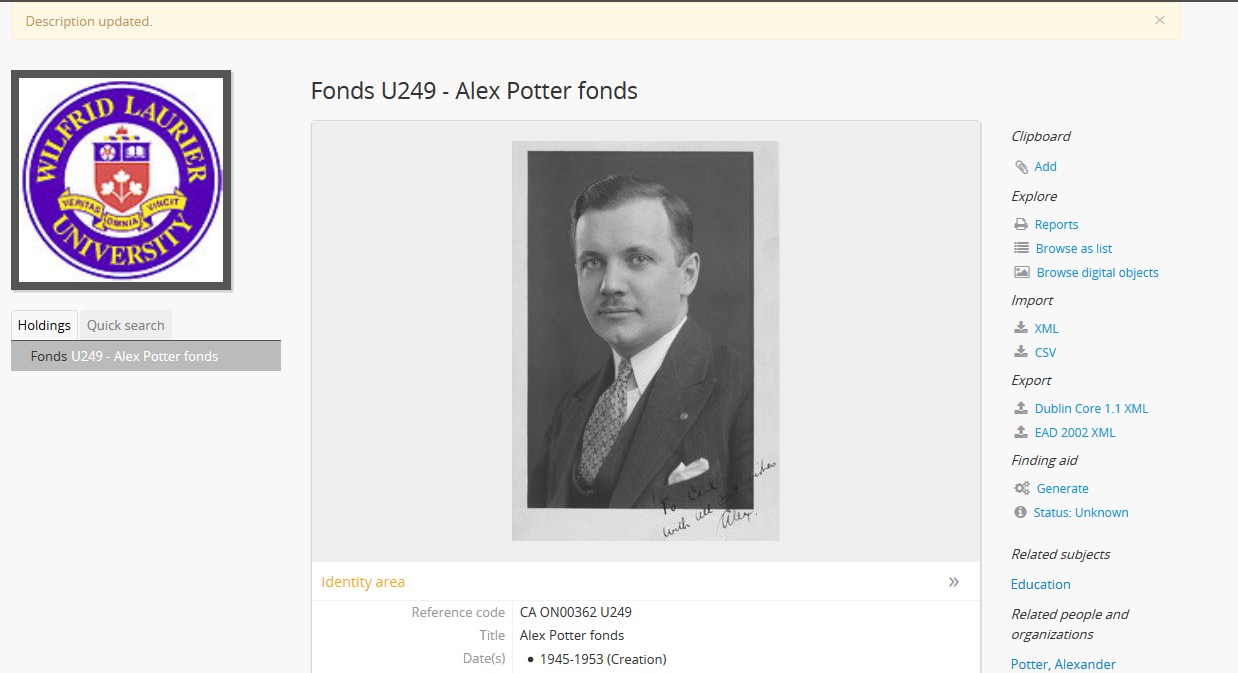
- You can see the updated filename in the Digital object metadata area at the bottom of the record. If you are unhappy with the results, you can repeat steps 1-7 as necessary.
Delete digital objects
To delete a digital object that has been uploaded and linked to an archival description or authority record:
- Navigate to the view page of an existing archival description or authority record that has an existing digital object.
- Click on the “More” button in the button block; from the menu that appears, select “Edit digital object”. You will be redirected to the digital object’s edit page.
- Scroll to the bottom of the page and click “Delete”. You will be prompted to confirm that you wish to “Delete” the digital object; click “Delete” once again. You will be redirected to the archival description’s view page.
Adding a watermark to reference images
A system administator can place a watermark file in AtoM’s root directory, so a digital watermark is overlayed over all reference display copy images generated when a digital object is uploaded.
For more information, see the Administrator’s manual:
Digital object storage
In AtoM, administrators can track digital object storage per repository. Storage limits may be placed on individual repositories by in-house server capacity or on hosted server agreements.
If you are utilizing a multi-institutional / portal instance of AtoM, you will need to check with the site administrator to learn the digital object storage limitations.
For more information, see Managing digital object storage.
Files formats
A number of file formats are supported as digital objects in AtoM. Files in other formats can still be uploaded to AtoM; they just cannot be directly accessed or streamed within AtoM itself. In these cases the user must download the file from AtoM to his or her desktop and (assuming the user has the requisite software) access the content there.
The table below shows image, audio and video formats which can be viewed in AtoM:
| Image | Audio | Video |
|---|---|---|
| 8SVX | AVS | |
| BMP | AC-3 | BFI |
| GIF | Apple Lossless | CamStudio CSCD |
| PNG | ATRAC3 | Cinepak |
| JPEG | Cook Codec | Creative YUV (CYUV) |
| V.Flash PTX | EA ADPCM | DNxHD |
| SGI | FLAC | Flash Screen Video |
| Sun Rasterfile | Intel Music Coder | FFV1 |
| FLIC | Monkey’s Audio | H.261 |
| TIFF | MP2 | H.263 |
| PNM | MP3 | H.264/MPEG-4 AVC |
| Nellymoser Asao Codec in Flash | Huffyuv | |
| QDM2 | id Software RoQ Video | |
| RealAudio 1.0 | Intel Indeo 2 | |
| RealAudio 2.0 | Intel Indeo 3 | |
| Shorten | LOCO | |
| Truespeech | Mimic[3] | |
| TTA | MJPEG | |
| TXD | MPEG-4 Part 2 | |
| Vorbis | Apple Computer QuickDraw | |
| WavPack | Quicktime Graphisc SMC | |
| Windows Media Audio 1 | RealVideo RV10 | |
| Windows Media Audio 2 | RL2 | |
| Smacker video | ||
| Snow | ||
| Sorenson SVQ1 | ||
| Sorenson SVQ3 | ||
| Theora | ||
| Asus V1 | ||
| Asus V2 | ||
| VMware VMnc | ||
| On2 VP3 | ||
| On2 VP5 | ||
| On2 VP6 | ||
| Westwood Studios VQA | ||
| Microsoft WMV v 7, 8 and 9 | ||
| Wing Commander/Xan Video |
Note
AtoM uses FFmpeg to handle audio-visual files. The table above shows the file formats supported by FFmpeg.