Docker Compose
Linux containers and Docker have radically changed the way applications are developed, built, distributed and deployed. The AtoM team is experimenting with new workflows that make use of containers. This document introduces our new development workflow based on Docker and Docker Compose. The latter is a tool that help us to run multi-container applications like AtoM and it is suitable for both development and production environments.
Warning
The Docker Compose integration and AtoM Dockerfile outlined here are intended for testing and development purposes only. They have not been fully tested and prepared for use in production environments at this time.
If you encounter issues or bugs, you are welcome to report them via the AtoM users forum - we will provide basic support as we are able, but urge you to proceed at your own risk.
If this is the first time that you have heard about containers you may find The New Stack eBook Series a useful resource to get up to speed quickly.
Install Docker and Docker Compose
Docker works the same whether you are using Docker for Windows, Docker for Mac or Docker on Linux. For the latter, make sure that both Docker Engine and Docker Compose are installed following the instructions in the links.
Spin it up
Let’s make sure that the Docker client can reach the engine. The following command will list the currently running containers:
docker ps
Now using git, check out the sources of AtoM and change your current directory:
git clone -b qa/2.x https://github.com/artefactual/atom.git atom
cd atom
Note
The source code (the entire “atom” folder) is copied to the Docker container on the build process and used to create the instance. For example, clone the “stable/2.8.x” branch if you want to test the latest stable version of AtoM.
Now set the environment variable COMPOSE_FILE to tell Compose what is the
location of our YAML file. You could do the same using the -f flag but we
don’t want to do so each time we invoke the docker-compose command.
# For bash users (most of you)
export COMPOSE_FILE="$PWD/docker/docker-compose.dev.yml"

# For fish users
set -lx COMPOSE_FILE (pwd)/docker/docker-compose.dev.yml
It’s time to use Docker Compose in order to provision our containers:
Important
In some operating systems, the default virtual memory limits can be low. Elasticsearch increases one of those limits when installed via packages and in the container that will be created below. However, the same limit needs to be increased in the host running this environment. Check the Elasticsearch documentation for more information.
The containers for the application use php:7.4-fpm-alpine as their base
image. If an old version of this image has been already downloaded by the
Docker engine in the host, run docker pull php:7.4-fpm-alpine to get the
latest version before creating the containers. It has to be based on Alpine
v3.8 or higher to be able to install some packages.
# Create and start containers. This may take a while the first time you run
# it because all the images have to be downloaded (e.g. percona, memcached)
# and the AtoM image has to be built.
docker-compose up -d
All seven docker containers should now be up and running.
Important
If the atom container command below to purge the database fails with the
message: PHP Fatal error: Allowed memory size of 536870912 bytes exhausted
..., you can increase the memory allocated by either adding the line
ATOM_PHP_MEMORY_LIMIT=1G to the file docker/etc/environment
or alternatively run the command without memory limits
docker-compose exec atom php -d memory_limit=-1 symfony tools:purge --demo
# Execute a command in the running container atom: purge database
docker-compose exec atom php symfony tools:purge --demo

# Execute another command: build stylesheets
docker-compose exec atom make -C plugins/arDominionPlugin
Tip
While you wait, take the opportunity to check out our Dockerfile, which describes the steps that are taken to build the AtoM image. It is based on Alpine Linux + PHP 7.4 and the rest of dependencies. In addition, our docker-compose.dev.yml file shows how AtoM is orchestrated together with its service dependencies. It is an environment meant to be used by developers.
That’s it! You have started the containers and put them in the background, populated the database and initiated the Elasticsearch index. You can start developing right away. Changes made in the source code will take effect immediately.
Due to a bug that has not been solved yet, the AtoM worker needs to be restarted after the database is populated for the first time:
docker-compose restart atom_worker
Important
To avoid resetting the configuration files to their default version each time the containers are created, the following files are only generated if they don’t exist already in the source code:
- apps/qubit/config/app.yml
- apps/qubit/config/factories.yml
- apps/qubit/config/settings.yml
Docker Compose lets you perform many different actions. Please refer to the documentation for more help. For example, you can monitor the output of some of your containers as follows:
docker-compose logs -f atom atom_worker nginx
You can also scale the AtoM worker as needed:
docker-compose up -d --scale atom_worker=2
Let’s verify that two workers have subscribed to Gearman:
# Establish a TCP connection to gearmand, port 4730
docker-compose exec atom bash -c "nc gearmand 4730"

# Send STATUS command
STATUS

0a2a58137e05032d1140fdbd0d6dccbb-arInheritRightsJob                0   0   2
0a2a58137e05032d1140fdbd0d6dccbb-arFileImportJob                   0   0   2
0a2a58137e05032d1140fdbd0d6dccbb-arInformationObjectXmlExportJob   0   0   2
0a2a58137e05032d1140fdbd0d6dccbb-arActorXmlExportJob               0   0   2
0a2a58137e05032d1140fdbd0d6dccbb-arCalculateDescendantDatesJob     0   0   2
0a2a58137e05032d1140fdbd0d6dccbb-arXmlExportSingleFileJob          0   0   2
0a2a58137e05032d1140fdbd0d6dccbb-arUpdatePublicationStatusJob      0   0   2
0a2a58137e05032d1140fdbd0d6dccbb-arObjectMoveJob                   0   0   2
0a2a58137e05032d1140fdbd0d6dccbb-arInformationObjectCsvExportJob   0   0   2
0a2a58137e05032d1140fdbd0d6dccbb-arUpdateEsIoDocumentsJob          0   0   2
0a2a58137e05032d1140fdbd0d6dccbb-arActorCsvExportJob               0   0   2
0a2a58137e05032d1140fdbd0d6dccbb-arRepositoryCsvExportJob          0   0   2
0a2a58137e05032d1140fdbd0d6dccbb-arFindingAidJob                   0   0   2
0a2a58137e05032d1140fdbd0d6dccbb-arGenerateReportJob               0   0   2
You could temporarily stop all the services with docker-compose stop (which
will need docker-compose up -d later to start the services again) or both
stop and remove related containers, network and volumes by running:
docker-compose down --volumes
Connect to AtoM
You can run the following command to check the status and other information about the containers:
$ docker-compose ps

         Name                       Command               State                  Ports
-----------------------------------------------------------------------------------------------------
docker_atom_1            /atom/src/docker/entrypoin ...   Up      9000/tcp
docker_atom_worker_1     /atom/src/docker/entrypoin ...   Up      9000/tcp
docker_nginx_1           nginx -g daemon off;             Up      0.0.0.0:63001->80/tcp
docker_elasticsearch_1   /bin/bash bin/es-docker          Up      127.0.0.1:63002->9200/tcp, 9300/tcp
docker_percona_1         /docker-entrypoint.sh mysqld     Up      127.0.0.1:63003->3306/tcp
docker_memcached_1       docker-entrypoint.sh -p 11 ...   Up      127.0.0.1:63004->11211/tcp
docker_gearmand_1        docker-entrypoint.sh gearmand    Up      127.0.0.1:63005->4730/tcp
As you can see in the right column:
- AtoM and its worker share port 9000, only in the containers network.
- Nginx is accessible in port 63001 from the host and from outside (if the host allows it).
- Elasticsearch can be accessed through port 63002, only from the host.
- Percona (MySQL) can be accessed through port 63003, only from the host.
- Memcached can be accessed through port 63004, only from the host.
- The Gearman server can be accessed through port 63005, only from the host.
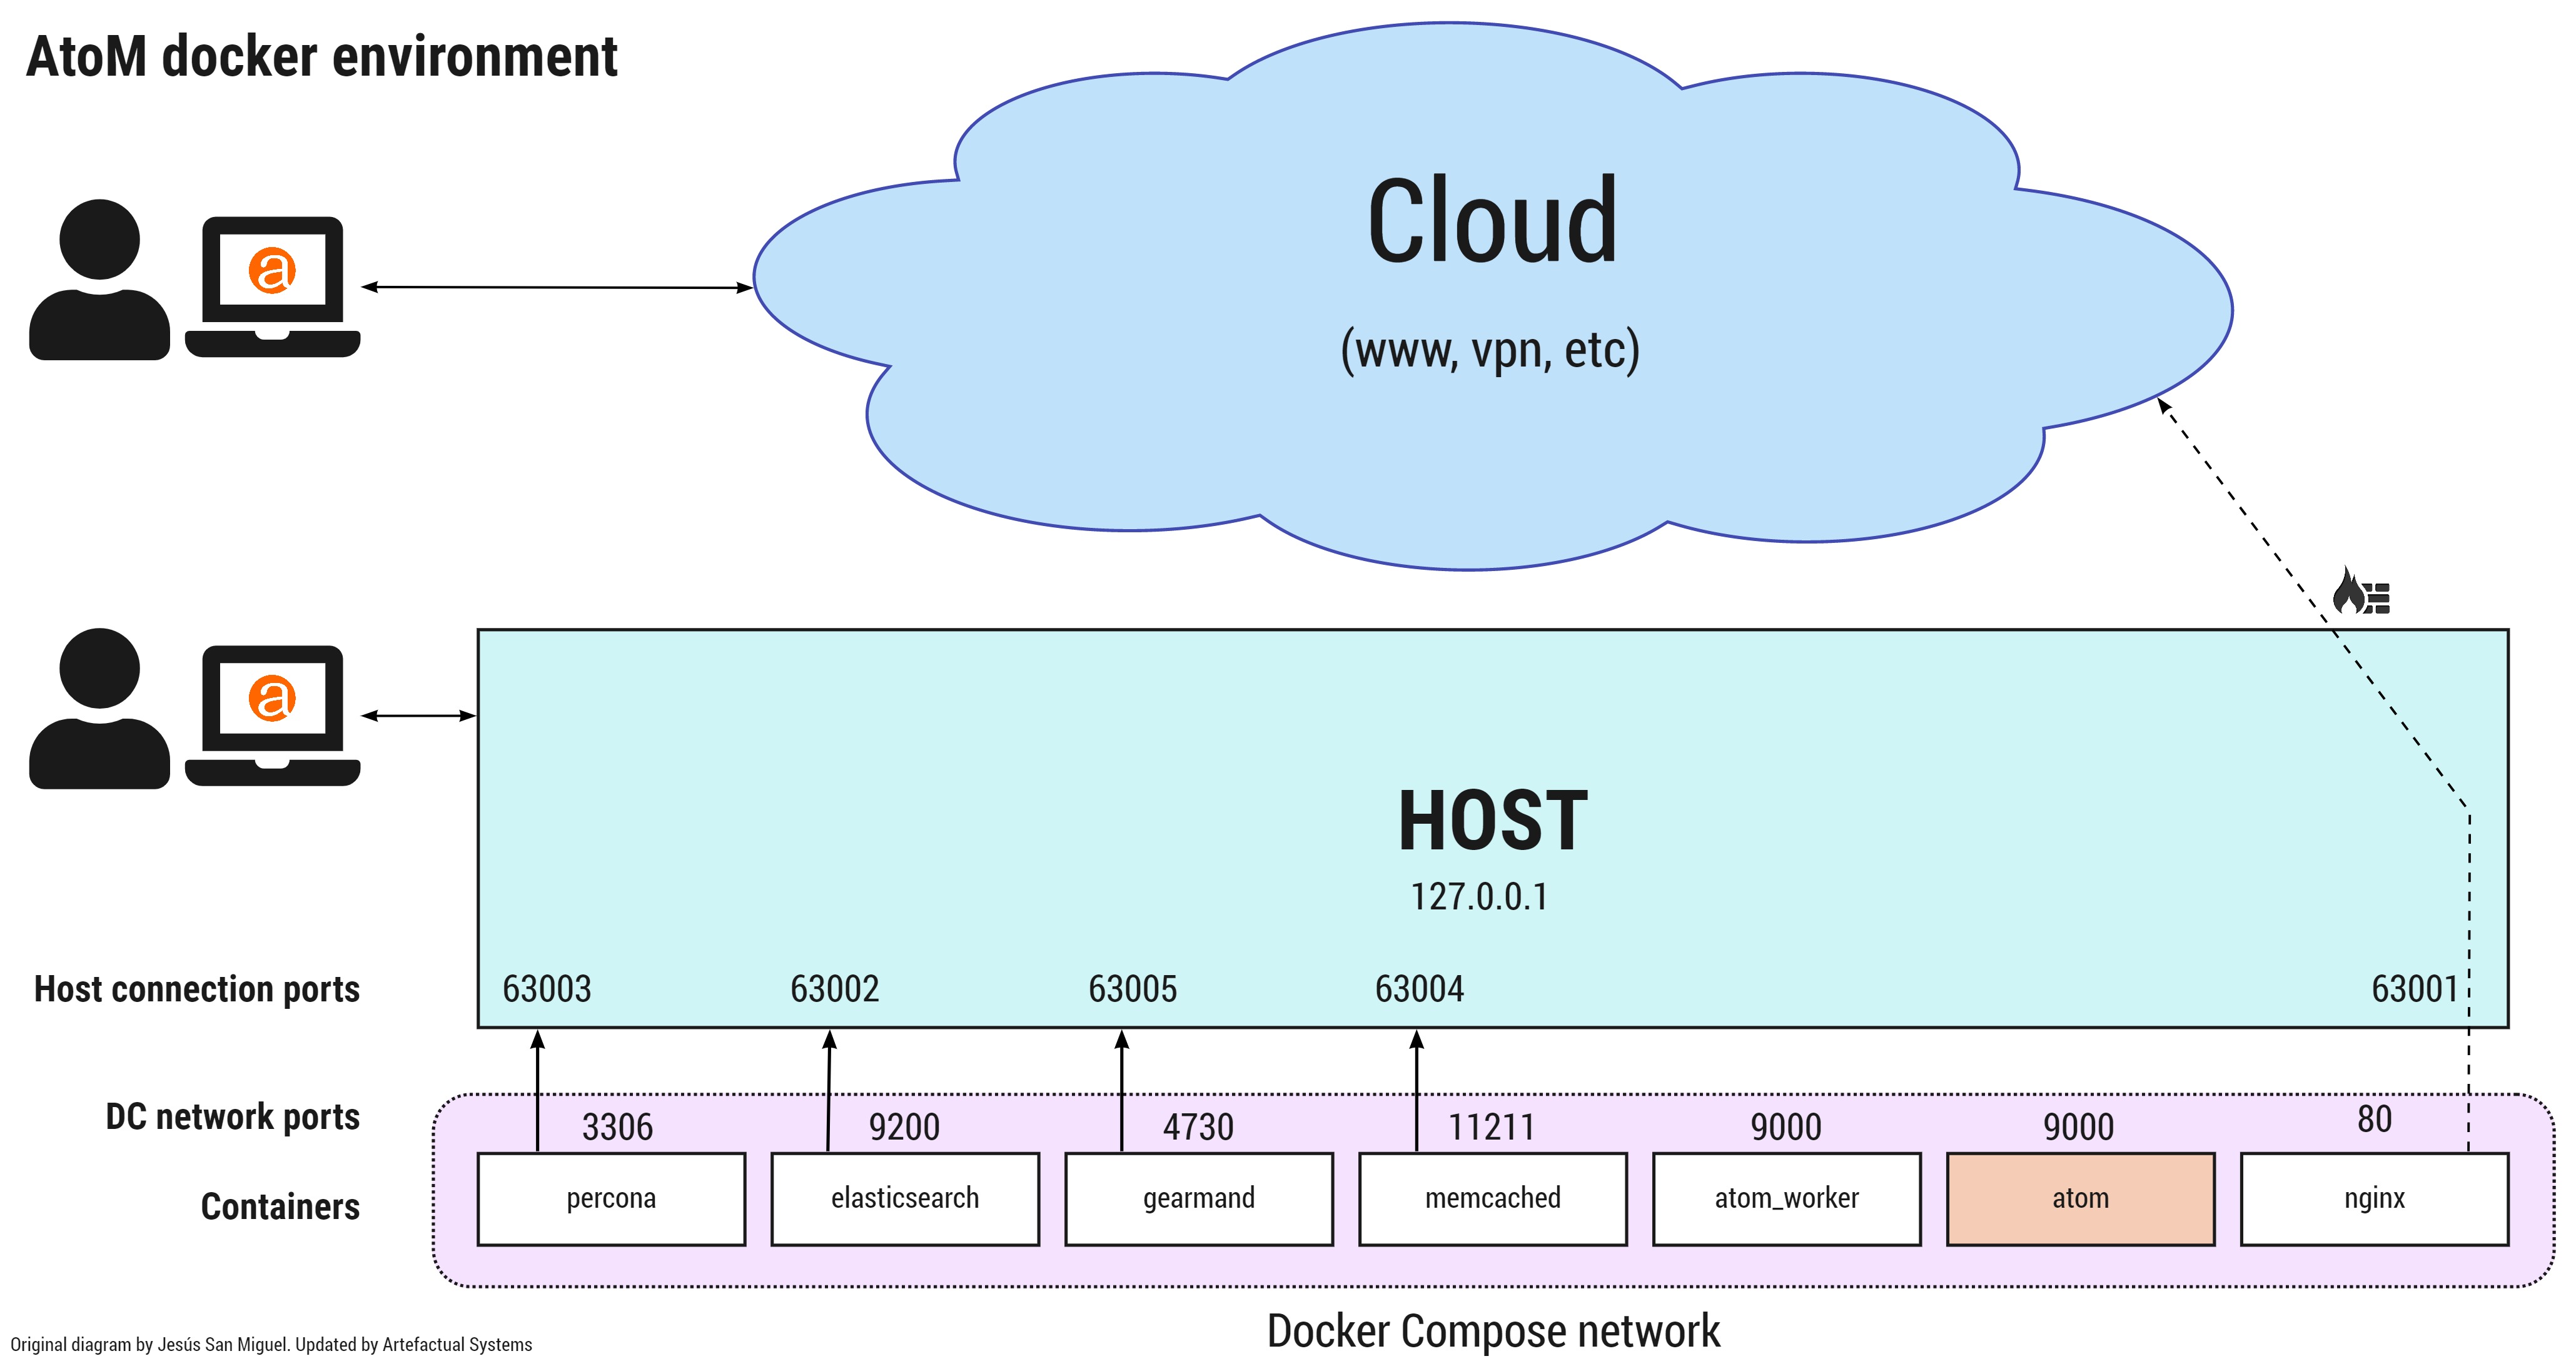
AtoM should be now accessible from your browser. To connect from the host, use the following address: http://localhost:63001.
The default login details are:
- Username:
demo@example.com - Password:
demo
Monitoring
Extending the development environment, you can deploy an instance of
[Percona Monitoring and Management](https://www.percona.com/doc/percona-monitoring-and-management)
configured by default to collect metrics and query analytics data from the
MySQL server. To setup the PMM server and client services alongside all the
others you’ll need to indicate two Docker Compose files on the COMPOSE_FILE
environment variable:
export COMPOSE_FILE="$PWD/docker/docker-compose.dev.yml:$PWD/docker/docker-compose.pmm.yml"
Unless it has been changed with the COMPOSE_PATH_SEPARATOR environment
variable, on Linux and macOS the separator is :, on Windows it is ;.
Tip
In some cases the pmm_client service fails to start reporting the
following error:
[main] app already is running, exiting
You’ll need to fully recreate the container to make it work:
docker-compose rm pmm_client
docker-compose up -d
To access the PMM server interface, visit http://localhost:63006:
- Username:
pmm - Password:
pmm
Varnish Cache
The development environment can also be extended with a Varnish Cache container installed in front of Nginx. It’s configured to cache all and ignore cookies to simulate a read-only public site, and therefore authentication doesn’t work.
export COMPOSE_FILE="$PWD/docker/docker-compose.dev.yml:$PWD/docker/docker-compose.varnish.yml"
docker-compose up -d
To access AtoM through Varnish, visit http://localhost:63007.
Tip
To see the Varnish logs use:
docker-compose exec varnish varnishlog