Web analytics
According to Wikipedia, web analytics is “the measurement, collection, analysis and reporting of internet data for purposes of understanding and optimizing web usage.”
There are two main technological approaches to collecting the data: logfile analysis, which reads the logfiles in which the web server records all its transactions; and page tagging, which uses JavaScript on each page to notify a third-party server when a page is rendered by a web browser.
Tip
If your analytics tracker is not working, try turning debugging on and off again via index.php. The analytics code should appear in ‘View Source’.
Logfile analysis tools
These types of tools require access to the log files generated by the web server.
- AWStats: http://awstats.sourceforge.net/
- Webalizer: http://www.webalizer.org/
Page tagging tools
The tools found under this section require a system administrator or developer to insert a JavaScript code snippet into the relevant page in AtoM where you’d like to gather analytic data. Probably the best known open source solution is Piwiki.
You should be able to configure any solution in AtoM by editing the corresponding PHP templates.
Google Analytics
As of AtoM 2.0.0, you can configure Google Analytics by adding your tracking ID to the file config/app.yml:
google_analytics_api_key: UA-XXXXX-X
Replace UA-XXXXX-X with your tracking ID. Once you are done, remember to clear the cache.
Google Analytics for tracking institutional pageviews
As of AtoM 2.5, it is possible to track pageviews for individual institutions who are sharing a multi-repository AtoM instance by adding a custom dimension to the tracking ID. Adding this dimension will set the authorized form of name from the source culture of the repository as the dimension value (e.g. for a repository where the source culture is English but translations into other languages are present, Analytics will use the English form of the authorized form of name).
- Description pages (all templates) use the repository value (direct or inherited)
- Actor pages use the maintaining repository value
- Repository pages use the repository’s authorized form of name value
Follow the instructions provided in Google’s Analytics Help pages to Set up custom dimension. When you reach step 6, Select the scope, choose Hit as the scope and set it to active. Once you have completed all the steps, the custom dimension will be displayed in a table. The index number is displayed in the column Index.
In the file config/app.yml, set the newly-created dimension index number below the API key and make sure that the setting is uncommented.
google_analytics_api_key: UA-XXXXX-X
google_analytics_institutions_dimension_index: 1
Remember to clear the cache and restart PHP-FPM after configuration.
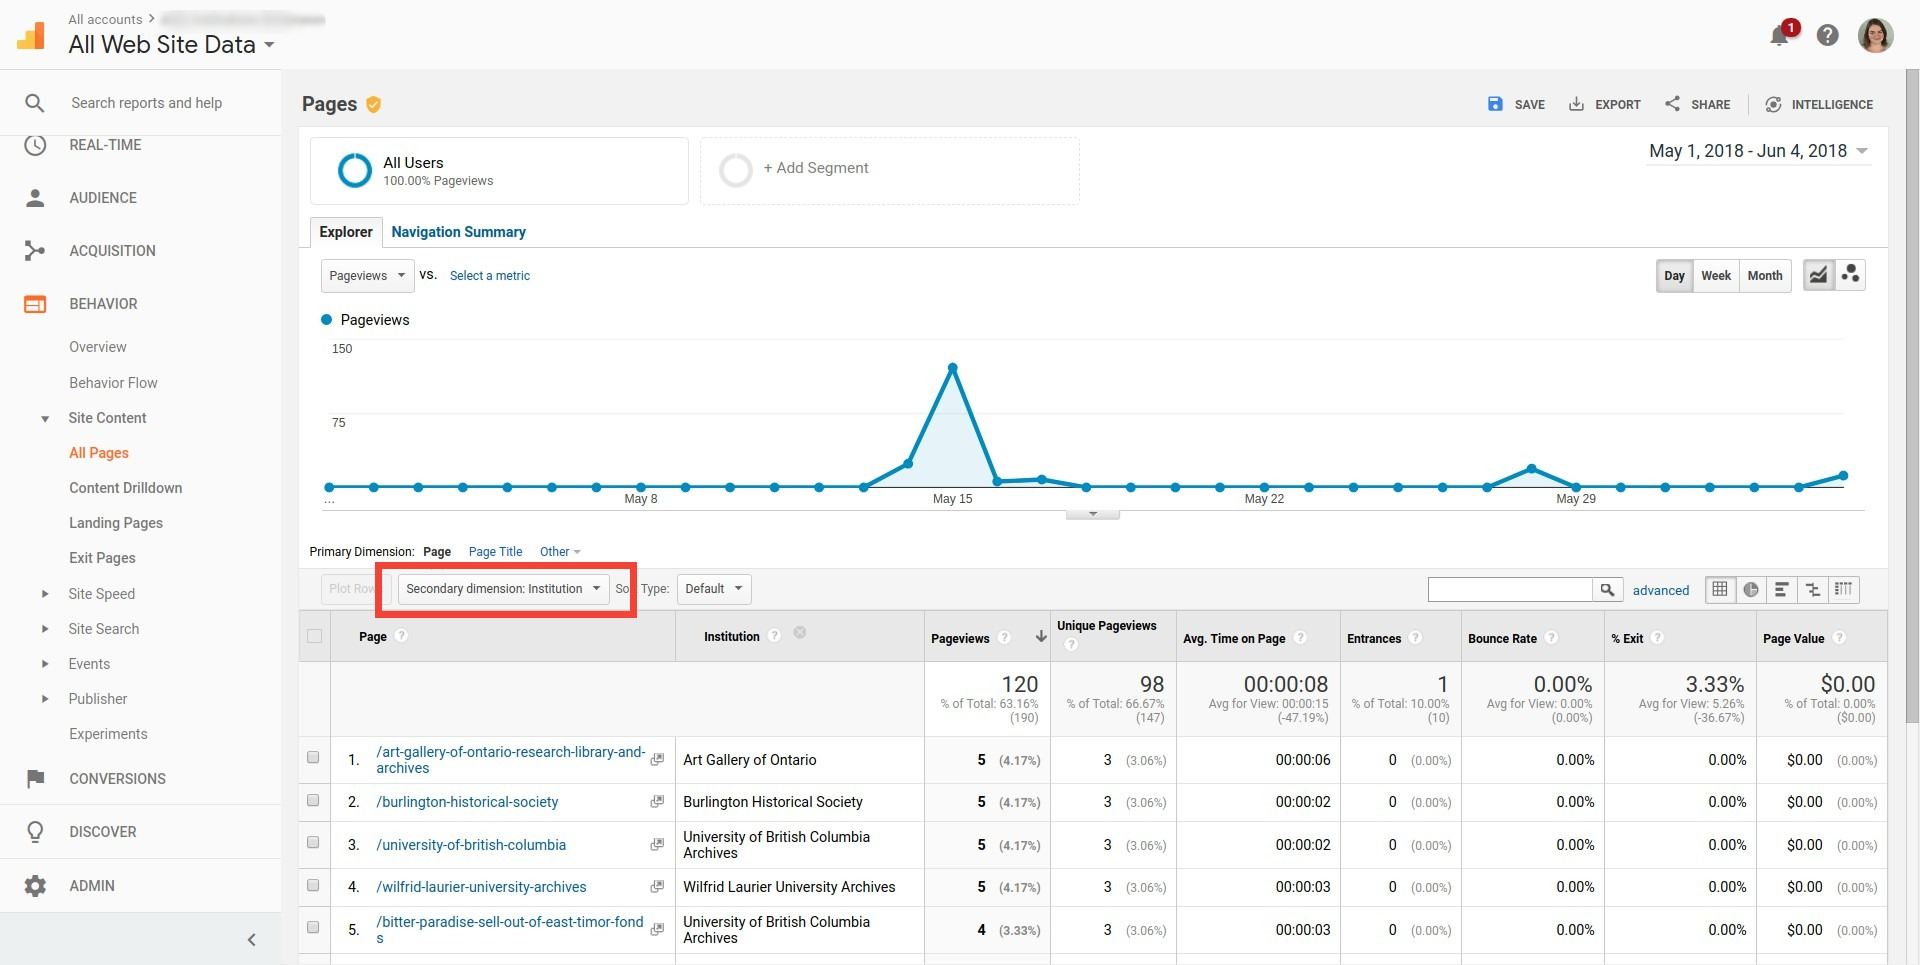
Viewing Google Analytics institutional pageview data
There are several ways to visualize analytics data in the Google Analytics dashboard. You can view institution names in the page views table:
In the Google Analytics dashboard left sidebar, select Behaviour.
Under Site Content, select All pages.
In the main body of the page, below the graph showing page hits, open the Secondary dimension dropdown and select Custom Dimensions, then your dimension.
A new column should appear in the table below, with the name of the custom dimension as the column header. Clicking on the column header will sort the table alphabetically by institution.
You can export this data by clicking the Export button in the top right.
It is also possible to create a custom report that displays the total number of pageviews for each institution:
- In the Google Analytics dashboard left sidebar, select Customization, followed by Custom Reports.
- Select New custom report.
- Give the report a title and following parameters:
- Name: The default name is fine; if you want to add more tabs to the resulting output, you can change it to a more specific name.
- Type: Select Flat Table
- Dimensions: Click on + add dimension and select Page (under Behaviour); repeat and select Institution (under Custom Dimension)
- Metrics: Click on + add metric and select Pageviews (under Users)
- Click Save. The report will be displayed and can be exported by clicking the Export button in the top right.
- You can save this report for future review by clicking on the Save button in the top right.