Command line tools
There are a number of command line tools that can help you troubleshoot various AtoM problems, as well as perform actions typically not supported in the user interface.
See also
- Populate search index
- Clear cache
- Load digital objects via the command line
- Import and export from the command-line
- Web server logs
- Troubleshooting
- Common AtoM database queries
We also have a slides of many of our command-line tasks. See:
Find out what version of AtoM you’re running
You can always find out what version of AtoM you have installed via the user interface by navigating to Admin > Settings > Global - the application version is the first thing listed on the Settings page. See: Application version for more information.
However, if you’d like to check the application version from the command-line, you can run the following command from AtoM’s root folder:
php symfony tools:get-version
Add a SuperUser (Admin) account
You can create a new administrator account from the command-line using the following command:
php symfony tools:add-superuser --email="youremail@example.com" --password="MYSUPERPASSWORD" <username>
The username should not have any spaces in it.
If you’d like to quickly create a user for demonstration, diagnostic purposes, you can use the following command:
php symfony tools:add-superuser –demo
This will create a superuser with username “demo”, email “demo@example.com”, and password “demo”.
Promote a user to an administrator
If you’d like to promote a user account in AtoM to have full administrator access privileges via the command-line, you can use the following task. You will need to know the user name of the account.
php symfony tools:promote-user-to-admin <username>
If the user doesn’t exist you’ll see the following error:
Unknown user.
If the user is already an administrator:
The given user is already an administrator.
If the operation succeeds:
The user <username> is now an administrator.
See also
For more information on user permissions, user roles, and how to manage them, see:
Change a password
If you need to change the password on a user account in AtoM, you can do so via the command-line.
php symfony tools:reset-password [--activate] username [password]
The username is a required value, while the password is optional - if no password is entered, AtoM will generate an 8-character temporary password to be used for the user account. AtoM will return the new password in the command-line.
Warning
We strongly recommend that these auto-generated passwords ONLY be used temporarily! They are not strong passwords - users should generate longer passwords that include special characters. For more information, see:
If the user account is currently marked inactive in the system (see
Mark a user “Inactive” for more information), you can also use the option
--activate to mark that account as active again.
See also
You can also manage user passwords through the user interface. For more information, see:
Delete a user account from the command-line
AtoM provides a method to delete a user account via the user interface, but you can also delete a user directly from the command-line interface. To do so, you will need to know the username of the user you wish to delete. The basic syntax for the command is:
php symfony tools:delete-user <username>
By typing php symfony help tools:delete-user into the console, we can see
the help text and options associated with this task:
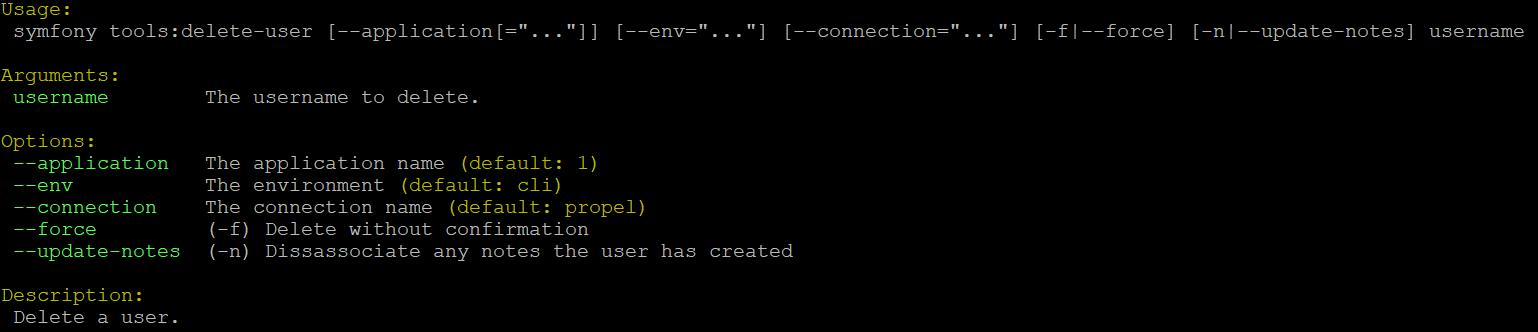
The --application, --env, and connection options should not be
used - AtoM requires the uses of the pre-set defaults for symfony to be
able to execute the task.
The command, when run, will normally prompt you for comfirmation before
proceeding. However, if you wish to skip the confirmation step, you can use the
--force or -f option.
Additionally, if the user has added notes (e.g. General notes; RAD special notes such as Accompanying material notes; Archivists’ notes; etc.) to an archival description, then by default, the user ID of that user is associated with the note in the database. Because of this, AtoM will not let you delete a user without first removing the user association from the notes, and the task will be aborted without delting the user account:
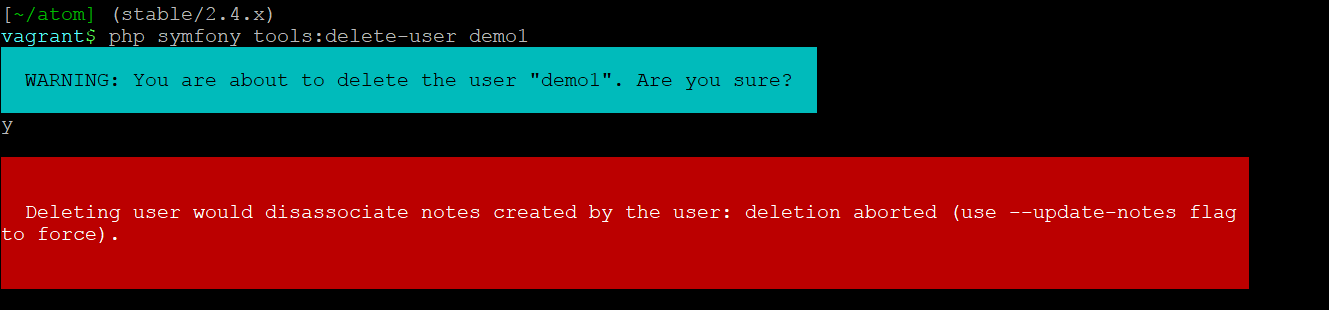
To remove the user association with the notes so the task can proceed, you can use
the --update-notes (or -n for short) option. When this is used, any notes
associated with the user in the database will be updated so the user field is
NULL, and the user account can now be deleted. Any notes created by the user
will remain in the system, unaffected by the deletion.
Important
The task will not allow you to delete a user account if it is the only administrator account in the system. If you wish to do so, you can use the other available tasks to create a new user and/or promote an existing user to the administrator group. See:
Here is an example of running the task with both options (force and update-notes)
used together, where the user being deleted has a username of demo:
php symfony tools:delete-user -f -n demo
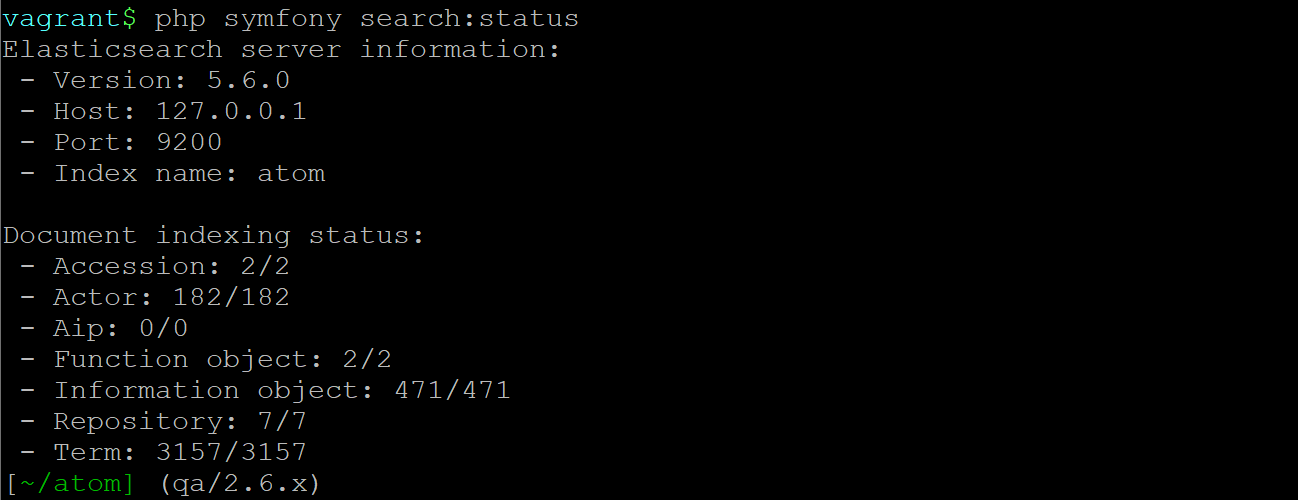
Check the status of your Elasticsearch index
This task will allow a system administrator to review the status of AtoM’s Elasticsearch index without having to access any configuration files. The task output will include:
- Installed Elasticsearch version
- Search host
- Port
- Index name
- Document index status for all primary entity types in AtoM (including Accession, Actor, AIP, Function, Information object, Repository, and Term)
The task should be run from AtoM’s root installation directory. It will not make any changes, but can provide useful information when troubleshooting issues or seeking support. To run the task:
php symfony search:status
Sample response:
See the search index output for a description
This task will output the full search index of a particular archival description, which can be useful for determining index mappings, or troubleshooting why a search is not returning the expected results. The task takes the slug of a target description as input. Basic syntax:
php symfony search:document your-slug-here
Where your-slug-here in the example above represents the slug of the
target description. Sample output:
{
    "findingAid": {
        "transcript": null,
        "status": null
    },
    "slug": "example-fonds",
    "parentId": "1",
    "identifier": "F1",
    "referenceCode": "F1",
    "referenceCodeWithoutCountryAndRepo": "F1",
    "levelOfDescriptionId": "2002760",
    "publicationStatusId": "160",
    "lft": "808",
    "alternativeIdentifiers": [
        {
            "label": "Alternate identifier label 1",
            "identifier": "ALT-ID1"
        },
        {
            "label": "Alternative identifer label 2",
            "identifier": "ALT-ID2"
        }
    ],
    "ancestors": [
        1
    ],
    "children": [
        "2013948"
    ],
    "digitalObject": {
        "mediaTypeId": "136",
        "usageId": "166",
        "filename": "cat.jpg",
        "thumbnailPath": "\/uploads\/r\/example-repository\/1\/4\/7\/14733117bf539c20ab6d4596b2842eeb9314d6cf48cabad809b90c455ef377b0\/cat_142.jpg",
        "digitalObjectAltText": null
    },
    "hasDigitalObject": true,
    "dates": [
        {
            "startDate": "2015-01-01",
            "startDateString": "2015-01-01",
            "endDate": "2016-12-31",
            "endDateString": "2016-12-31",
            "actorId": "2013941",
            "typeId": "111",
            "sourceCulture": "en",
            "i18n": {
                "languages": [
                    "en"
                ],
                "en": {
                    "date": "January 1, 2015 - December 31, 2016"
                }
            }
        },
        {
            "startDate": "2016-01-01",
            "startDateString": "2016",
            "endDate": "2016-12-31",
            "endDateString": "2016",
            "actorId": "2013943",
            "typeId": "118",
            "sourceCulture": "en",
            "i18n": {
                "languages": [
                    "en"
                ],
                "en": {
                    "date": "2016"
                }
            }
        }
    ],
    "startDateSort": "2015-01-01",
    "endDateSort": "2016-12-31",
    "repository": {
        "id": "2013921",
        "slug": "example-repository",
        "identifier": null,
        "i18n": {
            "languages": [
                "en"
            ],
            "en": {
                "authorizedFormOfName": "Example Repository"
            }
        }
    },
    "directPlaces": [
        "2013929",
        "2013930"
    ],
    "places": [
        {
            "id": "2013929",
            "slug": "place-access-point-1",
            "taxonomyId": "42",
            "isProtected": false,
            "numberOfDescendants": 0,
            "createdAt": "2020-05-29T13:58:10Z",
            "updatedAt": "2020-05-29T13:58:10Z",
            "sourceCulture": "en",
            "i18n": {
                "languages": [
                    "en"
                ],
                "en": {
                    "name": "Place access point 1"
                }
            }
        },
        {
            "id": "2013930",
            "slug": "place-access-point-2",
            "taxonomyId": "42",
            "isProtected": false,
            "numberOfDescendants": 0,
            "createdAt": "2020-05-29T13:58:10Z",
            "updatedAt": "2020-05-29T13:58:10Z",
            "sourceCulture": "en",
            "i18n": {
                "languages": [
                    "en"
                ],
                "en": {
                    "name": "Place access point 2"
                }
            }
        }
    ],
    "directSubjects": [
        "2013925",
        "2013926"
    ],
    "subjects": [
        {
            "id": "2013925",
            "slug": "subject-access-point-1",
            "taxonomyId": "35",
            "isProtected": false,
            "numberOfDescendants": 0,
            "createdAt": "2020-05-29T13:58:10Z",
            "updatedAt": "2020-05-29T13:58:10Z",
            "sourceCulture": "en",
            "i18n": {
                "languages": [
                    "en"
                ],
                "en": {
                    "name": "Subject access point 1"
                }
            }
        },
        {
            "id": "2013926",
            "slug": "subject-access-point-2",
            "taxonomyId": "35",
            "isProtected": false,
            "numberOfDescendants": 0,
            "createdAt": "2020-05-29T13:58:10Z",
            "updatedAt": "2020-05-29T13:58:10Z",
            "sourceCulture": "en",
            "i18n": {
                "languages": [
                    "en"
                ],
                "en": {
                    "name": "Subject access point 2"
                }
            }
        }
    ],
    "directGenres": [
        "2013933",
        "2013934"
    ],
    "genres": [
        {
            "id": "2013933",
            "slug": "genre-access-point-1",
            "taxonomyId": "78",
            "isProtected": false,
            "numberOfDescendants": 0,
            "createdAt": "2020-05-29T13:58:10Z",
            "updatedAt": "2020-05-29T13:58:10Z",
            "sourceCulture": "en",
            "i18n": {
                "languages": [
                    "en"
                ],
                "en": {
                    "name": "Genre access point 1"
                }
            }
        },
        {
            "id": "2013934",
            "slug": "genre-access-point-2",
            "taxonomyId": "78",
            "isProtected": false,
            "numberOfDescendants": 0,
            "createdAt": "2020-05-29T13:58:10Z",
            "updatedAt": "2020-05-29T13:58:10Z",
            "sourceCulture": "en",
            "i18n": {
                "languages": [
                    "en"
                ],
                "en": {
                    "name": "Genre access point 2"
                }
            }
        }
    ],
    "names": [
        {
            "id": "2013937",
            "i18n": {
                "languages": [
                    "en"
                ],
                "en": {
                    "authorizedFormOfName": "Name access point 1"
                }
            }
        },
        {
            "id": "2013939",
            "i18n": {
                "languages": [
                    "en"
                ],
                "en": {
                    "authorizedFormOfName": "Name access point 2"
                }
            }
        },
        {
            "id": "2013943",
            "i18n": {
                "languages": [
                    "en"
                ],
                "en": {
                    "authorizedFormOfName": "Accumulator (ISAD 3.2.1)"
                }
            }
        }
    ],
    "creators": [
        {
            "id": "2013941",
            "slug": "creator-isad-3-2-1",
            "entityTypeId": null,
            "hasDigitalObject": false,
            "descriptionIdentifier": null,
            "corporateBodyIdentifiers": null,
            "actorRelations": [],
            "createdAt": "2020-05-29T13:58:10Z",
            "updatedAt": "2020-05-29T13:58:10Z",
            "sourceCulture": "en",
            "i18n": {
                "languages": [
                    "en"
                ],
                "en": {
                    "authorizedFormOfName": "Creator (ISAD 3.2.1)",
                    "history": "Example fonds Creator history (ISAD 3.2.2). Note that this will be added to the related authority record for Creator (ISAD 3.2.1)."
                }
            }
        }
    ],
    "physicalObjects": [
        {
            "sourceCulture": "en",
            "i18n": {
                "languages": [
                    "en"
                ],
                "en": {
                    "name": "Example Shelf",
                    "location": "Example Shelf Location"
                }
            }
        }
    ],
    "generalNotes": [
        {
            "sourceCulture": "en",
            "i18n": {
                "languages": [
                    "en"
                ],
                "en": {
                    "content": "Example fonds General note (ISAD 3.6.1)"
                }
            }
        },
        {
            "sourceCulture": "en",
            "i18n": {
                "languages": [
                    "en"
                ],
                "en": {
                    "content": "Example fonds General note 2"
                }
            }
        }
    ],
    "archivistsNotes": [
        {
            "sourceCulture": "en",
            "i18n": {
                "languages": [
                    "en"
                ],
                "en": {
                    "content": "Example fonds Archivist's notes (ISAD 3.7.1)"
                }
            }
        }
    ],
    "actRights": [],
    "basisRights": [],
    "createdAt": "2020-05-29T13:58:10Z",
    "updatedAt": "2020-05-29T13:58:10Z",
    "sourceCulture": "en",
    "i18n": {
        "languages": [
            "en"
        ],
        "en": {
            "title": "Example fonds",
            "extentAndMedium": "Example fonds Extent and medium (ISAD 3.1.5)",
            "archivalHistory": "Example fonds Archival history (ISAD 3.2.3)",
            "acquisition": "Immediate source of acquisition or transfer (ISAD 3.2.4)",
            "scopeAndContent": "Example fonds Scope and content (ISAD 3.3.1)",
            "appraisal": "Example fonds Appraisal, destruction and scheduling (ISAD 3.3.2)",
            "accruals": "Example fonds Accruals (ISAD 3.3.3)",
            "arrangement": "Example fonds System of arrangement (ISAD 3.3.4)",
            "accessConditions": "Example fonds Conditions governing access (ISAD, 3.4.1)",
            "reproductionConditions": "Example fonds Conditions governing reproduction (ISAD 3.4.2)",
            "physicalCharacteristics": "Example fonds Physical characteristics and technical requirements (ISAD 3.4.4)",
            "findingAids": "Example fonds Finding aids (ISAD 3.4.5)",
            "locationOfOriginals": "Example fonds Existence and location of originals (ISAD 3.5.1)",
            "locationOfCopies": "Example fonds Existence and location of copies (ISAD 3.5.2)",
            "relatedUnitsOfDescription": "Example fonds Related units of description (ISAD 3.5.3)",
            "institutionResponsibleIdentifier": "Example fonds Institution identifier (Control area)",
            "rules": "Example fondsRules or conventions (ISAD 3.7.2)",
            "sources": "Example fonds Sources (Control area)",
            "revisionHistory": "Example fonds Dates of creation, revision and deletion (Control area)"
        }
    }
}
See also
Regenerating derivatives
If you are upgrading to AtoM 2 from ICA-AtoM, the digital object derivatives (i.e. the reference display copy and the thumbnail generated by AtoM when a master digital object is uploaded) are set to be a different default size (i.e. they are larger in AtoM) - consequently, after an upgrade, derivatives from ICA-AtoM may appear blurry or pixellated. Alternatively, if you have changed the Digital object derivatives settings, you might want to regenerate your derivatives so that the new setting is used for multi-page content such as PDF derivatives.
As well, sometimes the digitalobject:load task used for importing digital
objects to existing descriptions (see:
Load digital objects via the command line) won’t generate the thumbnail and
reference images properly for digital objects that were loaded (e.g. due to a
crash or absence of convert being installed, etc. - see under requirements,
Other dependencies). In this case, you can regenerate
these thumbsnail/reference images using the following command:
php symfony digitalobject:regen-derivatives
By typing php symfony help digitalobject:regen-derivatives into the
command-line, you can see the options available for this task:
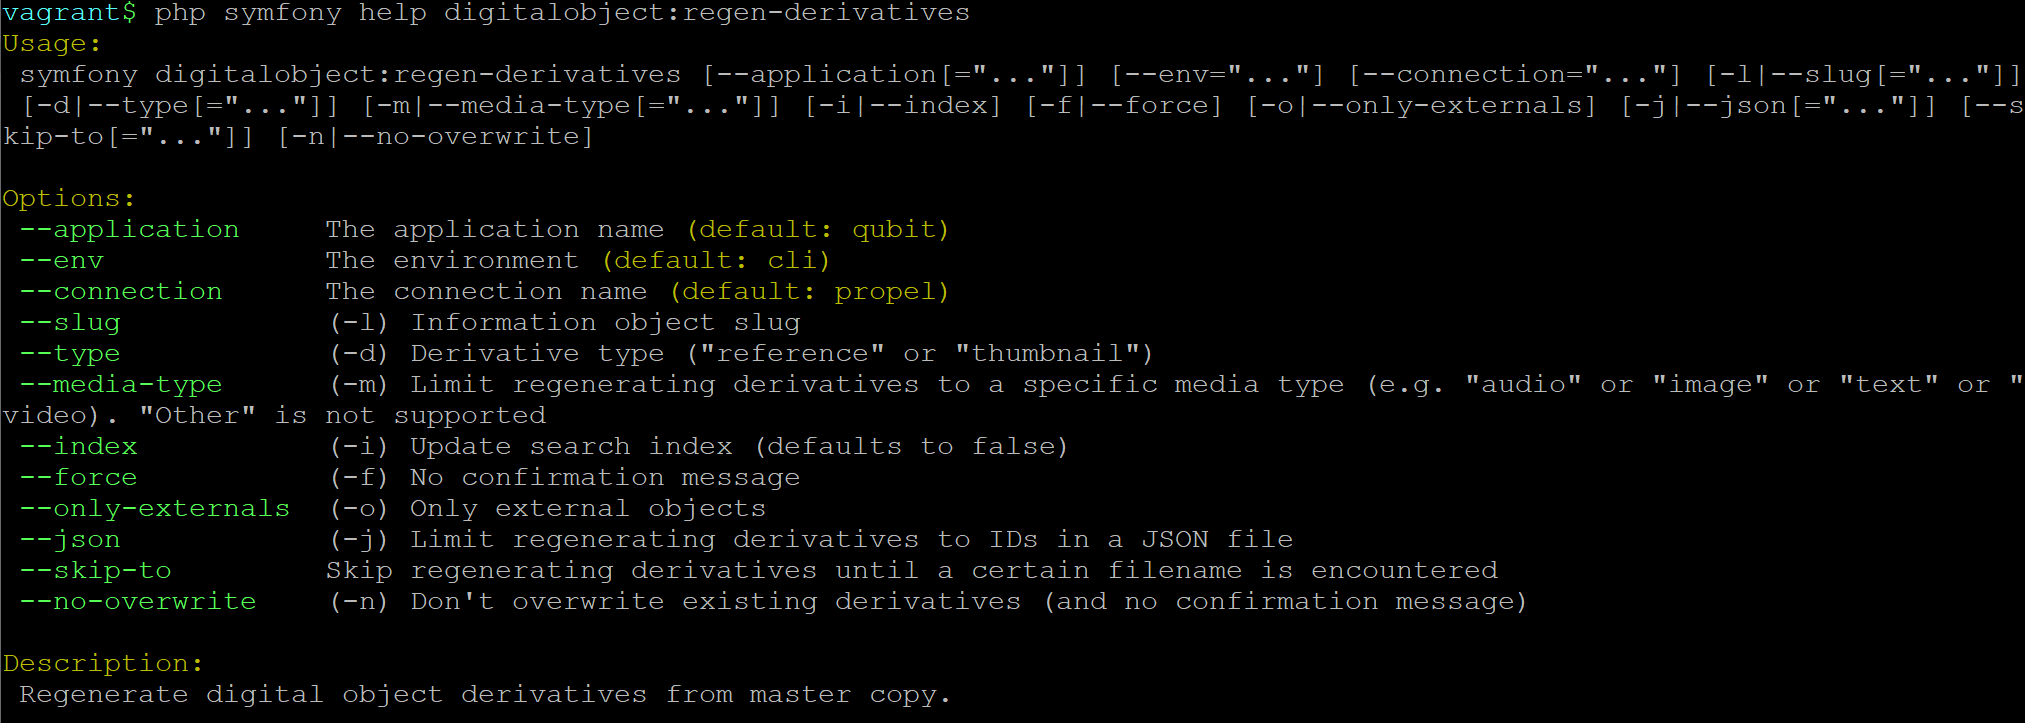
The --application, --env, and connection options should not be
used - AtoM requires the uses of the pre-set defaults for symfony to be
able to execute the task.
The --index option is used to enable the rebuilding of the search index as
part of the regeneration task. When running this task via the command-line
interface, indexing is disabled by default to allow the task to progress
more quickly - generally, we recommend manually clearing the cache and
rebuilding the search index following the use of this task - to do so,
from AtoM’s root directory, run:
php symfony cc && php symfony search:populate
However, if you would like to re-index as the derivative regeneration progresses,
the --index option can be used to enable this. For more information on
populating the search index, see: Populate search index.
The --slug option can be used to target specific derivatives associated with
a description, using the description’s slug as criteria. Any
digital object attached or linked to the description whose slug is
provided as criteria will have its derivatives regenerated. Example use:
php symfony digitalobject:regen-derivatives --slug="the-jane-doe-fonds"
The --type option (or -d for derivative type) can be used if you only
want to regenerate one type of digital object derivative - either the
reference display copy used on the view page of related archival
descriptions, or the thumbnail used in search and browse results. Supported
parameters are:
- reference
- thumbnail
So, for example, if you only wanted to regenerate your thumbnails, you could execute the command like so:
php symfony digitalobject:regen-derivatives --type="thumbnail"
Similarly, the --media-type (or -m) option can be use to limit the
regeneration to a specific media type. AtoM uses 5 media types: audio, video,
image, text, and other; the application displays the media type for each digital object in
the Digital object metadata area on the
view page of the associated archival description. This task will
only work with the first 4 types - currently “other” is not supported.
For example, if you only wanted to regenerate derivatives for your uploaded videos, you could execute the command like so:
php symfony digitalobject:regen-derivatives --media-type="video"
The --force or -f option can be used to skip the warning normally
delivered by the task when the command is entered. Because the task will delete
ALL previous derivatives - including those manually altered by editing the
thumbnail or reference display copy of a digital object via the
user interface (see: Edit digital objects for more information) - the task
will normally ask for confirmation when invoked:

However, experienced developers and system administrators can skip having to
manually confirm the procedure by using the --force (or -f for short)
option as part of the command.
The --only-externals (or -o for short) option can be used if you would
only like to attempt to regenerate the local derivatives for linked digital
objects - that is, those that have been linked via an external URI, rather than
by uploading a master digital object. For more information on linking
digital objects, see: Link a single digital object to an archival description.
The --skip-to option is useful when the task is interrupted, such as when
an error is encountered mid-process that ends the task. As the task
progresses during normal execution, it will output information about the
current digital object filename it is working on. If the task interrupts
(for example, trying to fetch a large external digital object, the task might
time out), a system administrator can use this option to resume the task
where it interrupts. Example:
$ php symfony digitalobject:regen-derivatives

Regenerating derivatives for file1.jpg...
Regenerating derivatives for file2.jpg...
Regenerating derivatives for file3.jpg...

<timeout error occurs>

$ php symfony digitalobject:regen-derivatives --skip-to='file3.jpg'

Regenerating derivatives for file3.jpg...
<task continues where it left off>
The --json or -j option is for advanced users who would like to target
only a specific subset of digital objects for regeneration. With this option, a
user can supply the path to a JSON file that lists the internal
digital_object ID’s associated with the digital objects targeted and stored in
AtoM’s database. These digital_object ID’s will first need to be determined
by crafting an SQL query designed to meet your specific criteria. Help crafting
these queries is not covered here (though see Common AtoM database queries, for a
basic introduction to SQL queries in AtoM) - in general, we only recommend this
task be used by experienced administators.
Once you have determined the IDs of the digital objects you would like to target with the task, you can place them in square brackets in a JSON file, separated by commas, like so:
[372, 366, 423, 117]
(etc)
The criteria for the --json option then becomes the path to your JSON file:
php symfony digitalobject:regen-derivatives --json="path/to/my.json"
Warning
When running the regen-derivatives task, all of your current derivatives
for the targeted digital objects will be deleted - meaning ALL of them if you
provide no criteria such as a slug or a JSON file. They will be replaced
with new derivatives after the task has finished running. If you have
manually changed the thumbnail or reference display copy
of a digital object via the user interface (see:
Edit digital objects), these two will be replaced with digital
object derivatives created from the master digital object.
Finally, the --no-overwrite or -n option can be used if you only want to
generate derivatives where they are currently missing. All existing derivatives
will be left as-is in AtoM. When this option is used, no confirmation prompt is
given: the task will begin generating missing derivatives as soon as you enter
it in the console.
Re-indexing PDF text
php symfony digitalobject:extract-text
In rare situations you may want to to re-index all PDFs to make their text searchable in AtoM without having to re-import them completely. This task will go through each existing PDF imported into AtoM and re-index their contents for searches.
For linked digital objects (e.g. PDFs that are linked from a publicly accessible URI, instead of uploaded locally - see for example: Link a single digital object to an archival description), this task will re-fetch a version of the external PDF and store it in a temporary file, re-index the contents, and then purge the local master after the indexing is complete.
Tip
Large PDFs may cause 500 errors if you do not first adjust the download
timeout limit. You can do this by changing the value in the app.yml file
located in /config/app.yml. The default timeout value in AtoM is 10s. You
should also clear the cache after making changes to the app.yml file:
php symfony cc
Rebuild the nested set
AtoM generally uses a relational database to store its data (we recommend MySQL). However, relational databases, which are comprised of flat tables, are not particularly suited to handling hierarchical data. As developer Mike Hillyer notes, “Hierarchical data has a parent-child relationship that is not naturally represented in a relational database table.” One method of addressing this is to employ a “Nested set model” (Wikipedia). AtoM makes use of a nested set to manage hierarchical relationships, such as between parent and child terms and descriptions.
Sometimes, during operations that involve updates to large hierarchies, the nested set can become corrupted - especially if the server times out during an operation that reaches the execution limit settings. The following task will rebuild all nested sets in AtoM:
php symfony propel:build-nested-set
Important
You should also run the search:populate task to re-index your site
after rebuilding the nested set. For more information and task options, see:
This task also includes one option that can be used to exclude certain
entity types from the task’s execution. The --exclude-tables option
supports the following options:
- information_object
- term
- menu
Multiple options can be passed by separating them with a comma. Example use - if you only wanted to rebuild the nested set for information objects (AKA archival descriptions), then you can exclude the term and menu rebuilds like so:
php symfony propel:build-nested-set --exclude-tables="term,menu"
Example output:

Generate slugs
In some cases, AtoM may time out in the middle of an operation that involves the creation of new records - for example, if a user attempts to import a very large CSV file through the user interface (rather than the command-line - see: CSV import). In such cases, it is possible that AtoM has died after creating an information object, but before having a chance to create a slug for the record. This can cause unexpected errors in the application - most notably, 500 errors when trying to access the records missing slugs through the application interface.
If you want to generate slugs for records in AtoM without them, you can use the following command:
php symfony propel:generate-slugs
Important
You should also run the search:populate task to re-index your site
after generating slugs. For more information and task options, see:
This task will work for the following entities:
- information objects (e.g. archival descriptions)
- actors (e.g. authority records)
- terms
- taxonomies
- physical objects (e.g. storage locations, etc)
- events (e.g. creation events, etc - usually the relationship between actors and information objects)
- accession records
- deaccession records
- digital objects
- functions
- rights records
- static pages
- relations (e.g. relations between objects - i.e. relating two descriptions, relating an information object to a digital object, relating an information object to a physical storage location, relating two actors, etc)
If an error has left other areas in AtoM without slugs (for example, a donor record, etc), this task will not resolve the issue - you will likely have to manually insert a slug into the database for that entity.
For information objects, the generate slugs task will respect the global settings for the source from which description permalinks are created. These settings can be controlled by an administrator via the user interface - for more information, see:
- Generate description permalinks from.
- Use any valid URI path segment and uppercase character in slugs
Note that by default, existing slugs will not be replaced. If you want to generate new slugs for existing objects, you will need to first delete the existing slugs from the database. This can be useful for records in which a random slug has been automatically assigned, because the default user data used to generate the slug has not been provided (see below for more information on how slugs are generated in AtoM).
However, if you would like to replace all existing slugs with newly
generated slugs, you can use the --delete option, like so:
php symfony propel:generate-slugs --delete
Important
This will replace all custom slugs you may have created with the Rename module! For more information on the Rename module, see: Rename the title or slug of an archival description
Slugs can also be manually deleted via SQL queries. For further information on deleting slugs from AtoM’s database via SQL, see Common AtoM database queries - particularly, Delete slugs from AtoM.
Notes on slugs in AtoM
A slug is a word or sequence of words which make up the last part of a URL in AtoM. It is the part of the URL that uniquely identifies the resource and often is indicative of the name or title of the page (e.g.: in www.yourwebpage.com/about, the slug is about). The slug is meant to provide a unique, human-readable, permanent link to a resource.
In AtoM, all pages based on user data (such as archival descriptions, archival institutions, authority records, terms, etc.) are automatically assigned a slug based on the information entered into the resource:
| Entity type | Slug derived from |
|---|---|
| Archival description | Title or Reference code |
| Authority record | Authorized form of name |
| Accession | Identifier (accession number) |
| Users, Groups | Automatically generated |
| Other entities | Name |
By default in new installations, AtoM will “sanitize” slugs, removing spaces, special characters, punctuation, and capital letters. However, this behavior can be changed by an administrator to allow a more permissive slug generation pattern, where any UTF-8 character allowed by RFC 3987 in an Internationalized Resource Identifier (IRI) can be used. For more information, see:
When this permissive mode is enabled, AtoM will allow the following to be used in slugs:
- a-z, A-Z, and 0-9
- All unicode characters specified in RFC 3987, including characters with accents
- The following punctuation symbols:
, - _ ~ : = * @
Certain special characters are still reserved either as specified by IRI requirements or based on how AtoM generates URLs. Consequently, even when permissive mode is enabled, some sanitization will still take place. For example:
- Spaces will still be replaced by dashes
- Special characters not listed above will be stripped - examples include:
! ` " ' # $ / | \ + % ( ) { } [ ] . < > ?
When the permissive setting is set to “No” and slugs are being more comprehensively sanitized, generated slugs will only allow digits, letters, and dashes. Sequences of unaccepted characters (e.g. accented or special characters, etc.) are replaced with valid characters such as English alphabet equivalents or dashes. This conforms to general practice around slug creation - for example, it is “common practice to make the slug all lowercase, accented characters are usually replaced by letters from the English alphabet, punctuation marks are generally removed, and long page titles should also be truncated to keep the final URL to a reasonable length” (Wikipedia).
In AtoM, all slugs are truncated to a maximum of 250 characters. Case matters
for the uniqueness of a slug - for example: my-slug is not considered the
same as My-slug or My-Slug, which could all point to different records
in AtoM.
If a slug is already in use, AtoM will append a dash and an incremental number (a numeric suffix) to the new slug - for example, if the slug “correspondence” is already in use, the next record with a title of “correspondence” will receive the slug “correspondence-2”.
If a record is created without data in the field from which the slug is normally derived (e.g. an archival description created without a title), AtoM will assign it a randomly generated alpha-numeric slug. Once assigned, slugs for archival descriptions can be changed through the user interface. Slugs for other entity types cannot be changed through the user interface - either the record must be deleted and a new record created, or you must manipulate the database directly, or use the Generate slugs task described above.
Tip
Users can edit the slug associated with an archival description via the user interface. For more information, see:
Finally, static pages, or permanent links, include a slug field option, but only slugs for new static pages can be edited by users; the slugs for the default Home page and About page in AtoM cannot be edited. New static page slugs can either be customized by users or automatically generated by AtoM if the field is left blank; AtoM will automatically generate a slug that is based on the “Title” you have indicated for the new static page. For more information on static pages in AtoM, see: Manage static pages.
Note
Slugs such as “search” and “browse” are reserved for use in AtoM by the Search and Browse modules - if you create a static page, or even a description, with the slug “search”, it may interfere with your search results, redirecting to this new page instead of display your results! A simple workaround would be to iterate the slug (e.g. “search-1”) or alter it in some meaningful way (e.g. for a static page with tips on searching, changing the slug to “search-help”).
Tip
For developers interested in seeing the code where slugs are handled in
AtoM, see /lib/model/QubitSlug.php
Taxonomy normalization
A command-line tool will run through taxonomy terms, consolidating duplicate terms. If you’ve got two terms named “Vancouver” in the “Places” taxonomy, for example, it will update term references to point to one of the terms and will delete the others.
php symfony taxonomy:normalize [--culture=<culture>] <taxonomy name>
Task options
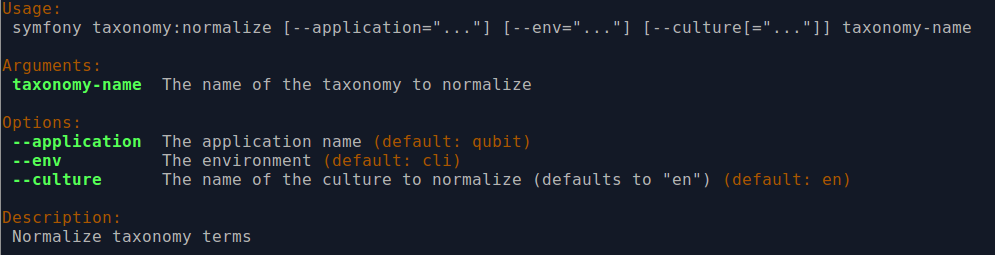
By entering php symfony help taxonomy:normalize into the command-line, you
see the options and descriptions available on this tool, as pictured above.
The --application, --env, and connection options should not be
used - AtoM requires the uses of the pre-set defaults for symfony to be
able to execute the import.
The --culture option on this command-line tool is optional - the default
value, if none is entered is en (English). The value you
enter for <culture> should be the default culture of the terms you wish to
normalize - in most cases this will be the default culture you set up when
installing AtoM (though depending on your imports and multi-lingual use of the
application, this may not always be true) The value, if needed, should be
entered using two-letter ISO 639-1 language code values - for example,
“en” for English; “fr” for French, “it” for Italian, etc.
See Wikipedia for a
full list of ISO 639-1 language codes.
The taxonomy name value should be entered as it is seen in the user interface in Manage > Taxonomies for the culture you want to normalize (i.e. if you are trying to normalize the French terms, then use the French name of the related taxonomy). This value is case sensitive. If the taxonomy name has spaces (i.e. if it is more than one word), use quotation marks around the taxonomy name.
Below is an example of running this command on French terms in the Description Details Level taxonomy:
php symfony taxonomy:normalize --culture="fr" "Niveaux de détail de la description"
You might also run this command on English terms in the Places taxonomy like so:
php symfony taxonomy:normalize Places
Manage physical storage locations
AtoM currently provides two command-line tasks that enable system administrators to manage physical object storage locations and to perform the following:
- Consolidate duplicated storage location information.
- Delete physical object storage locations not linked to any descriptions.
Normalize physical object data
The physical object normalization task aids in the management of containers in AtoM’s physical storage module. Specifically, this task identifies duplicate storage locations that share identical values in the container name, location, and type. When duplicates are identified, the oldest of this data (based on the createdAt timestamp in the database) will be preserved, and then all relations from the duplicate(s) are appended to that record before deletion. Running this task essentially aids in the consolidation of duplicate storage locations.
php symfony physicalobject:normalize
Task options
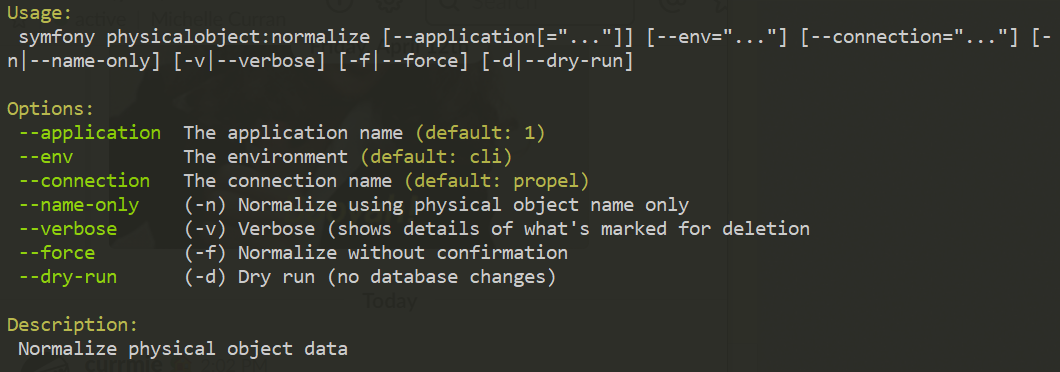
By entering php symfony help physicalobject:normalize into the command-line,
you see the options and descriptions available on this tool, as pictured above.
The --application, --env, and connection options should not be
used - AtoM requires the uses of the pre-set defaults for symfony to be
able to execute the import.
The --name-only option specifies that the task only should match and
consolidate based on the container’s name.
The --verbose option shows details of what is marked for deletion.
The --force option will enable normalization without confirmation.
The --dry-run option makes no database changes. The output will be a list
of containers that will be affected in the console, without actually merging
and deleting.
Delete unlinked physical object locations
Another tool that may be helpful for managing physical storage locations is a task to identify containers in the physical storage module that are not linked to any archival descriptions and then to delete them.
php symfony physicalobject:delete-unlinked
Task options
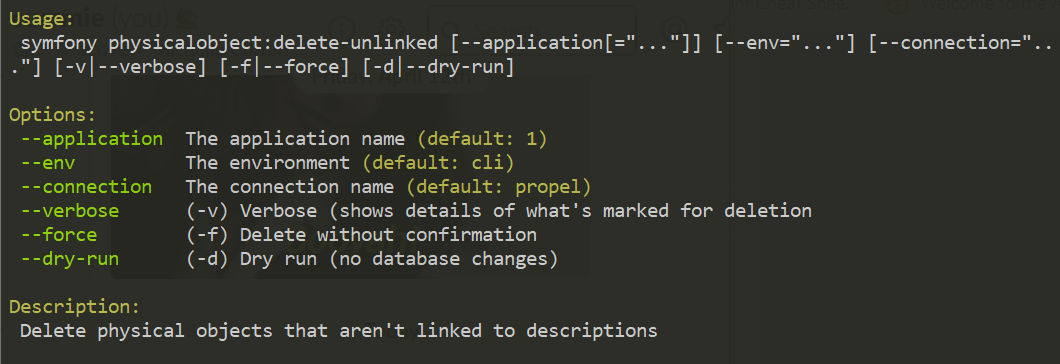
By entering php symfony help physicalobject:delete-unlinked into the
command-line, you see the options and descriptions available on this tool, as
pictured above.
The --application, --env, and connection options should not be
used - AtoM requires the uses of the pre-set defaults for symfony to be
able to execute the import.
The --name-only option specifies that the task only should match and
consolidate based on the container’s name.
The --verbose option shows details of what is marked for deletion.
The --force option will enable normalization without confirmation.
The --dry-run option makes no database changes. The output will be a list
of containers that will be affected in the console, without actually merging
and deleting.
Update the publication status of descriptions
In AtoM, an archival description can have publication status of either “Draft” or “Published”. The publication status of a record, which can be set to either draft or published, determines whether or not the associated description is visible to unauthenticated (i.e., not logged in) users, such as researchers. It can be changed via the user interface in the administration area of a description’s edit page by a user with edit permissions. See Publish an archival description for instructions on changing this via the user interface.
If you would like to change the publication status of a record via the command-line, you can use the following command-line tool, run from the root directory of AtoM. You will need to know the slug of the description whose publication status you wish to update.
You can also update the publication status of all descriptions associated with
an archival institution by using the --repo option and providing a
repository slug instead - details are included below. Here is the basic
syntax of the command with all options shown:
php symfony tools:update-publication-status [--application[="..."]] [--env="..."] [--connection="..."] [-f|--force] [-i|--ignore-descendants] [-y|--no-confirm] [-r|--repo] publicationStatus slug
Notes on use
AtoM requires two parameters to be able to execute the task: the publication status you wish to use, and the slug of a resource on which to perform the task. For the publication status, you can use any term you have added to the Publication status taxonomy in AtoM - the default terms are Draft, and Published. You cannot create a new publication status term by using this task - the term must already exist in AtoM, or the task will fail.
Example use (no options) - update a description with a slug of
example-description to published:
php symfony tools:update-publication-status published example-description
Task options:
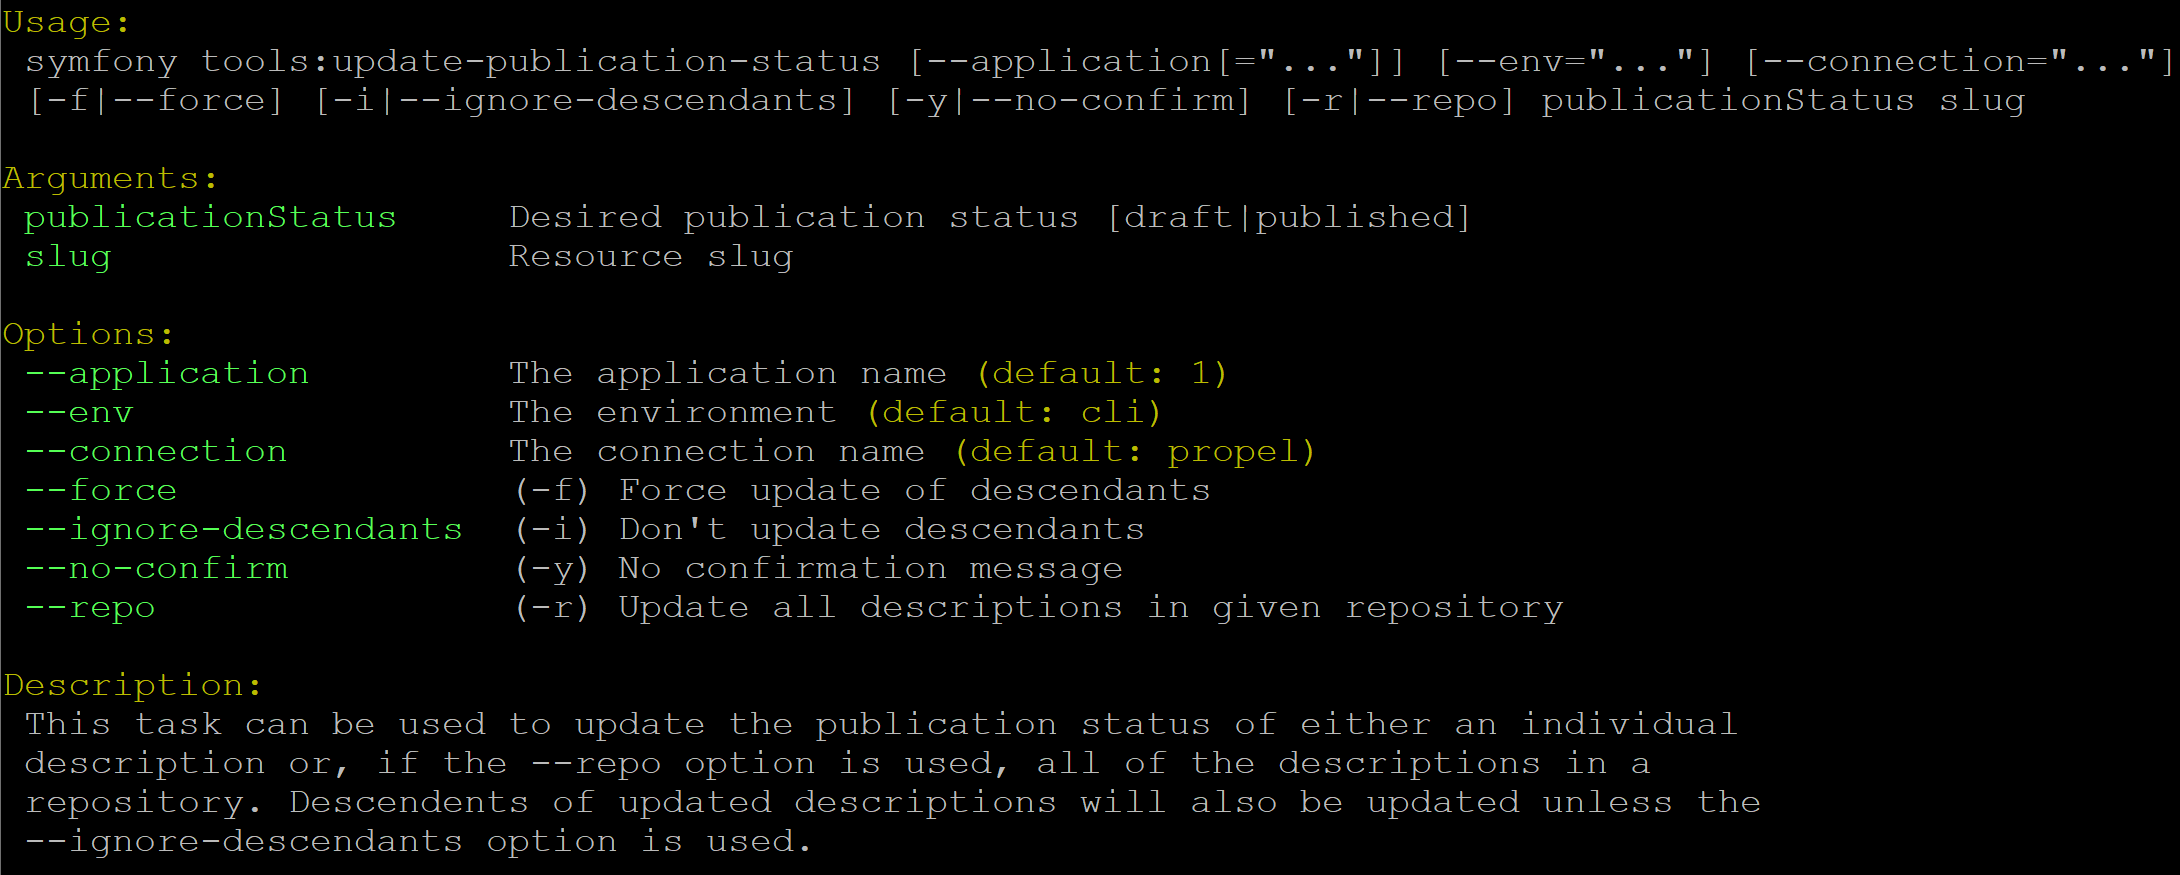
By entering php symfony help tools:update-publication-status into the
command-line, you see the options available on this tool, as pictured above.
The --application, --env, and connection options should not be
used - AtoM requires the uses of the pre-set defaults for symfony to be
able to execute the task.
In general and as in the user interface, if a parent
description is updated, it will also update the publication status of its
children. In some rare cases however, there may be legacy records in the
system with a publication status of NULL. The command-line option --force,
or -f for short, will force the update of the target information object
and all of its children, including legacy records that
might have a publication status of NULL. We recommend using this option any
time you want a publication status update to affect children as well.
The --ignore-descendents, or -i, option can be used to leave the
publication status of all children unchanged. This is
useful if you have a mixture of publication statuses at lower levels - some
draft, and some published.
Normally when the command is run, AtoM will ask for a y/N confirmation before
proceeding. The --no-confirm or -y option was introduced so that
developers who are interested in using this task in a larger scripted action
can override the confirmation step.
If the --repo or -r option is used, AtoM will update the publication
status for ALL descriptions belonging to the associated
repository (i.e. archival institution). To use this option,
you must supply the slug of the repository.
Example use - updating all the descriptions associated with “My archival
institution” (slug = my-archival-institution) to published.
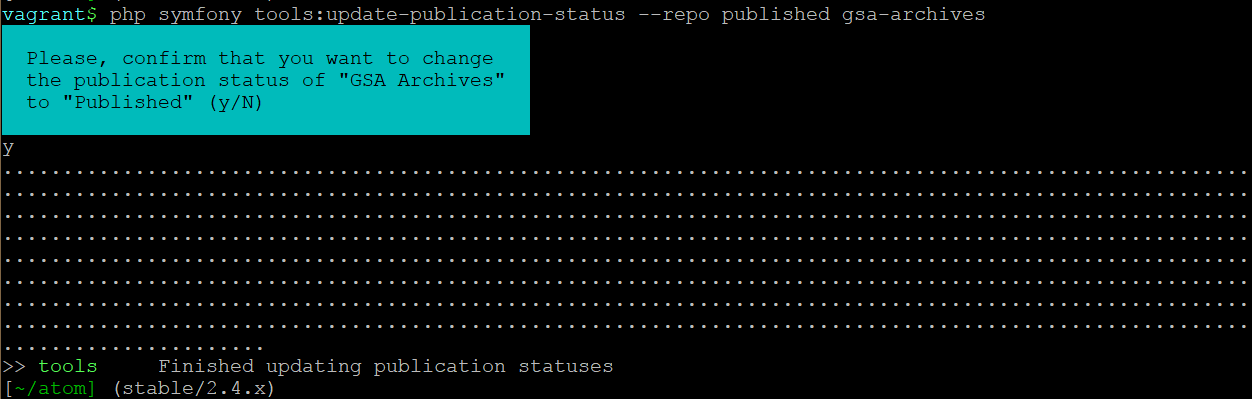
php symfony tools:update-publication-status --repo published my-archival-institution
As the task proceeds, it will print a . period in the command-line for each
record that is updated, providing a visual indication of progress.
Warning
This task is NOT designed for scalability. If you are planning on updating the publication status of thousands of records, we recommend using SQL to do so instead. See:
Unlink creators from child descriptions and reapply inheritance to hierarchy
By default in AtoM, creators and repository names (aka archival institutions) are automatically inherited from parent levels in descendant records - meaning if you add a creator name at a collection level, it will be inherited all the way down to the lowest level records if no alternative creator name is manually added to an intermediate level.
This adheres to the International Council of Archives’ multilevel description rules , which encourage descriptive practices that move “from the general to the specific” (ISAD 2.1), include only information relevant to the level of description (2.2), and “do not repeat information at a lower level of description that has already been given at a higher level” (2.4). Additionally, this supports better scalability and performance in AtoM when working with large hierarchies, as less descriptions need to be updated if the creator is edited.
In some circumstances, an intermediate creator can be purposefully added at intermediate levels (e.g. a different creator for a series). For scenarios where users unknowingly add direct links to the same creator at some or all lower levels of description, the following command-line task can be used to automatically unlink that creator and reapply the default inheritance rules at lower levels of description.
Using the unlink creators task
php symfony tools:unlink-creators
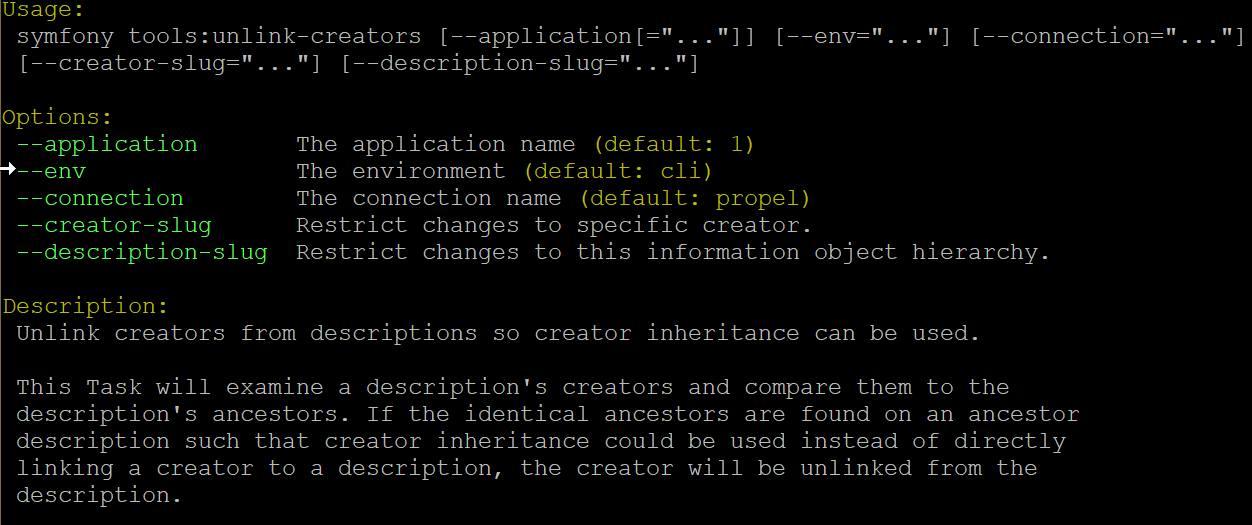
By typing php symfony help tools:unlink-creators into the command-line, you
can see the options available on the unlink creators task, as pictured above.
The --application, --env, and connection options should not be
used - AtoM requires the uses of the pre-set defaults for Symfony to be
able to execute the task.
The --creator-slug option takes the slug of an authority
record (i.e. one linked to descriptions as a creator) as input. When
used, it restricts the affected descriptions to those associated with a
specific creator.
The --description-slug option takes the slug of an
archival description as input, and when used, restricts the changes to
the specified archival unit and its descendants.
An example of using the task to restrict the changes to a specific collection:
php symfony tools:unlink-creators --description-slug="my-collection-slug"
Move description relations from one authority record to another
This task allows a user to specify a source authority record, and a target. When run, the task will move all archival description relations from the source to the target, including event relations (i.e. creator and other event type relations) and name access points. Any existing description relations already associated with the target authority record will be unaffected by the task.
This can be useful in scenarios such as:
- When performing a data migration or an update import, and you accidentally create duplicate authority records
- When attempting to update an authority causes timeouts (relations can be moved to a new authority with the correct information, or a temporary authority while the source record is updated)
- Manually cleaning up near-duplicates in a multi-repository system (e.g. combining “John Smith” and “Smith, John” into a single authority record)
The task accepts two slugs as input - the slug of the source authority record (i.e. the one currently with the relations), and the slug of the target (i.e. the authority to which you want to move your relations).
Tip
A slug is a word or sequence of words which make up a part of a URL
that identifies a page in AtoM. It is the part of the URL located at the
end of the URL path and often is indicative of the name or title of the
page (e.g.: in www.youratom.com/this-description, the slug is
this-description). For more information on slugs in AtoM, see:
The basic syntax of this task is:
php symfony actor:move-description-relations source-slug target-slug
Where source-slug is the slug of the authority with the relations,
and target-slug represents the slug of the authority record where the
relations will be moved.
By default, this task will update AtoM’s search index as it runs. However, if
you want to disable this behavior (for example, if you are moving hundreds or
thousands of relations and want to optimize for performance), you can prevent
this by using the --skip-index option. Example use with this option:
php symfony actor:move-description-relations --skip-index source-slug target-slug
If you skip the search index update, you will need to manually update the search index after:
php symfony search:populate
Important
Task notes and limitations
- This task will not delete either authority record. That must be done manually after the task is run, if desired.
- The task will only move description relations - not other relations, such as related actors.
- This task does not attempt to merge actor metadata. Any metadata from the source that you want to see on the target must be manually added.
Delete a description
You can delete a description from the command-line if you know the description’s slug. A slug is a word or sequence of words which make up a part of a URL that identifies a page in AtoM. It is the part of the URL located at the end of the URL path and often is indicative of the name or title of the page (e.g.: in www.youratom.com/this-description, the slug is this-description). When a new information object is created in AtoM, the slug for that page is generated based on the title, with spaces, stopwords, and special characters stripped out.
If you know the slug of a description you’d like to delete, use the following command to delete it from the command-line:
php symfony tools:delete-description <slug>
AtoM will ask you for confirmation before you proceed giving you a count of descriptions affected (e.g. the target description and its descendants):

Tip
If you would like to proceed without having to confirm your actions, you
can use the --no-confirmation option - or its shorthand, -B, like
so:
php symfony tools:delete-description -B <slug>
You can also delete all descriptions that are associated with a particular
repository, by using the --repository option, and supplying the
slug of the linked repository instead of the slug of a description. For
example, if your repository is called “Example Archives,” with a slug in AtoM of
example-archives, then you could delete all archival description
records linked to this repository with the following command:
php symfony tools:delete-description --repository example-archives
Delete all draft descriptions
If you want to remove all draft information object (e.g. archival description) records from AtoM, you can use the following command-line tool to delete all records with a publication status of “Draft”:
php symfony tools:delete-drafts
The task will ask you to confirm the operation:
>> delete-drafts Deleting all information objects marked as draft...
Are you SURE you want to do this (y/n)?
Enter “y” if you are certain you would like to delete all draft records.
Delete a digital object
AtoM maintains a 1:1 relationship between a digital object and an information object (AKA an archival description) - this means that every digital object in AtoM must have an associated description, and a description cannot be linked to more than 1 digital object. For more general information on digital objects in AtoM, see:
You can delete a description’s associated digital object from the command-line
if you know the related description’s slug, using the
digitalobject:delete task. The task also includes an option to delete
digital objects from all descendant records, when a
parent description slug is provided. Alternatively, you
can delete all digital objects associated with a particular
archival institution by prodiving the slug of the associated
repository instead of a description slug.
Tip
A slug is a word or sequence of words which make up a part of a URL that
identifies a page in AtoM. It is the part of the URL located at the end of
the URL path and often is indicative of the name or title of the page
(e.g.: in www.youratom.com/this-description, the slug is
this-description). For more information on slugs in AtoM, see:
The basic syntax for the task is:
php symfony digitalobject:delete target-slug
Where target-slug represents the slug of the target record - either an
archival description or an archival institution.
By running php symfony help digitalobject:delete we can see the
command-line’s help output for the task:
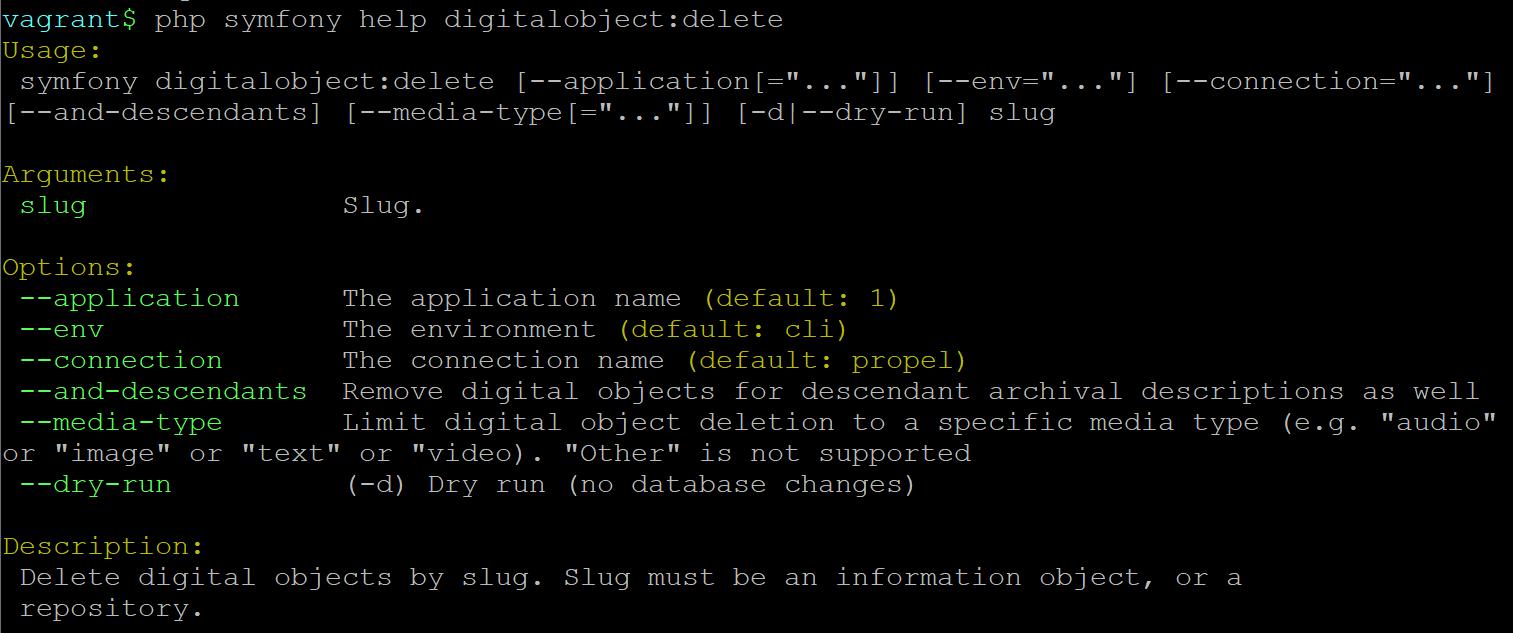
The --application, --env, and connection options should not be
used - AtoM requires the uses of the pre-set defaults for Symfony to be
able to execute the task.
The --dry-run option can be used to test the effects of the task by
reviewing the console output. When used, no deletions will take place and your
data will be unchanged, but the console output will give you a count of affected
records to review. An example output:

Deleting digital objects from a multi-level hierarchy
The task also includes the --and-descendants option, which can be used to
delete all digital objects from all levels of an archival unit. When
using the --and-descendants option, the slug you provide should be for the
top-level description in the hierarchy. Example use:
php symfony digitalobject:delete --and-descendants slug-of-top-description
Where slug-of-top-description represents the slug of the top-level
parent description.
Additionally, the --media-types option can be used to target only a specific
type of digital object for deletion. Options supported are:
- audio
- video
- image
- text
- other
Example usage - deleting only video files from all levels of an archival hierarchy:
php symfony digitalobject:delete --media-type="video" --and-descendants slug-of-top-description
Deleting all digital objects associated with a repository
Instead of providing an archival description slug, you can provide the
slug of an archival institution (AKA repository) record to
delete all digital objects linked to descriptions associated with a
particular repository. When a repository slug is used, the --and-descendants
option will be ignored - by default, providing a repository slug means that ALL
associated digital objects at all levels will be deleted from the related
descriptions.
You can still use the --dry-run and --media-types options when providing
an archival institution slug.
Important
This task will not automatically update the search index. You will need
to manually run the search:populate task after using this task. For more
information, see:
Delete temporary data (saved clipboards, access log, and downloads)
In the process of using your AtoM installation, you may generate some data that is only needed temporarily, and can be deleted once no longer needed.
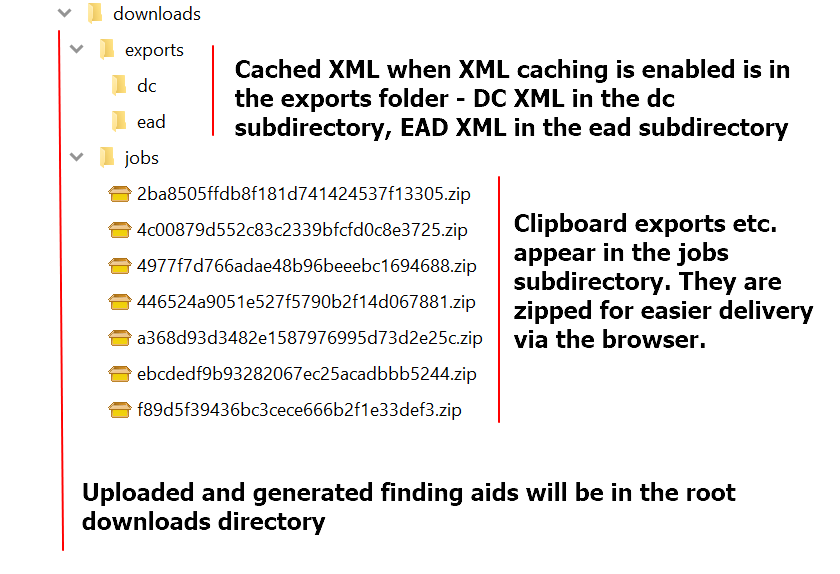
For example, CSV and XML exports are
generated as compressed ZIP files, and are stored in a jobs subdirectory
of the AtoM downloads directory, so users can download local copies of
their exports. While these files are rarely needed after the initial download,
AtoM currently has no automated method of clearing these files.
Additionally, users can save clipboard results for use in later sessions - when saved these clipboard are stored in AtoM’s database. There is a setting that an administrator can use to set an expiry limit on saved clipboards, but this does not provide a bulk method to remove all saved clipboards at once if desired.
Finally, AtoM has a database table called the access_log, which is updated
every time an archival description, authority record, or
archival institution is viewed. This table is used to populate the
Popular this week listing on the homepage, but there is no in-built mechanism
to clear old results from the table.
Fortunately, AtoM has a command-line task that can be used to manage these temporary data elements at will.
The basic syntax for the task is:
php symfony tools:expire-data data-type
Where data-type represents one of three supported parameters:
access_log: clears the access log table associated with the Popular this week listing on the homepageclipboard: clears saved clipboards from AtoM’s databasejob: clears the contents of thejobssubdirectory in the AtoMdownloadsdirectory
You can also specify all options at once using a comma, like so:
php symfony tools:expire-data access_log,clipboard,job
Important
If you have set an
expiry limit on saved clipboards via AtoM’s
settings, the task will use this as a parameter for what saved clipboards
to delete. For example, if you have the expiry limit setting configured to
10 days, then running the tools:expire job for the clipboard on
January 10th would only delete clipboard saves older than January 1st by
default. This is to avoid accidentally deleting clipboards that your end
users may still expect to be able to retrieve. However, the --older-than
command-line option, described below, can be used to specify your own
date range.
If the the clipboard save maximum age setting is set to 0, all saved clipboards will be deleted by default when the task is run.
By running php symfony help tools:expire-data we can see the
command-line’s help output for the task:
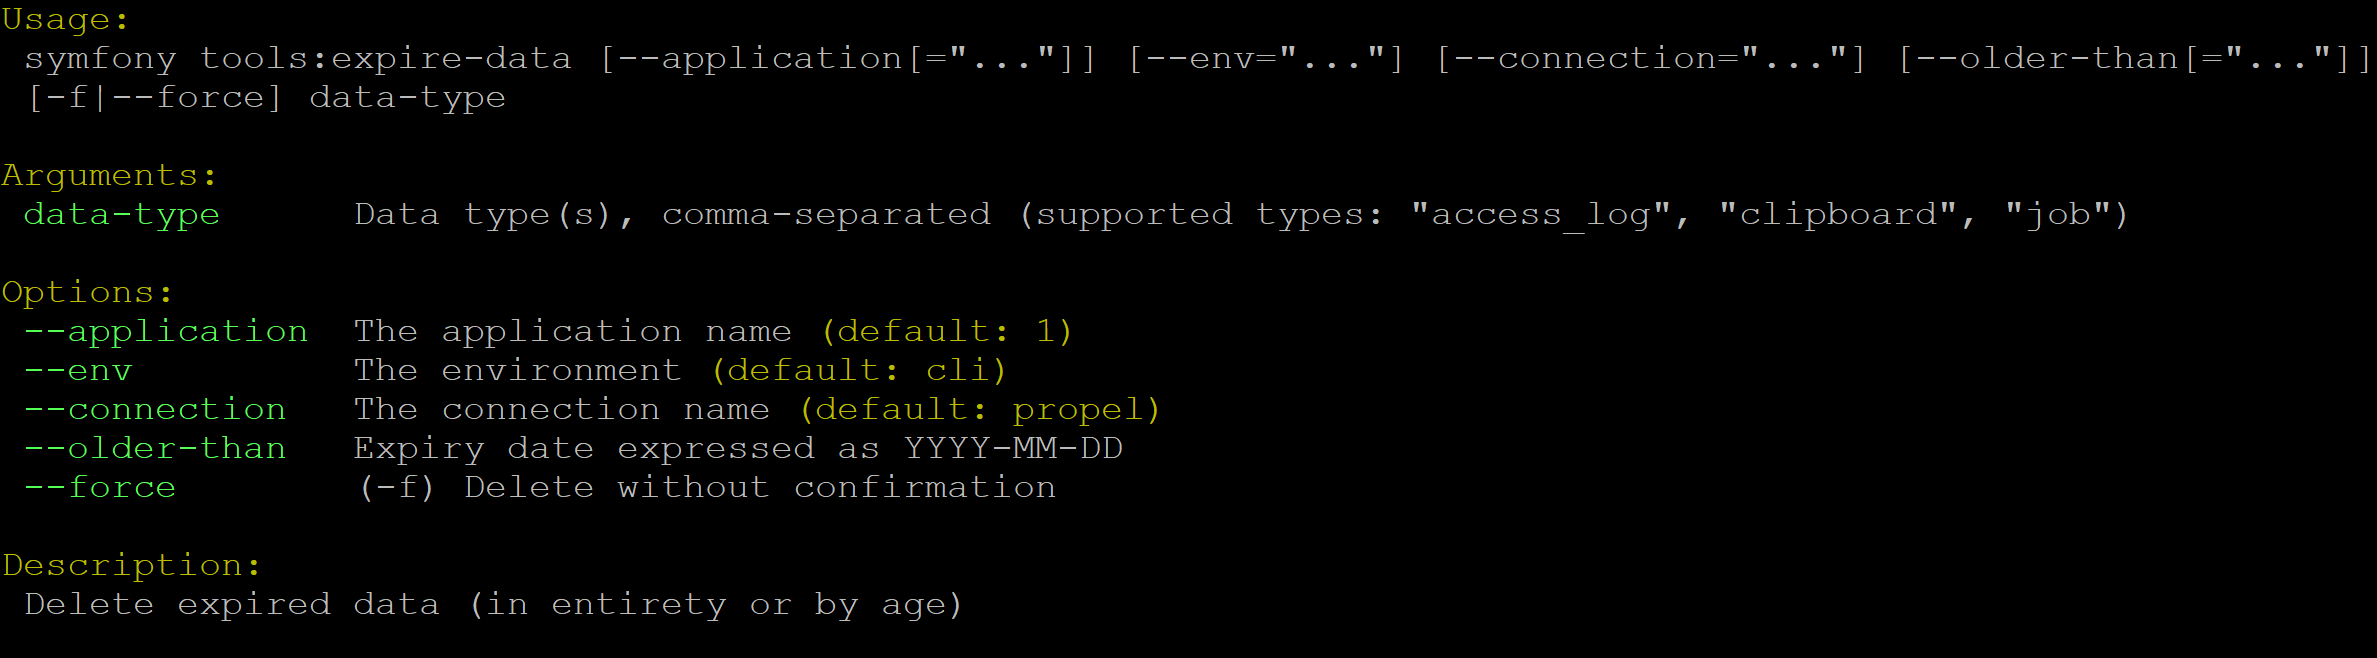
The --application, --env, and connection options should not be
used - AtoM requires the uses of the pre-set defaults for Symfony to be
able to execute the task.
The --older-than option can be used to limit the deletion by time range. It
accepts date inputs in ISO 8601 format (i.e. YYYY-MM-DD), and will delete
any elements that are older than the specified date. Example use, deleting all
download ZIPs from the jobs subdirectory that were created before January
1, 2020:
php symfony tools:expire-data --older-than="2020-01-01" job
This option can be particularly useful when deleting saved clipboards. By default, AtoM will use the administrative setting Saved clipboard maximum age value when deleting saved clipboard data. However, you can specify your own range using this parameter to override the default.
Additionally, by default the task will ask you to confirm the operation before proceeding, once per data type:

However, experienced developers and system administrators can skip this
confirmation step by using the --force (or -f for short) option. This
is useful if you would like to create a script that runs the command-line
task on a periodic basis for example.
Generate and cache XML for all archival descriptions
AtoM includes several options for exporting archival description metadata in XML format - for more information, see: Export XML.
Additionally, users can enable the OAI plugin to allow harvesters to collect archival description metadata via the OAI-PMH protocol, in EAD 2002 or Dublin Core XML - for more information, see: OAI Repository.
Normally, when exporting or exposing archival description metadata, the XML is generated synchronously - that is, on request via the web browser. However, many web browsers have a built-in timeout limit of approximately 1 minute, to prevent long-running tasks and requests from exhausting system resources. Because of this, attempts to export or harvest EAD 2002 XML for large descriptive hierarchies can fail, as the browser times out before the document can be fully generated and served to the end user.
To avoid this, AtoM includes a setting that allows users to pre-generate
XML exports via AtoM’s job scheduler, and then cache them in the downloads
directory. This way, when users attempt to download large XML files, they can
be served directly, instead of having to generate before the browser timeout
limit is reached. For more information, see: Cache description XML exports upon creation/modification.
The XML generated will be cached in AtoM’s downloads directory - 2
subdirectories named ead and dc will automatically be created, and the
XML will be stored by type in these two subdirectories.

When users attempt to download XML from the view page of an archival description, AtoM will check if there is a cached copy of the requested XML and if so, it will serve it. If there is no cached version available, then AtoM will fall back to the default behavior of generating the XML on request.
In an OAI-PMH request, if a cached version of the EAD 2002 XML is available,
AtoM will serve it in response to oai_ead requests - if there is not a
cached version, then AtoM will return a “Metadata format unavailable” reponse.
In contrast, if no cached DC XML exists, the OAI Repository module will
generate DC XML on the fly to respond to the request. For further information,
see: OAI Repository.
By default, cached XML files are generated for public users, meaning that draft descriptions are not included in the XML.
When engaged, this setting will not retroactively generate and cache XML for existing descriptions. Howeveer, this command-line task can be used to generate and cache EAD 2002 and DC XML for all existing descriptions.
The basic syntax for the task is:
php symfony cache:xml-representations
By running php symfony help cache:xml-representations we can see the
command-line’s help output for the task:
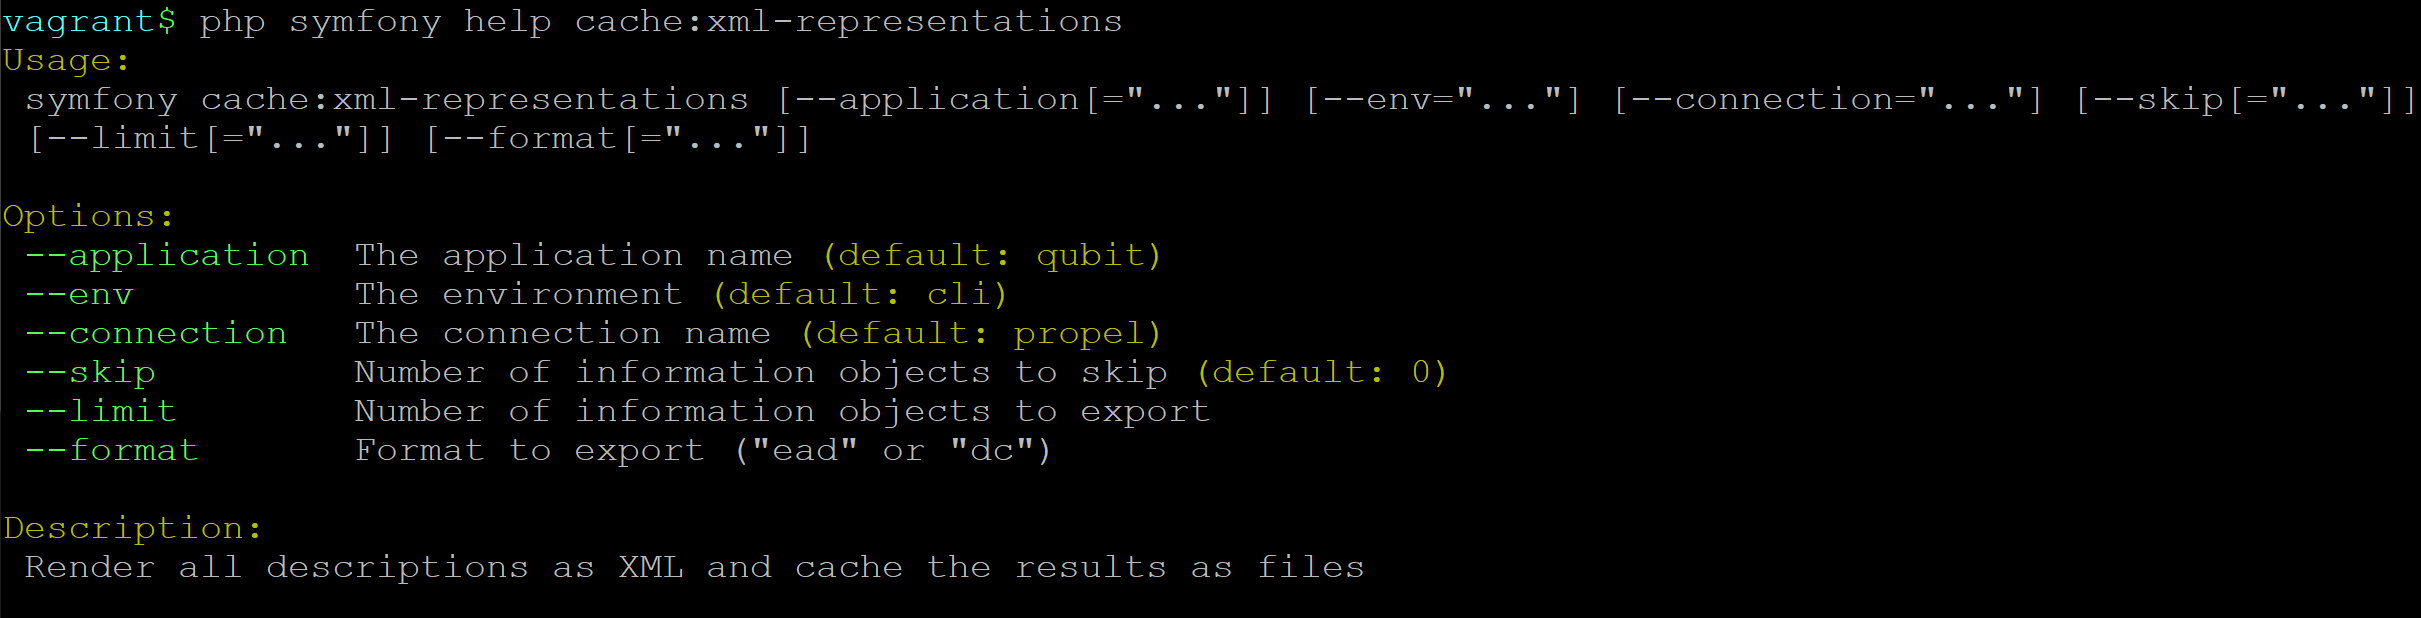
The --application, --env, and connection options should not be
used - AtoM requires the uses of the pre-set defaults for Symfony to be
able to execute the task.
As the task progresses, the console will output the related ID of the current information object, followed by the number of the current information object (aka archival description) and the total count:
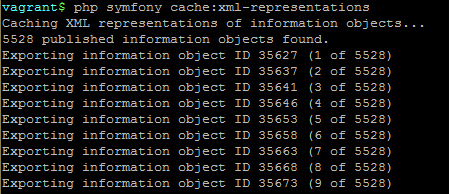
In some cases with very large hierarchies (for example, an
archival unit with thousands or tens of thousands of descendants),
available system memory may be exhausted during this process, and the task may
crash before all XML can be generated. In that case, the --skip and
--limit options can be useful for managing partial loads to avoid using all
system memory.
The --limit option can be used to limit the amount of XML files generated
when the task is executed - by default, without using this option, the task
will generate DC and EAD 2002 XML for all published descriptions in AtoM. The
--limit option expects a whole number as a parameter, representing the
total number of descriptions to be exported as XML by the task. For example,
if you only want to generate XML for the first 10 descriptions in AtoM, you
could run the task like so:
php symfony cache:xml-representations --limit="10"
The --skip option accepts as a parameter the number of information objects
to be skipped - so for example, if the task crashed while trying to generate
the XML for infomation object 2445 of 5528, then you could restart it on
information object 2445 again by skipping the first 2444, like so:
php symfony cache:xml-representations --skip="2444"
Finally, the --format option can be used to limit the XML generated to
just one of the two supported options - EAD 2002 XML, or DC XML. By default, the
task will generate and cache XML for both formats - however, by using the
--format option and passing either ead or dc as the option value,
you can limit the XML to selected format. For example, to generate and cache only
EAD 2002 XML:
php symfony cache:xml-representations --format="ead"
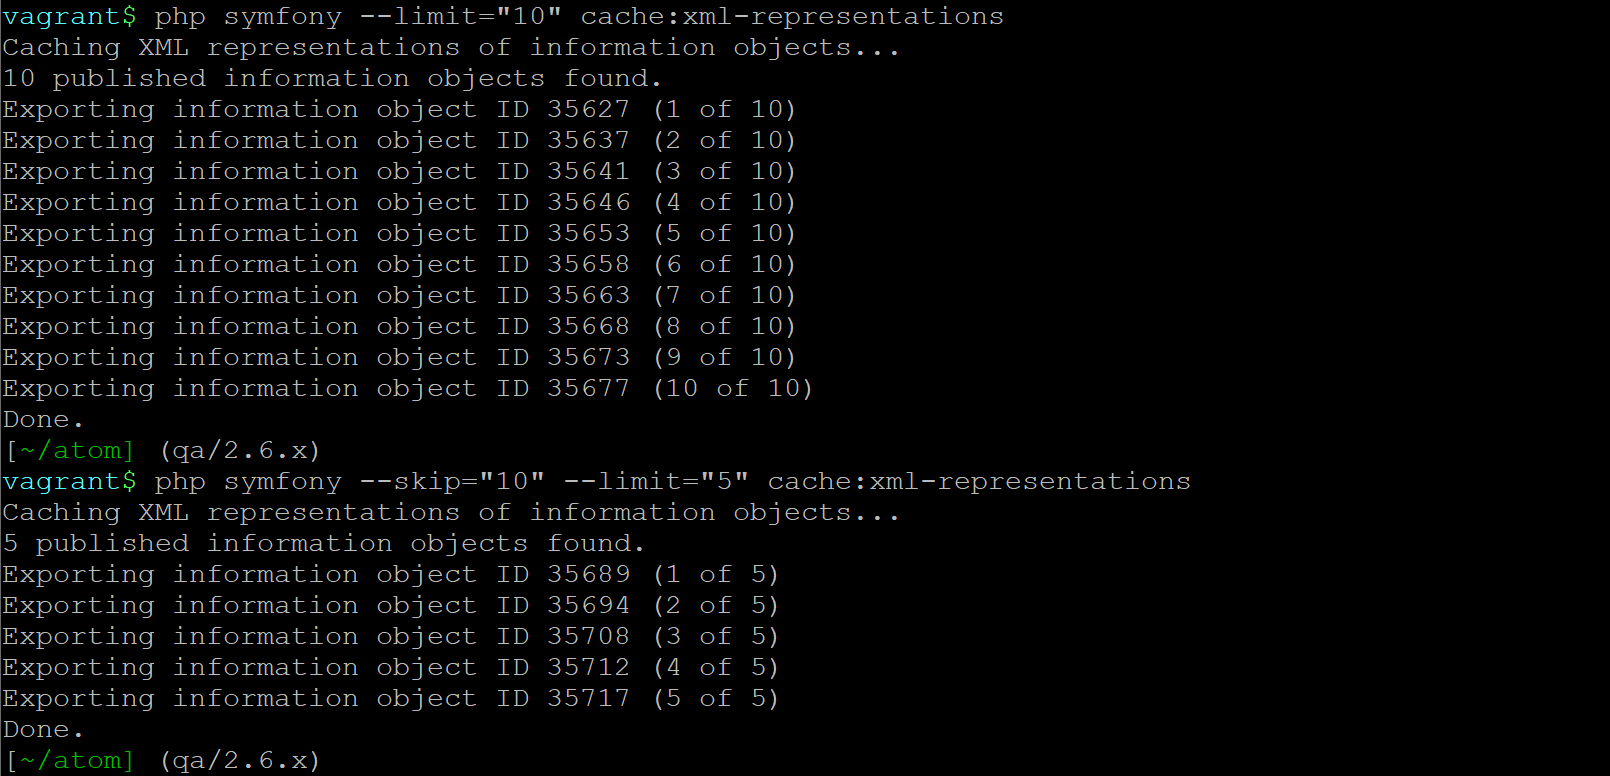
Example usage
Below is an example of using two options together. First, we use the
--limit option to generate the XML for only the first 10 descriptions.
Then, in our second pass, we skip the first 10 with the --skip option, and
limit the next pass to 5 descriptions:
Note
By default, cached XML files are generated for public users, meaning that draft descriptions are not included in the XML, and cached XML is not generated for any unpublished archival units.
The XML generated will be cached in AtoM’s downloads directory - 2
subdirectories named ead and dc will automatically be created, and the
XML will be stored by type in these two subdirectories.
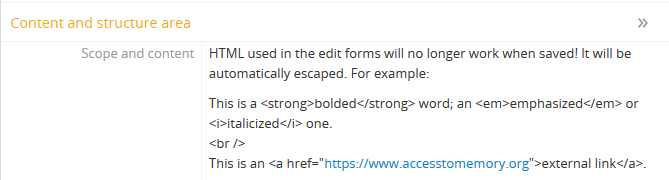
Remove HTML content from archival description fields
As of the 2.2 release, HTML added to atom’s descriptive templates will be automatically escaped for security purposes. This means that if you were previously using HTML to style content added to an edit template, it may no longer display correctly:
To assist legacy users who have added HTML to records in AtoM, a command-line task to strip the HTML from descriptions and other entities has been added. At present, it will only remove HTML from the following entity types:
- archival description
- authority record
- Notes (however, General notes are not affected currently)
- archival institution (aka repository records)
- rights record
Other entities in AtoM (such as accessions, user and goup records, terms, etc.) will not be affected.
Important
There are also some fields in the information object (e.g. archival description) that do not currently support this task - meaning HTML will not be removed from these fields by running this CLI task:
- RAD title note (e.g. Source of title proper, Attributions and conjectures, etc)
- General notes fields in any template
To run the HTML scrub task:
From the root directory of your AtoM installation, run the following command:
php symfony i18n:remove-html-tags
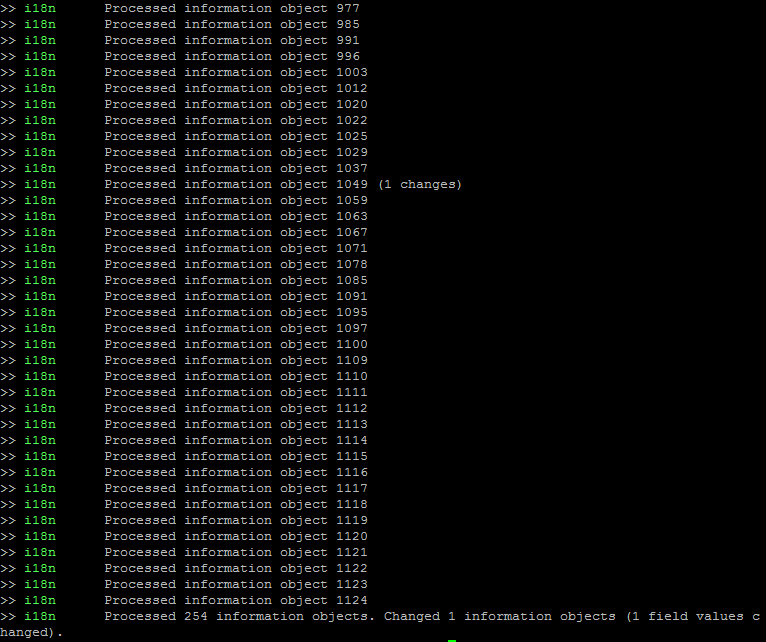
The command-line interface will output information on how many fields within each information object were scrubbed, as well as a summary when the task terminates:
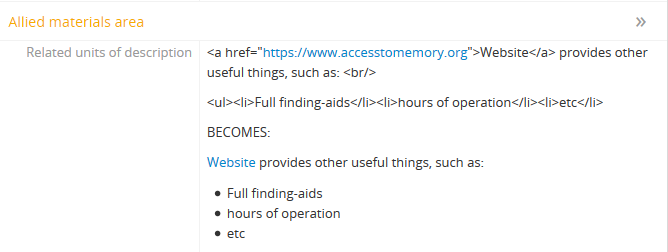
The task will have the following effects on HTML elements:
- Links, including email
mailto:links, will be replaced with AtoM’s custom formatting for links - for more information, see: Hyperlinks. This means that after being run, links will now appear in AtoM’s view pages as they were intended to when the HTML was added. - Styling elements, such as
<em>,<b>,<strong>,<i>, etc. will be removed with no substitutions (the text they wrap will be preserved). - List elements (
<li>) will be replaced with an asterix and a space - AtoM’s edit templates already include a helper that will transform asterixes used this way into bullets. So,<ul><li>This item</li></ul>will become* This item - Definition list elements such as
<dd>,<dt>, etc (which were briefly used in earlier versions of AtoM to structure physical description EAD import data) will be removed (the text they wrap will be preserved). - Paragraph tags (
<p>) will be removed, and substituted with 2 line breaks to preserve spacing (i.e./n/n) - HTML escape characters (for example,
",&,<) will will be replaced with the character they represent (e.g.",&,<)
Export a list of terms linked to one or more descriptions from a taxonomy
This task is useful when performing an administrative review of your AtoM installation. If you have imported a large controlled vocabulary to one of AtoM’s taxonomies (such as subject, place, or genre access point terms), you might want to be able to determine which terms are actually in use (i.e. linked to descriptions) versus those which are currently not linked to any descriptions.
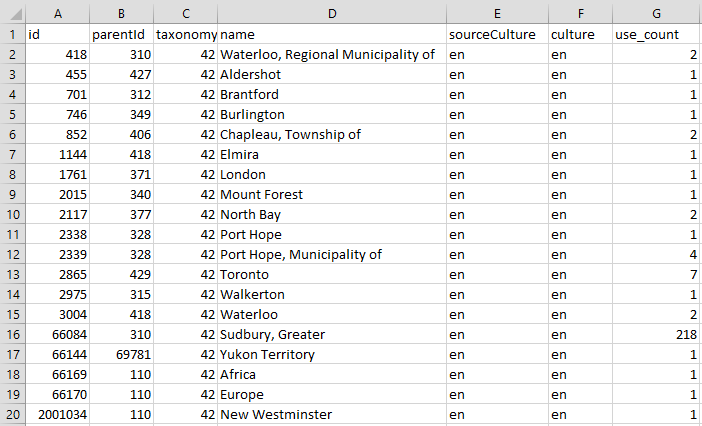
This task, when run against a specific taxonomy, will generate a CSV with a list of terms that are linked to one or more archival descriptions (information objects). The CSV includes a count of how many times a specific term is used (e.g. a count of direct links to information objects - inherited links from a hierarchy are not counted). It does not list terms that are in the taxonomy but currently not used.
The CSV output for the task includes the following columns:
id: the internal object ID of the term
parentId: the object ID of the the parent to which the term is linked.
- Even in a taxonomy that is not organized hierarchically, terms are linked
to a root term object. If the terms are organized heirarchically, then the
parentIDvalue will be the objectID of the parent term.
- Even in a taxonomy that is not organized hierarchically, terms are linked
to a root term object. If the terms are organized heirarchically, then the
taxonomy: the ID of the taxonomy to which the terms belong. In AtoM, typically the Subjects taxonomy ID is 35; Places is 42, etc.
- name: the authorized/preferred form of name for the term in the
current culture
sourceCulture: the culture in which the term was created - generally a 2 letter ISO language code value (e.g. en, fr, es, etc)
culture: Generally the value of the default installation culture of your AtoM instance, returned as a 2 letter ISO language code value (e.g. en, fr, es, etc)
use_count: a simple count of the number of times the term has been directly linked to an information object (archival description). Inherited relationships are not counted - e.g. in a hierarchy of
Canada > Ontario > Toronto, when Toronto is linked to an information object, Canada and Ontario do not also receive a count.
To see the help for the task:
php symfony help csv:export-term-usage

You must specify a target destination for the export as a file path, including
the name of the csv, and ending in the .csv extension, for the command to
work as expected. See the examples below.
Options
The --application, --env, and connection options should not be
used - AtoM requires the uses of the pre-set defaults for symfony to be
able to execute the export.
The --items-until-update option accepts a whole integer value, and will
indicate the progress of the task every n items by printing a dot in the
console.
you can use either the --taxonomy-name or the --taxonomy-id options to
tell the command which taxonomy terms you wish to count in the resulting CSV.
By default, the --taxonomy-name option expects the English name of the
target taxonomy; however, you can use the --taxonomy-name-culture option
to give the name of a taxonomy in another culture - this option expects a
2-letter ISO language code (e.g. “en”, “fr”, “es”, etc) as its value.
The --taxonomy-id option expects as its value the internal ID of the
target taxonomy. Below is a list of some of the more commonly used taxonomies
in AtoM, and their IDs. This list is NOT comprehensive - to see the full list,
navigate to /lib/model/QubitTaxonomy.php, or see a full list in AtoM’s
code on GitHub here.
| Taxonomy name | ID |
|---|---|
| Places | 42 |
| Subjects | 35 |
| Genres | 78 |
| Levels of description | 34 |
Examples
Sample command to return terms currently used in the Subjects taxonomy, using
the taxonomy-name option:
php symfony csv:export-term-usage --taxonomy-name="Subjects" /path/to/my-subjects.csv
The same command, but using the French name of the taxonomy:
php symfony csv:export-term-usage --taxonomy-name-culture="fr" --taxonomy-name="Sujets" /path/to/mes-sujets.csv
An example of using the taxonomy-id option to specify the Places taxonomy:
php symfony csv:export-term-usage --taxonomy-id="42" /path/to/my-places.csv
Here is the sample CSV output of a command run against the Places taxonomy in an English installation:
Auto-populate repository latitude and longitude values
AtoM includes the ability for users to add dynamic Google maps to the view page of a repository. To do so, a user must first have a Google API Key, and the Google Maps Javascript API key setting in Admin > Settings must be populated - see:
Once the key is added, then any time a user adds valid latitude and longitude values to the Contact area of an archival institution, AtoM will add a Dynamic Google map to the top of the repository’s view page. See:
However, you can also attempt to automatically populate existing latitude and longitude fields, based on previously entered Contact area address data (e.g. street address, city, region, postal or zip code, country, etc).
To do so, run the following command:
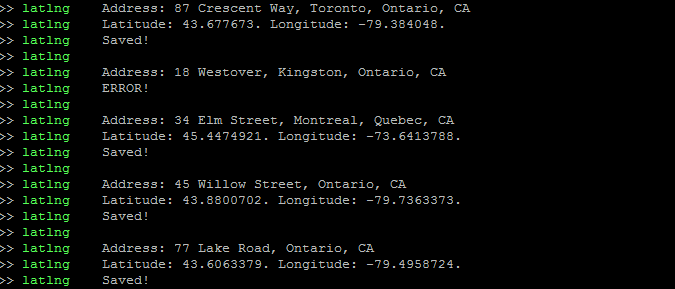
php symfony tools:find-repository-latlng
AtoM will begin reviewing all available repository contact information, and where possible, it will populate the latitude and longitude fields based on the address data. If any issues are encountered (such as incorrect or insufficient contact information for a lookup), the console will print an error message and move on to the next repository for lookup.
By default, the task will not overwrite existing latitude and longitude
information. However, if you would like to replace existing data with updated
values based on the task’s lookup, you can use the --overwrite option like
so:
php symfony tools:find-repository-latlng --overwrite
You may want to clear the application cache and repopulate the search index after. See:
See also
Installer
Configure and initialize a new AtoM instance:
php symfony tools:install
Warning
This will delete configuration files and ALL DATA in your AtoM instance! Be sure this is what you want to do before you proceed. You may want to back up your database first - see below
This task will prompt you for the following configuration details to connect to the MySQL and Elasticsearch severs and initialize the database and the search index:
- Database host (default: localhost)
- Database port (default: 3306)
- Database name (default: atom)
- Database user (default: atom)
- Database password
- Search host (default: localhost)
- Search port (default: 9200)
- Search index (default: atom)
It will also ask you for site information and administrator details:
- Site title (default: AtoM)
- Site description (default: Access to Memory)
- Site base URL (default: http://127.0.0.1)
- Admin email
- Admin username
- Admin password
Alternatively, the --demo option will avoid the prompts for the site
information and administrator details, using the following values:
- Site title: Demo site
- Site description: Demo site
- Site base URL: http://127.0.0.1
- Admin email: demo@example.com
- Admin username: demo
- Admin password: demo
To automate the task, there is an option for each of the configuration details
mentioned above, alongside a --no-confirmation option, so the task could be
executed as follows to avoid user interaction completely:
php symfony tools:install \
  --database-host=localhost \
  --database-port=3306 \
  --database-name=atom \
  --database-user=atom \
  --database-password=12345 \
  --search-host=elasticsearch \
  --search-port=9200 \
  --search-index=atom \
  --site-title=AtoM \
  --site-description='Access to Memory' \
  --site-base-url=http://127.0.0.1 \
  --admin-email=demo@example.com \
  --admin-username=demo \
  --admin-password=demo \
  --no-confirmation
Purging all data
If you’re working with an AtoM installation and want to, for whatever reason, purge all data you can do this with a command-line tool:
php symfony tools:purge
Warning
This will delete ALL DATA in your AtoM instance! Be sure this is what you want to do before you proceed. You may want to back up your database first - see below
The tool will prompt you for the title and description of your site as well as
for details needed to create a new admin user. If a .gitconfig file is present
in your home directory purge will use your name and email, from that file, to
provide default values.
If you are a developer or system administrator using this task for testing purposes,
there is also a --demo option available:
php symfony tools:purge --demo
Important
Using the --demo option with the purge task will have the following
consequences:
- The task will NOT ask for confirmation before purging all data (the warning is skipped)
- It will repopulate the database with a default demo user
- Username: demo
- Email: demo@example.com
- Pass: demo
- It will add a site title to the installation - “Demo site”.
- It will NOT clear the application cache. We recommend clearing the cache and restarting all services after running this task - e.g.
php symfony cc
sudo systemctl restart php7.4-fpm
Optionally, if you’re using Memcached as cache engine:
sudo service memcached restart
See Manage user accounts and user groups for information on how to edit or delete the demo user account via the user interface. See: Site information for instructions on how to edit the site title via the user interface. See Clear cache for more information on clearing the cache.
Generate an XML sitemap for search engine optimization
This task will allow a system administrator with to generate an XML sitemap of your AtoM instance, to enhance search engine optimization. It uses the sitemap protocol, as described on sitemaps.org. From the site’s home page:
Sitemaps are an easy way for webmasters to inform search engines about pages on their sites that are available for crawling. In its simplest form, a Sitemap is an XML file that lists URLs for a site along with additional metadata about each URL (when it was last updated, how often it usually changes, and how important it is, relative to other URLs in the site) so that search engines can more intelligently crawl the site.
Web crawlers usually discover pages from links within the site and from other sites. Sitemaps supplement this data to allow crawlers that support Sitemaps to pick up all URLs in the Sitemap and learn about those URLs using the associated metadata. Using the Sitemap protocol does not guarantee that web pages are included in search engines, but provides hints for web crawlers to do a better job of crawling your site.
source: http://www.sitemaps.org/
This XML sitemap can then be passed to search index providers such as Google, for better indexing of your AtoM instance. Multiple sitemaps can be generated by the task to account for Google’s limits on size and/or number of nodes. If the sitemap file has more than 50,000 nodes, it will automatically be broken into multiple sitemaps.
More information:
- On the protocol: http://www.sitemaps.org/protocol.html
- Google support: https://support.google.com/webmasters/answer/183668?hl=en&ref_topic=6080646&rd=1
The task will draw the default weighting for each level of description
used in archival descriptions from a
configuration file found in config/sitemap.yml. Here are the default
weightings (or priorities) for each level included:
| Level of description | Default weight |
|---|---|
| Collection | 0.9 |
| Fonds | 0.9 |
| Subfonds | 0.8 |
| Series | 0.7 |
| Subseries | 0.6 |
| File | 0.5 |
| Item | 0.4 |
If a user adds a custom level of description to the Level of description
taxonomy (see: Terms), or if you wish to change the default
priorities, you can edit the sitemap.yml file found in the config directory.
see: config/sitemap.yml for more information.
Important
There is currently no way to add custom weights for other entities in AtoM such as authority records, archival institutions, functions, or static pages, etc.
The default weighting for new archival description levels of
description added, without a custom entry into the config/sitemap.yml
file is 0.9.
By default, authority records receive a weight of 0.5 and static pages a weight of 1.0.
When the command is run, at least 2 files are generated - by default they are
added to the root AtoM directory (though a specific location can be specified
using the task’s options - see below). A sitemap.xml file acts as a
pointer file when multiple sitemaps are produced (e.g. if there are more than
50,000 nodes, the task will automatically break this up into 2 or more XML
files, as per Google’s recommendations). If only 1 sitemap file is produced,
this pointer will still be generated, but will not be needed and can be
discarded if desired. The other file (or files) is the actual sitemap for your
AtoM instance - by default it is compressed using
Gzip, although again there is also an
option to disable this if desired.
Using the sitemap generation command-line task:
Example use:
php symfony tools:sitemap
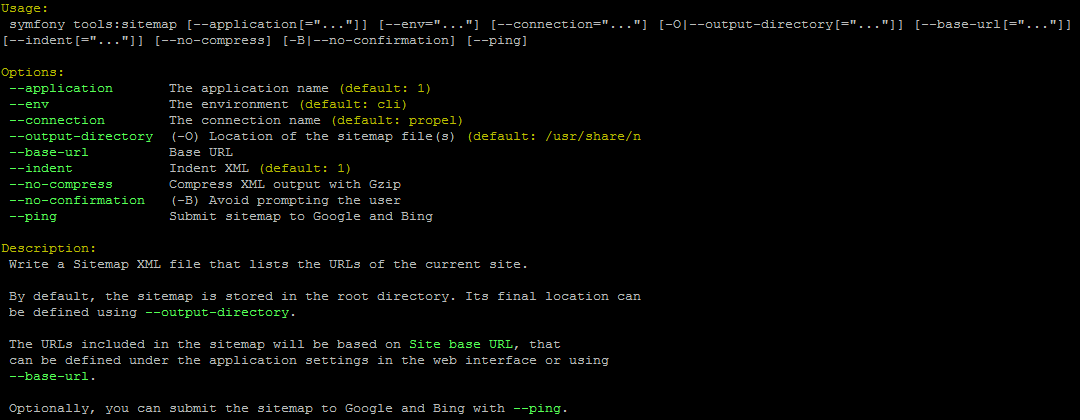
By typing php symfony help tools:sitemap into the command-line, you can
see the options available on the export:bulk command, as pictured above.
The --application, --env, and connection options should not be
used - AtoM requires the uses of the pre-set defaults for symfony to be
able to execute the task.
the --output-directory (or -O for short) option is used to specify a
specific location for the sitemap XML files on output - by default, they are
added to AtoM’s root directory.
The --base-url option can be used to specify a base URL for the AtoM
instance, used in the sitmap XML files generated. Note that AtoM will use the
value entered in the Admin > Settings > Site information page for the Base
URL by default, so if you’ve added the correct value there, you shouldn’t need
this option. See: Site information for more on Base URLs.
The --indent is a boolean value - by default, the XML generated will be
indented and formatted to assist human readability (e.g. --indent=1).
However, if desired, linebreaks and indentation can be removed, but adding
--indent=0 to the command
Also by default, the XML sitemap generated will be compressed using
Gzip - however, if desired, you can
prevent the compression by using the --no-compress option.
If an older sitemap already exists in the target directory when the task is
run, AtoM will ask you to confirm if you want the older versions to be
overwritten or not. If you don’t want this interruption (e.g. if you are using
this task as part of an automated deployment, etc), you can skip the
confirmation step with --no-confirmation, or -B for short.
Finally, if you would like the sitemap(s) to be submitted to Bing and Google
after generation, you can add the --ping option to the command.
See also
Manually upload Archivematica DIP objects
AtoM includes integration with the open source digital preservation system, Archivematica. Using Archivematica, you can generate Archival Information Packages (AIPs) for preservation, as well as Dissemination Information Packages (DIPs) for use in an access system such as AtoM. For more information, see:
- What is Archivematica?
- Upload a DIP to AtoM
- Store DIP
- Archivematica configuration for AtoM DIP upload
While a workflow that will automatically upload DIPs from Archivematica to AtoM is supported (see the links above), there may be cases where an archivist chooses to store a DIP, and then wishes to upload it later without having to run it through the re-ingest process. In that case, a system administrator can use this task to manually attach DIP objects to existing archival descriptions in AtoM.
To execute the task requires several things. First, the task expects to find DIP digital objects that have been modified by Archivematica in 2 key ways:
- The original object file has been converted to a derivative with a corresponding
file extension (e.g.
.jpg,.mp3, etc) - A Unique Universal Identifier (UUID) as been pre-pended to the file name (for
example,
815da5cf-f49f-41f5-aa5d-c40d9d4dec3c-MARBLES.jpg)
Additionally, the object names without the UUID must be unique for the
upload to succeed. If you have a number of files with the same name, we
suggest appending an incrementing number (e.g. correspondence-01,
correspondence-02, etc).
For AtoM to know where to upload the objects, you will also need to prepare a
simple CSV file. The CSV can be named anything, but must have the
extension .csv for the upload to work. The CSV must include a filename
column, which specifies the full name of each object. Additionally, include
either an identifier column (if your identifier values in AtoM are
unique) or, preferrably, a slug column, so AtoM knows the description to
which each object will be attached.

Important
Do not include both an identifier and a slug column in your CSV, or the upload may fail. You must choose one or the other - the final CSV should only have 2 columns.
The CSV should be placed in the objects directory of the DIP, with the
digital objects that will be imported. The basic syntax for the task is as
follows:
php symfony import:dip-objects /path/to/my/dip
By running php symfony help import:dip-objects we can see the help page and
options included with the task:
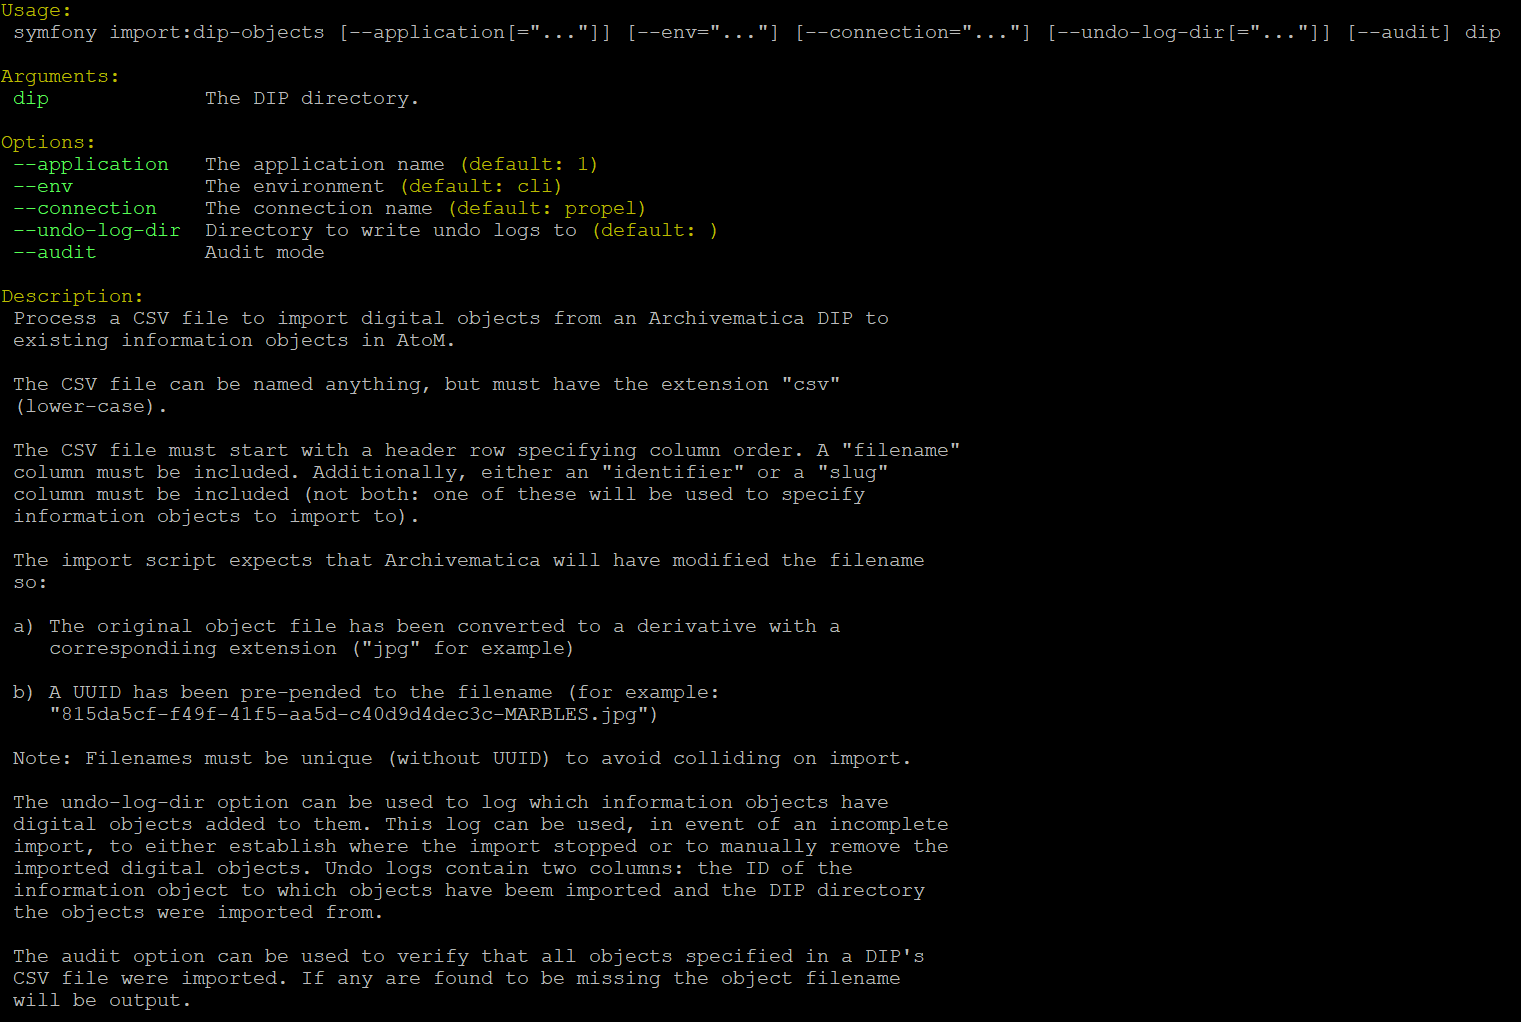
As a parameter, the task requires a file path. The path should point to the top-level directory where you have added the DIP.
The --application, --env, and connection options should not be
used - AtoM requires the uses of the pre-set defaults for Symfony to be
able to execute the task.
The --undo-log-dir option can be used to log which information objects (aka
descriptions) have digital objects added to them as a result of running the task.
This log can be used, in event of an incomplete import, to either establish
where the import stopped or to manually remove the imported digital objects.
Undo logs contain two columns: the object ID of the information object
to which objects have beem imported, and the DIP directory from which the objects
were imported. For more information object IDs, see Common AtoM database queries -
particularly, Finding the Object ID of a record.
Similarly, the --audit option can be used to verify that all objects
specified in the CSV file were imported. If any are found to be missing, then the
object’s filename will be output in the console.
Generate a finding aid
Generates a finding aid document in PDF or RTF format and attaches it to a top-level archival description.
php symfony finding-aid:generate top-level-description-slug
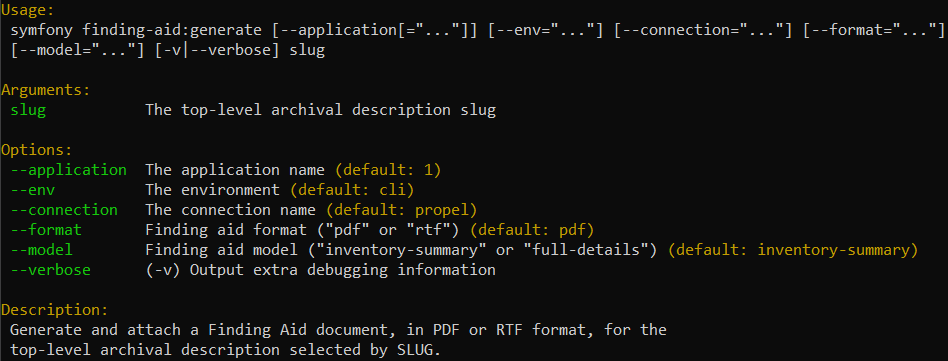
The slug parameter is required and must be the slug of a top-level
archival description, usually a Fonds or Collection level description.
The --application, --env, and connection options should not be
used - AtoM requires the uses of the pre-set defaults for Symfony to be
able to execute the task.
The --format option determines the file format of the generated finding aid.
Two formats are supported: “pdf” (default) or “rtf” (rich text format).
The --model option selects the finding aid template used when generating the
finding aid. The “inventory-summary” (default) model includes less descriptive
data for lower level descriptions (e.g. series, files, items) than the
“full-details” model.
The --verbose / -v option outputs additional debugging information to the
terminal.
Run a generic PHP script
For cases where you need to manipulate your data and there are no existing tasks
that will accomplish what you need, AtoM has the ability to execute generic PHP
scripts via the tools:run commmand. This task will accept the path to a PHP
file as input, and when run will execute the script. Example use:
php symfony tools:run /path/to/my/php-script.php
Important
We strongly recommend you make backups of your data before executing arbitrary PHP scripts in AtoM, and that you understand what the script will do. If you haven’t written the script yourself, be sure you trust its source!
This task includes two additional options to support logging. The --log option
will capture information about the script’s execution in AtoM’s default log
location, log/tools_run.log. If a tools_run.log file already exists at
that location, AtoM will append new log data to it the existing file.
Alternatively, you can specify your own log name and location by using the
--log_file option in conjunction with --log. This option accepts a file
path and name as input, allowing you to specify a different location for the log
file.
Example usage:
php symfony tools:run --log /path/to/my/php-script.php
This will execute the script at path/to/my/php-script.php, and create the
file log/tools_run.log or append data to it if log/tools_run.log already
exists.
php symfony tools:run --log --log_file="my-log-file.log" /path/to/my/php-script.php
This will execute the script at path/to/my/php-script.php, and create the
file my-log-file.log in the current location, or append data to it if
my-log-file.log already exists.