Settings
This section describes how to customize your AtoM application to the specific requirements of your own institution or network.
Below, you will find information on the following information areas:
- Global settings
- Site information
- Default page elements
- Default templates
- User interface labels
- Add/Remove languages
- OAI repository
- Job scheduling
- Security panel
Global settings
Global settings allow administrators to control certain aspects of how AtoM appears and behaves.
To access the “Settings” menu in AtoM, click on the  Admin
menu in the main menu located in the
header bar and select “Settings” from the drop-down menu. You
will be redirected to the “Site Settings”, where a number of information
areas, including the “Global” settings, should be opened.
If closed, simply click on the “Global” blue menu to open the area and view the
fields.
Admin
menu in the main menu located in the
header bar and select “Settings” from the drop-down menu. You
will be redirected to the “Site Settings”, where a number of information
areas, including the “Global” settings, should be opened.
If closed, simply click on the “Global” blue menu to open the area and view the
fields.
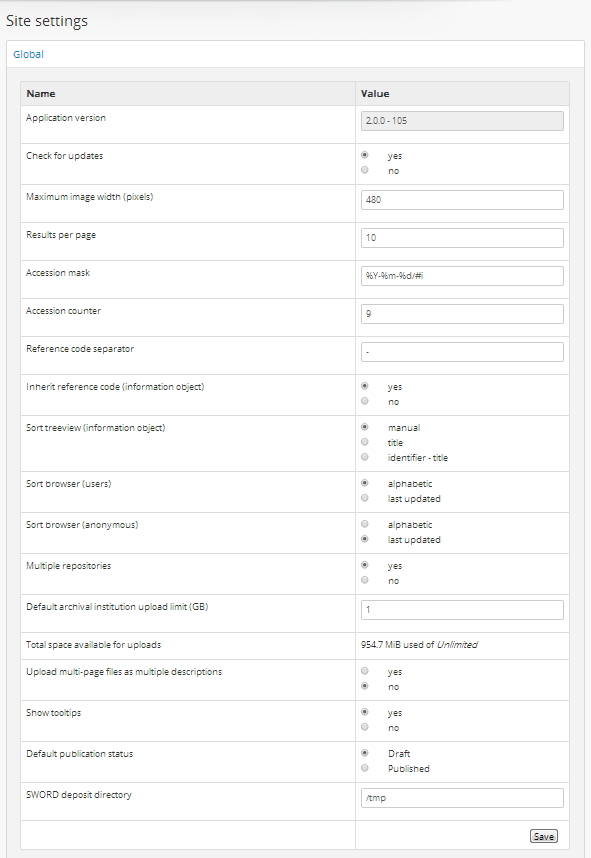
This section will describe each field in the “Global” information area:
- Application version
- Check for updates
- Maximum image width
- Results per page
- Accession mask
- Accession counter
- Reference code separator
- Inherit reference code (Information object)
- Sort treeview (information object)
- Sort browser (users)
- Sort browser (anonymous)
- Multiple repositories
- Default archival institution upload limit
- Total space available for uploads
- Upload multi-page files as multiple descriptions
- Show tooltips
- Default publication status
- SWORD deposit directory
Hovering over each field will also provide additional information on that field - it will appear in an “information box” below your cursor.
When making changes to the global settings in AtoM, don’t forget to click the “Save” button in the button block, located at the bottom of the “Global” settings information area.
Application version
This field shows the current version of the software. The value cannot be edited but is automatically updated when AtoM is upgraded to a newer release.
For more information on installing AtoM and searching for different versions, see:
- Installing AtoM with:
- Search for updates
Check for updates
If yes is selected, an administrator will automatically receive a notification if a newer version of the AtoM software has been released and can be installed. This notification will appear in the browser for authenticated (i.e. logged in) users, as an orange bar across the top of the application alerting users to the newest release available.
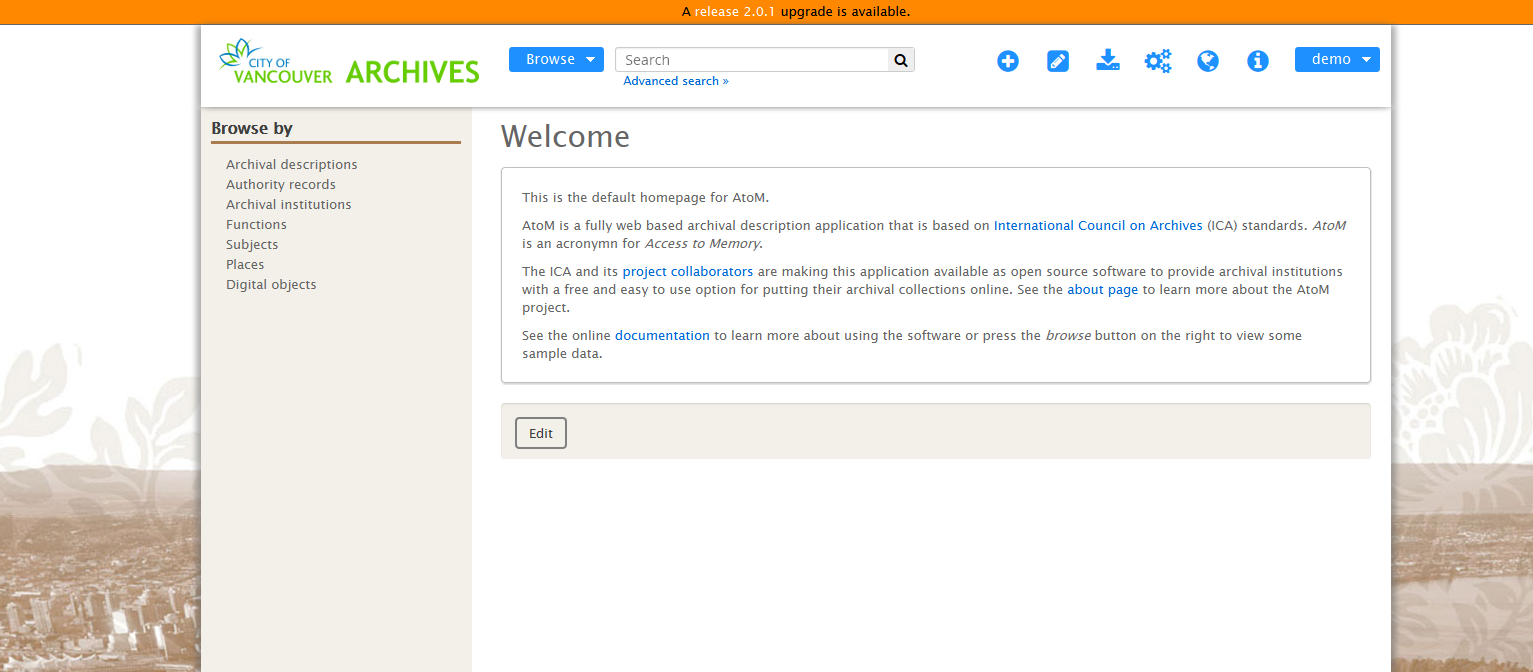
This image shows a themed AtoM installation at the City of Vancouver Archives, showing an update notification in orange at the top of the screen. Only authenticated users will see this notification.
For more information on updates, see:
Maximum image width (pixels)
One of AtoM’s design assumptions is that the display dimensions of files users upload typically will be too large to fit into the view page for an archival description. Therefore, when you upload a file, AtoM creates a reference display copy for displaying in the view page.
AtoM ships with a default setting specifying the maximum width of the reference display copy at 480 pixels. This is the optimized width given AtoM’s field width. Administrators, however, can increase or decrease the maximum reference image width to suit the requirements of their institution or network.
See also
Results per page
By default, AtoM lists objects in list pages and search results ten at a time, with a pager at the bottom of the page to allow users to navigate through long lists of objects. Administrators can increase or decrease this default number.
For more information on navigating in AtoM, see Searching in AtoM and Navigating in AtoM.
Note
Editing this number to display a large number of results per page may affect page load times.
Accession mask
By default, AtoM creates the accession record identifier as a unique
number compiled from YEAR-MONTH-DAY-Incremental#, expressed as %Y-%m-%d/#i.
This mask, or default counter, can be changed by
administrators to suit institutional needs.

For more information on accession records, see Accessions.
Accession counter
AtoM provides you with the number of accessions created. If you delete an accession, it will still be included in the Accession counter total value. If this number is changed by an administrator, the next accession created will receive the next number in sequence.
Reference code separator
The reference code separator is the character separating hierarchal elements in a reference code (see Inherit reference code, below). The default reference code separator appears as a dash “-” in AtoM, which can be changed by an administrator to suit institutional practices.
Inherit reference code (information object)
When this is set to “yes”, the reference code string will be built using the archival description identifier plus the identifier of all its ancestors (parent records), as well as the repository identifier and country code if they have been entered. The string will appear in this order with the applicable elements:
- Country code (derived from the country code of the country entered into the contact information of the related archival institution)
- Repository identifier (derived from the identifier field on the related archival institution)
- Fonds/Collection level identifier
- Series identifier
- Subseries identifier
- File identifier
- Item identifier
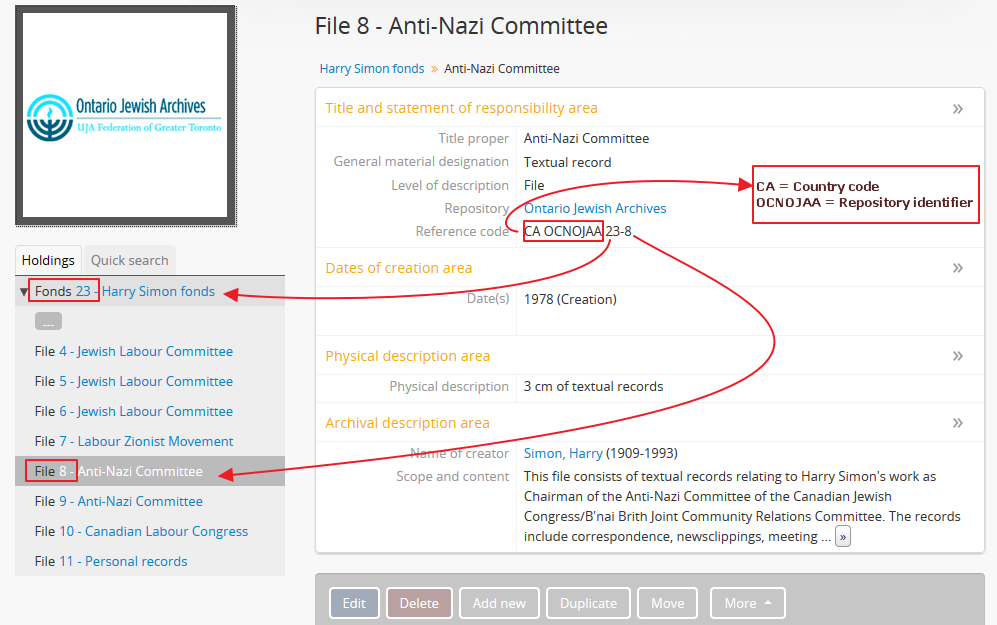
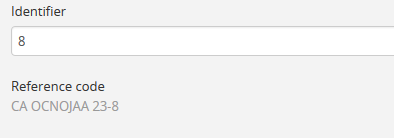
When reference code inheritance is enabled, AtoM will also display the full reference code in the edit page for archival descriptions, as contextual information to help orient the user.
Important
Whether reference code inheritance is turned on or not, the sort button option on the archival description browse page will still sort by full inherited reference code, and not by identifier alone. This setting only affects the display. For more information on sorting, see: Sort button.
See also
Sort treeview (information object)
This setting determines how lower-level descriptions are sorted in an archival description’s context menu.
- Selecting “manual” means the descriptions will appear in the order in which they were entered into AtoM. If manual sort is selected, editors can also drag and drop descriptions within the treeview to re-order.
- Selecting “title” sorts the descriptions by title.
- Selecting “identifier - title” sorts the descriptions by identifier, then by title.
Tip
AtoM’s search index is based on Elasticsearch, which sorts characters based on the order of the in the ASCII character encoding scheme. This can result in seemingly wrong orders when sorting by identifier- for example, 1-1 will be followed by 1-10 instead of 1-2. The solution is to use leading zeroes when forumulating identifiers that you wish to sort in a human- readable order, e.g. 1-01, 1-02, etc.
For more information, see Treeview quick search.
Sort browser (users)
Administrators can configure default sort order for the browse display as either “alphabetic”, “last updated,” or “identifier” for logged-in users. “Last updated” will display records most recently added or edited at the top of the results, allowing users to explore what has changed. By default, the sort order is set to “Last updated” for authenticated users. However, users have the option to reorder the page while browsing via the sort button located at the top of most browse pages.
See also
Sort browser (anonymous)
Administrators can configure default sort order for the browse display as either “alphabetic,” “last updated,” or “identifier” for public users (e.g., not logged-in). “Last updated” will display records most recently added or edited at the top of the results, allowing users to explore what has changed. By default, the sort order is set to “Alphabetic” for anonymous (i.e. public) users. However, users have the option to reorder the page while browsing via the sort button located at the top of most browse pages.
See also
Multiple repositories
Select “yes” if your AtoM application is acting as a union list or portal for descriptions of materials held at more than one archival institution or repository. The repository will appear as a column on the “Browse archival descriptions” page. The repository will appear as a link in the context menu.
Select “no” if your AtoM application is being used only by a single institution. By selecting “no”, the repository name will be excluded from certain displays because it will be too repetitive and the creator rather than the repository will now appear as a column on the list archival description page.
Default archival institution upload limit (GB)
Enter the upload limit in GB allowed for uploading digital objects. Use “-1” as the value for unlimited upload space. This setting can be modified by an authenticated (i.e. logged-in) administrator.
A value of “0” (zero) disables file upload.
For more information, see Upload digital objects.
Tip
While this setting is global, an upload limit can also be set by an administrator on a per-repository basis, from the archival institution page. For more information, see: Set digital object upload limit for an archival institution.
Total space available for uploads
This field will display the used space for digital objects as well as the total space available.
Upload multi-page files as multiple descriptions
Select “yes” if you would like each page of a multi-page file to be attached to a separate child-level description. For example, a PDF file with 10 pages uploaded to a description would result in 10 individual descriptions, one for each page in the file.
Select, “no” if you would like one multi-page file to be attached to a single description.
Show tooltips
Tooltips are online text designed to assist users to enter data in edit pages. While adding or editing an archival description, tooltip text is usually derived from the standards on which the edit templates are based (e.g. RAD, ISAD, etc).
Administrators can select “yes” to to have tooltips appear in edit pages as the user enters data. Selecting “no” will disable tooltips.
Default publication status
This setting determines whether new archival descriptions will automatically appear as draft records or published records. Note that this setting also affects imported descriptions. For more information, see Archival Descriptions.
SWORD deposit directory
The SWORD deposit directory is currently being used to support packages
deposited by Archivematica into AtoM.
If you do not know the name of your deposit directory, consult with your
systems administrator. The default is /tmp.
Site information
In this section, administrators can change the site title and site description. To save any modifications, click the “Save” button located below the “Site Description” field.
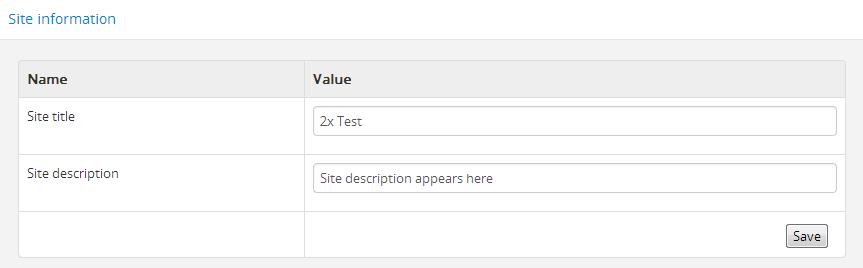
Note that the visibility of these elements can also be controlled via the “Default page elements” settings, described below.
Default page elements
This section allows administrators to enable or disable certain page elements. Unless they have been overridden by a specific theme, these settings will be used site-wide.
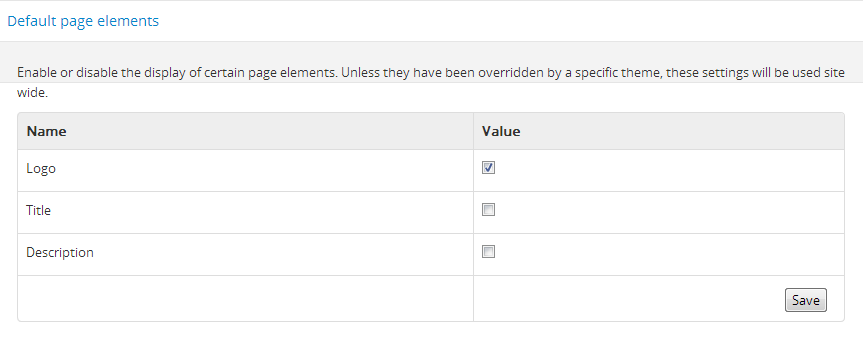
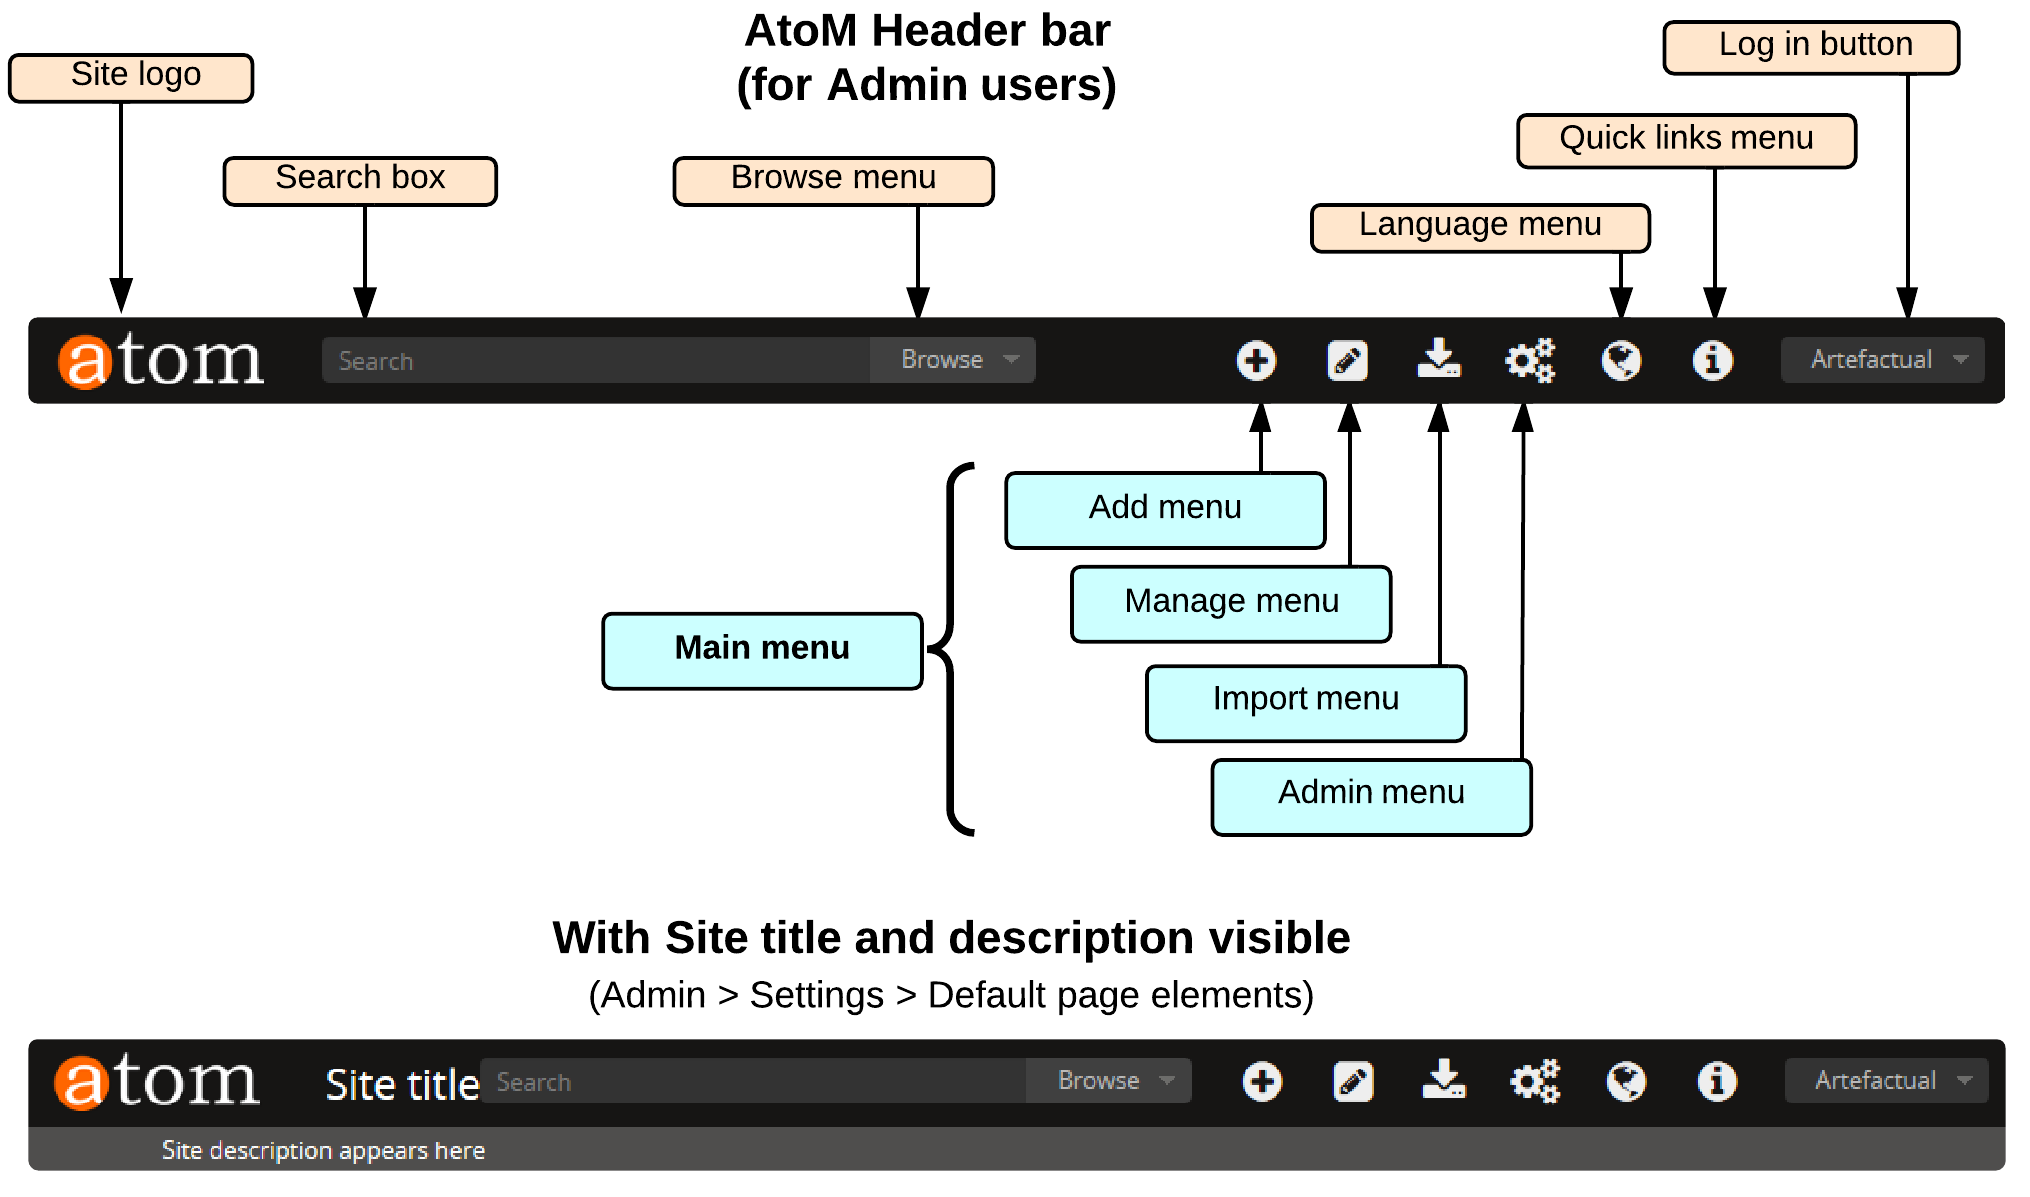
Checked boxes will display the corresponding element and unchecked boxes will hide the element. The logo, site title, and site description all appear as part of the AtoM header bar:
For more information on page elements, see Themes & Theming.
Default templates
AtoM ships with default page templates for viewing and editing archival descriptions, authority records, and archival institutions. For more information on the standards on which these templates are based, see Descriptive standards.
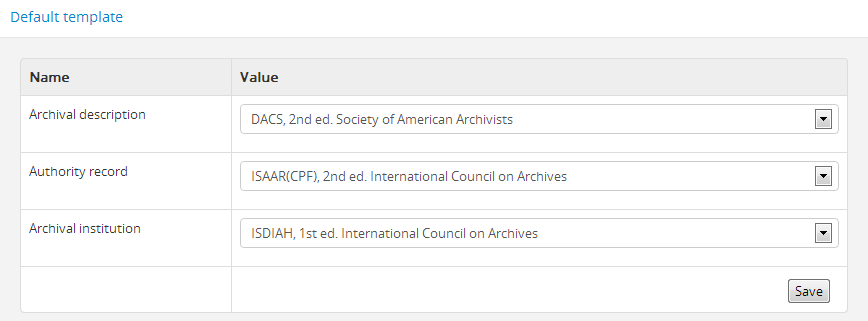
The “Name” column shows the types of entities that are described in AtoM: “Archival descriptions”, “Authority records” and “Archival institutions”. Drop-down menus of descriptive standards for each are provided under the “Value” column. Administrators may select one for each entity using the drop-down menus.
Once changes have been saved, records on the site will be able to be edited and viewed in the templates that have been selected.
User interface labels
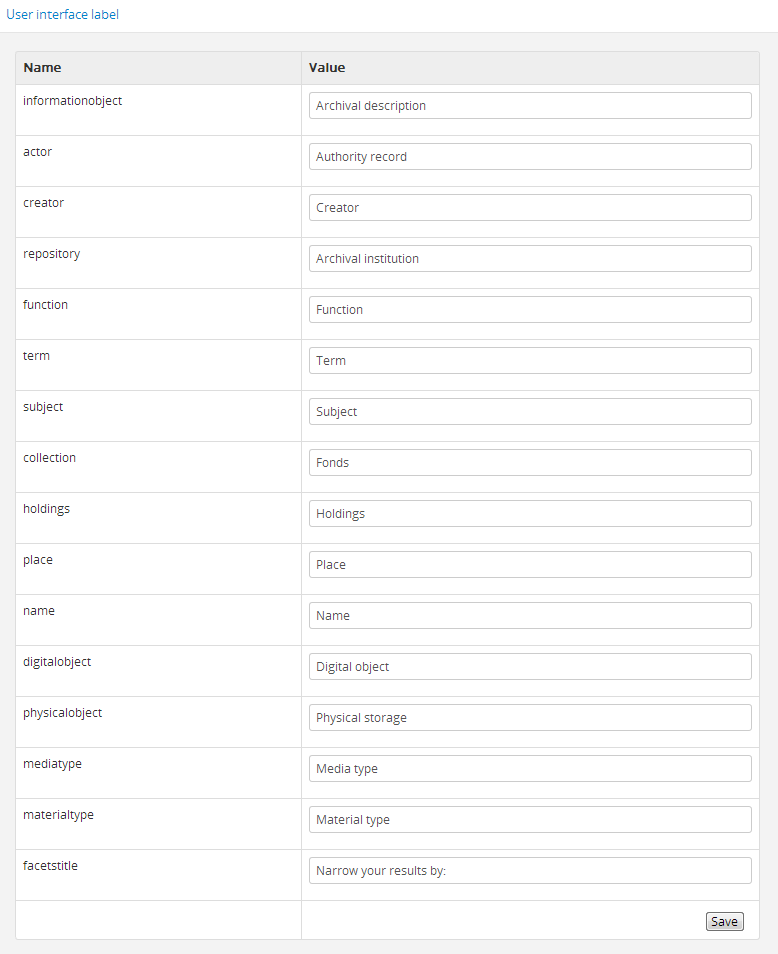
Users of AtoM interact with six main entities: accession records, archival descriptions, authority records, archival institutions, functions and terms.
See also
AtoM is flexible enough to support descriptions a variety of cultural materials such as archival, library, museum, and art gallery collections. The code, therefore, uses generic terms for entities. Administrators can specify how they want these terms to appear in the user interface labels to suit the institution’s collections. The default labels that ship with AtoM are terms typically used by archival institutions.
The “Name” column shows the generic entity name and the “Value” column shows AtoM’s default user interface labels. The following is a list of the generic terms and their AtoM user interface labels. Click on each label below to see glossary definitions and descriptions of how the terms are used in AtoM.
- informationobject: archival description
- actor: Authority record
- creator: Creator
- repository: Archival institution
- function: Function
- term: Term
- subject: Subject
- collection: Fonds
- holdings: Holdings
- place: Place
- name: Name
- digitalobject: Digital object
- physicalobject: Physical storage
- mediatype: Media type
- materialtype: Material type (general material designations used in the Canadian Rules for Archival Description).
- facetstitle: facets title
User interface labels can be changed by administrators by entering a new label(s) into the field(s) under the “Value” column. Changes will only be saved once the “Save” button is clicked. Changing the label will change its appearance throughout AtoM for both authenticated (logged-in) and public users.
Note
Changing the user interface labels will not automatically change the corresponding labels in the navigation menus. To change these menus, go to Admin > Menus. See the Manage menus page for more information.
Add/Remove languages
AtoM relies on volunteer translators from the community to support new language options. The translations are managed using Transifex and community members can learn more about contibuting translations here.
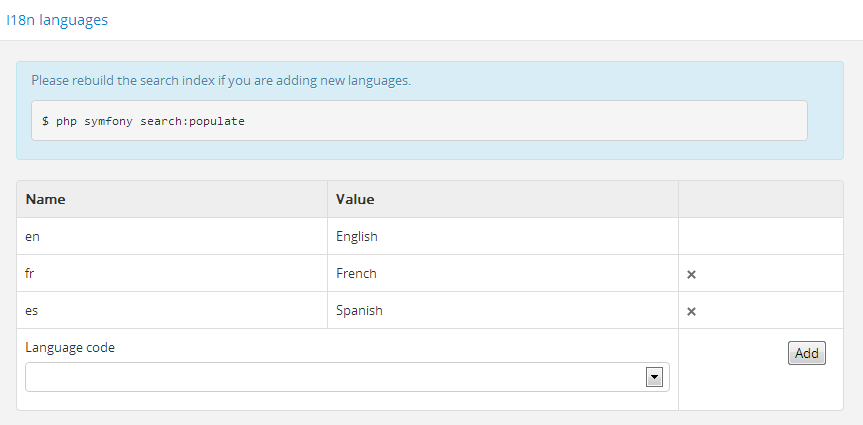
The language menu will display the languages that are currently available in your AtoM application.
To add a language:
- Select a language from the drop-down menu located under “Language code”.
- Click the “Add” button.
- AtoM adds the language and refreshes the page; the added language will now
appear in the “Add/remove language” section in “Settings”, as well as in the
drop-down menu of the
 language navigation menu located at the top right corner of the header bar.
Note
Many languages appear in the “Add/remove language” section in “Settings”, but the translations for all languages are not completed. If a language is selected from the Language menu in the header bar, content that has not yet been translated will remain in English.
To continue adding languages, repeat these steps as required.
Note
If a user selects a language that is not currently supported (i.e., where the content has not yet been translated through Transifex), AtoM will refresh the settings screen without implementing any changes.
To remove a language:
- Click the delete
 located in the third (blank) column next to the
language.
located in the third (blank) column next to the
language. - AtoM will delete the language and refresh the page; the deleted language will
no longer appear in the “Add/remove language” section in “Settings”, nor in
the drop-down menu of the language navigation menu located at the top right corner of the header bar.
To continue removing languages, repeat these steps as required.
See also
OAI repository
Open Archives Initiative, or OAI, is a protocol for metadata harvesting that allows automatic data harvesting and crawling within other systems that support OAI harvesters.
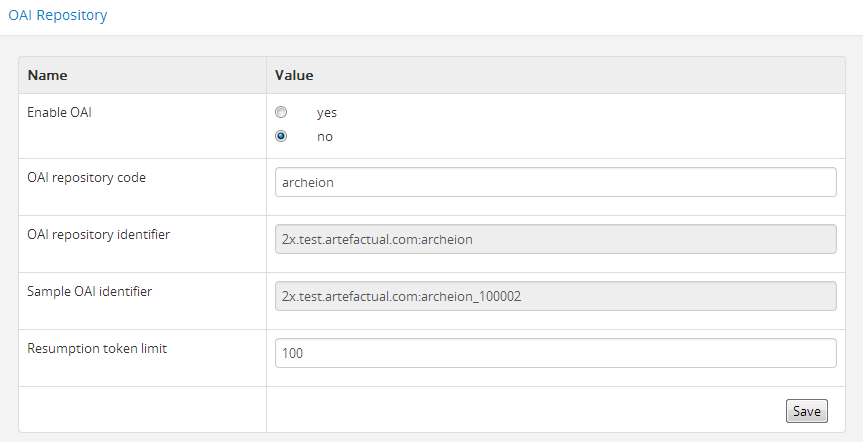
Warning
This feature was developed for earlier versions of AtoM and has not been tested in AtoM 2.x. We hope to improve OAI features in future version releases of AtoM.
Enable OAI
Select “yes” if you want the system to act as an OAI repository and respond to OAI harvesting requests.
OAI repository code
An alpha-numeric code can be added in the value field to uniquely identify this particular OAI repository within its network domain to create a unqiue, OAI compliant identifier.
OAI repository identifier
This is an auto-generated setting that produces an OAI compliant repository identifier, which includes OAI repository code value if it is set.
Sample OAI identifier
This is an example of the auto-generated, OAI compliant identifier which is created for each item in this particular OAI repository.
Resumption token limit
This relates to the number of entities to include in a single OAI response list before inserting a resumption token.
Job scheduling
In Release 1.3, job scheduling was introduced, using Gearman, to make AtoM capable of running applications in the background. At present, the only process that makes use of this feature is SWORD.
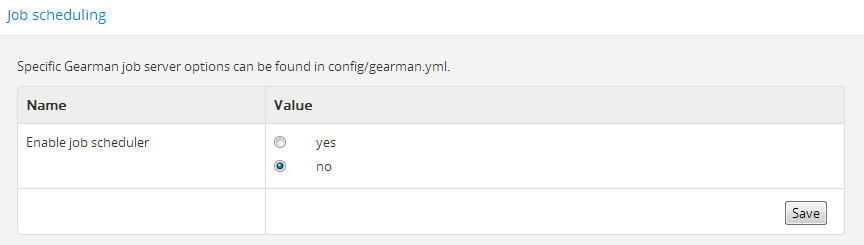
Click the radio button beside “yes” to enable job scheduler.
Note
Users who have DIP uploads configured from Archivematica will need to enable this feature.
Security panel
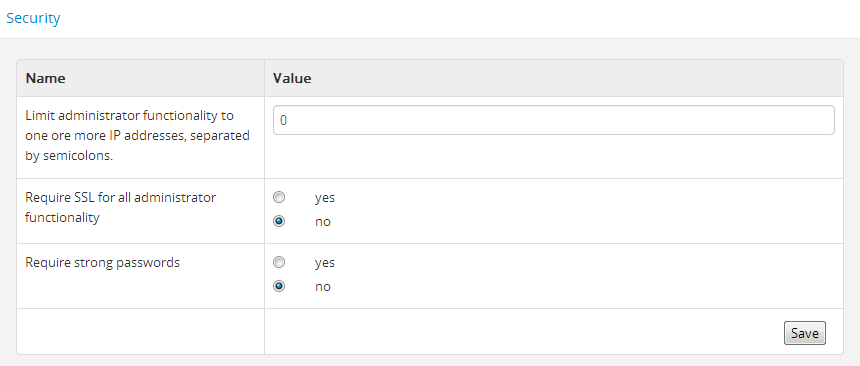
Limit administrator functionality by IP address
This feature allows administrators to limit administrator functionality to one or more IP addresses or IP ranges. Separate multiple IP address or ranges by semicolons, and use a dash to indicate an IP range. For example:
- 192.168.0.1 (single IP address)
- 192.168.0.1;192.168.0.255 (multiple unique IP addresses)
- 192.168.0.1-192.168.0.255 (IP range)
Require SSL for all administrator functionality
This feature allows administrators the option to enable the Hypertext Transfer Protocol Secure (HTTPS), which is a protocol for security over a computer network. It works by layering the Hypertext Transfer Protocol (HTTP) with the SSL/TLS protocol (Secure Sockets Layer/Transport Layer Security).
Select yes to require all HTTP requests to be redirected to the HTTPS server, changing the URI scheme from “http” to “https.”
Note
This will only apply to users who are authenticated (logged-in) or visiting the login page.
Require strong passwords
This feature allows administrators to enhance login validation by requiring the use of strong passwords. Strong passwords use least 8 characters, and contain characters from 3 of the following classes:
- Upper case letters
- Lower case letters
- Numbers
- Special characters
Choose “yes” to require authenticated (logged-in) users to have strong passwords.