CSV export
Most often understood as an acronym for “comma-separated values” (though sometimes called “character-separated values” because the separator character does not have to be a comma), CSV is a file format that stores tabular data in plain-text form. Information with common properties that can be expressed as a sequence of fields sharing a common header can be stored in plain-text using the CSV format, making it application agnostic and highly transportable.
A CSV file consists of a number of records (rows), that have identical fields, separated by commas (or in some cases, another separator). Often a header column (i.e. the cell values in first or top row of a CSV file) is included, naming each column and indicating what kind of data the column contains. Data is then entered using a separator or delimitor (such as a comma) to indicate a separation of fields (or cells), and a line break or carriage return to indicate rows (i.e. different records). Most spreadsheet applications (such as OpenOffice Calc or MS Excel) can open CSV files and express them as a spreadsheet. See Wikipedia for more information on CSV.
In AtoM, there are several kinds of CSV exports available - command-line export of archival description records; export of advanced search results; and an export of jobs completed. Each will be outlined below.
Jump to:
- Export archival descriptions in CSV format
- Export search and browse results in CSV format
- Export completed jobs in CSV format
See also
Export archival descriptions in CSV format
The CSV export task is a command-line task that will allow a system administrator with access to the root AtoM directory to export some or all archival descriptions held in AtoM in CSV format. This template is the same as that used for CSV import (AtoM 2.3 and higher), and the export produced can therefore also be used to import data into another AtoM instance.
Example use - run from AtoM’s root directory:
php symfony csv:export /path/to/my/export-location/example.csv
If you specify just a path to a directory, AtoM will generate a name for the CSV. If you wish to name your CSV file, then you can specify the target filename in the path (e.g. in the above example, “example.csv” is the target filename).
CSV export task options
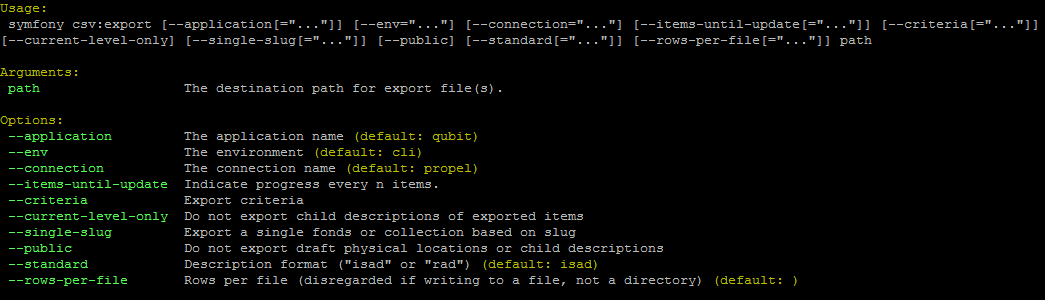
By typing php symfony help csv:export into the command-line from your root
directory, without specifying an export location of the CSV, you will able
able to see the CSV import options available (pictured above). A brief
explanation of each is included below.
The --application, --env, and connection options should not be
used - AtoM requires the uses of the pre-set defaults for symfony to be
able to execute the export.
The --items-until-update option can be used for a simple visual
representation of progress in the command-line. Enter a whole integer, to
represent the number of rows should be imported from the CSV before the
command-line prints a period (e.g. `` . `` ) in the console, as a sort of
crude progress bar. For example, entering --items-until-update=5 would
mean that the import progresses, another period will be printed every 5 rows.
This is a simple way to allow the command-line to provide a visual output of
progress.
The --criteria option can be added if you would like to use raw SQL to
target specific descriptions.
Example 1: exporting all draft descriptions
php symfony csv:export --criteria="i.id IN (SELECT object_id FROM status WHERE status_id = 159 AND type_id = 158)" /path/to/my/exportFolder
If you wanted to export all published descriptions instead, you could simply
change the value of the status_id in the query from 159 (draft) to 160
(published).
Example 2: exporting all descriptions from a specific repository
To export all descriptions associated with a particular archival institution, you simply need to know the slug of the institution’s record in AtoM. In this example, the slug is “example-repo-slug”:
php symfony csv:export --criteria="i.repository_id = (SELECT object_id FROM slug WHERE slug='example-repo-slug')" /path/to/my/exportFolder
Example 3: exporting specific descriptions by title
To export 3 fonds titled: “779 King Street, Fredericton deeds,” “1991 Canada Winter Games fonds,” and “A history of Kincardine,” You can issue the following command:
sudo php symfony csv:export --criteria="i18n.title in ('779 King Street, Fredericton deeds', '1991 Canada Winter Games fonds', 'A history of Kincardine')" path/to/my/exportFolder
You could add additional archival descriptions of any level of description into the query by adding a comma then another title in quotes within the ()s.
The --current-level-only option can be used to prevent AtoM from exporting
any children associated with the target descriptions.
If you are exporting fonds, then only the fonds-level description
would be exported, and no lower-level records such as series, sub-series,
files, etc. This might be useful for bulk exports when the intent is to submit
the exported descriptions to a union catalogue or regional portal that only
accepts collection/fonds-level descriptions. If a lower-level description
(e.g. a series, file, or item) is the target of the export, its
parents will not be exported either.
The --single-slug option can be used to to target a single archival unit
(e.g. fonds, collection, etc) for export, if you know the slug of the
target description.
Example use
php symfony csv:export --single-slug="test-export" /path/to/my/directory/test-export.csv
Important
Currently, this task will only export the top-level description (e.g.
the parent); none of the lower level descriptions
will be included. Since the --current-level-only option exists, we hope
to fix this behavior in future versions, see this issue ticket for further
details: https://projects.artefactual.com/issues/8992
The --public option is useful for excluding draft records from an export.
Normally, all records in a hierarchical tree will be exported regardless of
publication status. When using the --public option, only records
with a publication status of “Published” will be exported.
Important
If you are planning on re-importing your CSV export into another AtoM
instance, and you are using the --public option, you will need to ensure
that there are no published records that are children
of draft parents. If so, your re-import may fail!
AtoM uses the legacyID and parentID columns to manage hierarchical
relationships - but if the parent record is draft (and therefore excluded
from the export), then the parentID value for the published (and
exported) child record will point to a legacyID that is not included in
the export. We recommend you either remove such rows before trying to
re-import, or publish the parent record prior to exporting.
For more information on the legacyID and parentID columns, and how
AtoM manages hierarchical data via CSV import, see:
Legacy ID mapping: dealing with hierarchical data in a CSV and LegacyID and parentID.
The --standard option allows you to determine if the Canadian
RAD template or the international
ISAD(G) template is used when exporting. The default if
the option is not specified is ISAD(G). AtoM maintains several different
standards-based templates (see: Descriptive standards) and there are
currently 2 different CSV import/export templates - the default ISAD(G)
template, and the Canadian RAD template (because there are many different
fields in the RAD template). Other standards-template users (such as
DACS users) are encouraged to use the ISAD template.
The --rows-per-file option can be used when performing large exports, to
break the export into multiple CSV files. You can specify a whole integer
representing the number of rows to be included in a single CSV file, before
the export task will begin a new CSV. When invoking the task, remember to
specify the destination target to a directory, not a filename.
Example use
php symfony csv:export --rows-per-file="1000" /path/to/my/export-directory/
In the above example, when 1000 rows are added to the first CSV, AtoM will export it, and begin a second CSV - and so on.
Export search and browse results in CSV format
Any authenticated (i.e. logged in) user can generate a CSV export of Search or Browse results. The CSV export, after it is generated, is made available for download from the jobs page.
See also
When downloaded, the file will be compressed in a ZIP archive - there are many free utilities (likely there is one already included on your computer) that will allow you to “unzip” a ZIP file.
To generate and download a CSV export of search or browse results:
- Navigate to the archival description Browse page. You can get there using the browse menu located in the AtoM header bar - for more information, see: Browse menu. You can also perform a search directly via the global search box in the AtoM header bar, or by placing your cursor in the search box, selecting “Advanced search” from the drop-down menu that appears, and then using the advanced search panel to perform a search. For more information, see: Search and Advanced search
- If you wish to limit the results returned based on a search query before exporting, perform a search using the advanced search panel, and/or limit the results using the facet filters available in the left column. For more information on working with the fields and filters available on the advanced search panel, see: The Advanced search panel. For information on using the facets, see: Facet filters; particularly, Using facet filters in AtoM:.
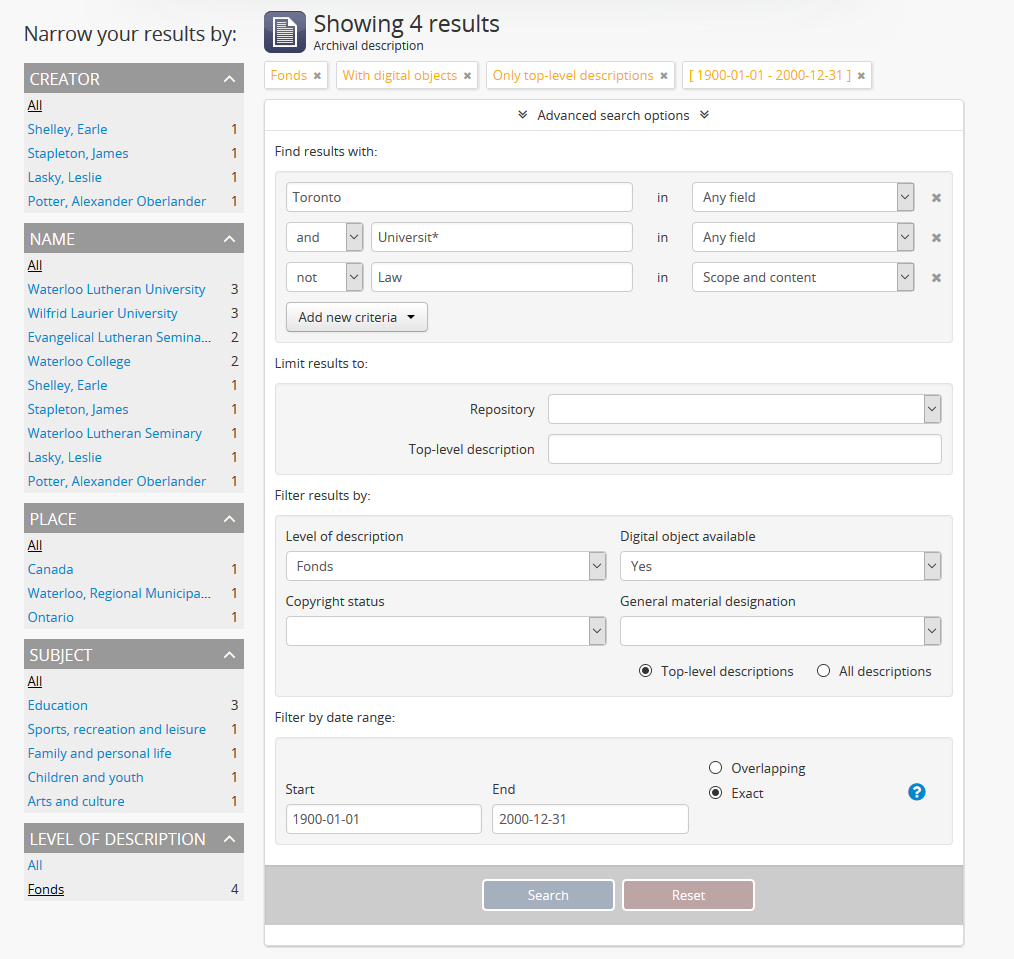
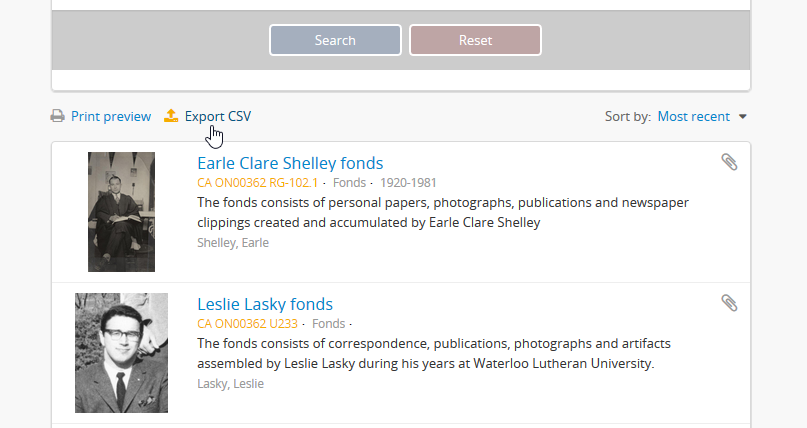
- When you want to export the search results returned, click on the “Export CSV” link - it’s located below the advanced search panel, but above the results, on the left.
Note
Public users will not be able to see this export link. Currently, the search CSV export feature is only available to authenticated (i.e. logged in) users.
- The CSV export of the search results will be generated by the job scheduler. After clicking the “Export CSV” link, AtoM will reload the page - scroll back up to the top to see a notification about the job, with a link to the jobs page where you can see the status of your job and download the CSV when it is ready. Click on the link in the notification to go to the jobs page.
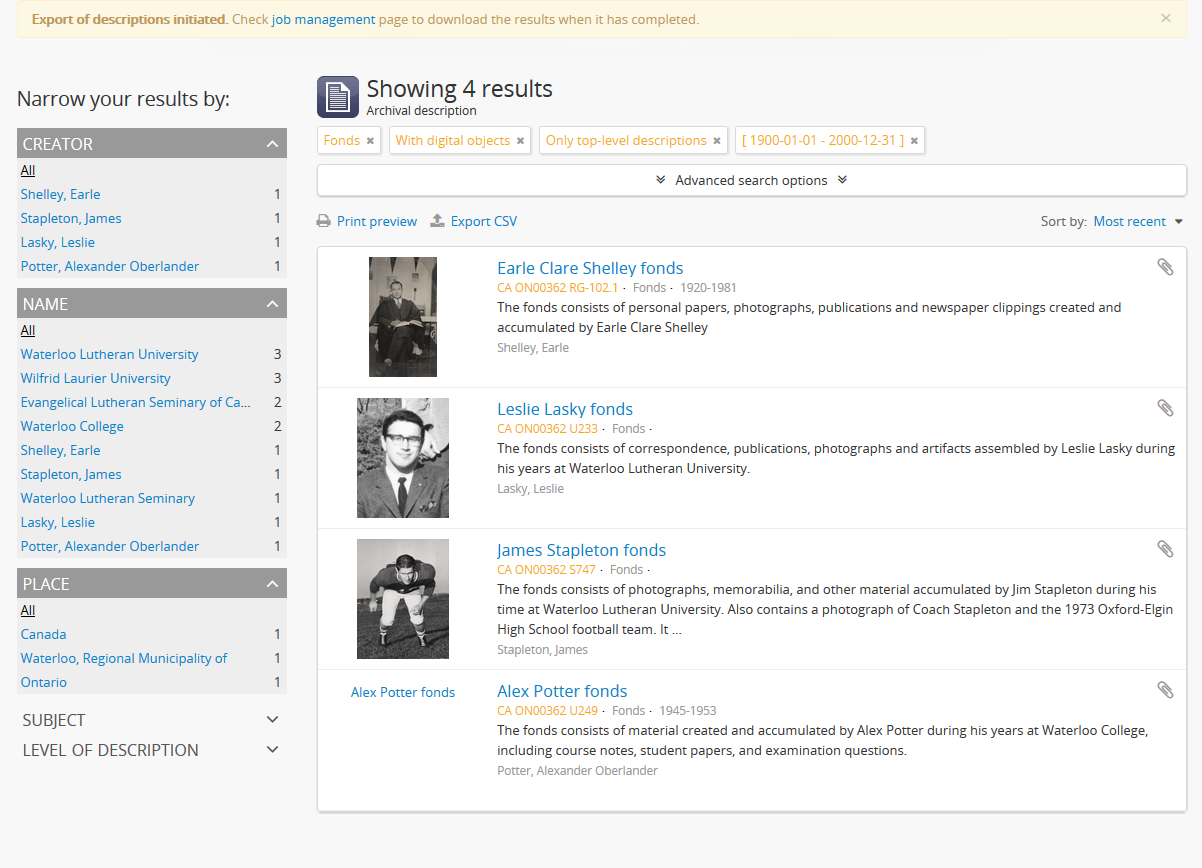
On the jobs page, you will find information about the export job, including a download link when the task is done. Check the “Job status” column - if it says “Completed,” then the job has successfully finished and you can now download your CSV. It is says “Running,” then the task is still being executed - try refreshing the page in a moment for an updated status. If the Job status column says “Error,” then the CSV export has failed for some reason - talk to your system administrator for assistance. See the Manage jobs page for more information.
When the job is complete, click on the Download link in the “Info” column, and the CSV, compressed in a ZIP file, will be downloaded to your computer.
Tip
The CSV export is formatted similarly to our CSV import templates. Curious about what fields are included, or uncertain what a certain field represents in the corresponding content standard? Take a look at our CSV import documentation on archival descriptions, or check out the CSV import templates on our wiki:
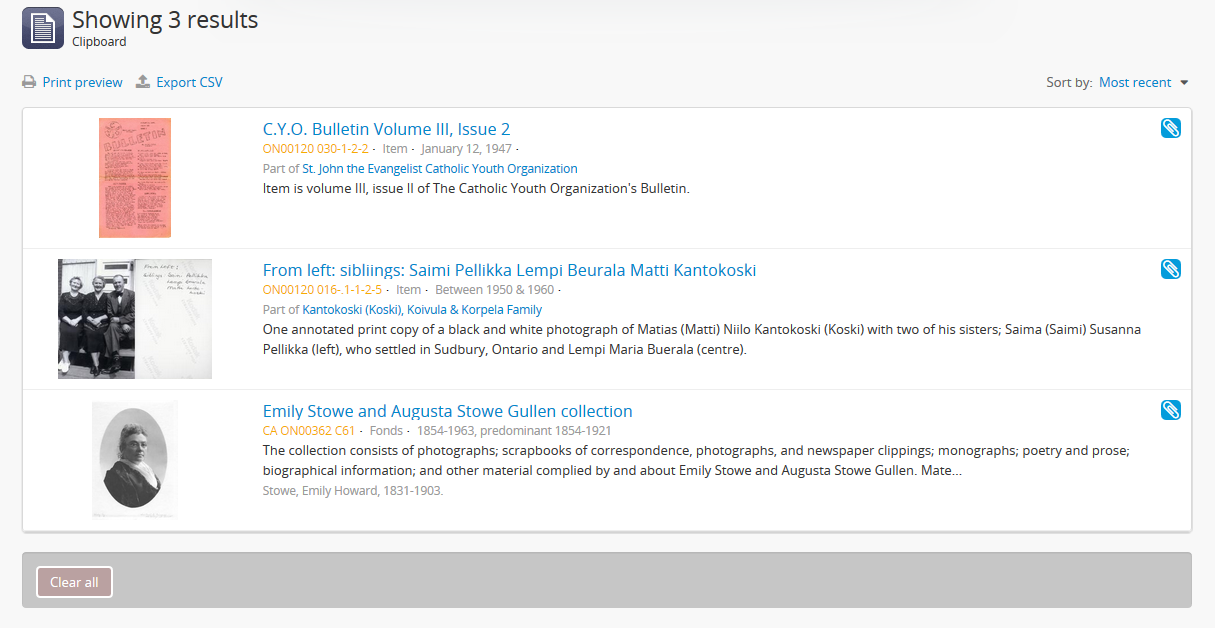
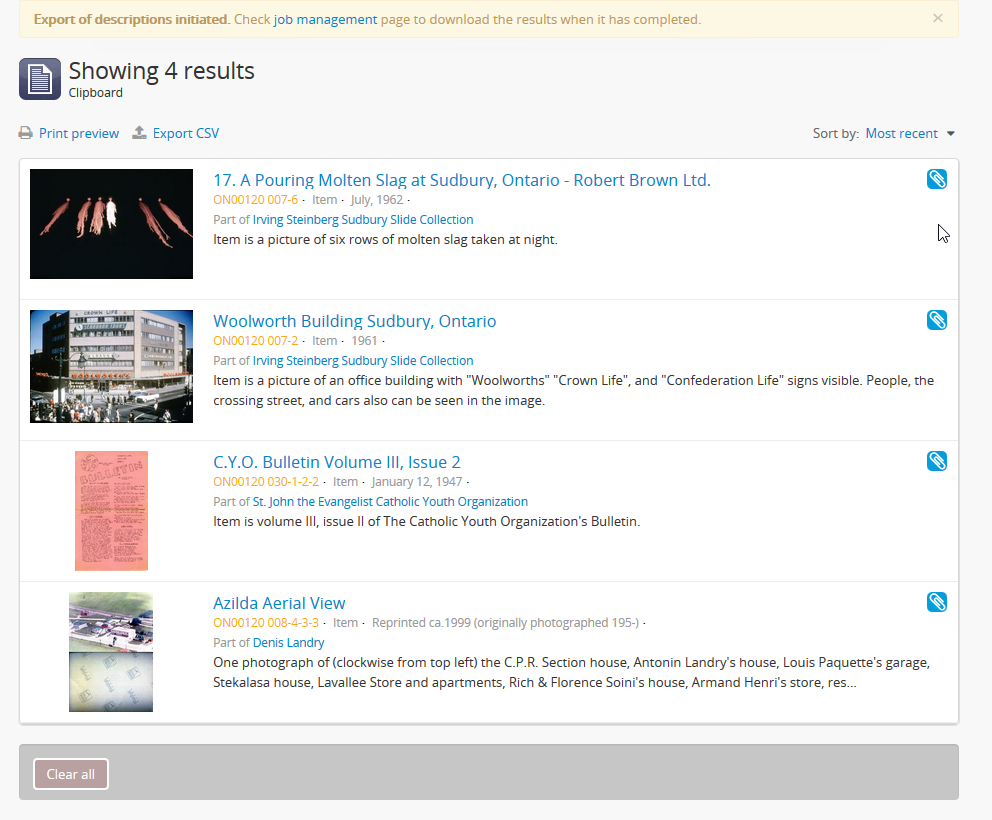
Export Clipboard results in CSV format
AtoM includes a Clipboard that allows users to “pin” archival description results to it for review or further action.
Any authenticated (i.e. logged in) user can generate a CSV export of Clipboard results. The CSV export, after it is generated, is made available for download from the jobs page.
See also
When downloaded, the file will be compressed in a ZIP archive - there are many free utilities (likely there is one already included on your computer) that will allow you to “unzip” a ZIP file.
To generate and download a CSV export of clipboard results:
- You should first ensure that you have the results you would like to export already pinned to the Clipboard. For more information on using AtoM’s Clipboard module, see: Clipboard.
- Navigate to the Clipboard page. You can get there via the
 Clipboard menu in the AtoM header bar - open the
menu, and select “Go to Clipboard”.
Clipboard menu in the AtoM header bar - open the
menu, and select “Go to Clipboard”. - AtoM will redirect you to the Clipboard page. Above the Clipboard results, click on the “Export CSV” link at the top left of the page.
Note
Public users will not be able to see this export link. Currently, Clipboard CSV export feature is only available to authenticated (i.e. logged in) users.
- The CSV export of the clipboard results will be generated by the job scheduler. After clicking the “Export CSV” link, AtoM will reload the page with a notification about the job at the top, which includes a link to the Jobs page where you can see the status of your job and download the CSV when it is ready. Click on the link in the notification to go to the jobs page.
On the jobs page, you will find information about the export job, including a download link when the task is done. Check the “Job status” column - if it says “Completed,” then the job has successfully finished and you can now download your CSV. It is says “Running,” then the task is still being executed - try refreshing the page in a moment for an updated status. If the Job status column says “Error,” then the CSV export has failed for some reason - talk to your system administrator for assistance. See the Manage jobs page for more information.
When the job is complete, click on the Download link in the “Info” column, and the CSV, compressed in a ZIP file, will be downloaded to your computer.
Tip
The CSV export is formatted similarly to our CSV import templates. Curious about what fields are included, or uncertain what a certain field represents in the corresponding content standard? Take a look at our CSV import documentation on archival descriptions, or check out the CSV import templates on our wiki:
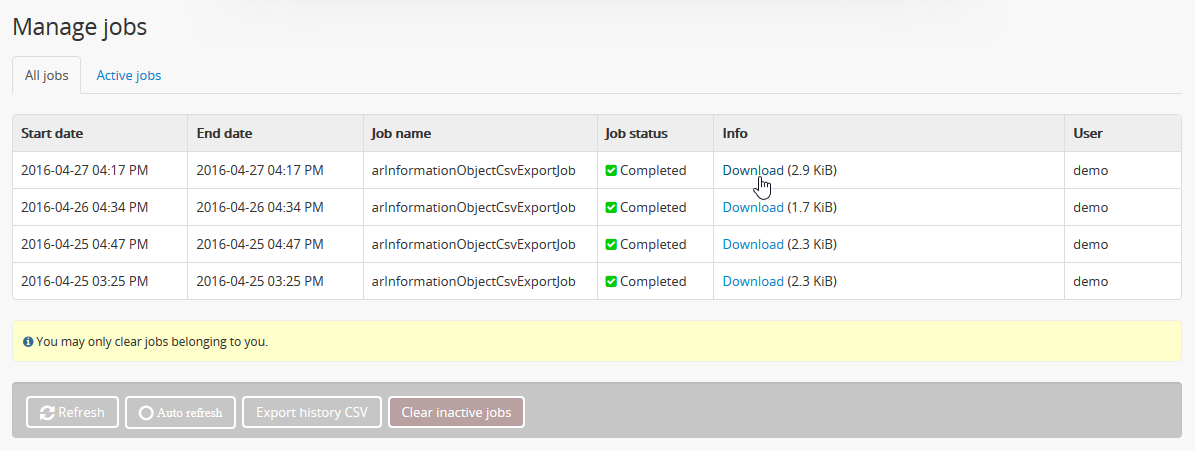
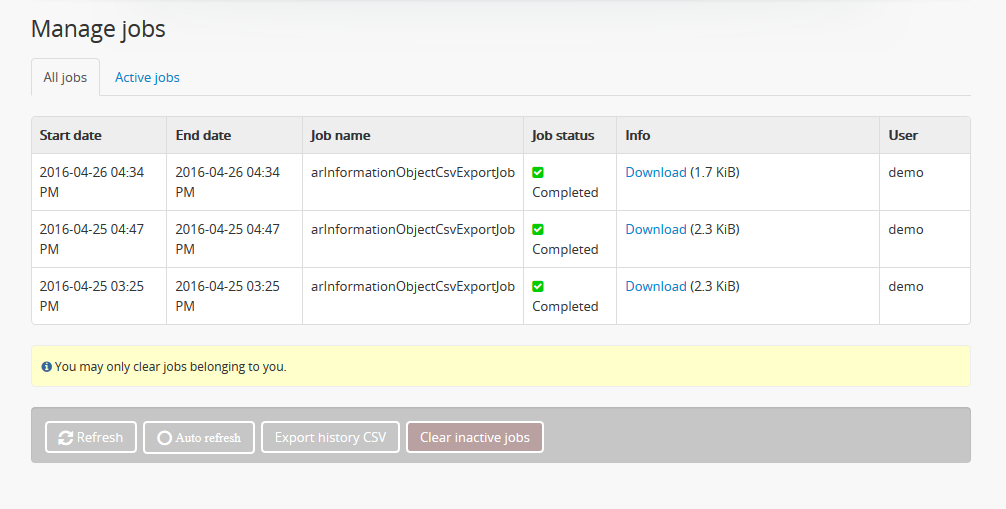
Export completed jobs in CSV format
AtoM includes a job scheduler in order to execute certain long-running tasks asynchronously to guarantee that web requests are handled promptly and work loads can be distributed across multiple machines. This ensures time and/or resource-intensive tasks do not timeout when running via the web browser. For more information see, Manage jobs.
In case users would like to clear completed jobs but keep a record outside of AtoM of previous jobs performed, a CSV export of the Jobs table is available. Like the display table in the user interface, the output contains columns for startDate, endDate, jobName, jobStatus, jobInfo, and jobUser.

Simply navigate to the jobs page via  Manage > Jobs, and then
click the “Export history CSV” button located in the button block on
the page. All jobs currently listed on the Jobs page will be included in the
export.
Manage > Jobs, and then
click the “Export history CSV” button located in the button block on
the page. All jobs currently listed on the Jobs page will be included in the
export.
Important
Only an administrator can see all jobs initiated by all users in the system. Other users can only see jobs that they themselves have initiated - and will only be able to export a CSV of their own jobs. See the Manage jobs page for more information on using the Jobs page.