Rights
As discussed in the section on entity types, Rights records provide rights related restrictions that can be linked to accession records, archival descriptions and their related digital objects. AtoM Rights metadata elements use PREMIS rights elements. In AtoM restrictions can be based on Copyright(s), License, Statute(s), Policy, or Donor (as in an agreement established with a donor). Rights can be set to be inherited in AtoM, which means that rights added at a higher level (e.g., fonds level) can be inherited by the lower levels (e.g., item level). See Manage rights inheritance, below.
If you add rights to an accession record, all archival descriptions created from that accession will inherit the same rights.
AtoM also allows you to choose one PREMIS rights act (such as Display, Disseminate, etc) to use as an action for your digital objects - though you can configure different digital object access permissions for each PREMIS rights Basis. See Make rights actionable on digital objects, below.
Jump to:
- Add a new rights record
- Manage rights inheritance
- Make rights actionable on digital objects
- Configure Disallowed and Conditional access statements
- Add a Copyright statement before allowing access to a master digital object
- Manage Rights holders records
Add a new rights record
This section describes how to add a new rights record by using the rights dialog provided through the add/edit template. You must add rights to an existing accession record or archival description. To create an accession record or archival description first, please see: Add new accession record or Add new archival description.
Note
You must be logged in and have the appropriate privileges, such as editors and administrators to be able to add/edit content in AtoM, which includes creating a rights record. See: Log in.
Add rights to an Accession record
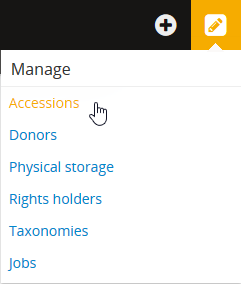
- Navigate to the accession record you want to edit. You can do this via the main menu in the AtoM header bar, by clicking on Manage > Accessions. For more information on navigation in AtoM, see: Access content.
- AtoM will redirect you to the accession record browse page. Select the record you want by clicking on the hyperlink Identifier. You can also search for an accession record with the accession records search box located at the bottom of the browse page. For more information on searching for accession records in AtoM, see: Searching for accession records.

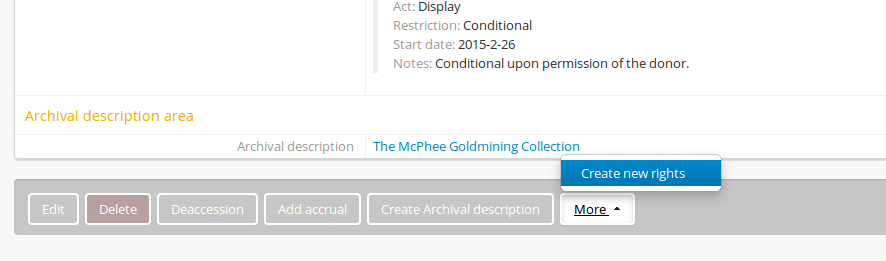
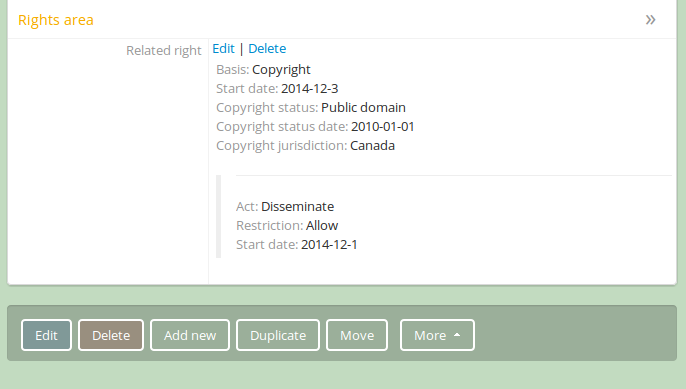
- When you have arrived at the record to which you wish to add rights, click on “Create new rights” in the button block. The PREMIS rights entry form will appear.
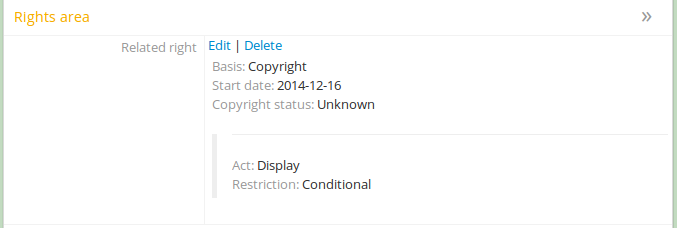
- The Rights entry page allows you to establish the basis for which rights are granted or disallowed as well as describing the rights themselves.
- Rights basis:
AtoM provides a drop-down menu to select the basis for the rights associated with the description. You can select: Copyright, License, Statute, Policy, or Donor.
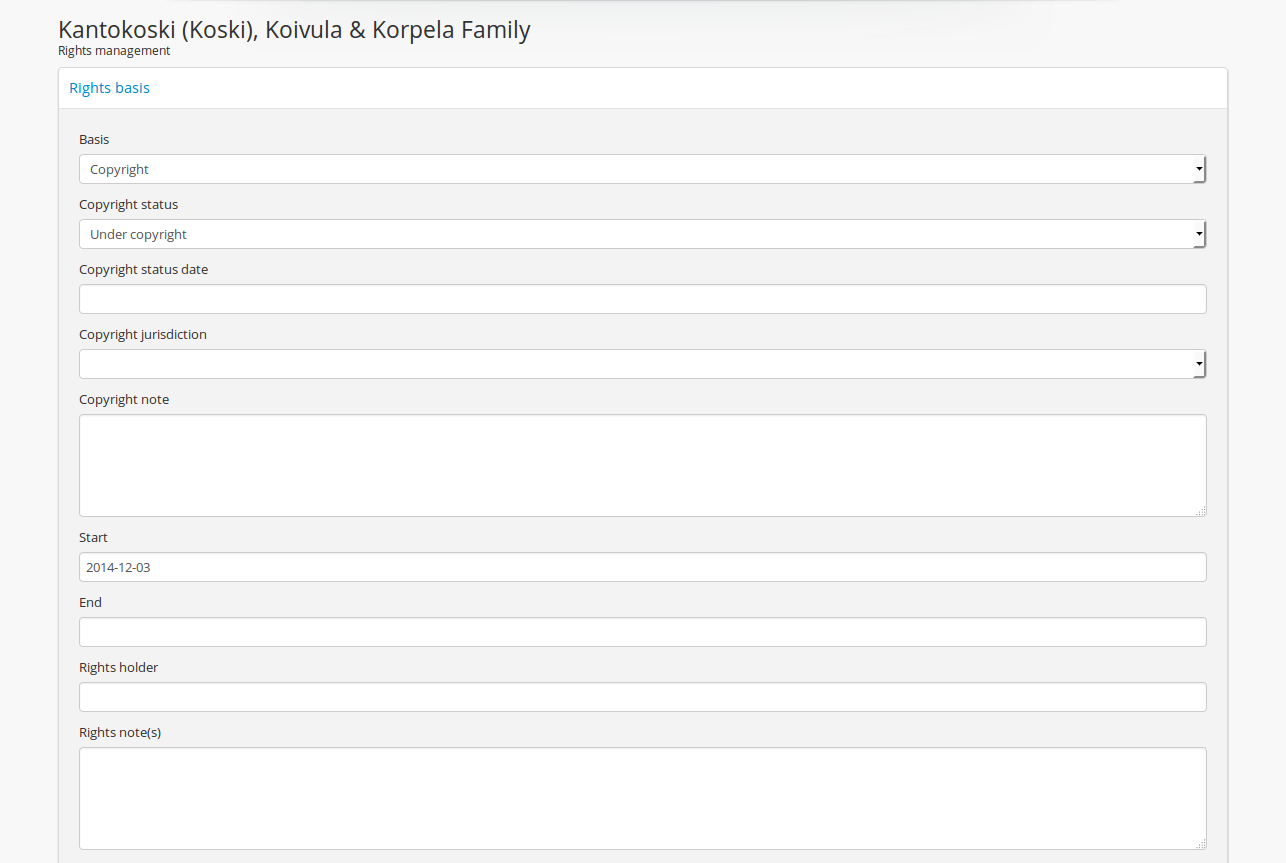
The Rights entry page with Copyright set as the basis.
The fields below the rights basis will differ depending on the basis chosen. Compare for example the figure above, showing Copyright as the basis, and the figure below, showing Statute as the basis:
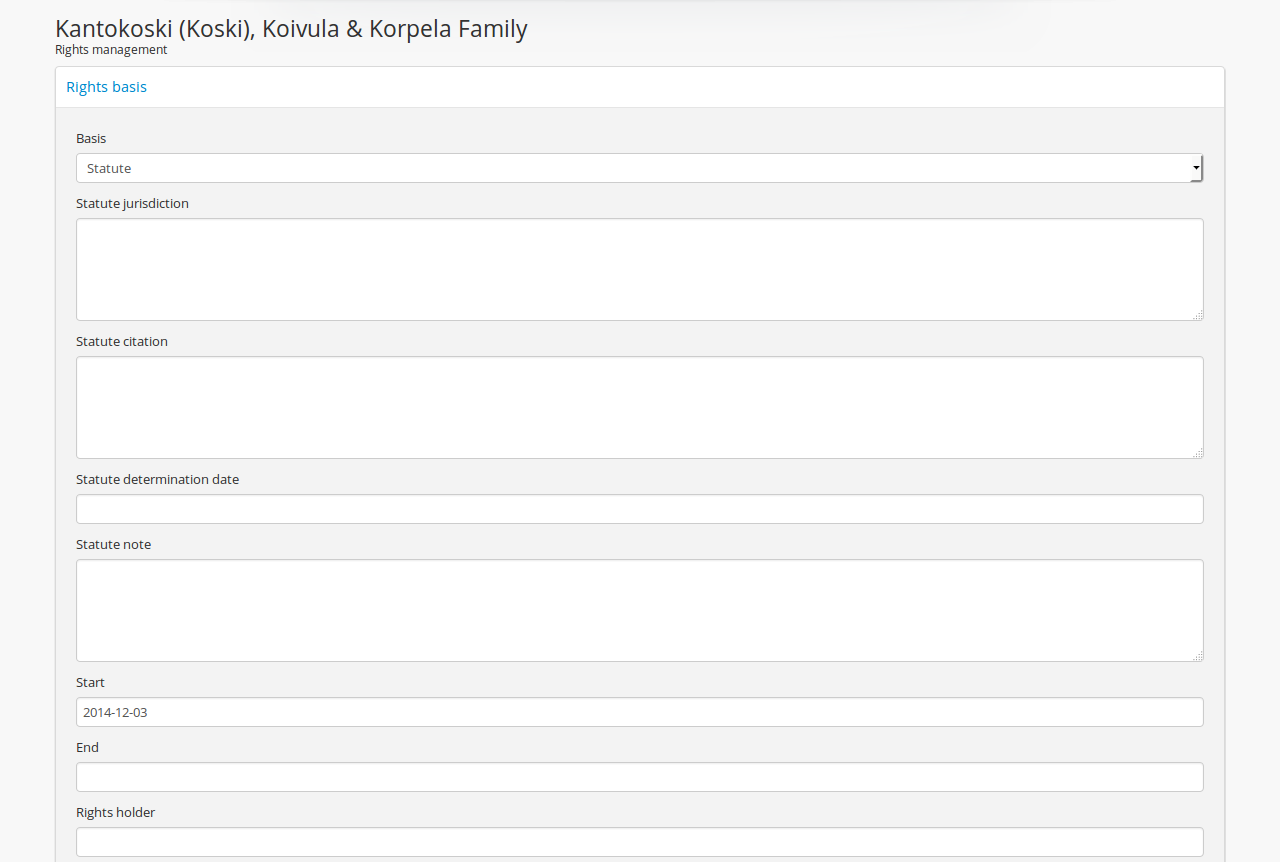
The Rights entry page with Statute set as the basis.
As you complete the Rights basis fields, tooltips will appear to explain the purpose of the field.
When adding the Rights holder, can add a new Rights holder name, or select an existing one using the auto-complete action provided by AtoM.
- Act/Granted rights:
Once you have established the basis for the rights you need to grant, fill in the Act/Granted rights fields:
- The “Act” data entry field is a drop-down list. You can select: Delete, Discover, Display, Disseminate, Migrate, Modify, and Replicate.
- The “Restriction” data entry field provides three choices: Allow, Disallow or Conditional.
- Add Start and End dates for the right. Leave the end date blank if it is unknown or open.
- You can add notes related to the granted right.
If you are finished adding granted rights related to this basis, click Save. If you have more granted rights to add related to this basis, click Add granted right and fill in the fields again. Click Save when you are finished.
Tip
You may have granted rights to record that are related to more than one basis. For example, you may want to record a granted right related to Copyright, and another granted right related to Policy. After you click Save, you can return to the accession and add more rights related to another basis by clicking More -> Create new rights again.
After rights are created for an accession, they can be edited or deleted by logged in users with the correct permissions by clicking the links from the archival description in view mode:
Important
When you click delete, AtoM deletes the rights record without asking for confirmation, so be sure to click only when you are positive you wish to delete the rights information!
- Once you complete adding information to the rights record, click on the click Save.
Add rights to an Archival description
- First, navigate to the archival description you wish to add rights to. You can do this by browsing or searching for the archival description - see Access content for more information on navigation in AtoM.
- In the button block, click on “More,” then on “Create new rights”.
- The Rights entry page allows you to establish the basis for which rights are granted or disallowed as well as describing the rights themselves.
- Rights basis:
AtoM provides a drop-down menu to select the basis for the rights associated with the description. You can select: Copyright, License, Statute, Policy, or Donor.
The Rights entry page with Copyright set as the basis.
The fields below the rights basis will differ depending on the basis chosen. Compare for example the figure above, showing Copyright as the basis, and the figure below, showing Statute as the basis:
The Rights entry page with Statute set as the basis.
As you complete the Rights basis fields, tooltips will appear to explain the purpose of the field.
When adding the Rights holder, can add a new Rights holder name, or select an existing one using the auto-complete action provided by AtoM.
- Act/Granted rights:
Once you have established the basis for the rights you need to grant, fill in the Act/Granted rights fields:
- The “Act” data entry field is a drop-down list. You can select: Delete, Discover, Display, Disseminate, Migrate, Modify, and Replicate.
- The “Restriction” data entry field provides three choices: Allow, Disallow or Conditional.
- Add Start and End dates for the right. Leave the end date blank if it is unknown or open.
- You can add notes related to the granted right.
If you are finished adding granted rights related to this basis, click Save. If you have more granted rights to add related to this basis, click Add granted right and fill in the fields again. Click Save when you are finished.
Tip
You may have granted rights to record that are related to more than one basis. For example, you may want to record a granted right related to Copyright, and another granted right related to Policy. After you click Save, you can return to the archival description and add more rights related to another basis by clicking More -> Create new rights again.
After rights are created for an archival description, they can be edited or deleted by logged in users with the correct permissions by clicking the links from the archival description in view mode:
Important
When you click delete, AtoM deletes the rights record without asking for confirmation, so be sure to click only when you are positive you wish to delete the rights information!
Manage rights inheritance
AtoM will allow you to add a rights record to a parent record and choose whether or not the same rights record should be applied to that parent’s child records.
After creating a rights record at a parent-level, in edit mode click on “More” then “Manage rights inheritance” in the button block of the parent record.
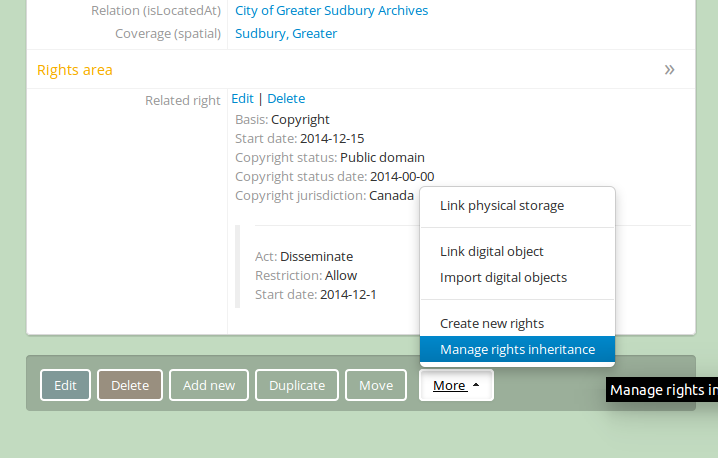
On the next screen, decide:
1. If you want the rights record(s) inherited by all descendants (children) or only descendants with digital objects associated with them (see Make rights actionalable on digital objects, below) and,
2. Whether you would like to delete any rights which pre-exist in the child records and replace with the parent rights (option 1) or combine the parent rights with any existing rights in the child records (option 2).
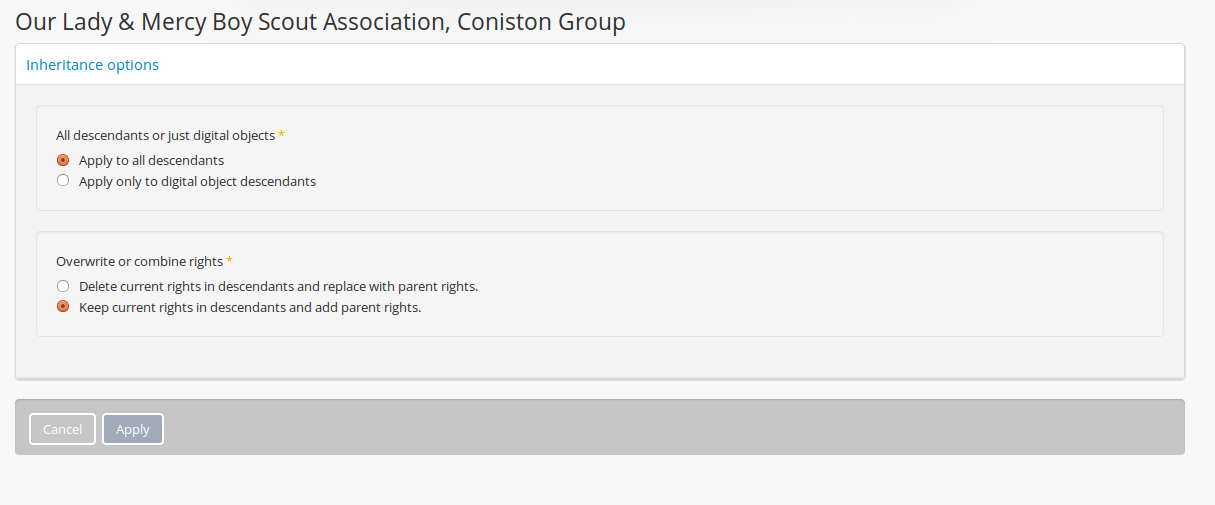
Click Apply. The child records will now reflect the rights inheritance from the parent record as you indicated.
Note
AtoM will only allow you to manage rights inheritance from the top down- you will not be able to modify the rights of a child record and have them passed up to the parent record.
Tip
Rights inheritance is a task that AtoM performs asynchronously, via the Jobs Scheduler. If the parent description has many children, it may take some time for all of the children to inherit the rights. See Manage Jobs for more information.
Make rights actionable on digital objects
Administrators can choose an act/granted right for which digital object permissions are set. This means that digital object thumbnails, reference display copies and master digital objects can be made visible or invisible to non-authenticated users by changing the rights record in conjunction with the appropriate administrative settings.
To access the settings, click on the
 Admin menu in the main menu and
select “Settings” from the drop-down menu. Then click on “Permissions.”
Admin menu in the main menu and
select “Settings” from the drop-down menu. Then click on “Permissions.”
First, choose from the drop-down menu the act/granted right you would like to apply to digital objects. You can choose from: Delete, Discover, Display, Disseminate, Migrate, Modify and Replicate. For many institutions, either Display or Disseminate will be the logical choice since this functionality relates to the display of digital objects.

Tip
The PREMIS acts are maintained in the “Rights act” taxonomy, and can be customized by users with the proper edit permissions. If you add a new term to the Rights act taxonomy, it will appear in the PREMIS Access permissions table when you return to the Settings page. You can then configure its settings.
The default terms are mostly derived from the PREMIS 2.2 standard - here are their definitions as found in the PREMIS Data Dictionary (v2.2, 2012), p. 225:
- replicate = make an exact copy
- migrate = make a copy identical in content in a different file format
- modify = make a version different in content
- disseminate = create a copy or version for use outside of the preservation repository
- delete = remove from the repository
AtoM includes 2 other default basis terms: discover, and display. These were added because PREMIS is intended to support digital preservation, and its rights module does not get very granular, especially when applied to digital object permissions management in an access system.
- discover = based on “Resource discovery”, i.e. exposing metadata through searches
- display = display a digital object in a public access system
Users can use these terms as originally defined, or based on local interpretations. New terms can be added to the Rights act taxonomy as need, and unnecessary terms can be altered or deleted. For more information on managing terms and taxonomies, see: Terms.
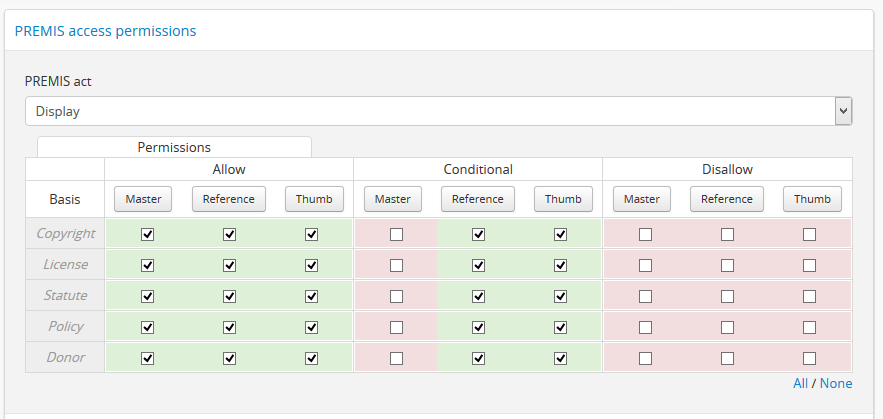
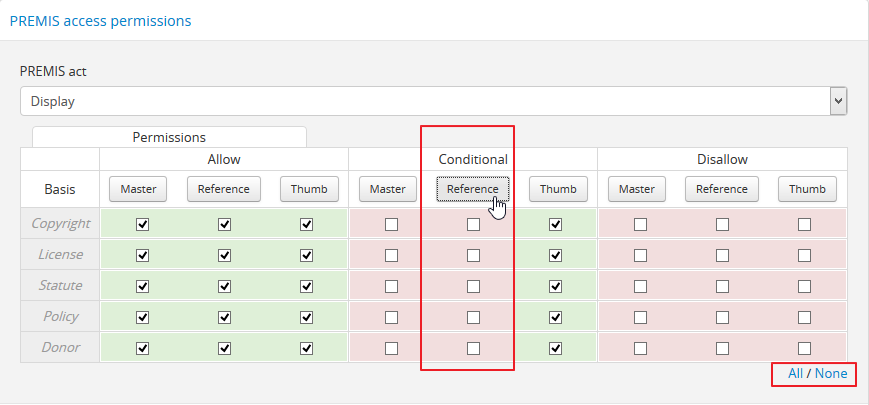
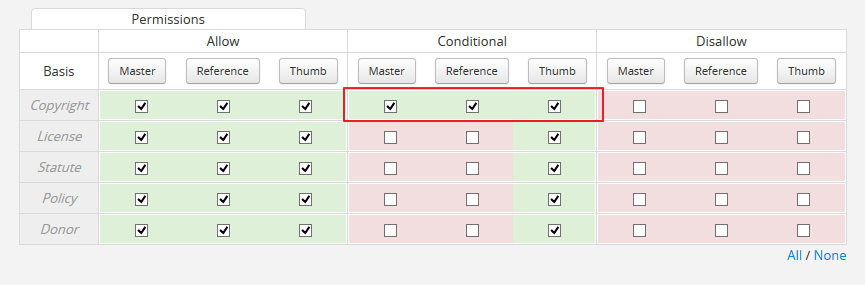
Next, use the permissions table to indicate whether viewing/downloading digital objects should be allowed or disallowed. You will set these permissions for each of possible Rights bases (Copyright, License, Statute, Policy, and Donor), covering each of the three possible restrictions (Allow, Conditional, and Disallow). For each restriction you will also indicate whether viewing and downloading masters, reference representations and thumbnails are allowed or disallowed.
Note
You can only make rights actionable based on one act/granted right, determined by the PREMIS act drop-down menu above the permissions table. Other acts and granted rights can be added to an archival description, but they will have no effect on the visibility of digital objects to your users.
When a check-box in the permissions table is checked (and the area surrounding it is green), it means that access is allowed for that particular rights configuration. When a check-box is unchecked (and the area surrounding it is red), it means that access is disallowed for that particular rights configuration.
You can use the “Master,” “Reference,” and “Thumb” buttons above each row to check or uncheck all basis rows in a particular column. You can also use the “All / none” link below the table to check or uncheck all values in the permissions table:
Don’t forget to save your changes with the “Save” button in the button block at the bottom of the page.
Remember, for your rights to have an effect on a digital object attached to an archival description:
- A Rights statement must be associated with the description (see above, Add rights to an Archival description)
- The associated rights must have the same act as the one set in the
PREMIS act drop-down menu above the permissions table in
Admin > Settings > Permissions
- The basis of the rights on your archival description must be configured to
disallow access in the permissions table in Admin > Settings >
Permissions
- The user must be a public user (e.g. not logged in; also known as a researcher) - the rights do not apply to authenticated (e.g. logged in) users
For a public user, when access to the thumbnail is disallowed based on an attached rights statement, AtoM will instead display a default generic media type icon:
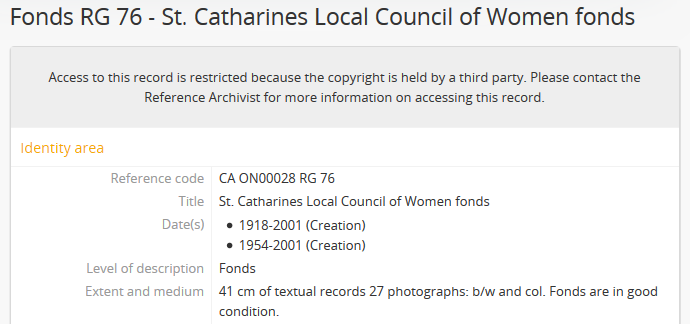
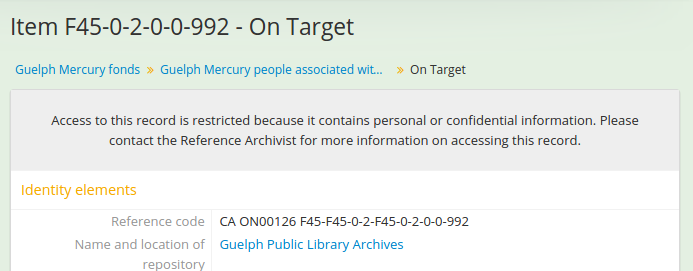
When access to the reference display copy is disallowed based on an attached rights statement, users will instead be shown the related Access statement, depending on the Basis of your PREMIS right. Access statements are intended to be user-friendly messages explaining the restriction, and can be configured by an administrator - see below for more information: Configure Disallowed and Conditional access statements.
If access to the reference display copy is allowed, but access to the master digital object (e.g. the original) is disallowed, the users will be able to view the reference copy, but they will not be able to click on it to view/download the original.
Example: Configuring copyright permissions
Here is an example use case:
Suppose an institution has determined that their digital objects fall into 3 categories: those that are in the public domain, those that are definitely still under copyright, and those that have an unknown copyright status. The institution does a risk assessment and determines that:
- Public domain digital objects can be accessed by anyone in any format
- Items under copyright can only be viewed online in their thumbnail version
- Items with unknown or uncertain copyright status can be viewed online, but only in smaller resolution. It is determined to be too risky to allow online access to the master copies.
The institution has created rights records for their archival descriptions using the act “Display”.
This institution would set their Permissions as such:
Example rights records in the related archival descriptions could look like this:
Public domain items: Display - Allow
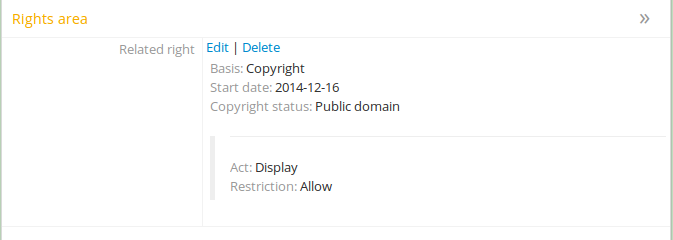
The digital object would display, and would also be “clickable” to access the master copy:
Copyrighted items: Display - Disallow
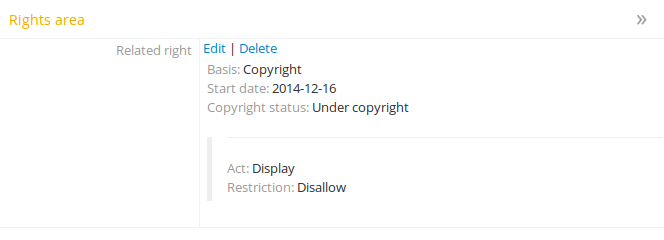
The digital object would not display, and is replaced by a statement explaining why it is not visible:
Uncertain copyright: Display - Conditional
The image will display in its reference representation, but will not be “clickable”, preventing the user from using the master image:
Tip
For another possible way of dealing with access to digital objects with conditional copyright restrictions, see below, Add a Copyright statement before allowing access to a master digital object.
Configure Disallowed and Conditional access statements
When access to the reference display copy of a digital object is restricted to public users via a PREMIS right, AtoM will display a customizable access statement in its place:
Access statements are intended to be user-friendly explanations of why access is restricted, and what the user can do (if anything) to gain access (for example, contact the Reference Archivist, etc).
These access statements can be individually configured for each Rights basis
by an administrator, in Admin > Settings > Permissions.
Scroll down to the section labelled “PREMIS access statements”:
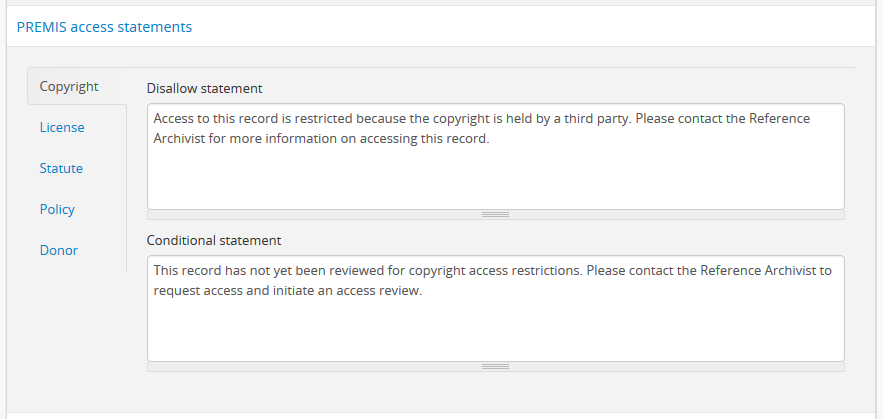
The different Rights basis terms along the left act as tabs - click on one to flip the view and display the current accesss statement text for that basis. Each basis has a Conditional access statement (when the associated rights restriction is set to “Conditional” and the permissions table setting for the reference display copy is set to “Disallow”), and A Disallow access statement (when the rights restriction is “Disallow” and the associated permission for the reference copy is also “Disallow”). You can add custom text for each.
Tip
The PREMIS Rights basis terms are all maintained in a
taxonomy. The terms can be edited or deleted, and new terms can be
added by logged-in users with appropriate
access privileges. If a new term is added to the
Right basis taxonomy, then a new tab will be added to the PREMIS access
statements section in Admin > Settings > Permissions. An
administrator can then add custom Conditional and Disallow access
statements for the new PREMIS basis.
You can customize the access statements for each Rights basis, as needed based on local practice. When you have made the edits you want to each Basis tab, remember to scroll down and click “Save” in the button block at the bottom of the page.
Add a Copyright statement before allowing access to a master digital object
There may be use cases where you wish to allow users access to the master digital object (i.e. the original digital object you have uploaded), but want to remind users of the copyright terms involved in the digital object’s usage and/or dissemination. For example, perhaps the terms of the copyright do not permit commercial use, or require attribution.
In these cases, AtoM includes the ability to configure a customizable copyright pop-up notice, that will appear for all users when they try to access the master digital object. The copyright pop-up must be viewed, and an “Accept” button clicked (acknowledging the terms in the pop-up), before access to the master digital object is granted. This pop-up will come into effect when:
- The copyright pop-up is enabled in Admin > Settings >
Permissions
- Users are granted sufficient access privileges to access the master digital object
- A Rights statement with a Copyright basis and the Restriction set to “Conditional” is attached to the associated archival description
- The digital object is uploaded locally, not linked via a web address (i.e. from an external site).
More on each of these points will be included below.
Configuring the copyright pop-up
- To enable and configure the copyright pop-up, click on the
Admin menu in the AtoM header bar, and
select “Settings”. AtoM will redirect you to the settings page. Choose
“Permissions” in the left-hand navigation menu, and scroll down to the
section entitled “Copyright statement”:
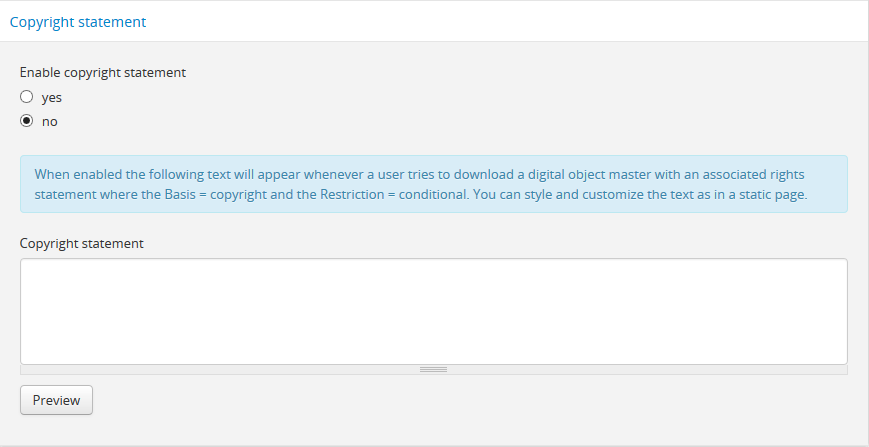
- To activate the copyright statement, make sure that the “Enable copyright statement” radio button is toggled to “Yes”

- Now, in the text-box below, you can add the content you would like to see appear in your copyright statement. Content added here will be rendered similar to a static page - that is, you can add HTML to style and structure the content. For tips on working with HTML in static pages, see: Styling static pages. You can also drag the bottom of the text-box down to expand it, if you need more room to work.
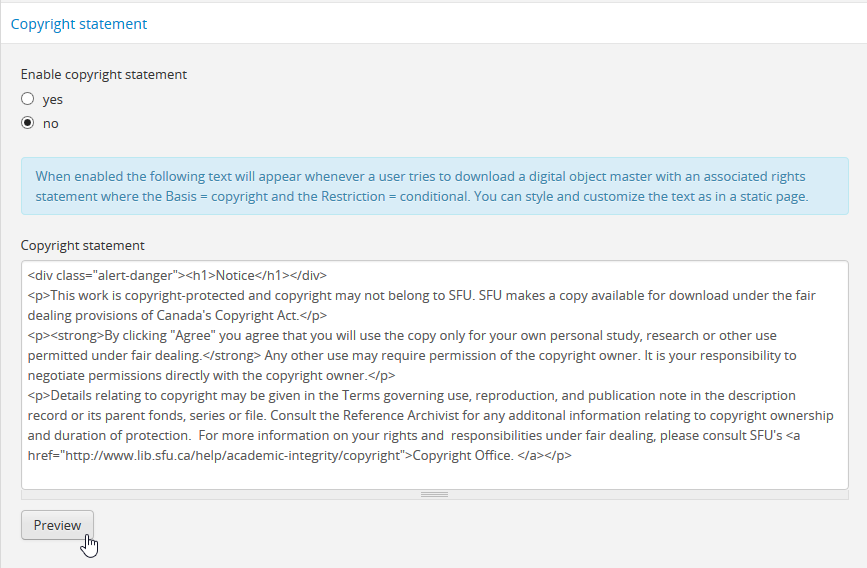
- As you add your custom content, you can preview your work at any time to
see how it will be rendered in the copyright pop-up page. Click the
“Preview” button below the text-box: AtoM will open a new tab in your
browser, with a preview of the rendered Copyright statement. It will differ
from an actual copyright statement in 3 ways:
- At the top of the preview tab, a message in a blue box indicates this is the “Copyright statement preview”
- Where the title of the related archival description would normally appear, the preview tab will only say “Untitled”
- The “Agree” button in the button block on the preview page will be disabled - normally users who click “Agree” will be taken to the related master digital object.
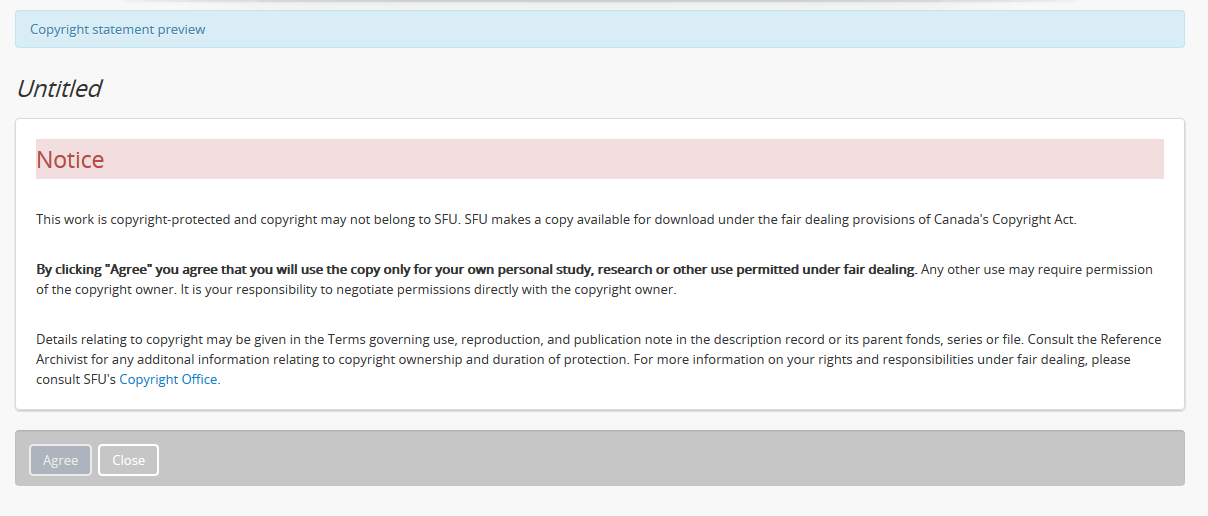
- Clicking “Close” in the copyright statement preview tab will close the tab.
- When you are done configuring your copyright statement, don’t forget to scroll down and click the “Save” button in the button block at the bottom of the page.
Applying the Copyright statement pop-up
Now that you have enabled and configured the Copyright statement, there are still 3 other conditions that must be met before your copyright statement will be seen:
- Users must be granted sufficient access privileges to access the master digital object
- A Rights statement with a Copyright basis and the Restriction set to “Conditional” must be attached to the associated archival description
- The digital object is uploaded locally, not linked via a web address (i.e. from an external site).
Step 1: Granting sufficient access
For users to be able to see the Copyright statement, they must first have
access to the master digital object. By default, the “anonymous” group
in AtoM’s permissions module (e.g. a researcher or public user who is
not logged into the application) does not allow public users to view the
master digital object - so you must change this setting from “Inherit” to
“Allow” in Admin > Groups > Anonymous > Archival description
permissions:

Tip
For more information on working with Users and Groups in AtoM, see: Manage user accounts and user groups. For more information on configuring the permissions for Users and Groups, see: Edit permissions.
You will also need to ensure that the PREMIS Rights permissions you have
configured in Admin > Settings > Permissions will allow your users
to access the master digital object when the Basis is “Copyright” and
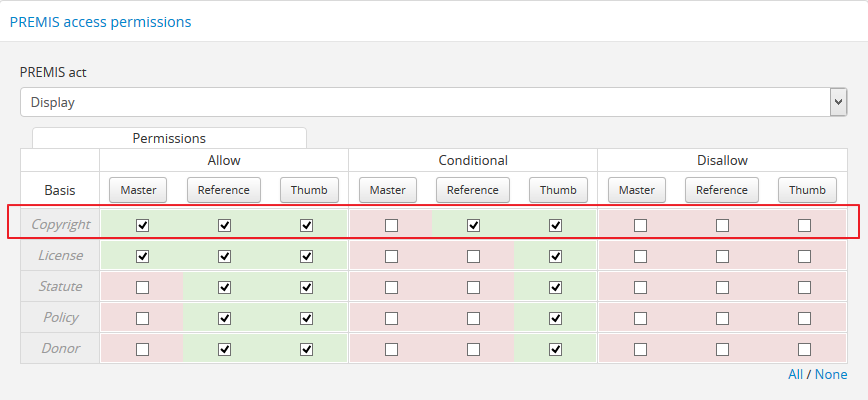
the Restriction is “Conditional”:
Tip
For more information on configuring the PREMIS permissions, see above, Make rights actionable on digital objects.
Now public users will have enough rights to access the master digital objects. If there are some masters to which you do not wish to grant access, you can always apply a PREMIS right with the Restriction “Disallow”, and configure the permissions settings accordingly (see above for further details on configuration). For the copyright pop-up statement to be presented, we still have to apply the appropriate Rights to related archival descriptions.
Step 2 - Applying the appropriate PREMIS rights
The Copyright statement is only triggered when specific PREMIS rights have been associated with the archival description to which the digital object is attached:
- Act: Whichever act you have chosen to be actionable in Admin >
Settings > Permissions. See above for
further details on configuration.
- Basis: Must be “Copyright”
- Restriction: Must be “Conditional”
For example, if you have set “Display” as the Act in the Permissions settings, then the following rights statement, when applied to an archival description with a digital object attached, will trigger the copyright statement:
For further guidance in applying actionable PREMIS rights to archival descriptions with associated digital objects, see the section above, Add rights to an Archival description. For an example use case, see: Example: Configuring copyright permissions.
Important
The copyright statment will only work when it is applied to digital objects that are uploaded locally - not to those linked via URL to an external web address! This is because the pop-up relates to the master digital object. When you upload locally, then the master digital object is stored in AtoM. When you link to an external digital object, AtoM will generate local derivatives (ie the reference display copy and the thumbnail), but the master is still external!
We suggest using a different (perhaps custom) Basis, and applying rights with the settings configured to deny access to the master digital object, if you wish to restrict access to external digital objects. You can also hide the source URL from the Digital object metadata area via the Visible elements module.
For more information on configuring PREMIS settings, see above. For information on uploading digital objects, see: Upload and manage digital objects. For information on the Visible elements module, see: Visible elements.
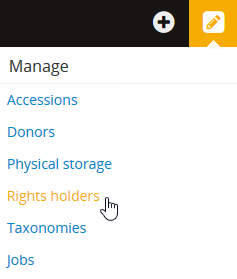
Manage Rights holders records
- Users with editor and administrator access permissions can
navigate to the main menu located in the AtoM header bar and
click on the
 Manage menu, then select
Rights holders from the drop-down list. AtoM will take you to a browse page
for Rights holders.
Manage menu, then select
Rights holders from the drop-down list. AtoM will take you to a browse page
for Rights holders.
Tip
For general information on navigation in AtoM, see: Access content. For general information on browse menus in AtoM, see: Browse. See also our section on the Manage menu
An administrator can also customize the elements that appear in the Main menu via Admin > Menus. For more information, see: Manage Menus.
- When you have arrived at the Rights holders records browse page, AtoM provides a dedicated search box for searching existing rights holders in the system. For more information on using the Rights holders dedicated search box, see: Rights holders. The list of rights holders can be browsed by “most recent” or “alphabetic” via the Sort buttons on the page.
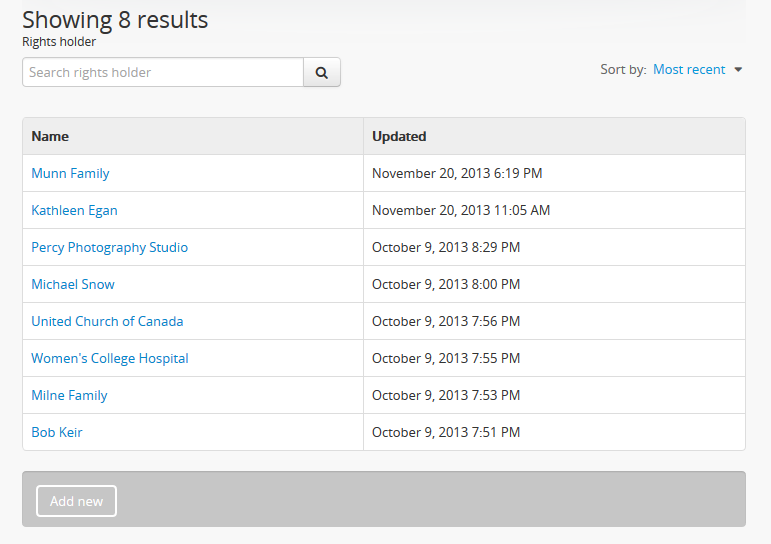
- If you click on the hyper-link name of a rights holder, AtoM takes you to the View rights holder page.
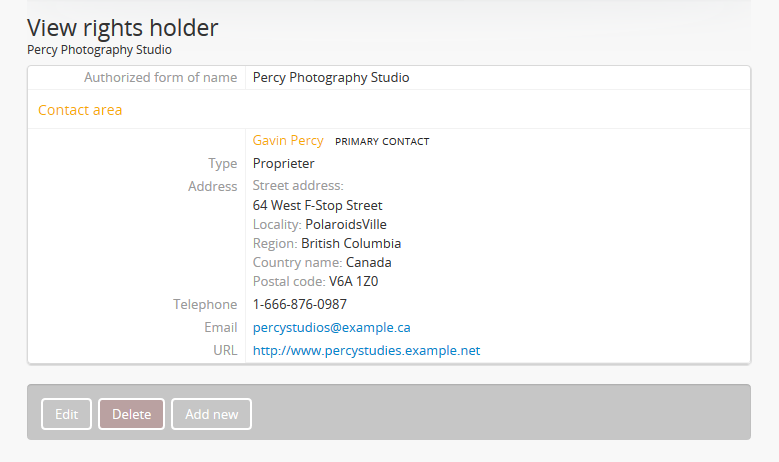
- The View rights holder page lets the authorized user edit and delete the existing rights holder record, or add a new rights holder.
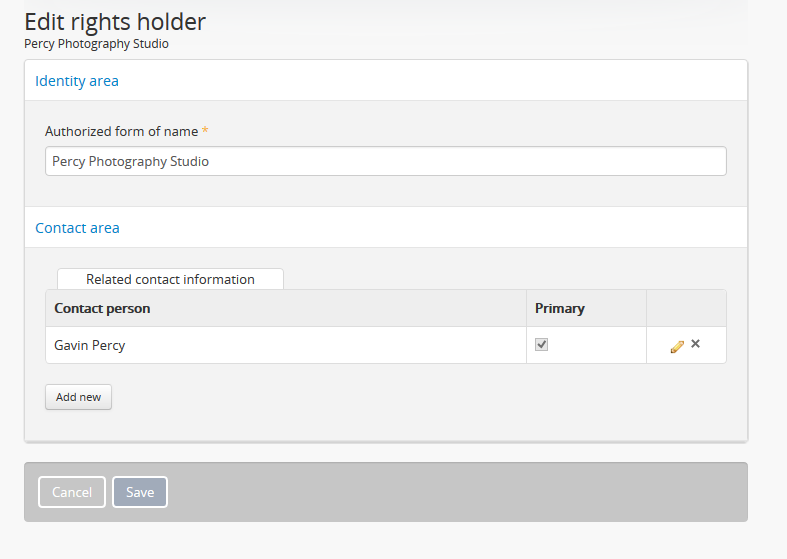
- If you click on the edit button, AtoM takes you to the Edit rights holder template. There are two areas: the Identity area and the Contact area. In the Identity area there is one data entry field, authorized form of name. In the Contact area there is add new button, which allows you to add a new contact person. If you click on the add new button, AtoM opens a contact information dialogue with three tabs, Main, Physical location and Other details. Add as much information into the Related contact information dialogue and click on the Submit button.
- Remember to click on the Save button at the bottom of the rights holder page to save all the new information you have added to the rights holder record. AtoM will reload the Rights holder record in view mode.

- If you click on the Delete button located at the bottom of the Rights holder record when in view mode, AtoM will ask you to confirm that you want to delete the Rights holder record. Click the “Delete” button to delete, or the “Cancel” button to return to Rights holder record view page. If you click “Delete,” the Rights holder record will be permanently deleted.
