Archival Descriptions
Archival descriptions are one of the core Entity types in AtoM and provide users with invaluable contextual infomation about the resources held by an archival institution.
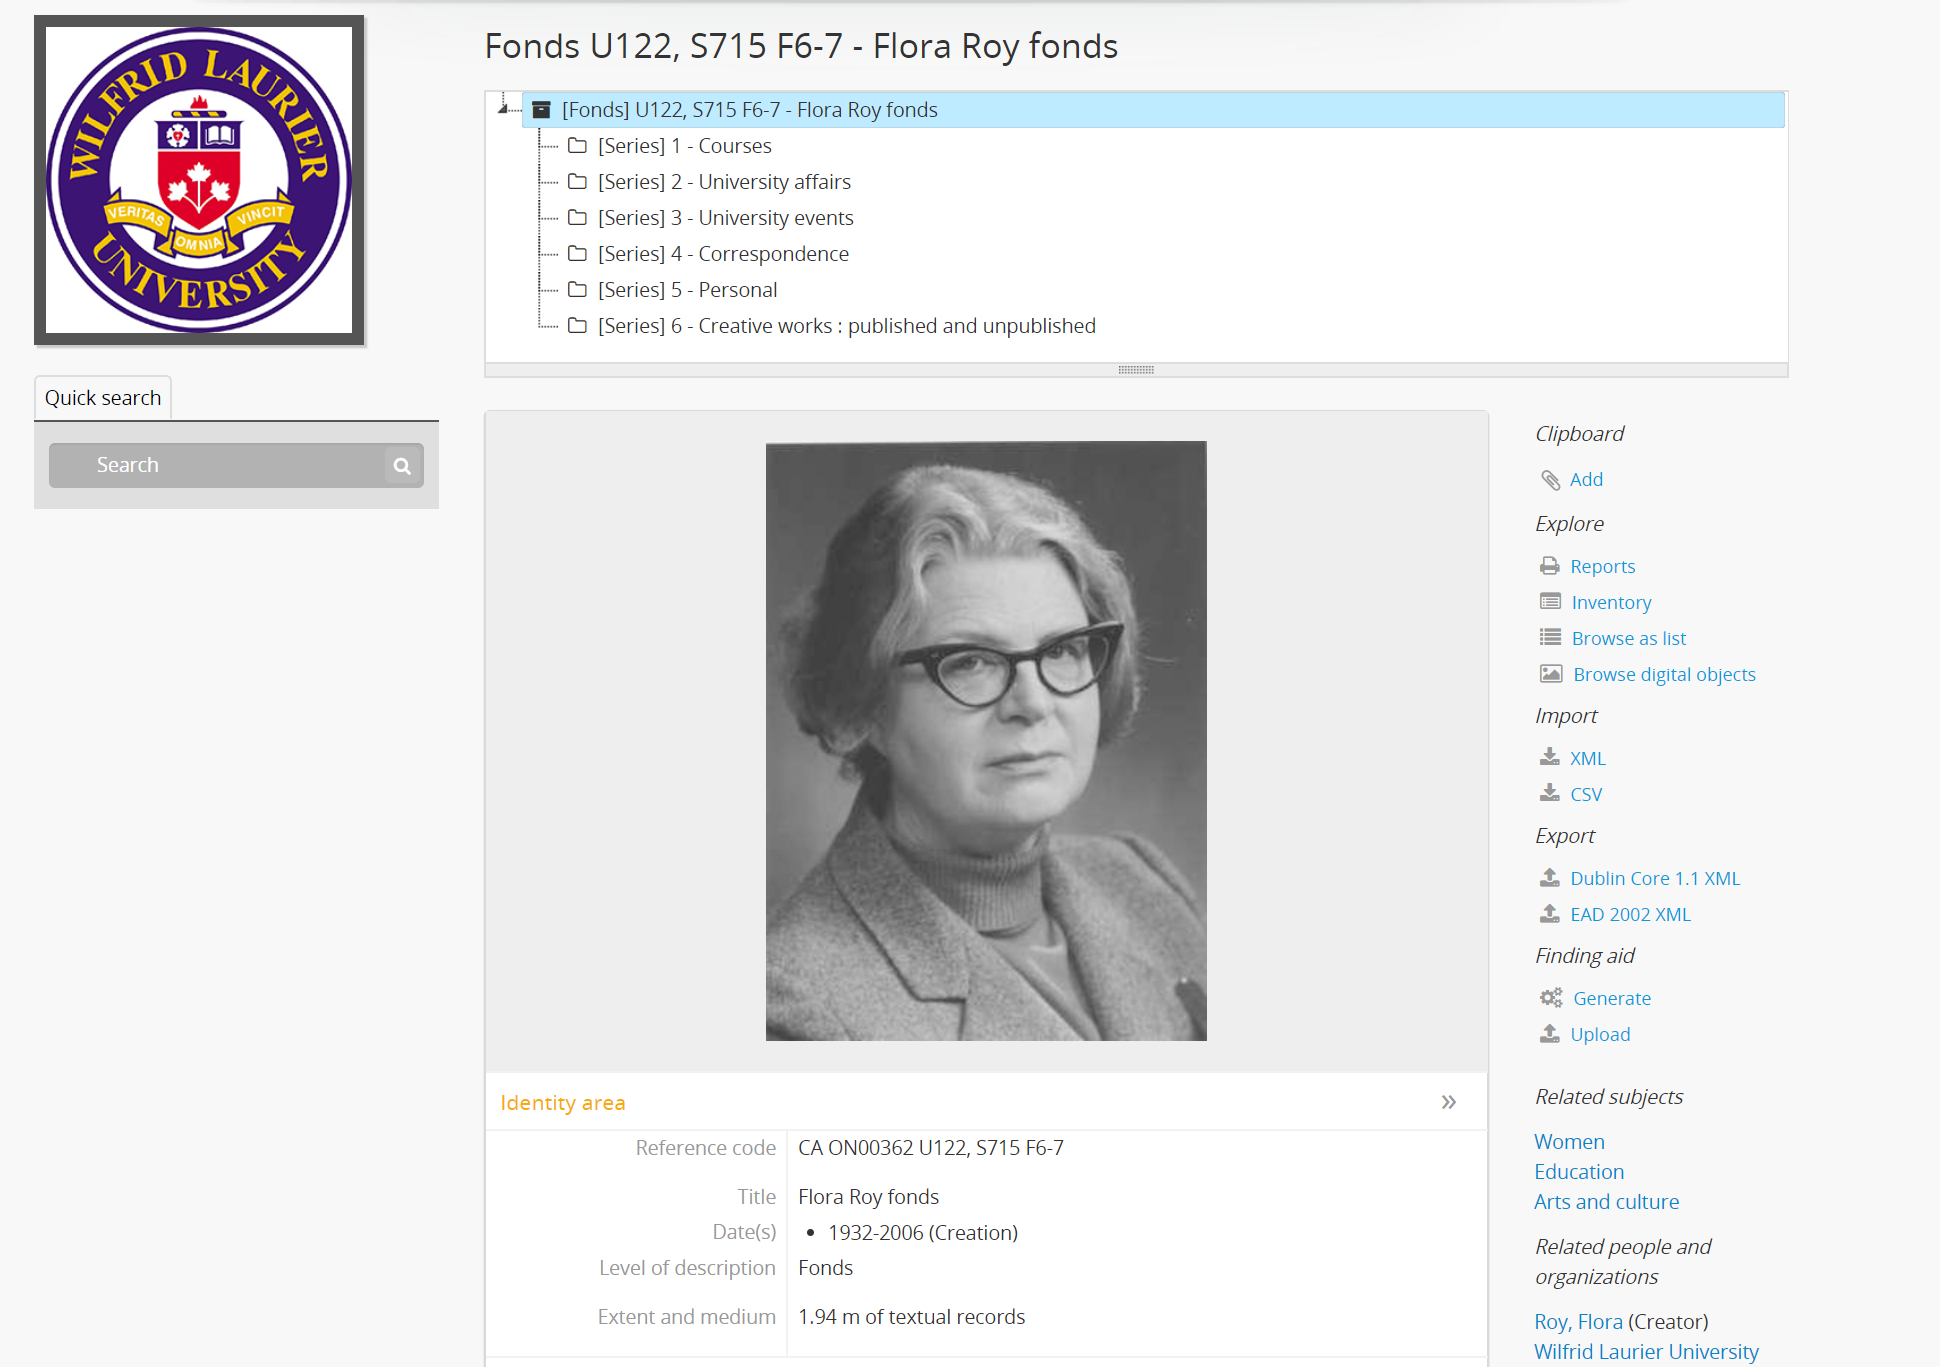
In AtoM, an archival description is a body of information about an archival record or records. The descriptions provide contextual information about the archival materials and are arranged into hierarchical levels (fonds, series, files, items, and variations of these in accordance with institutional standards).
Archival desription is also an activity, however - generally accompanied by the process of archival arrangemenent, it is the outcome of a process to gain intellectual control over a resource or collection of resources and provide end users (such as researchers) with a means of conceptualizing the organization of these resources and navigating to the specific content in which they are interested, as well as a sense of what is contained, how it got there, and what role it serves in the larger accumulation of materials. Archival description is therefore intended to facilitate the identification, management, and understanding of archival materials.
The International Council on Archives (ICA) defines an archival description as “The creation of an accurate representation of a unit of description and its component parts, if any, by capturing, analyzing, organizing and recording information that serves to identify, manage, locate and explain archival materials and the context and records systems which produced it. This term also describes the products of the process” (ISAD glossary).
Archival description is somewhat similar to the process of bibliographic description, and some standards, such as the Canadian Rules for Archival Description (RAD), are derived from bibliographic standards. Daniel Pitti, one of the original creators of the Encoded Archival Description XML-based metadata exchange standard (EAD), points out that one of the key differences, however, is in the hierarchical nature of archival description:
The distinction between what and for whom libraries and archives remember accounts form the major differences in archival and bibliographic description. A bibliographic description, such as that found in a MARC record, represents an individual published item, and thus is item-level. There is a one-to-one correspondence between the description and the item. The description is based on, and is derived from, the physical item. Archival description represents a fonds, a complex body of materials, frequently in more than one form or medium, sharing a common provenance. The description involves a complex hierarchical and progressive analysis. It begins by describing the whole, then proceeds to identify and describe sub-components of the whole, and sub-components of sub-components, and so on. Frequently, but by no means always, the description terminates with a description of individual items. The description emphasizes the intellectual structure and content of the material, rather than their physical characteristics. (Pitti, 1999)
Archival description is often preceded by the creation of an accession record, and much of the information generated during the accessions process can be re-used to create archival descriptions. As new accruals are added, the archival description is updated to reflect these changes.
Tip
AtoM can generate an archival description from an existing accession record - see Create an archival description from an accession record for more information.
Below are instructions for using the Archival description module in AtoM to:
- Add a new archival description
- Edit an existing archival description
- Duplicate an existing archival description
- Link related archival descriptions in AtoM to each other
- Change the display standard
- Add alternative identifiers to an archival description
- Rename the title or slug of an archival description
- View the modification history of an archival description
- Move an archival description
- Delete an archival description
AtoM also includes standards-based templates for describing resources. Please see the sections below for more specific instructions on the use of fields within each template:
- General International Standard Archival Description: ISAD(G)
- Describing Archives: A Content Standard (U.S.A): DACS
- Dublin Core Metadata Element Set, Version 1.1: Dublin Core
- Metadata Object Description Schema: MODS
- Rules for Archival Description (Canada): RAD
See also
- Add an access point “on the fly” from an archival description
- Browsing within an archival unit’s hierarchy
- Physical storage
- Upload digital objects
- Create an archival description from an accession record
- Link an accession record to an archival description
- Formatting
- Link a function to an archival description
- Link an existing authority record to an archival description
- Upload and manage digital objects
- Add rights to an Archival description
- Import XML
- Export XML
- CSV import
Add a new archival description
This section contains instructions on how to Add a new top level archival description (also known as a parent record), and how to add a new child description (or child record) via two different methods
Add a new top level description
A new archival description can be added at any time, from anywhere in the application, via the main menu available to authenticated (i.e. logged in) AtoM users with the appropriate privileges (such as contributors, editors, and administrators). For more information on User roles and types of users in AtoM see: User roles.
Note
You must be logged in to be able to create a new archival description in AtoM. See: Log in.
To create a new archival description:
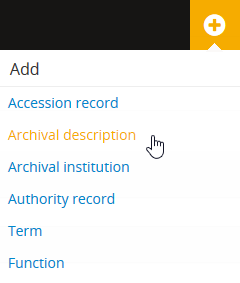
- In the main menu located in the header bar, click the
 “Add” menu and select “Archival description”
from the drop-down menu.
“Add” menu and select “Archival description”
from the drop-down menu.
- AtoM takes you to a blank edit page for data entry.
Note
The edit page that appears will depend on the default template set in the application. When first installed, the default template in AtoM is the ISAD(G) (General International Standard for Archival Description) template. Administrators can change the default template to any of the other 4 supported standards (RAD, DACS, Dublin Core, or MODS via Admin > Settings > Default template. For more information, see: Settings.
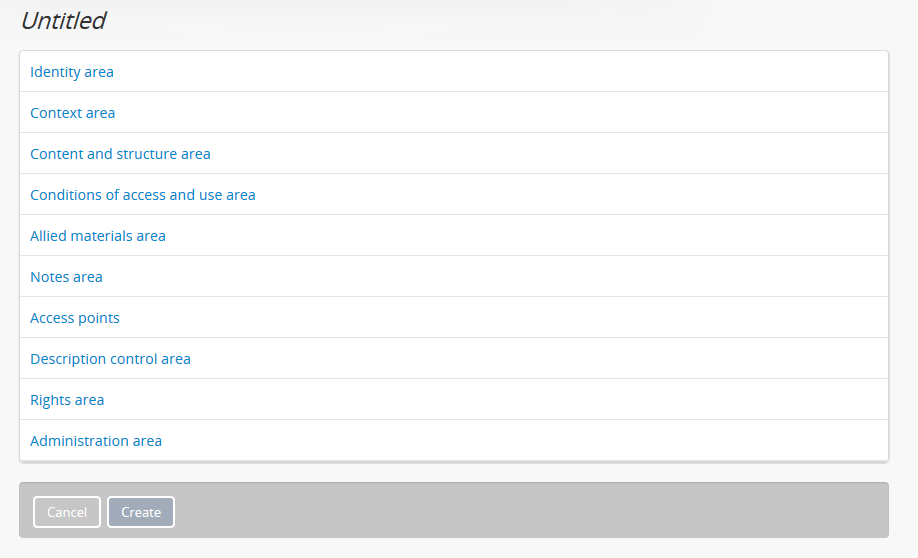
- On loading, the edit page displays the record with all information areas closed; click on an information area to access the fields grouped under it. Enter data as required.
- In the Identifier field, you can automatically generate an identifier if desired, based on the settings defined in Admin > Settings - for more information, see: Identifier mask. Click the “Generate identifier” link beneath the identifier field, and AtoM will populate the field with a unique value based on the identifier mask settings.

Note
Clicking this while the identifier field is populated will overwrite any existing data - if you do this by accident, you can always click “Cancel” in the button block at the bottom of the archival description edit page.
One populated, you can still edit the supplied value - place your cursor in the identiier field and make any desired changes.
An administrator can also turn on a setting so that the identifier field is pre-populated with a unique value, based on the Identifier mask settings. For more information, see:
- Note that new lower levels of description (i.e. children) can be created on the fly without leaving the top-level or parent description you are currently creating. For more information, see below, Add a new child description.
- You can quit the create process at any time by clicking the “Cancel” button in the button block; any data already entered will not be saved, and no new record will be created. Note that simply navigating away from the page by any other means, without first clicking “Create” will also result in no new record being created.
- To save the new record, click the “Create” button located in the button block at the bottom of the record.

Note
The default status of a newly created archival description is DRAFT. Draft records are not visible to unauthenticated (i.e. not logged in) users such as researchers. To publish your description, see:
Tip
Administrators can also change the default publication status of new records throughout the application via Admin > Settings > Global > Default publication status. For more information, see: Settings.
Add a new child description
A child descriptions is an archival description that is part of a larger hierarchy, often a fonds or collection. A child record refers to a description of the archival unit that is one level of description lower than the current unit - for example, if a series belongs to a fonds, the series is the child record of the fonds. AtoM helps users understand the context of the materials by depicting the current record’s position in the treeview, which can also be used for navigation (see: Context menu)
There are two ways to add a new child description in AtoM - Method 1 allows a user to add a new child record “on the fly” while creating a top-level description (or parent record), but these records should be considered stubs or placeholders until they can be returned to and supplemented with further description. Method 2 explains how to create a full child description at any time.
Method 1: “On the fly”
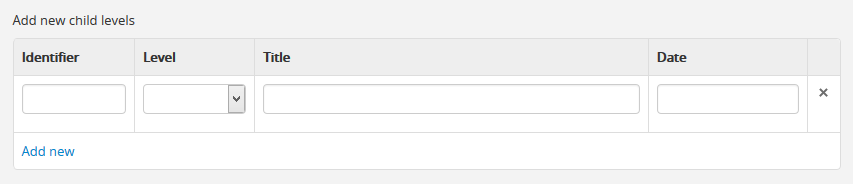
AtoM includes a data entry element in the first information area of the archival description edit page that allows users to generate lower levels of description to a parent record without leaving the current edit page.
This area is located in:
- The Identity area of the ISAD(G) and DACS templates
- The Statement of responsibility area of the RAD template
- The Elements area of the Dublin Core and MODS templates
Note that this method is not meant to replace more granular description - it allows a user to create a sort of skeleton structure to the whole of the description (such as a fonds or collection), which can improve supplement an archival arrangement workflow - the child descriptions can then be supplemented later.
Fields provided for creating lower levels of description “on the fly” via the parent description’s edit page include:
- Identifier (i.e., reference number)
- Level (of description)
- Title
- Date (aka Display date - these is not the controlled ISO 8601 formatted start or end date field)
Tip
You can add as many levels as needed at one time; for example, to add multiple series to a fonds or collection, fill in the fields under the “Add new child levels” and add as many lower levels as desired. When the record is saved, you will be able to see the new child records in the context menu. You can navigate to it later to supplement it with further information - see: Edit an existing archival description.
Method 2: Adding a full child description
Full child descriptions can be added to an archival description at any time (by users with sufficient edit privileges) by navigating to the description to which you would like to add a child (the parent description).
First, navigate to the parent archival description to which you wish to add a child description. You can do this by browsing or searching for the archival description - see Access content for more information on navigation in AtoM.
Note
You must be logged in to be able to create a new archival description in AtoM. See: Log in.
- In the view page of the parent archival description, scoll to the bottom of the record to the button block and click the “Add new” button.

- You will be redirected to a new archival description edit page. On loading, the edit page displays the record with all information areas closed; click on an information area to access the fields grouped under it. Enter data as required.
Important
It is important to note that after clicking on the “Add new” record button, the edit archival description template will appear, but no reference is made to the parent archival description. When you save your record, however, you will be able to see the relationship expressed in the treeview, located in the context menu on the left-hand side of the view page.
- Enter appropriate information into the template for the lower-level description, and remember to select the level of description. For more information on working with new descriptions, see the guidance in the section above, Add a new top level description.
- Note that you can add further children to this lower level of description as you work, via The “On the fly” method described above.
- You can quit the create process at any time by clicking the “Cancel” button in the button block; any data already entered will not be saved, and no new child record will be created. Note that simply navigating away from the page by any other means, without first clicking “Create” will also result in no new record being created.
- To save the new child record, click the “Create” button located in the button block at the bottom of the record.
After clicking “Save” you will be redirected to the view page for the new child description. You can see the relationship to the parent record expressed in the :ref:` context menu <context-menu>`. For more information on the Context menu and the treeview in AtoM, see: Context menu, and specifically, Treeview. See also: Treeview quick search.
Edit an existing archival description
An authenticated (i.e. logged in) user with edit privileges can edit or update an archival description at any time. For more information on edit privileges and user roles see: User roles. For information on logging in, see: Log in.
To edit an existing archival description:
- First, navigate to the archival description you wish to edit. You can do this by browsing or searching for the archival description - see Access content for more information on navigation in AtoM.
- Switch from view mode to edit mode by clicking the “Edit” button in the button block, or by clicking on one of the information area headings; this takes you to the record’s edit page.
- On loading, the edit page displays the record with all information areas closed; click on an information area to access the fields grouped under it. If you’ve clicked on an an area header directly, the edit page will load with that area open.
- Add and/or revise data as required.
- If you wish to edit the existing Identifier value and replace it with one generated by AtoM based on the Identifier mask settings, you can click the “Generate identifier” link beneath the identifier field. AtoM will overwrite the existing value, and populate the field with a unique value based on the identifier mask settings.
Note
Clicking this while the identifier field is populated will overwrite any existing data - if you do this by accident, you can always click “Cancel” in the button block at the bottom of the archival description edit page.
One populated, you can still edit the supplied value - place your cursor in the identiier field and make any desired changes. For more information, see:
- You can quit the create process at any time by clicking the “Cancel” button in the button block; any changes made will not be saved. Note that simply navigating away from the page by any other means, without first clicking “Save” will also result in no changes being saved to the archival description.
- To save your edits, click the “Save” button located in the button block at the bottom of the record.

You will be redirected to the view page for the edited archival description, where you can review your work.
Publish an archival description
All new and imported archival descriptions in AtoM are automatically saved as draft records. This means that users who are not authenticated (i.e. logged in) cannot view these records.
Note
Administrators can change the default publication status, via Admin > Settings. For more information, see: Settings.
Publication status can also be inherited from the highest level of description, meaning that changes to the publication status of the parent record can be made to affect the publication status of all child records. For example, when a fonds description is changed from draft to published and the option to update descendants is also selected, all lower levels within the fonds (series, files, items, etc.) will be automatically changed as well. Note that it is still possible to only change the publication status of the current level, if the “Update descendants” option is not selected.
Warning
It is possible to break the full-width treeview in AtoM by publishing child descriptions of a draft parent. For example, publishing all items within a series, and then making the parent series record draft again (but not the children). In this case, the fullwidth treeview will not load. The sidebar treeview will still load, displaying the draft parent node (e.g. the series) in the tree - public users will get a “Permission denied” message if trying to access the draft record. It is up to you as a user to ensure you are not making contradictory publication status updates that will break the treeview. For more information on the treeview in AtoM, see: Treeview and Treeview type.
Changing a record’s status to published allows unauthenticated (i.e. not logged in) users such as researchers the ability to see the record, i.e. read access is granted to the public. Draft records are not viewable by unauthenticated users (i.e. those not logged in).
To avoid timeouts via the web browser for large publication status requests, updates to descendants are performed asynchronously in the background via AtoM’s job scheduler. For example, when a user publishes a draft fonds and selects the “Update descendants” checkbox as well (so all lower-level records in the fonds will be published as well), the fonds-level record will be immediately updated, while the job scheduler will begin the task of updating the descendants in the background. In this case, a notification will appear at the top of the archival description view page when the user is redirected to it after submitting the update request, with a link to the Jobs page, where more information about the status of the job can be seen. In most cases this will be very rapid, but for exceptionally large requests it is possible for a user to navigate to a descendant record (e.g. an item in the fonds) before the update job has been completed. If you’re unsure if your publication status update job has executed properly or not, be sure to check the jobs page. For more information on the Jobs page in AtoM, see: Manage jobs.
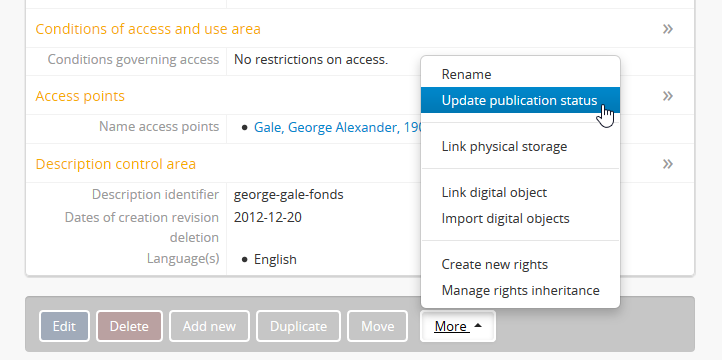
Note
For AtoM 2.2 and earlier users - the “Update publication status” options have moved out of the description edit page! You can now find this option in the “More” button menu, in the button block at the bottom of an archival description view page for authenticated users. Further details are included in the steps below.
Tip
An administrator can turn on a setting in the Global settings page that will notify authenticated (i.e. logged in) users of the number of draft records in AtoM when they log in. For more information, see:
Notes on publication status and publish permissions
An administrator can set whether or not groups and/or users have publish permissions via the User and Group settings - see Manage user accounts and user groups and Edit permissions for more information. This means that a user may have the ability to edit a record, but without publication permissions, the record may revert from a published status to a draft one on save. The following points describe the expected behavior for publication status updates based on user permissions:
When new records are created, they default to the global publication status setting. In a new installation, this setting is set to Draft, but an administrator can change this via Admin > Settings > Global - see: Default publication status
If the default pub status is set to “Published”, but a new record is created by a user WITHOUT publication permissions (e.g. a contributor), the record will default to Draft when it is saved.
When new records are created, or a published record is duplicated, the new records will use the default publication status - unless the setting is set to published, and the user doesn’t have publish permissions. In this case, the new record(s) will have a draft publication status
The above is also true for new child records created via the “Add new child records” widget
If a record is published, and a user WITH publish permissions edits the record, then on save, it will maintain the same publication status it had at the time of editing (e.g. in this case, published)
If a record is published, and a user WITHOUT publish permissions edits the record, the published record will revert to draft on save, and a notification will appear, informing the user of this change with the following text:
Your edits to this description have been saved and the description has reverted to Draft status. Please ask a user with sufficient permissions to publish the description again to make it publicly visible.
To publish an existing archival description
- Navigate to the record you wish to publish. For more information on navigation in AtoM, see: Access content
- Scroll to the button block at the bottom of the archival description’s view page, and click on the “More” button. A menu will appear - select the “Update publication status” option.
- AtoM will redirect you to a publication status configuration page. Using the drop-down menu provided, select the desired publication status - published, or draft.
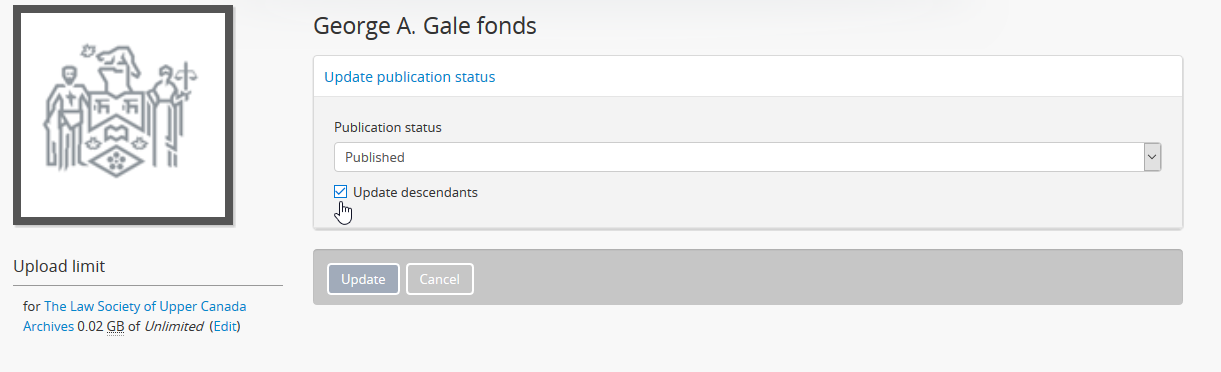
- If you would like all lower-level records (descendants) to be updated as well, check the “Update descendants” box beneath the drop-down menu. Note that this option will not appear if there are no lower-level records.
- You can cancel your actions at any time, and return to the archival description view page by clicking the “Cancel” button in the button block at the bottom of the page. Note that navigating away from the page has the same effect - the publication status will not be updated unless the Save button is clicked.
- To save your changes, and update the publication status of your description(s), click the “Update” button in the button block at the bottom of the publication status configuration page.
- AtoM will redirect you back to the archival description view page. The current description will now be updated to the desired publication status (e.g. published, if it was previously draft). If you have also checked the box to update descendants, a notification will appear at the top of the page, with a link to the Jobs page.
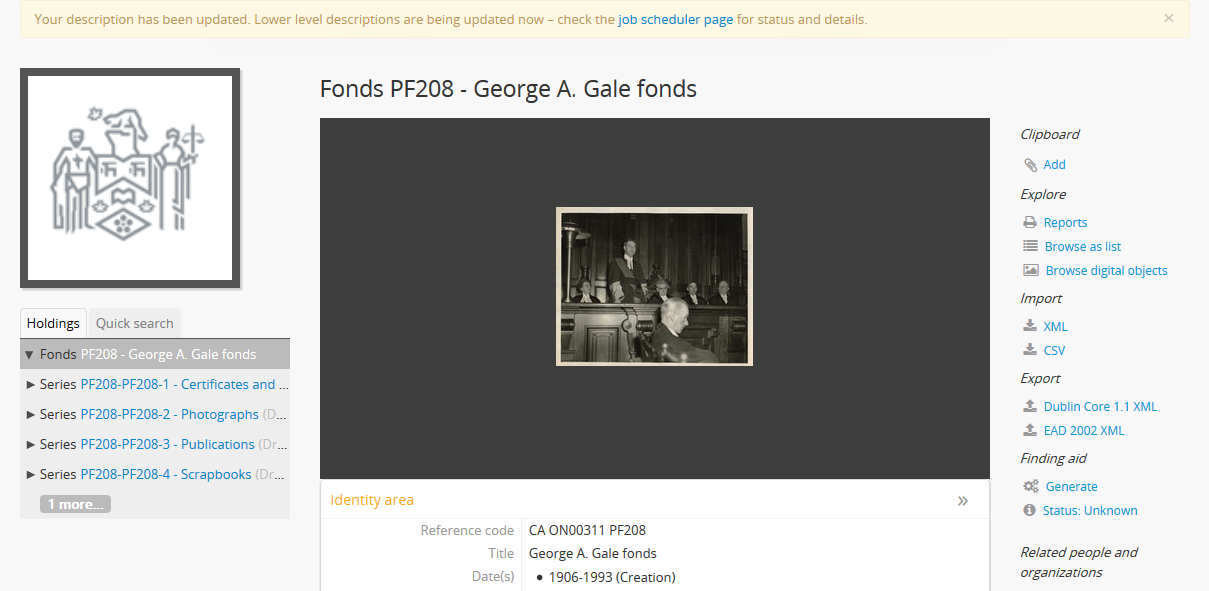
The archival description, and any lower levels of description associated with it, will now be published - public users who are not logged will now be granted read access to view (but not edit) the record(s). The record(s) will also be discoverable to public users via Browse or Search.
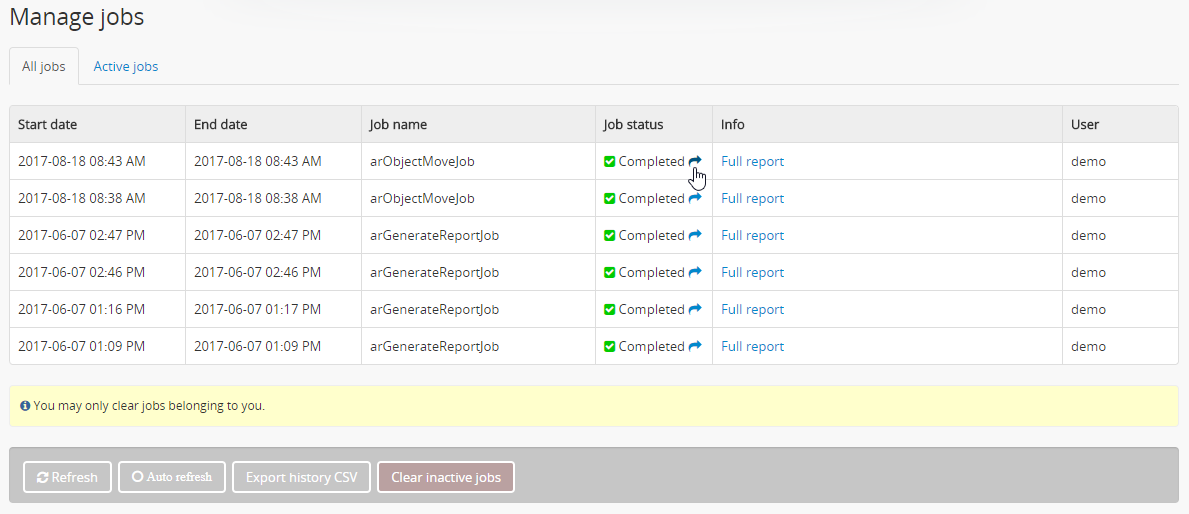
For updates to descendants, you can use the link in the notification message to navigate directly to the Jobs page - The Jobs page will include the name of the parent description whose descendants are being updated, a link (the blue arrow in the Job status column) back to the parent description, and information on the current job status (Running, Completed, or Failed).
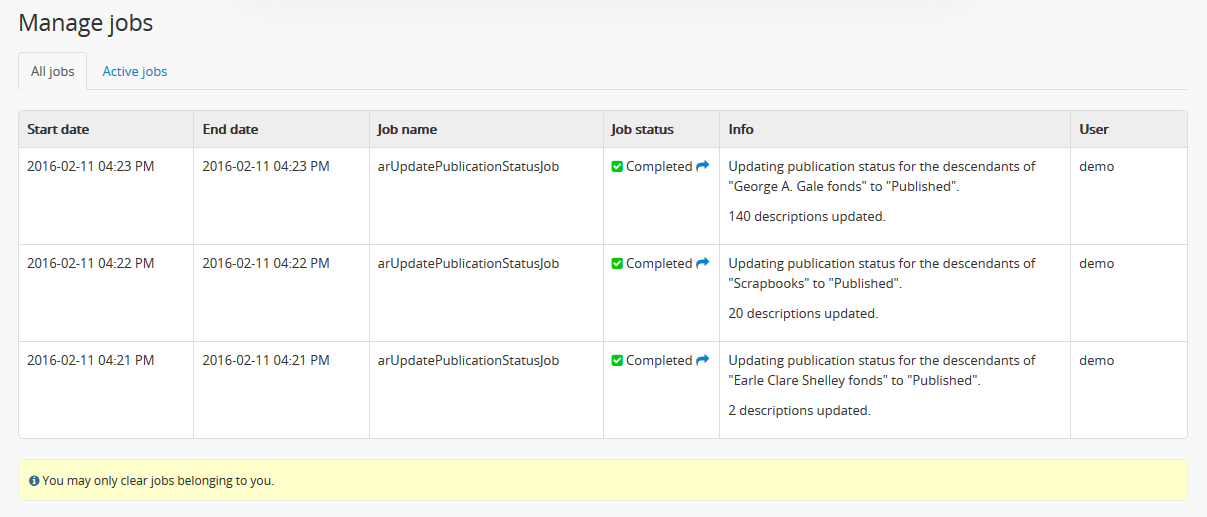
For more information on using the Jobs page, see: Manage jobs.
Calculate dates based on lower-level descriptions
To assist the description workflow when working with hierarchical descriptions, AtoM includes a “Calculate dates” task that can automatically update the controlled start and end date fields of a parent archival description’s event dates, based on the broadest values found in descendant descriptions. Users can update any event type (e.g. Creation and Accumulation in ISAD(G); or other event types such as Manufacturing, Collection, Broadcast, etc. found in other description templates), and in cases where there are multiple dates, the option to select the target date is provided. Additionally, for a non-destructive approach (or if users would like to compare the existing date range with a newly calculated one), it’s also possible to calculate a new date range without overwriting existing data.
Important
AtoM will only update the internal controlled start and end date fields, not the display date. The Display date field is a free-text field that allows the use of typography (as suggested by relevant standards or local practice) to indicate approximation and/or uncertainty. When a description is saved, the values in this field are what are shown in the view page of an archival description. The start and end date fields, which expect ISO 8601 date values (e.g. YYYY-MM-DD, YYYY-MM, or YYYY), are never shown to public users. These fields are used to support date range searching and sorting.
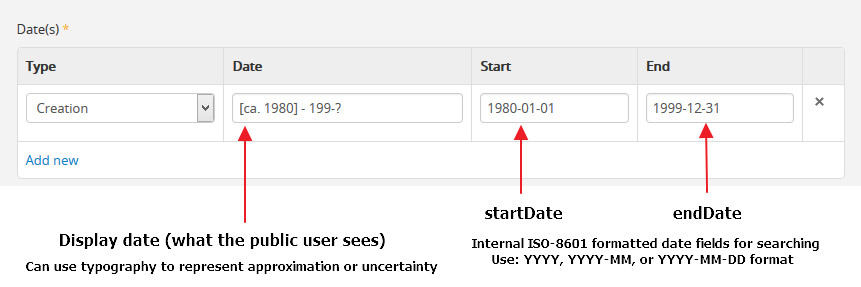
Because the display date field is free-text and may contain important non-numerical contextual information, AtoM is not able to automatically update this field.
This means if you use the Calculate dates task, it is important that you review the display date field of the updated date range after the task has completed, and make any further manual updates necessary.
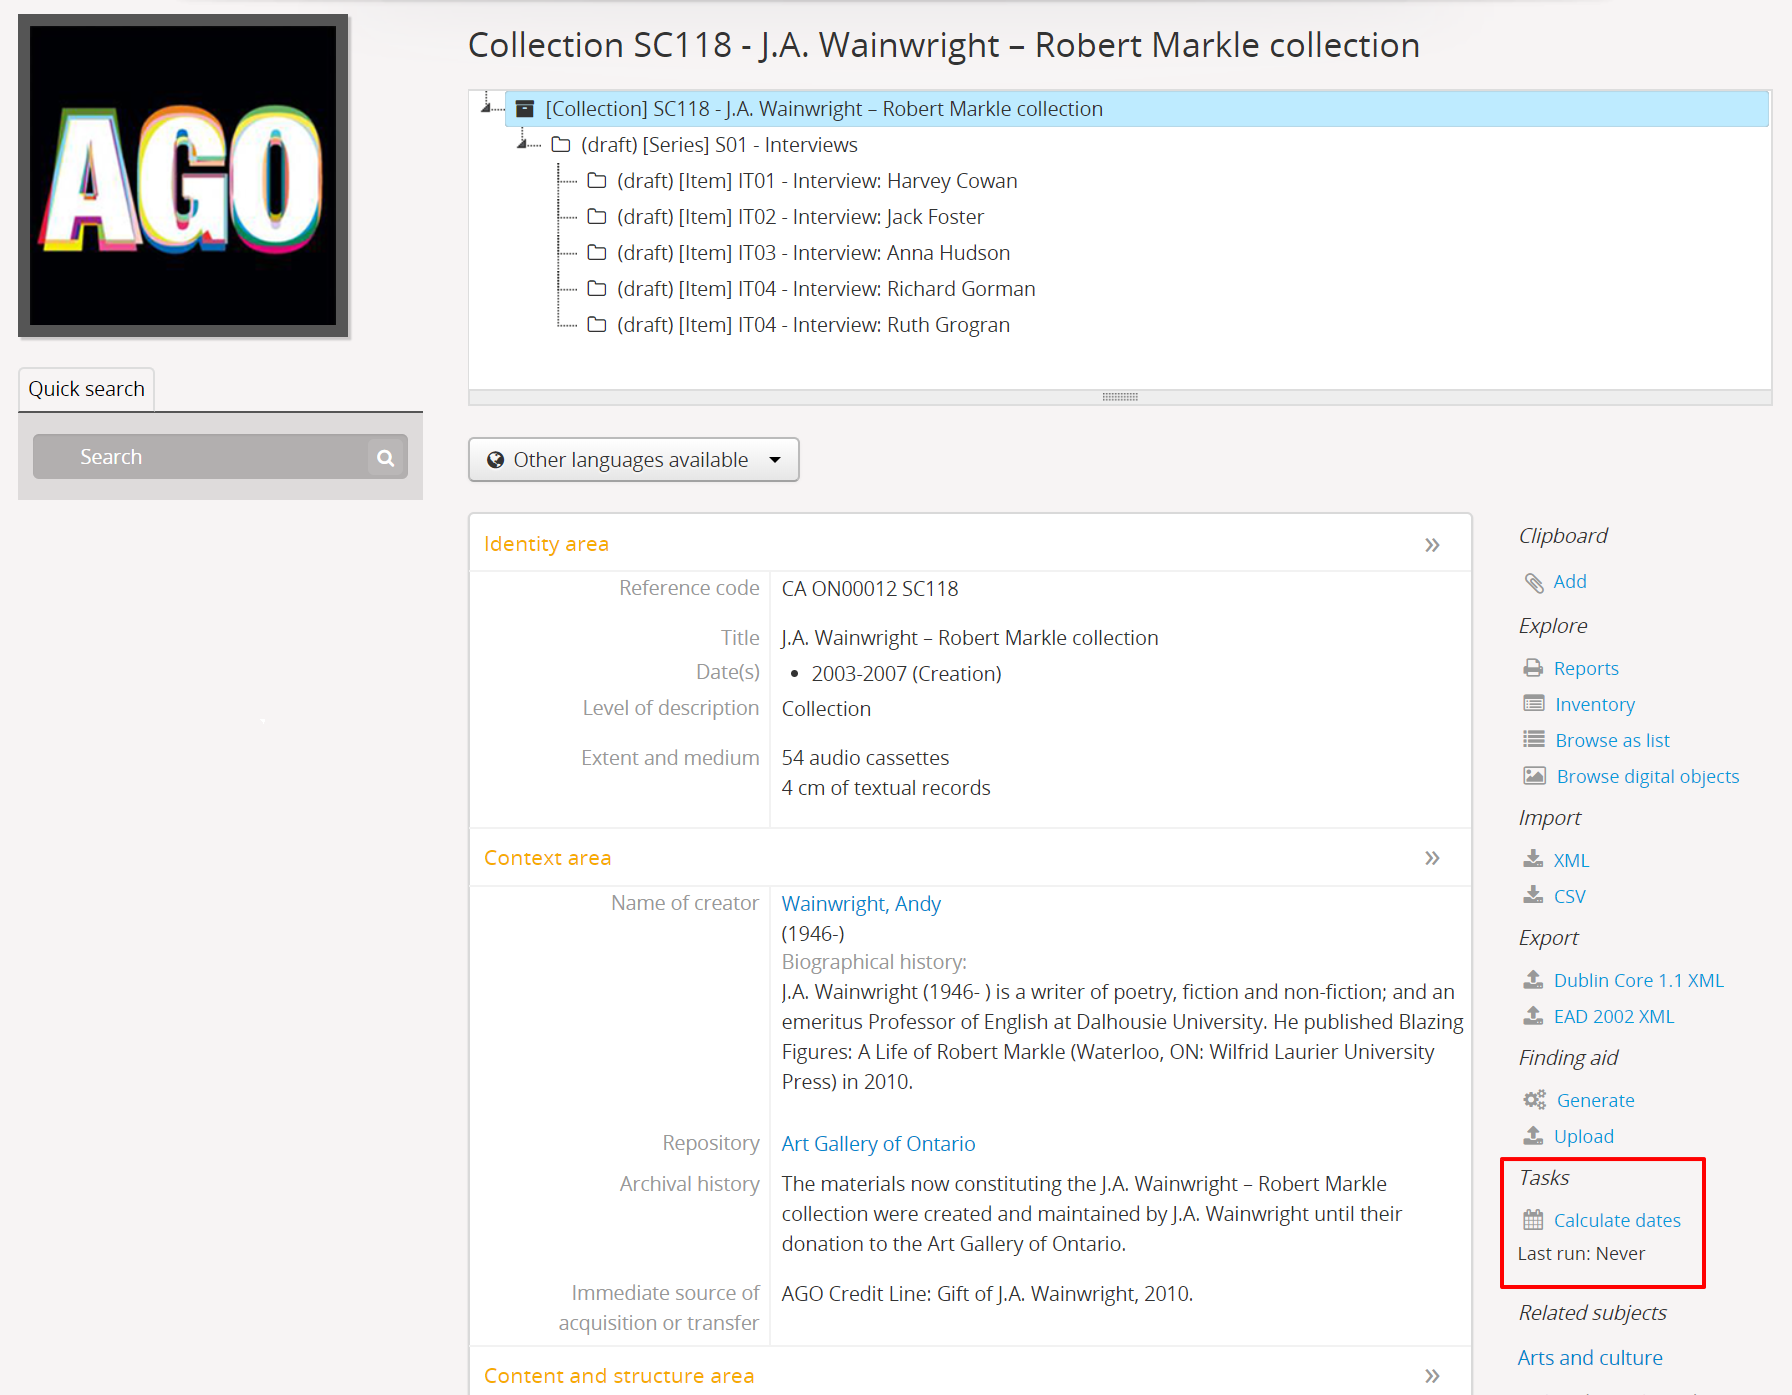
AtoM will not indicate on the parent record if the current dates do not match the range expressed in all descendant records. However, on lower-level descriptions, if the date range of a child record is broader than that of its parents, AtoM will show a warning in the view page when the description is saved:

In this example, the “Interviews” series currently being viewed has a broader date range added to it than its parent collection, the J.A. Wainright - Robert Markle collection.
Clicking the hyperlink on “higher levels” in the warning will redirect AtoM to the nearest parent record in need of an update.
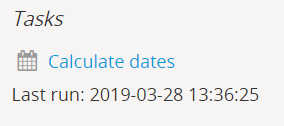
The option to launch the Calculate dates task appears in the right hand context menu (aka sidebar) of the archival description view page. If there are no lower-level descriptions with dates, the option will not be shown.
Once the task has been run, AtoM will display the date and time of the most recent task execution. This date value is derived in part from the PHP timezone settings, which a system administrator can configure in one of AtoM’s configuration files. For more information, see the Administrator manual: Manage AtoM configuration files.
To use the Calculate dates task:
- First, navigate to the archival description whose dates you would like to update. You can do this by browsing or searching for the archival description - see Access content for more information on navigation in AtoM.
- In the right-hand context menu under the Tasks section, click the “Calculate dates” link.
- AtoM will redirect you to the Calculate dates configuration page:
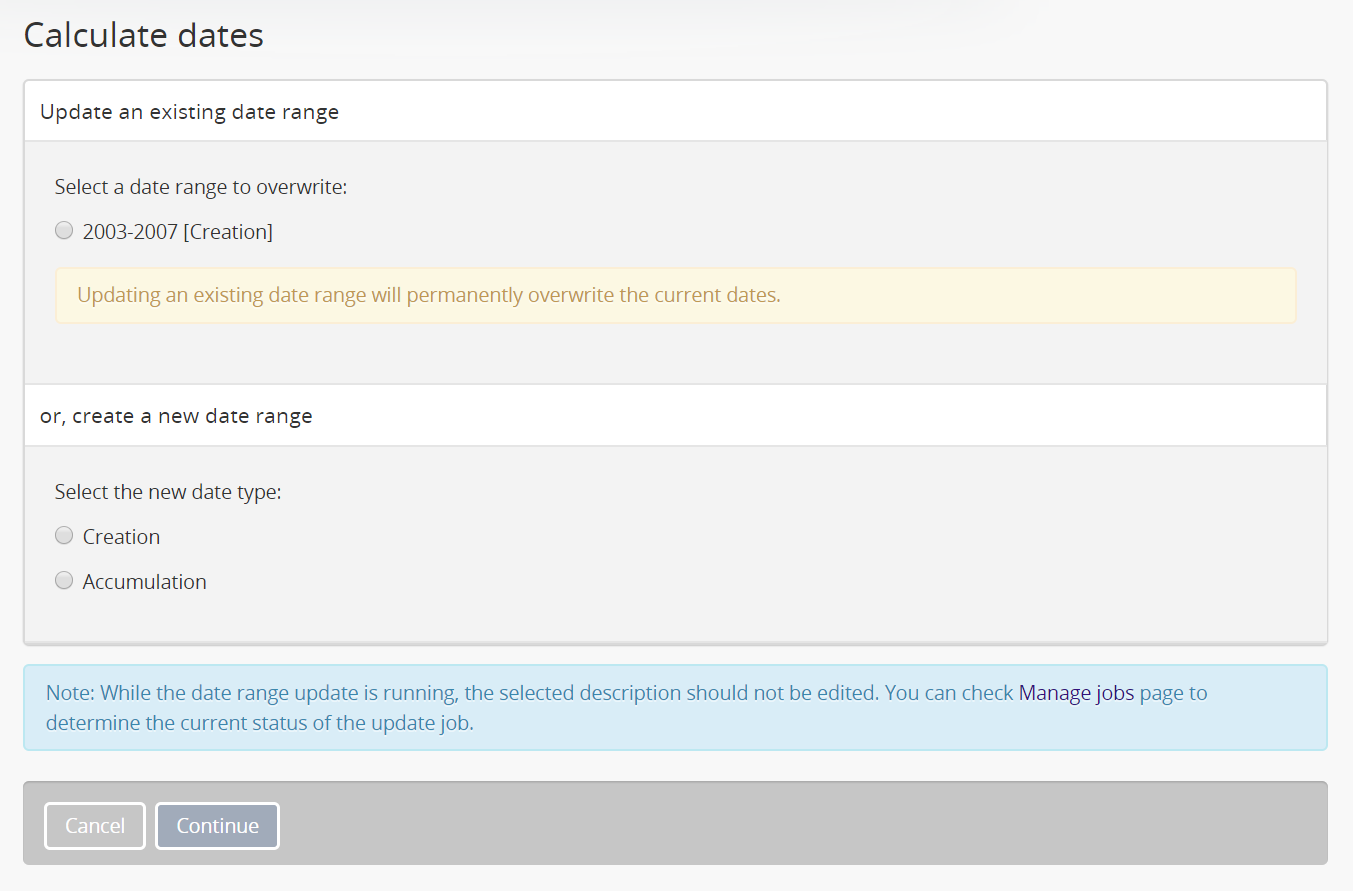
- The top section of the page will display a list of existing dates on the current record - the event type (e.g. creation, accumulation, etc.) will be shown in square brackets following the date range value. If you wish to update the start and end date values of an existing date range, select the target date range using the radio button next to the appropriate date.
- Alternatively, you can also choose to create a new date range. AtoM will present date event types based on those present in the lower levels of description - if your lower level descriptions only have creation dates, then you will only see “Creation” as an option here.
- When you have configured your choice, click the “Continue” button in the button block at the bottom of the configuration page. This will launch the task.
- When launched, you will be redirected back to the view page of the archival description, and a notification message will appear at the top of the page, indicating that the job is in progress:

Important
While the date range update is running, the selected description should not be edited.
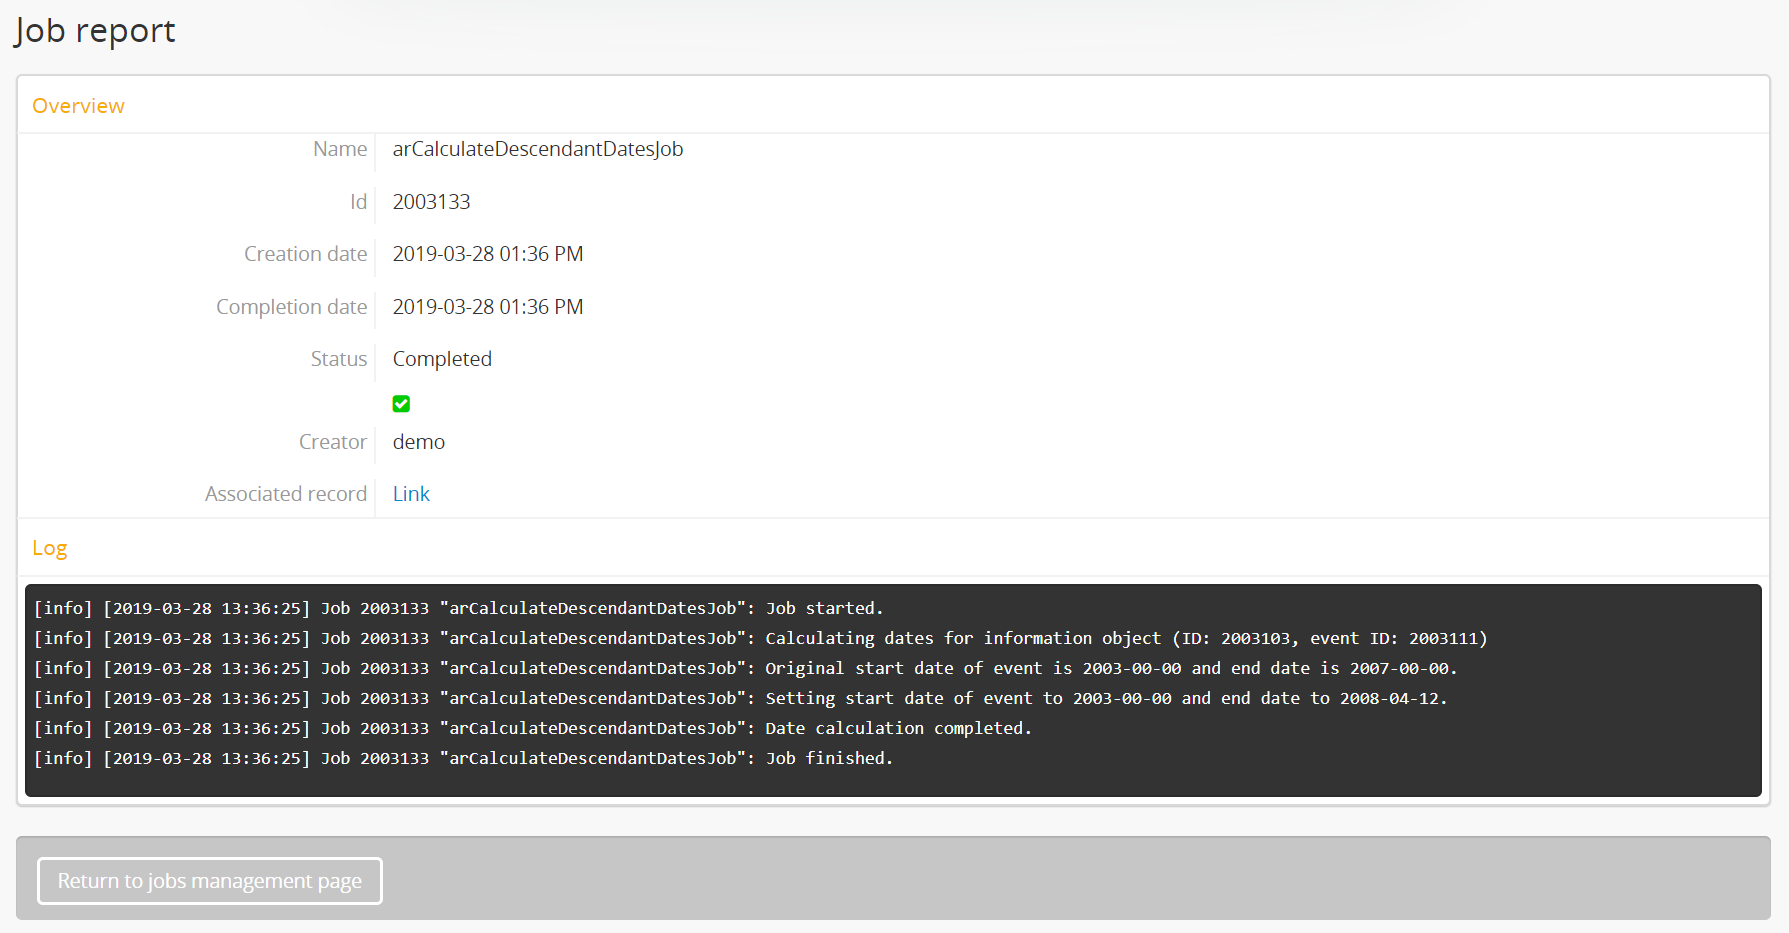
- The task is handled by AtoM’s job scheduler. You can navigate to
 Manage > Jobs to check on the status of the job. The
Job details page’s console output will also display
what the original start and end date values were, and what they have been
updated to after the task completes. For more information on Jobs in AtoM,
see: Manage jobs.
Manage > Jobs to check on the status of the job. The
Job details page’s console output will also display
what the original start and end date values were, and what they have been
updated to after the task completes. For more information on Jobs in AtoM,
see: Manage jobs.
Remember, AtoM will only update the start and end date fields for the target date, not the display date visible on the view page of the description. This is because the the display date field is a free-text field and may contain important non-numerical contextual information (such as typographical marks to express approximation or uncertainty, etc), and as such AtoM is not able to automatically update this field.
This means if you use the Calculate dates task, it is important that you review the display date field visible on the view page of the description after the task has completed, and make any further manual updates necessary. See above for more information on editing descriptions in AtoM: Edit an existing archival description.
You can repeat this process as many times as needed, or again at higher levels if desired.
Duplicate an existing archival description
To simplify the description workflow when working with many similar descriptions (such as, in some cases, many items in a collection), AtoM includes the ability to generate a duplicate record from an existing archival description, and then edit it to make necessary changes. This can allow a user to avoid unnecessarily repeating data entry.
Note
When duplicating a parent record, lower (child) levels of description will NOT be duplicated.
To duplicate an existing archival description:
- First, navigate to the archival description you wish to edit. You can do this by browsing or searching for the archival description - see Access content for more information on navigation in AtoM.
- At the bottom of the archival description, click the “Duplicate” button located in the button block.
- You will be redirected to a new screen with an edit page of an archival description open.
- The new edit page provides a warning at the top to indicate that it is a duplicated record.
- On loading, the edit page displays the record with all information areas closed; click on an information area to access the fields grouped under it. You will note that these will be populated with the exact same data found in the original archival description - you can now make any edits or revisions necessary.
- You can quit the create process at any time by clicking the “Cancel” button in the button block; no new record will be created. Note that simply navigating away from the page by any other means, without first clicking “Create” will also result in no new record being created.
- To save the duplicate as a new record, click the “Save” button located in the button block at the bottom of the record.
Important
If you are duplicating a child of a parent record (such as a series, file, or item), the duplicate description will automatically be created as a child of the same parent archival description. If you duplicate a top or parent level of description, the new record will also be a top-level description with no parent.
Records can be moved in AtoM as well - see below, Move an archival description
Link related archival descriptions in AtoM to each other
Many AtoM descriptive templates include a free text field, derived from the related content standards (for more information, see: Descriptive standards and Data entry / templates) that will allow users to describe allied or related materials:
| Content standard | Rule no. | AtoM field label | Information area |
|---|---|---|---|
| ISAD | 3.5.3 | Related units of description | Allied materials area |
| DACS | 6.3 | Related archival materials | Related materials elements |
| RAD | 1.8B20 | Associated materials | Notes area |
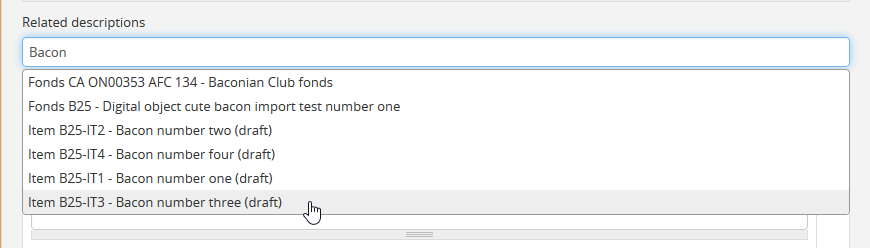
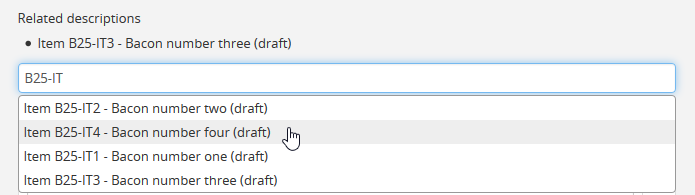
However, as of AtoM 2.1, a new auto-complete field has been added to the edit page of each of the above standards, that will allow users to link an archival description to another related description held in AtoM. This linking is reciprocal - once it is added on one description, a link back to the first resource will also appear on the related description. Linking is managed via an auto-complete field: users begin to type the identifier or title of a resource, and as they type, the auto-complete drop-down will display matching results.
In each standards template, the linking field appears just below the free-text fields listed in the table above. It is labelled as “Related descriptions” in the ISAD and DACS templates, and as “Related materials” in the RAD template.
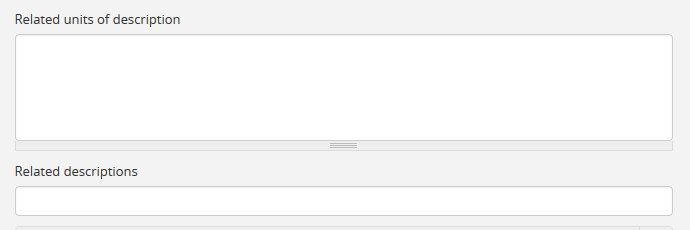
In this example, the “Related description” linking field is shown below the ISAD 3.5.3 Related units of description field in the ISAD template.
To link an archival description to another description in AtoM:
- First, navigate to the archival description where you wish to add a link. You can do this by browsing or searching for the archival description - see Access content for more information on navigation in AtoM.
- Switch from view mode to edit mode by clicking “Edit” button in the button block, or by clicking on one of the information area headings; this takes you to the record’s edit page.
- On loading, the edit page displays the record with all information areas closed; click on an area header to expand it and make changes. Use the table above to determine which information area will have the related descriptions field, based on which descriptive template (ISAD, RAD, DACS) you are using. For more information on working with content standards and descriptive templates in AtoM, see:
- In the Related descriptions field, begin typing either the identifier, full reference code, or title of the archival description to which you would like to create a link. As you type, the field’s drop-down menu will provide auto-complete matching results. When you see the description to which you would like to create a link, click on it in the drop-down menu.
- You can repeat this process to add multiple links to different descriptions at the same time.
- To remove a linked description, place your cursor over the bullet next to the linked description - it will change into an X. Click the X to remove the link to the related description.

- When you are finished adding or editing your related descriptions, click “Save” in the button block at the bottom of the edit page. Alternately, if you click “Cancel” or navigate away from the page without saving, none of your changes will be saved.
- Upon saving, AtoM will redirect you to the view page for your archival description. You will be able to see a link to the related description in the relevant information area of your display template.

- Similarly, AtoM will automatically add a reciprocal link back to the original description on the view and edit pages of the related resource. You can edit or remove the link by entering edit mode on either description, and following instructions to remove a link in Step 6, above.

Change the display standard
AtoM’s archival description edit templates are based on known standards used within the cultural heritage community. For more information on standards used in AtoM, see: Descriptive standards.
You can change the display standard for an individual archival description in the adminstration area while editing an archival description. This allows you to choose a different description template per archival description than the template you have chosen in your AtoM settings. This includes at different levels of the same archival unit - so for example, if you have an image collection, you could create a fonds-level description using the ISAD template, and then display all of the item-level image descriptions using the Dublin core template.
You can also choose to have the newly selected display standard be inherited by all child records (for example, all the file-level children beneath a series) if desired, or you can simply change the current description. Instructions are included below.
To change the display template of a description in AtoM:
- First, navigate to the archival description you wish to edit. You can do this by browsing or searching for the archival description - see Access content for more information on navigation in AtoM.
- Switch from view mode to edit mode by clicking “Edit” button in the button block, or by clicking on one of the information area headings; this takes you to the record’s edit page.
- On loading, the edit page displays the record with all information areas closed; click on the Administration area heading to expand it and make changes.
- In the Administration area, click the drop-down menu labelled “Display standard”. You will see a list of all display standards for archival descriptions available in AtoM. For more information on standards available in AtoM, see: Descriptive standards. For specific information on each standard, see: Data entry / templates.
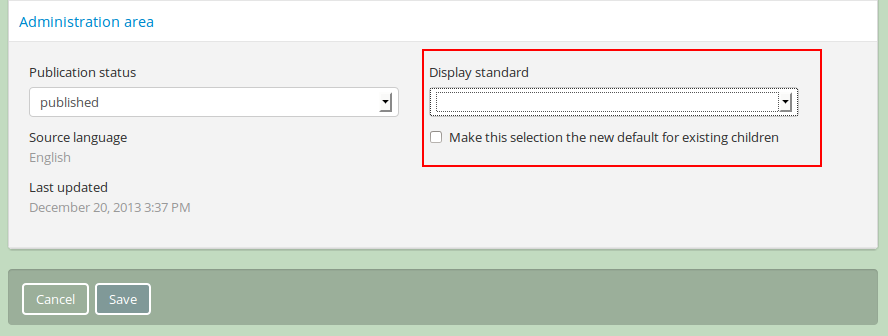
- If you are currently using the default display template (see: settings), the field will be blank until you select a different template. Select the display standard you would like to use from the drop-down menu.
- If you would like all lower levels of description (e.g. child records) to adopt the new display standard as well, click on the check-box below the template drop-down.
- You can quit the create process at any time by clicking the “Cancel” button in the button block; no new record will be created. Note that simply navigating away from the page by any other means, without first clicking “Create” will also result in no new record being created.
- To save the record and display it with the new standards template, click the “Save” button located in the button block at the bottom of the record.
Add alternative identifiers to an archival description
As of AtoM 2.1, users can now add alternative identifiers to descriptions using the ISAD(G), RAD, or DACS standards-based description templates. This can be useful for keeping track of legacy identifiers or other relevant alphanumeric strings associated with the identification of your records, such as a bar code. To learn more about the description standards templates available in AtoM, see the following:
To add an alternative identifer to your archival description:
- First, navigate to the archival description you wish to edit. You can do this by browsing or searching for the archival description - see Access content for more information on navigation in AtoM.
- Switch from view mode to edit mode by clicking “Edit” button in the button block, or by clicking on one of the information area headings; this takes you to the record’s edit page.
- On loading, the edit page displays the record with all information areas closed; click on the Administration area heading to expand it and make changes.
- You will a link to reveal the Alternative identifiers field below the Identifier field, whose location depends on which display standard you are using (ISAD, RAD, or DACS). In general, it will be found in the first information area of the description template.
| Content standard | Information area |
|---|---|
| ISAD | Identity area |
| RAD | Title and statement of responsibility area |
| DACS | Identity elements |
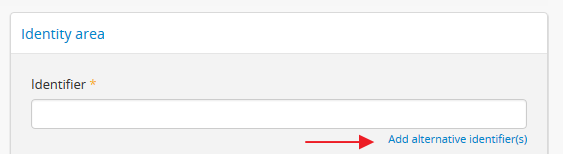
In this example, the link to reveal the Alternative identifier fields is found under the Identifier fields in the Identity information area of the ISAD(G) template.
- Click on the link to reveal the Alternative identifier fields below. Users can add a custom label (to describe the purpose or origin of the alternative identifier), and a value.
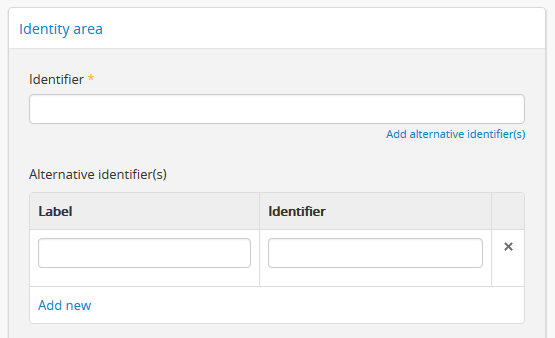
- You can add multiple alternative identifiers at the same time, and you can return in edit mode at any point in the future to edit, remove, or add new identifiers. To add another row, click the “Add new” link beneath the fields. To remove an alternative identifier, click the X to the right of the field row.
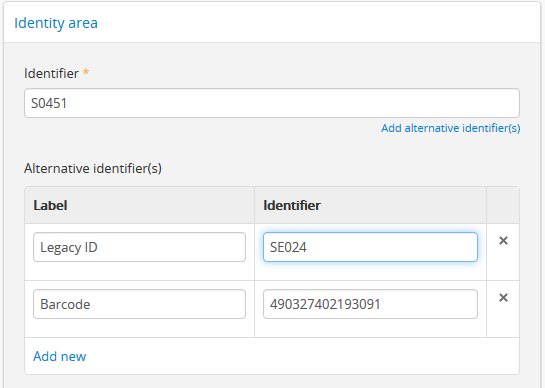
- When you are done adding, editing, or removing your alternative identifiers, click “Save” in the button block located at the bottom of the edit page. If you click “Cancel” or navigate away from the page without clicking “Save,” you changes will not be saved.
- AtoM will redirect you to the view page for your archival description. The alternative identifiers will be displayed with their custom labels in the Notes area of your descriptive template.

Rename the title or slug of an archival description
When archival descriptions are created, a permalink (also known as a slug) is generated as well, to be used in the URL associated with the description - the slug is the unique part of that URL. In AtoM, the slug of an archival description is generated automatically, from either the title of the description, or from the inherited reference code of the description - an administrator can determine which is used globally based on a setting available in Admin > Settings > Global. For more information, see: Generate description permalinks from.
However, users with the appropriate permissions can edit the slug, the title of the description, or even the filename of an associated uploaded digital object after the description is saved, by using the “Rename” module.
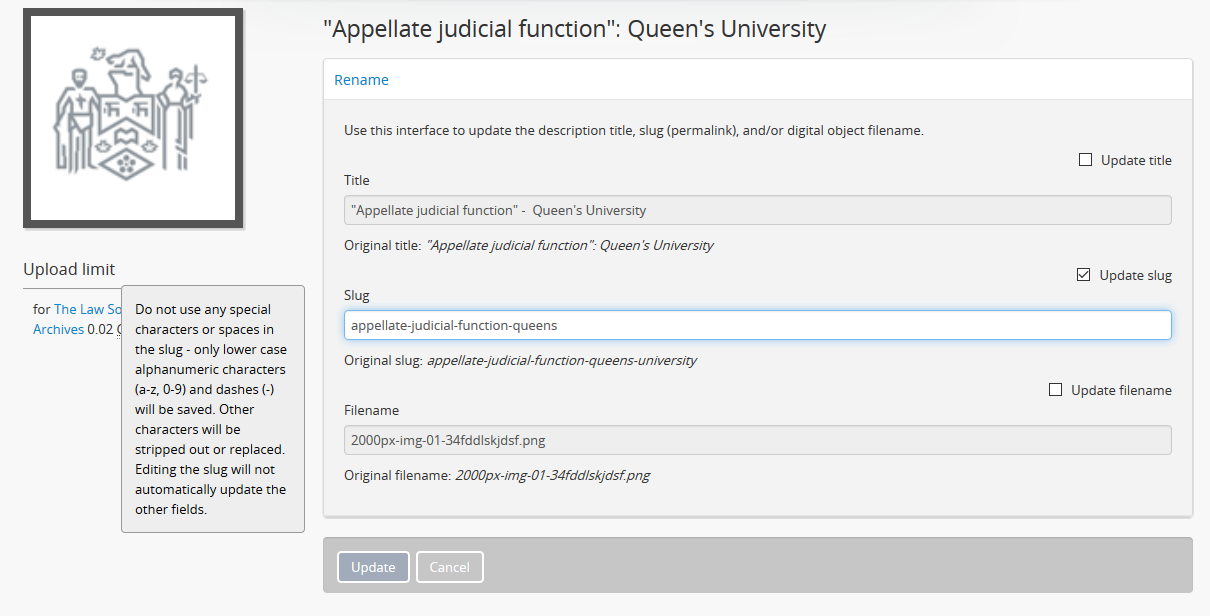
When editing a slug in AtoM, it is important to understand how they are generated, and why your slug may be saved differently than the value you input. By default, slugs in AtoM are sanitized to remove spaces, special characters (such as ! @ # $ % & etc), and capitalization. They are also truncated to a maximum of 250 characters. Since they are used as permalinks, they must also be unique within the system - so AtoM will automatically append a dash and an incrementing number to the end of non-unique slugs. More information on slugs in AtoM can be found here: Notes on slugs in AtoM. Whenever the Rename module alters the slug you enter based on the above parameters, a notification indicating this will be shown.
Tip
An administrator can enable more permissive slug generation via
 Admin > Settings > Global. When enabled, capitalization, accents,
and some special characters are preserved. For more information, see:
Admin > Settings > Global. When enabled, capitalization, accents,
and some special characters are preserved. For more information, see:
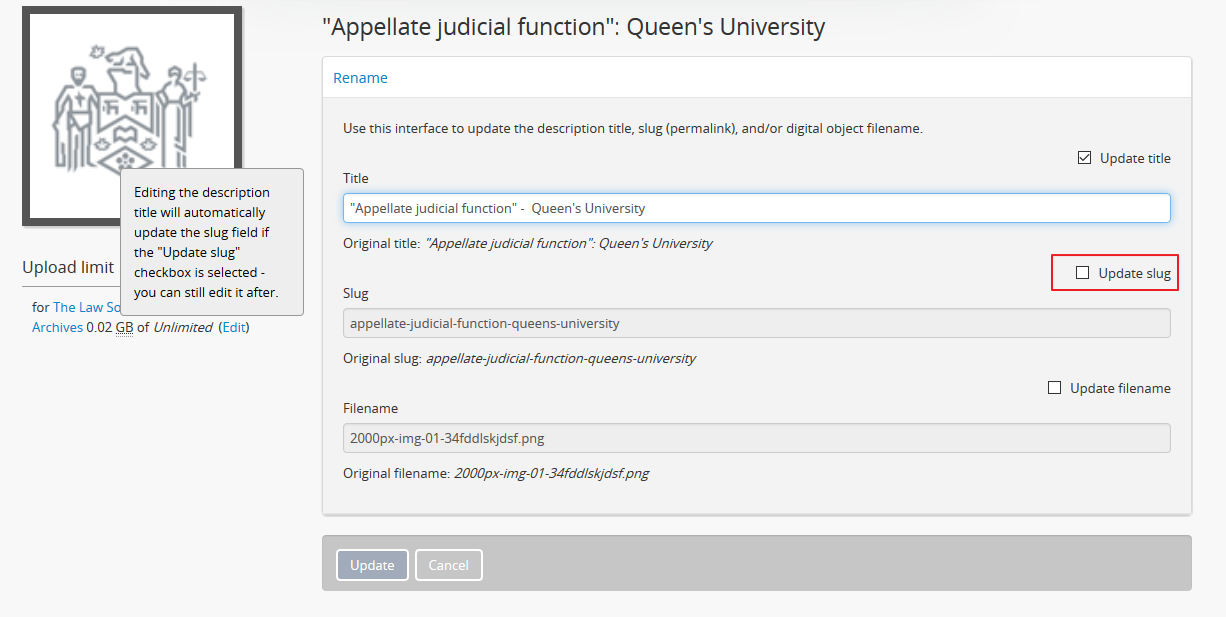
Note that the title of a description can always be edited within the edit page of the description itself - for more information, see above, Edit an existing archival description. The ability to edit the title of the description in the Rename module has been included for convenience - when the title of archival description is edited in the Rename module, and the checkbox for editing the slug is also selected, then the slug will be automatically updated to match the title.
Tip
If you ever update the slug accidentally when editing the title, don’t worry! You can simply uncheck the update slug box to the right of the field - AtoM will disable the slug edit field, and when saved, the slug will be unchanged from the original. You can also always re-open the Rename module and edit the slug or title again as needed. Further details are included below.
Although it can be done in the same module, specific instructions on editing the filename of a linked digital object will be covered on the Upload and manage digital objects page - for more information, see: Edit the filename of a digital object linked to an archival description.
To update the title or slug of an archival description:
- Navigate to the archival description whose title or slug you wish to edit. You can do this by browsing or searching for the archival description - see Access content for more information on navigation in AtoM.
- Scroll down to the button block at the bottom of the page, and click on the “More” button - a menu will open with further options. Click on “Rename” to open the Rename module.
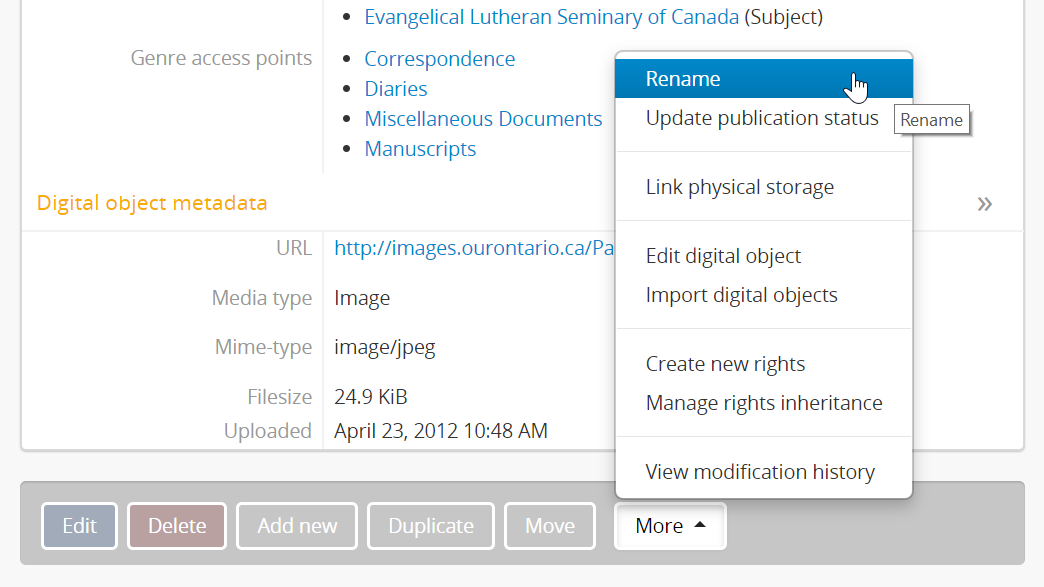
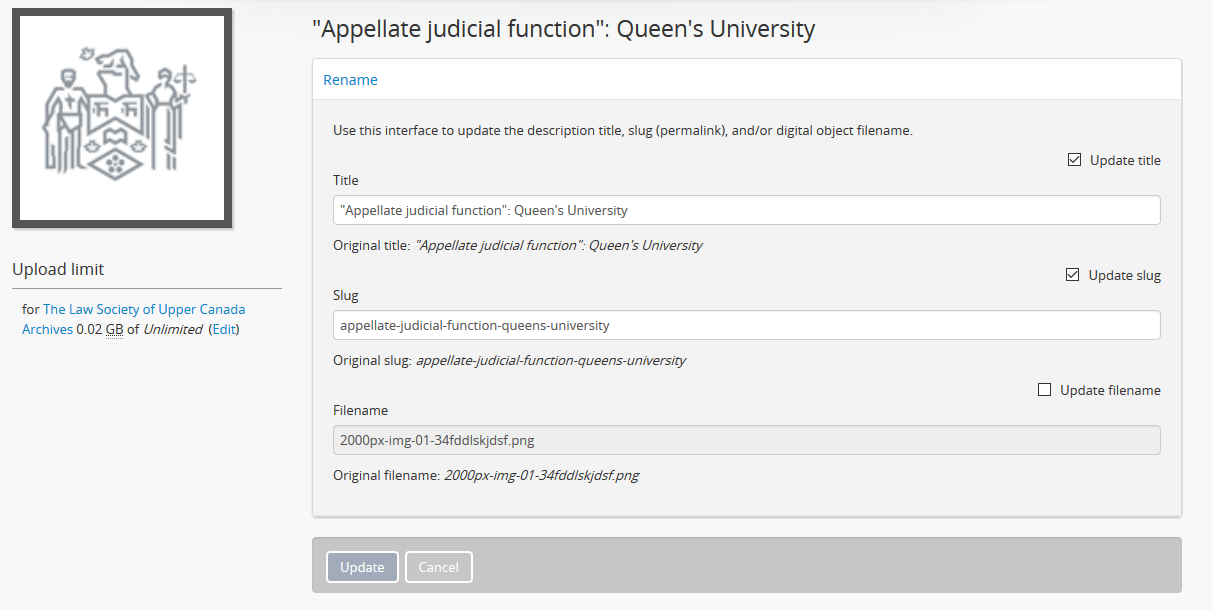
- AtoM will redirect you to the Rename module page. You will see at least 2 fields - one for the title of the description, and one for the slug. If there is a digital object linked to the description, you will also see a third field to edit the digital object filename.
See also
For more information on editing the digital object filename with the rename module, see: Edit the filename of a digital object linked to an archival description.
- To the right of the edit fields, there is a checkbox corresponding to each field. By default, the title and slug checkboxes will be checked - this means that they are enabled for editing. You can uncheck these fields at any time to disable them - doing so will undo any changes made and prevent the field from updating when the “Update” button is clicked.
- Place your cursor in the field whose value you would like to edit, and make changes as necessary. For reference, the original value before your changes is displayed below each field. Remember to uncheck any fields you don’t wish to edit - this will disable them.
Important
If you are editing the title of a description, and the “Update slug” checkbox is checked, then the slug will be automatically updated based on the new title you enter! The updated slug will be visible in the slug’s edit field after you move your cursor out of the title field. You can still make changes to the slug after it is automatically updated. Also, if you do not want to save the changes made to the slug, you can uncheck the “Update slug” box at any time during the edit process - AtoM will disable the edit field, and the original slug will be preserved when your changes are saved.
- When editing the slug of a description, if you enter a slug value that is already in use in AtoM, a notification pop-up will appear when you move your cursor out of the slug edit field, and AtoM will automatically append an incremental number to the slug to make it unique. You can still edit this value as desired to find a unique slug.
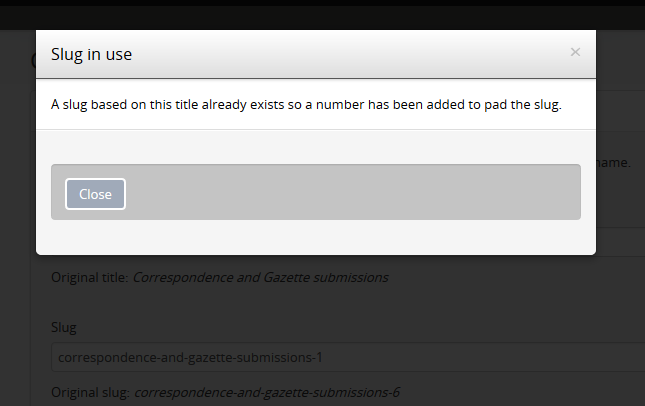
Tip
To make sure you see the notification pop-up before saving your record, we recommend actively moving the cursor out of the slug field after making an edit, instead of directly clicking on the “Update” button while your cursor is still in the slug edit field.
- When you are satisfied with your changes, click the “Update” button in the button block at the bottom of the Rename module’s edit page. If you wish to cancel all changes and return to the archival description, click the “Cancel” button.
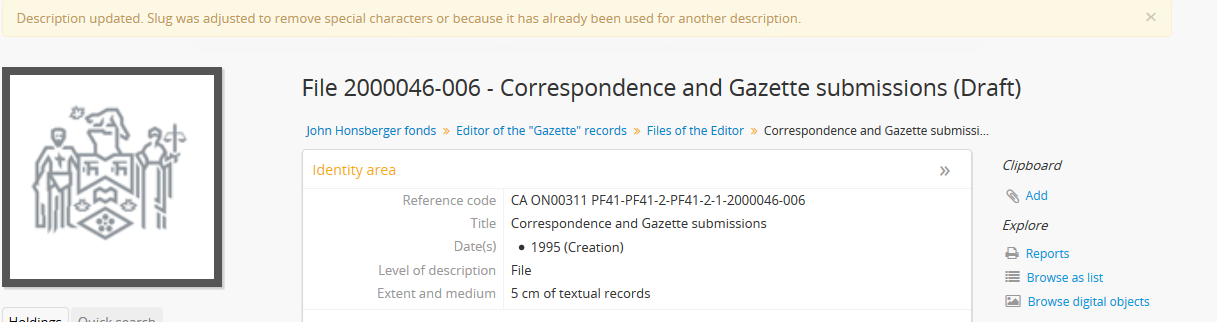
- After submitting your changes by clicking the “Update” button, AtoM will redirect you to the archival description’s view page. A yellow notification banner will appear at the top of the page acknowledging your edits. If the value you have entered for the slug has been changed by AtoM (e.g. sanitized to remove special characters, spaces, or capital letters, or incremented to make the slug uniqe), the message will mention this so you can review the slug in your browser’s address bar.
- You can repeat these steps as needed until you are satisfied with the outcome. Note that links to the description from other entities (e.g. a linked archival institution, authority record, etc) will be preserved even when the title or slug are changed.
Note
AtoM does not automatically add redirects from the old URL to the new one after a slug is updated - this allows previous slugs to be re-used if they are available. However, this means that if you have added links to a specific description on an external website, they may break after changing the slug.
View the modification history of an archival description
AtoM has a basic audit log for archival descriptions that can be enabled by an
administrator in Admin > Settings > Global - see:
Enable description change logging.
Once enabled, AtoM will capture basic information (including date, type, associated user, and/or associated description) when archival descriptions are created or modified.
Important
For archival description modifications to be tracked by AtoM, an administrator must first have enabled the Enable description change logging setting. Any description creation or modification events prior to enabling the setting will not be tracked.
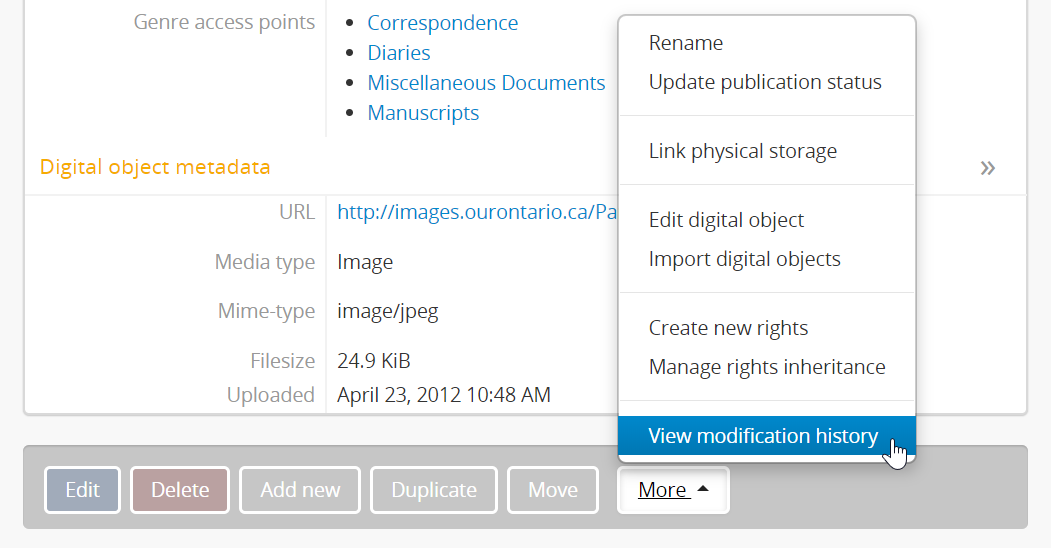
After the setting has been enabled, authenticated (i.e. logged in) users with sufficient permissions can see the modification history of an archival description using the “More” button found in the button block at the bottom of a description’s view page. To do so:
- Navigate to the view page of the archival description whose audit log you would like to see. You can do this by browsing or searching for the archival description - see Access content for more information on navigation in AtoM.
- In the button block at the bottom of the description’s view page, click on the More menu, and select “View modification history.”
Note
If the “View modification history” option is not present in the More menu, this is likely because the audit log has not been enabled by an administrator. See: Enable description change logging.
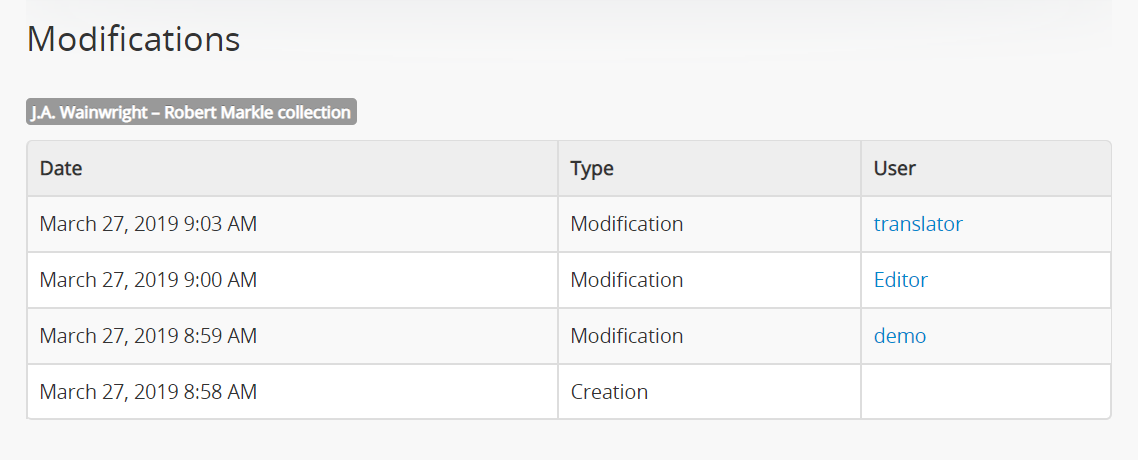
- AtoM will redirect you to the Modifications view page for the related
archival description. The page includes a table with 3 columns:
- Date: Includes the date and time the change was made. The date and time
values are determined based on the PHP time zone settings, which can be
modified by a system administrator in the
apps/qubit/config/settings.ymlconfiguration file. For more information, see: Manage AtoM configuration files. - Type: Either Creation, or Modification. Deletions and other events are not currently tracked.
- User: The username of the user associated with the modification. Note that for administrators, these usernames will appear as hyperlinks - an administrator can click the hyperlink to navigate to the related user’s profile page, where a full history of that user’s desrciption modifications can be seen. For more information, see: View a user’s description modification history.
- Date: Includes the date and time the change was made. The date and time
values are determined based on the PHP time zone settings, which can be
modified by a system administrator in the
Note
For records created or modified via actions performed via the command-line interface (such as a CSV import, etc), no associated username will be shown. In the image above, the record was created via a command-line EAD XML import - as such, the User field for the associated modification is empty.
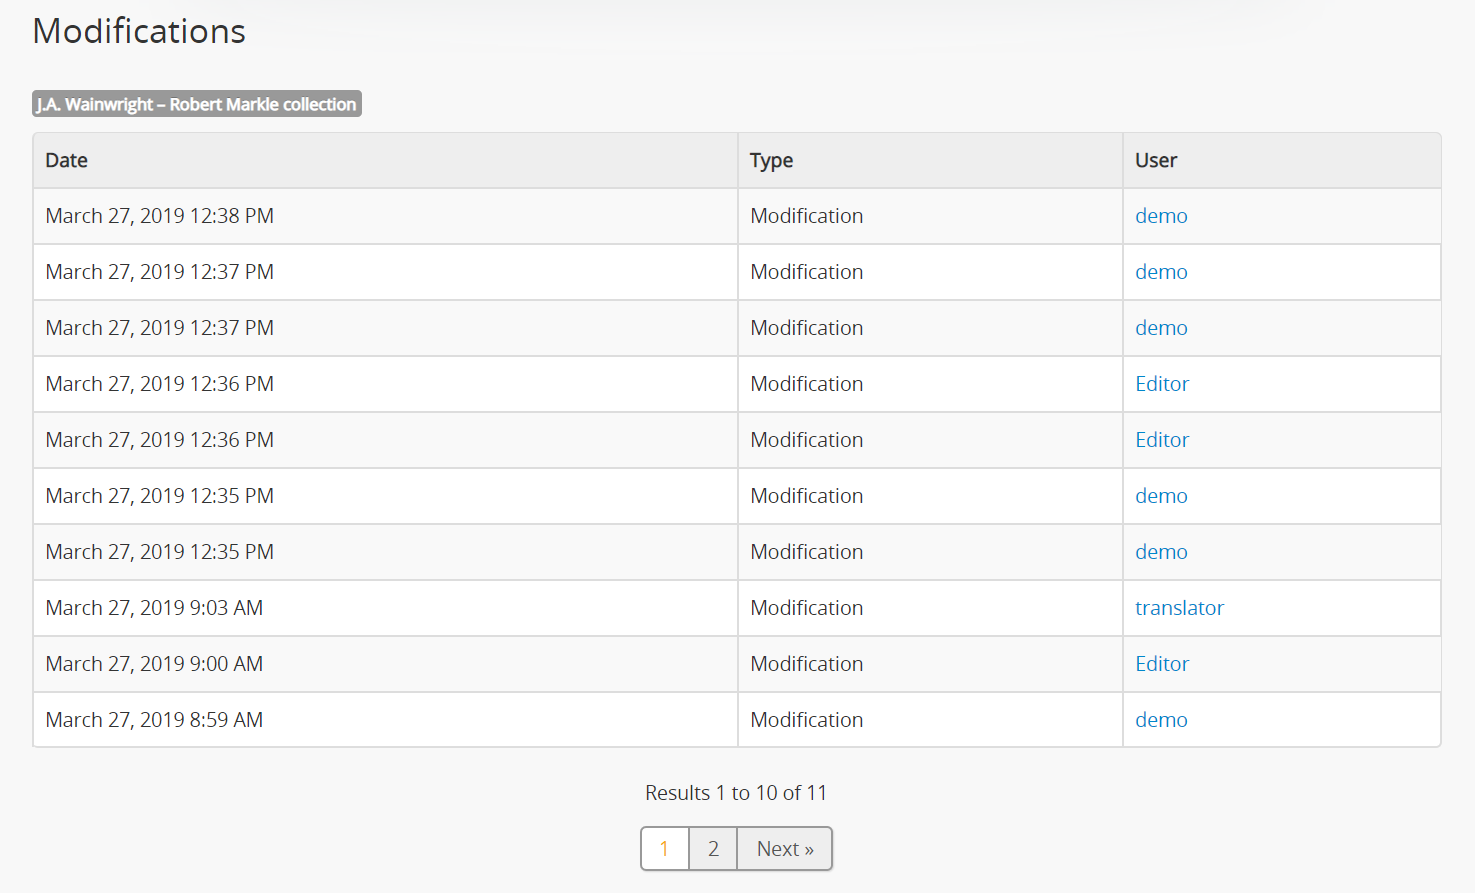
- The number of results included in the Modifications page is determined by
the Results per page setting in Admin > Settings > Global.
If there are more results than the results per page setting, AtoM will
display a pager at the bottom of the page, to allow you to page through
the results.
Move an archival description
Occasionally a user will need to move an archival description from one level of description to another, from one fonds or collection (or other top-level description) to another, or simply to change the sort order within a number of records that share the same level of description (sometimes called siblings). There are two methods of moving archival descriptions - the first method allows only for changing the sort order in the treeview found in the context menu, while the second method, more robust, allows for a record to be moved broadly throughout the application, even allowing a lower level of description to be moved so that it becomes a new parent description.
Method 1: Change sort order
This method only applies when there are multiple children with the same level of description beneath a parent description - i.e. “siblings”. It will change the sort order as displayed in the treeview found in the context menu of the related descriptions. Users can drag-and-drop children within the same level, for example moving series 02 above series 01 or moving items around within the same file. This is useful for users managing the intellectual arrangement of an archival unit.
Important
This ability works with both treeview types (full-width and sidebar). However, to be able to change the sort order with the sidebar treeview, an administrator must change the “Sort treeview” settings (located in Admin > Settings > Treeview) to “Manual”. Otherwise the drag and drop capabilities of the sidebar treeview are disabled.
For more information, see Treeview settings. See also:
To change the sort order of sibling descriptions in the treeview:
- Navigate to the child description whose sort order you wish to change. You can do this by browsing or searching for the archival description - see Access content for more information on navigation in AtoM.
- In the treeview (depending on your settings located either on the left- hand side or above the record’s view page), the current record being displayed in the view page will be highlighted. For more information on the treeview, see: Treeview.
- In the treeview, hover your cursor over the sibling record you wish to move - it can be any record on the same level of description as the one currently being viewed.
- In the Sidebar treeview, if the “Sort treeview” setting has been set to “Manual” by an administrator in Admin > Settings > Global > Sort treeview, then you will see three horizontal lines or bars appear on the right-hand side of the record-title you are hovering over in the treeview. This means the item can be dragged and dropped to a new sort order.
- In the Full-width treeview, nothing will show when you first click and hold on the treeview node. However, as you begin to drag the node, node text will follow your cursor. A red X will appear if you attempt to drag the node to a new parent record (indicating this is not a supported move function with the drag-and-drop), while a green checkmark will be shown if you can drop the node where your cursor is currently positioned. A black caret character on the left-side of the treeview indicates where the node will be positioned if you drop it:
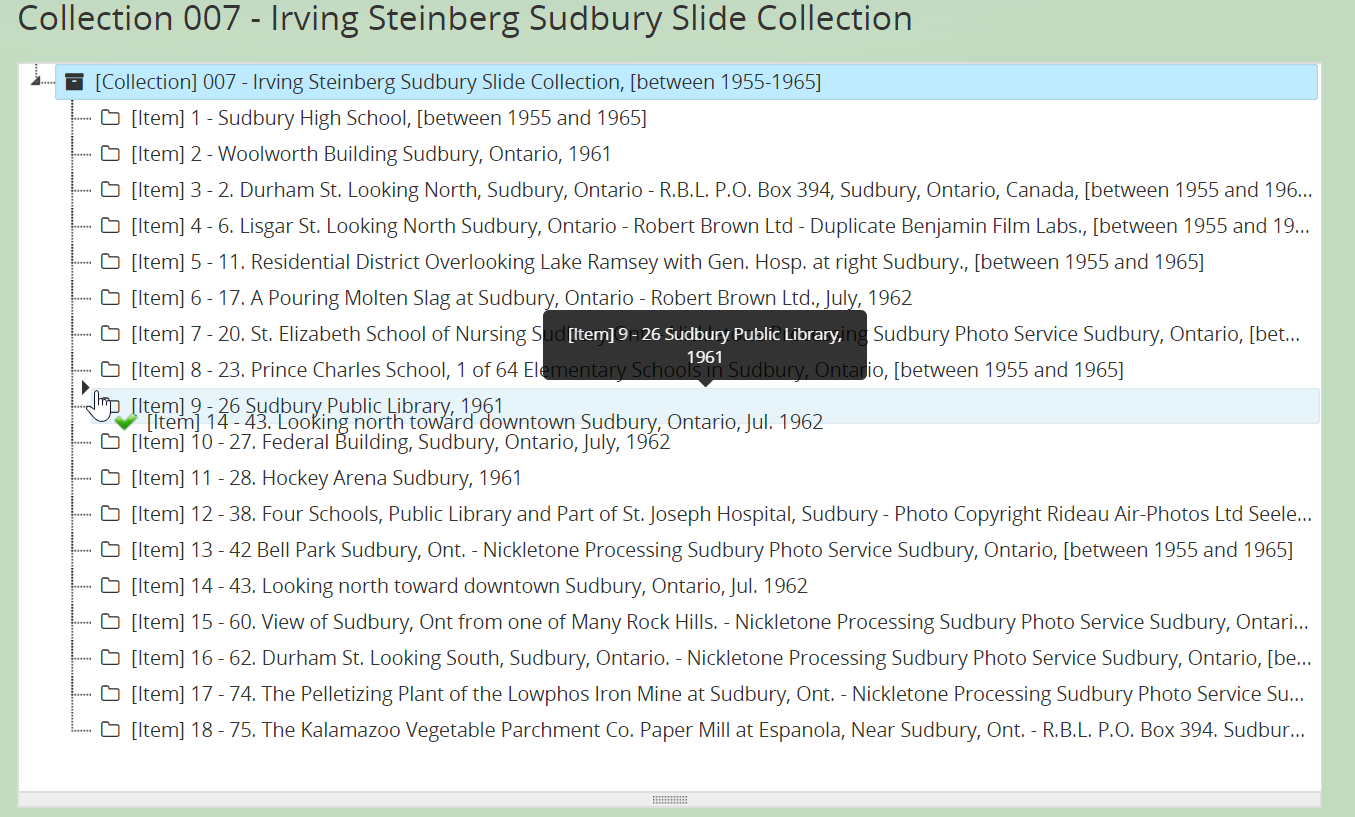
- Click on the record in the treeview and hold, and then drag it to the new position you would like it to have in the treeview. Remember, you can move it to another position within the same level of description, but the record will not be moved if you attempt to drag it from a lower to a higher level (e.g., from an item level to a file level, from a file level to a series or fonds level, etc.)
- The record in the treeview will drop into its new location. For the sidebar treeview, no changes will occur on the view page of the current record, though the sort order has been changed within the collection. You can repeat these steps as many times as are necessary to achieve the sort order you wish.
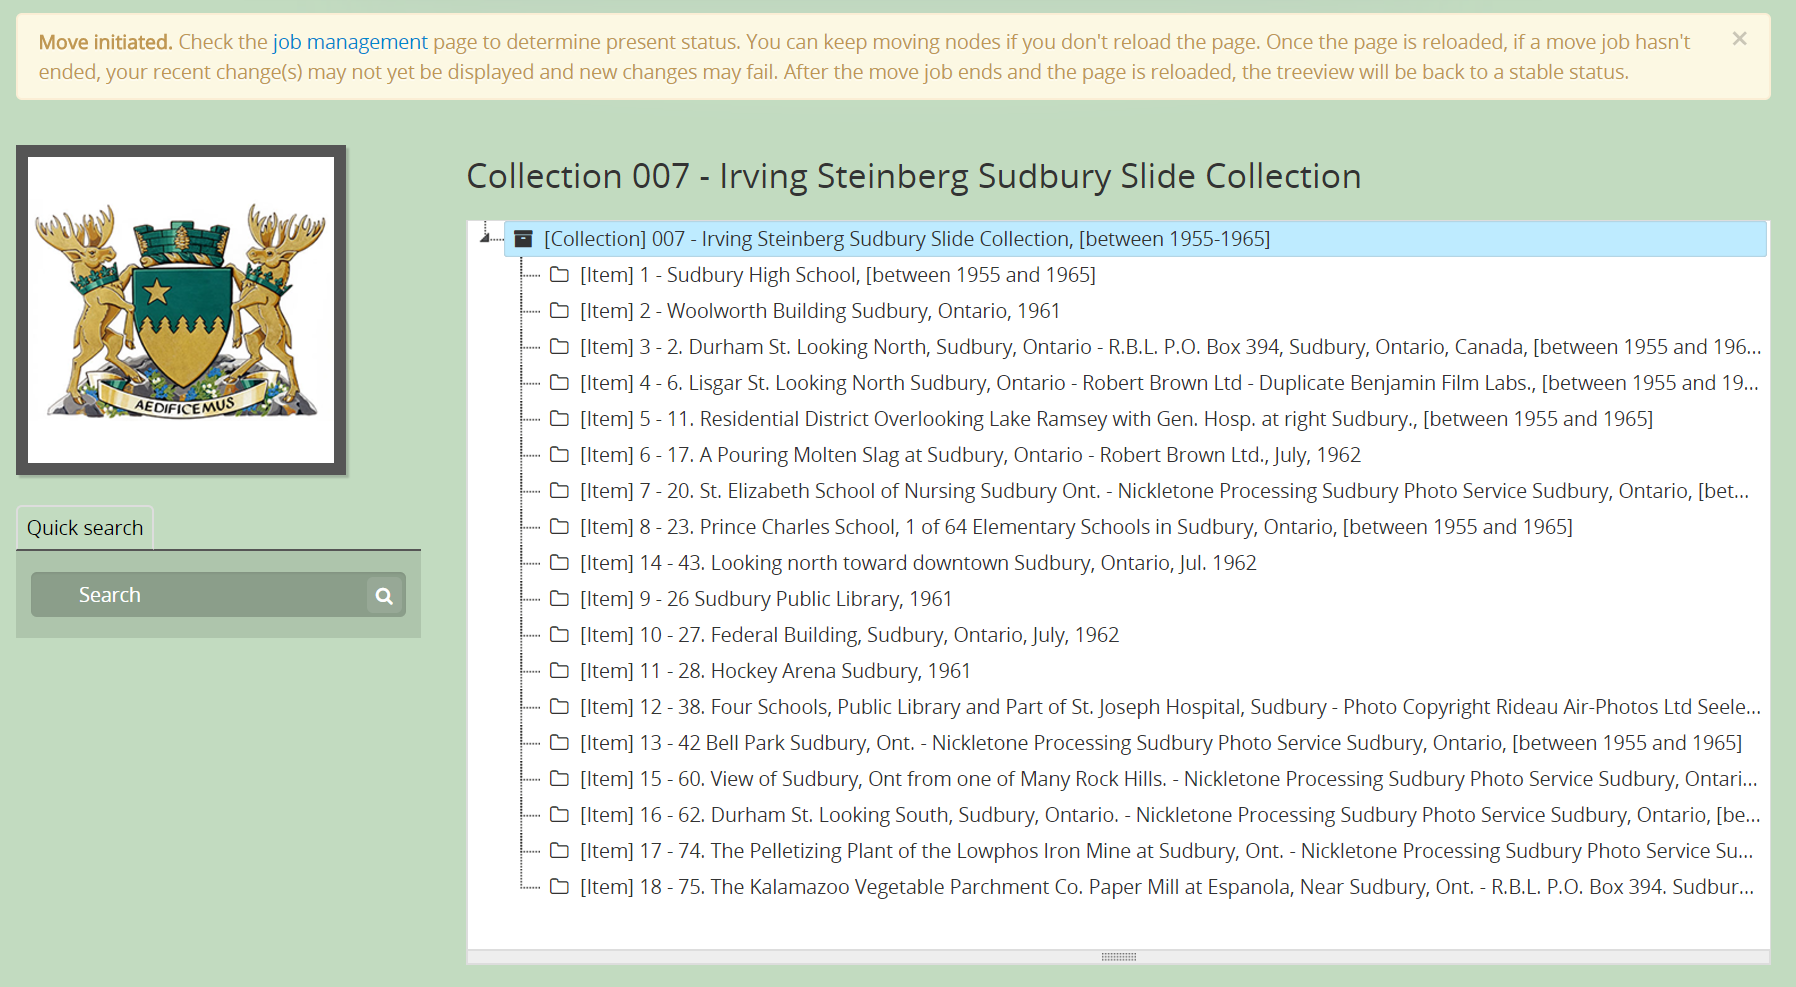
- For the full-width treeview, a Move job will be triggered, and a notification will appear. You can continue to drag nodes as needed, but the page will not be automatically updated until you manually refresh your browser page.
Note
Changing the sort order of a description with associated lower levels of description (i.e. children) will also move the description’s children. For example, if File 03, which has 10 item-level children, is dragged above File 01 to change the sort order, all of File 03’s children will also be moved, and will stay associated with File 03.
Method 2: Move a description to a different level
An authenticated (i.e. logged in) user with the proper permissions (see: User roles and Edit permissions) can also move a description from one level to another, or even from one fonds or collection (or other top-level description), by using the “Move” button located in the button block of an archival description’s view page. A lower level of description can also be moved so that it becomes a new parent description.
Important
Moving any description using this method also moves all child-level descriptions of the description being moved. For example, if you move a series that has file-level descriptions attached, all the file-level descriptions will be moved along with the series.
If you wanted to move a description without moving all of its children, you could 1) Create a duplicate of the description 2) Move the duplicate record to its new position, and then 3) Edit the original description (with the children). See above, Duplicate an existing archival description.
To move an archival description:
- Navigate to the child description that you wish to move. You can do this by browsing or searching for the archival description - see Access content for more information on navigation in AtoM.
- At the bottom of the description’s view page, press the “Move” button, located in the button block.
- You will be redirected to the Move page, which lists all top-level (i.e. parent) descriptions, and provides a search bar.
- To find your move location more quickly you can use the Move search bar to bring up results in the Move browse results listed below. For example, if you don’t know the name of a series record but you do know the name of the fonds or collection, you could search for the top-level description and then use the Move browser (below) to navigate to the correct level of description.
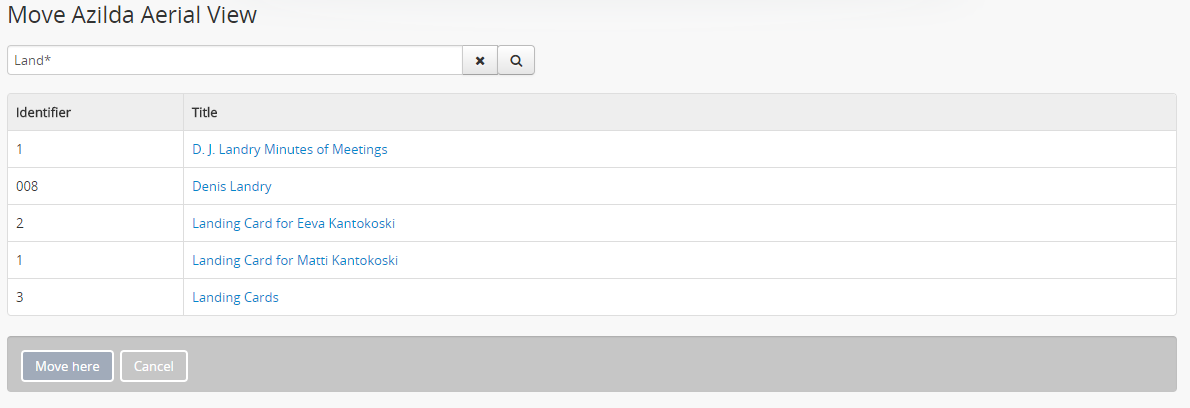
- The blue hyperlinks allow Users to drill down into the hierarchy of the archival description selected. Clicking on a top-level description in the Move page will display the description’s lower levels of description - for example, clicking on a fonds would reveal the series below it, and clicking on the series would then reveal the files below the series. To orient yourself, a breadcrumb trail will appear above the list of potential archival descriptions, indicating where in the archival unit’s you are currently located - this is intented to help Users understand if they are moving the record to a subfonds, series, sub-series, or a file.
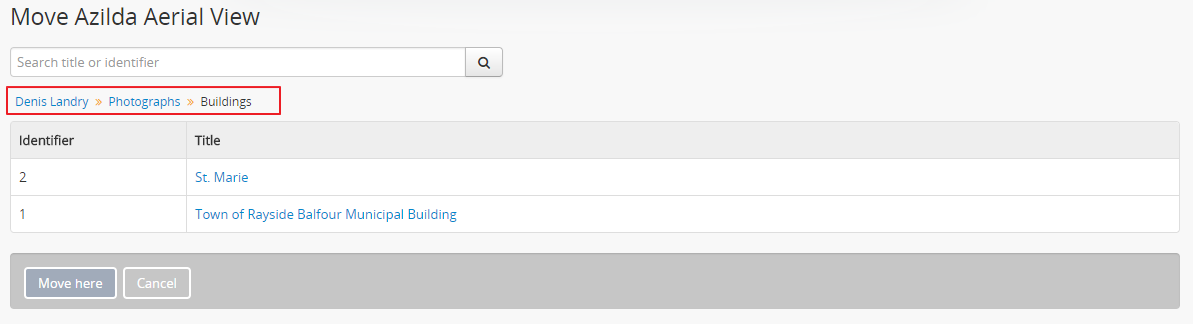
- If there are no more lower-level descriptions beneath the current level you are exploring in the move browser, then the move browser will be empty, as you can no longer drill down any lower in the hierarchy. You can always use the breadcrumb trail above the move browser to navigate back up the current archival hierarchy, or use the search box to begin a new search and browse for the correct move location.

- When you have reached the right level where you want to move the record, the new parent description should be the last breadcrumb in the breadcrumb trail, while the new siblings (if any) will be listed as hyperlinks below. Click “Move here” in the button block to move the record.

- To make a child-level description a top-level description (e.g. to turn a series into a fonds), click “Move here” without selecting one of the blue links.
- After clicking the Move button, the page will reload with a notification at the top of the page informing you that the Move operation has been initiated by the job scheduler. There is a link in the notification that will take you to the Manage jobs page if you want to check on the status of the move operation.
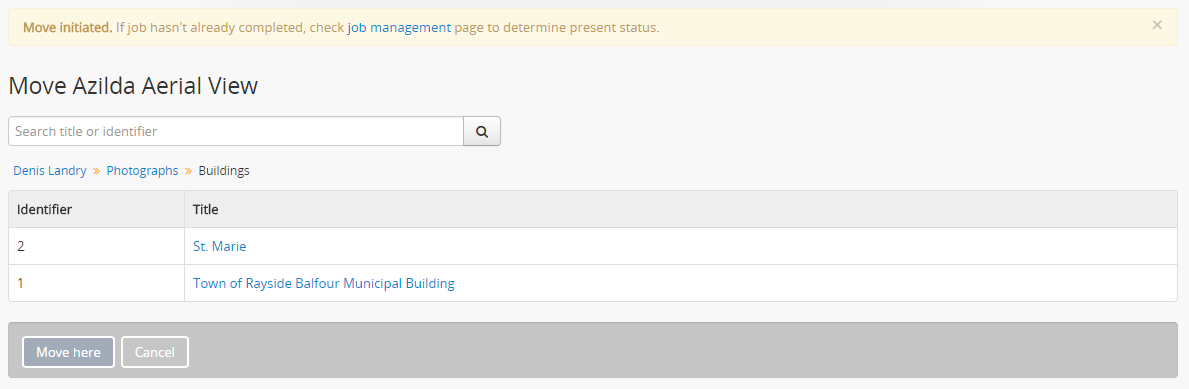
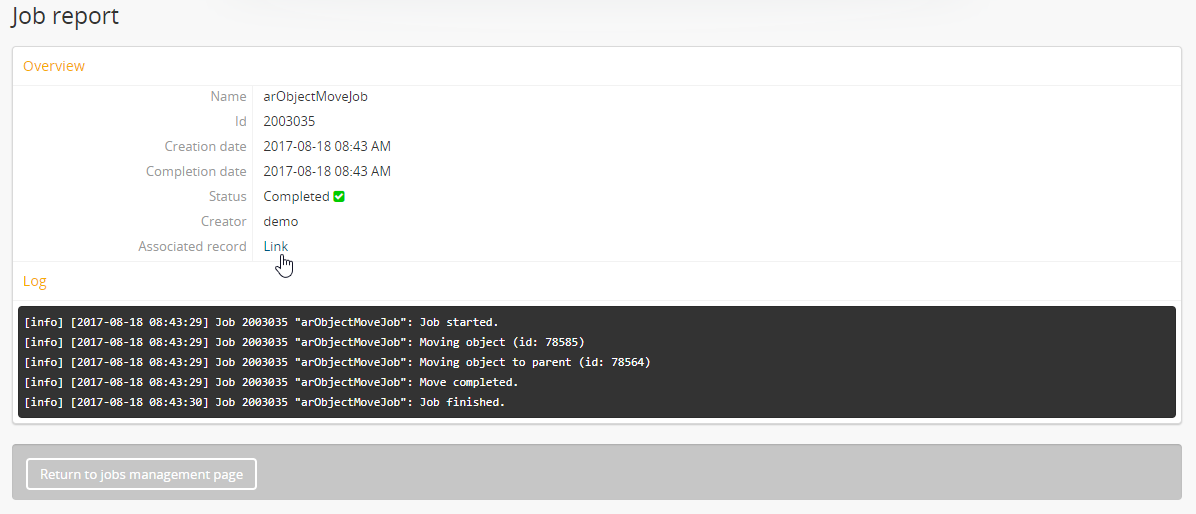
On the Jobs page, if the job has been successfully completed, then a link to the record’s new location will appear as a blue arrow in the Job status column.
Additionally, if you click the “Full report” link, you will be taken to the Job details page, where you can see the console output of the move job. There will also be a link to the associated description provided there.
Delete an archival description
An authenticated (i.e. logged in) user with the proper permissions (see: User roles and Edit permissions) can delete an archival description at any time, by navigating to the description and using the Delete button located in the button block.
Important
Consequences of deleting an archival description in AtoM:
- If the record has lower-level descriptions registered to it, all the lower-level records are also deleted - i.e. if you delete a series, any sub-series, files, or items that belong to the series will also be deleted
- Any date events (i.e. date(s) of creation, of publication, of contribution, etc.) associated with the description are deleted
- The authority record of the associated :term`creator` is not deleted
- The archival institution record of the associated repository is not deleted
To delete an archival description:
- Navigate to the archival description that you would like to permanently delete. You can do this by browsing or searching for the archival description - see Access content for more information on navigation in AtoM.
- Scroll to the bottom of the description’s view page, and click the Delete button located in the button block.
- AtoM will provide a warning and prompts you to confirm that you really wish to delete the description. If child descriptions will be deleted as well,the warning will list them. If you are sure you want to delete the record and all of its descendants/children, click “Delete”.
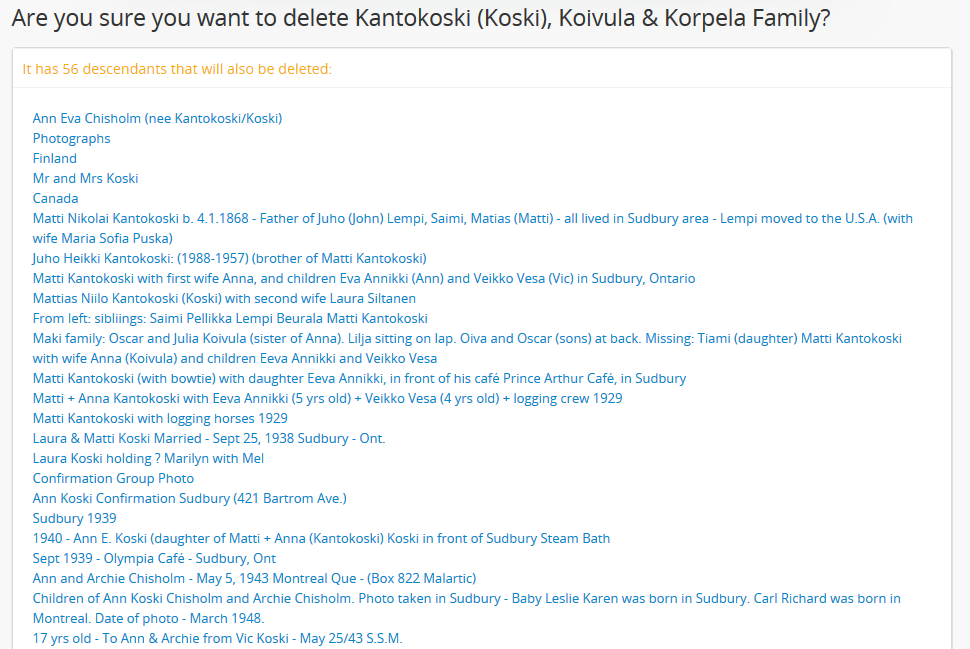
Warning
Deleting a description is a permanent operation that cannot be undone, and the associated data will be removed from AtoM’s database. Be sure that you want to delete a record before confirming the operation.
- AtoM deletes the record and returns you to the parent record of the deleted description or to the browse page if the deleted record was a top- level description.