Terms
A term in AtoM is generally understood as a word or phrase making up part of a controlled vocabulary, which are grouped into taxonomies for use throughout the application, as either value lists, or access points. Generally, a taxonomy is a system of classification, often (but not necessarily) organized hierarchically; in AtoM taxonomies are groupings of controlled vocabulary terms. Throughout AtoM, these controlled vocabularies are used to generate the values that appear in drop-down menus. These drop-down menus provide value lists that restrict data entry in certain fields to certain values (i.e. the controlled values in the taxonomy). AtoM typically stores these values as term records in the database, and assigns them to taxonomies - for example, the “type of entity” field of an authority record can by default accept only one of the three values, “corporate body,” “person,” or “family.” Each of these values is a term assigned to the Actor entity types taxonomy. All controlled vocabularies are managed via taxonomies in AtoM, accessible to authorized users via the Manage > Taxonomies menu.
AtoM ships with a fixed number of taxonomies containing default values (terms). Some terms are locked, i.e. cannot be edited or deleted, because they are used by the application’s underlying code. Most terms, however, can be edited or deleted, and all taxonomies can be assigned new terms in addition to any locked values.
Tip
An example of locked terms: Physical object type taxonomy

The Physical object type taxonomy contains terms that are used by the Physical storage module in AtoM - for more information on working with physical storage, see: Physical storage. In the Physical object type taxonomy, a set of default terms is included by default at installation. While some of these terms can be edited or deleted by users, and new terms can be added, key parent terms (Artefact, Container, and Location) are locked terms, because they are used by AtoM’s underlying code.
The intended use is for “Containers” to include specific storage containers, such as box numbers, cabinet drawers, etc., and for “Locations” to include more general storage locations, such as “Cold storage,” “Vault,” etc. Storage types and uses can be customized to meet institutional practices, however in order to link a custom storage container to a new or existing archival description you must nest the storage container under “Container.” Similarly, new locations can be created by users through the physical storage module’s user interface, and they will automatically be added a children of the locked term “Location.”
Other default terms (such as Box, Filing cabinet, Folder, etc) can be edited or delted by users - these are not locked terms, but are included by default for convenience. New terms can be added by users - see Add a new term, below, for more information.
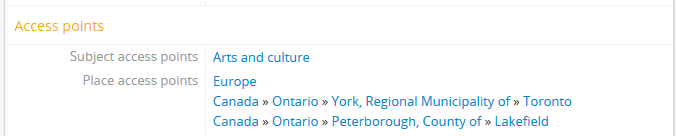
Terms are also used throughout the application as access points, such as subject and place access points added to archival descriptions. The place and subject taxonomies are the two taxonomies that users will likely interact with the most. AtoM’s use of a taxonomy to manage access points allows them to be organized hierarchically, with broader terms, related terms, and narrower terms. This is of particular use for place access points, as all parent terms will appear on a record as a breadcrumb trail when a term is added as an access point - for example, if the term “Vancouver” is added as a place access point to an archival description, and in the Places taxonomy “Vancouver” has the broader (or parent) term of “British columbia”, the access point will appear on the related archival description as “British columbia >> Vancouver”:
By allowing authorized administrators access to all taxonomies, users have the ability to customize descriptive templates to meet local or regional descriptive practices, or to remove controlled field terms that are not in use within the institution. This ability to customize is one of the strengths of AtoM as a freely available open-source software application.
Important
Users (even administrators) cannot add new taxonomies; the number and names of taxonomies are fixed and can only be altered by developers working directly with the code.
Below are instruction for using the Terms module in AtoM to:
See also
Add a new term
There are two main ways to add terms in AtoM, depending on what type of term is being added. Adding a term via the Manage taxonomy screen offers the most options for creating a controlled vocabulary term, as the entire term edit page is available to the user for data entry. However, if the term being created is a place or subject access point, users with sufficient access privileges can also create new place and subject terms “on the fly” from the archival description edit page when adding them as access points to an archival description. See below for assistance with:
- Adding a new term from the Manage Taxonomy screen
- Adding an access point “on the fly” from an archival description
Add a new term from the Manage Taxonomy screen
- In the main menu located in the AtoM header bar, click the
 “Manage” menu and select “Taxonomies”
from the drop-down menu. AtoM will redirect you to a list of the
the taxonomies available in AtoM.
“Manage” menu and select “Taxonomies”
from the drop-down menu. AtoM will redirect you to a list of the
the taxonomies available in AtoM.
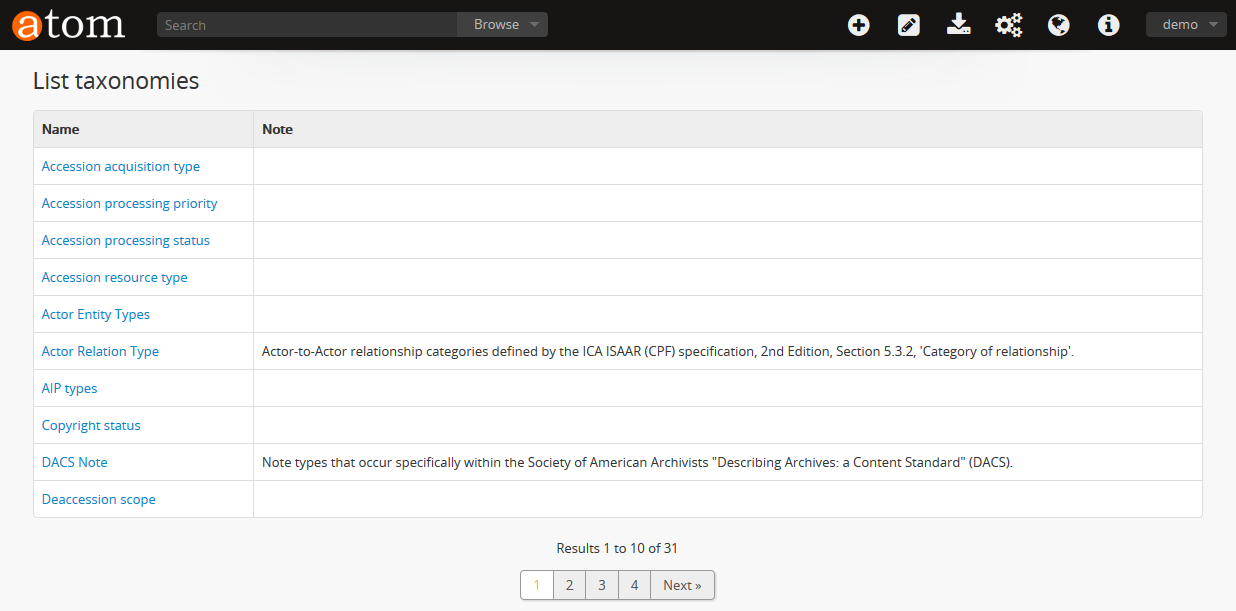
- Click on the taxonomy you want to edit to expand it and view the terms associated with the taxonomy.
Important
In general, if you are adding access points for use in archival descriptions, you will be navigating to the Places or Subjects taxonomies - the other taxonomy options listed manage the terms found in controlled fields throughout the templates in AtoM. Unless you are an advanced user with administrative permissions in your institution, we recommend that you do not add or edit other terms in the Taxonomies.
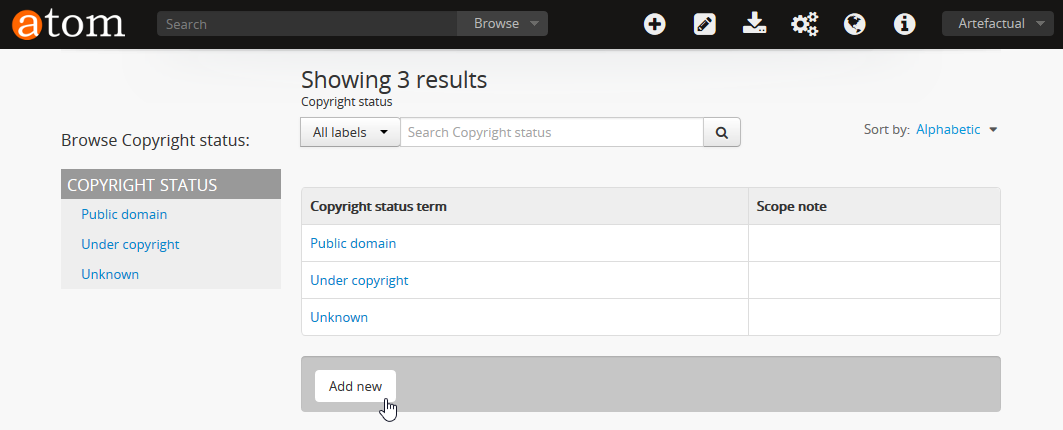
- Click the Add new button located in the button block at the bottom of the page to add a new term to the taxonomy. This will open the edit page for data entry.
- See the Term data entry section below for guidance in using specific fields in the Taxonomy edit page.
- You can quit the creation process at any by clicking the “Cancel” button in the button block at the bottom of the page; no new term will be created. Note that navigating away from the edit page without first saving your work will also result in no new term being created.
- When you are finished entering data, click the Create button to save the new record. AtoM will redirect you to the new term’s view page, where you can review your work.
Term data entry
The following gives a brief overview of the fields included in the Term edit template, to assist users in adding data:
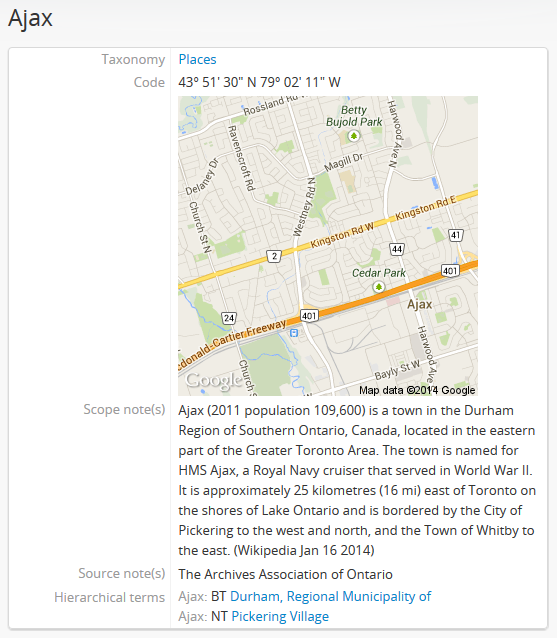
An example of a term from the Places taxonomy
- Taxonomy: This field is completed automatically according to the taxonomy to which the term belongs.
- Name: Enter the name of the term as you would like to see it appear in value lists in edit pages (e.g. as options in a drop-down menu)and as labels in the view pages.
- Use for: You can create one or more non-preferred terms using this field. When users attempt to add the non-preferred term to a record, the preferred term will be added instead. Similarly, if users search on the non-preferred term, AtoM will automatically substitute the preferred term.
- Code: This field is under development. Currently, it allows administrators and editors to add a static Google Map to a term description, as a basic form of geo-referencing. As such, it is most useful for the Places taxonomy. The field behaves similarly to the search bar on a Google Map, and will generate a static map image based on the term entered using Google’s Static Map API. Terms entered can include addresses, latitude/longitude coordinates, and place names (such as cities, neighborhoods, etc.). Unlike Google Maps, a pin will not be added to the map to mark the selected location, and currently the user cannot specify the scale of the map generated or refine the result in any way other than re-entering new data into the Code field.
- Scope note(s): Enter descriptive information about the term.
- Source note(s): Enter the source of the term, if applicable. This can be textual (if the term comes from an external controlled vocabulary, taxonomy, or thesaurus, such as the Library of Congress Subject Headings, the Getty Art & Architecture Thesaurus, etc.) and/or it can be a URL.
- Display note(s): Enter an alternate label for the term if applicable.
Note
In the current version of AtoM, the Display note(s) field applies only to the events taxonomy. For example, for the term “distribution” the display note is “distributor”.
Tip
For help working with the Relationships area in the taxonomy term edit page, see the section below on Managing hierarchical taxonomies.
Add an access point “on the fly” from an archival description
The ISAD Glossary deines an access point as a “name, term, keyword, phrase or code that may be used to search, identify and locate an archival description.” In AtoM, name, place, and subject access points are a way of associating specific terms contained or referenced within an information object (e.g. items within a file; a video; a picture) to its archival description, and creating searchable entry points for users. They can be conceptualized as similar to “tags” and help contextualize information objects while returning better search results. In AtoM, subject and place access points are derived from taxonomies created and customized by users. Like other taxonomies and AtoM, these can be preloaded by administrators by importing SKOS XML files with predefined controlled vocabularies and relationships (see: Import/export, but they can also be created on the fly by users.
Access points can be added by users with edit permissions on the fly (without leaving an archival description) from an archival description edit page by simply adding a new subject or place to the corresponding field in the Access points area.
Any terms previously created and any access point taxonomies already imported into AtoM will populate a the drop-down menu when a user places the cursor in the related access point field, to ensure that controlled vocabulary terms are maintained, but multiple new terms can also be added. However, if a hierarchical relationship is to be established between terms (for example, nesting “Mount Pleasant” as a narrower term of “Vancouver”), an administrator or editor will have to edit the term through the taxonomies list (see below, Manage hierarchical taxonomies).
To add an access point on the fly from an archival description:
- Navigate to the archival description to which you would like to add a new place or subject access point. You can do this either by searching or browsing - for more information on navigation in AtoM, see Access content.
- At the bottom of the archival description’s view page, you will see the button block with several options (Edit, Delete, and Add new). Click the “Edit” button, or click on any of the information area headers, to enter edit mode.

The button block available on an archival description
- Navigate to the Access points information area and beginning typing your place or subject access point into the relevant field. Wait a moment and do not press enter immediately - the access point fields will auto-complete any matching terms in a drop-down menu, allowing you to see if your access point already exists.
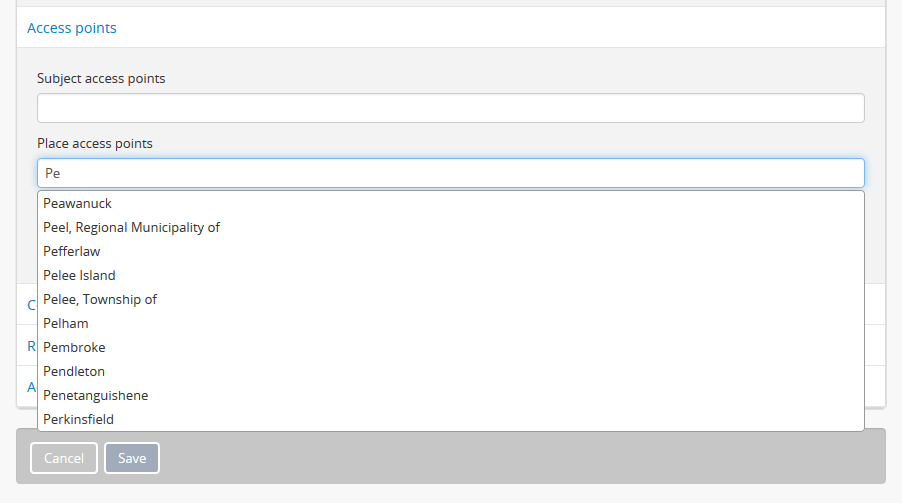
When you begin typing in an access point field, the drop-down will provide matching suggestions - select from the list to use an existing term, or enter a new term. Be careful: if you type the full name of an existing term and press enter (instead of selecting from the list), you could accidentally create a duplicate term!
- If a matching term DOES exist, select from the drop-down list and save the archival description by using the “save” button in the button block at the bottom of the edit page.
Important
If you are not careful, it is easy to accidentally create duplicate terms! To avoid duplication, matching terms must be selected from the auto-complete drop-down - otherwise, even exact matches will create duplicates when the user presses enter.
- If a matching term does not exist, press the Tab key to exit the field, or use your cursor. A new term will be created in the related taxonomy (e.g. places or subjects) when the description is saved.
- You can add multiple terms at a time - when you exit the field with your cursor, AtoM will provide a new blank field. Repeat steps 4-5 as necessary. If you need to edit or remove a term you have just added, place your cursor to the left of the term - an X icon will appear in place of the bullet next to the term. You can click the X to remove the term.
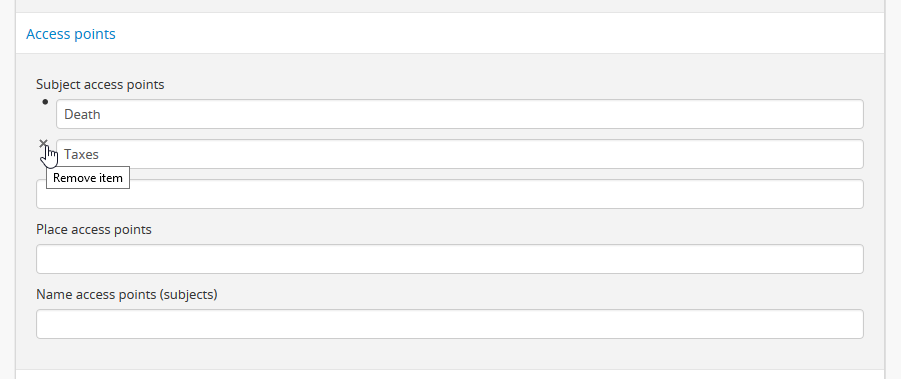
Place your cursor to the left of a term to see the option to remove it - the bullet icon will change to an X icon. Click to remove the term.
- At the bottom of the description’s edit page, click the “Save” button in the button block when you are done editing. AtoM will reload the archival description in view mode, and your new access point(s) will appear in the Access points information area as a blue hyperlink. You can now edit the term to add supplementary information if needed - instructions are provided below.
Note
If you wish to manage your new term by adding further data or organizing it hierarchically, you will need to access it in its relevant taxonomy by navigating to Manage > Taxonomies and locating the term in the relevant taxonomy - see: Edit an existing term or Manage hierarchical taxonomies for more information.
On Name vs. Subject Access Points
Name access points provide linked access to information about actors (e.g. persons, families, or corporate bodies) associated with an archival description – either as creators, or as subjects, or via other types of relation (including contributor, publisher, collector, distributor, etc.). The type of relationship of a name access point to an archival description can be managed via the ISAAR-CPF authority record template for that name (which the user is directed to when clicking on the name access point in an archival description).
Unlike subject or place access points, which are managed via a terms taxonomy, Name access points are managed as authority records in AtoM in two ways:
First, name (creator) access points are automatically derived from ISAAR authority records in AtoM. Whenever a creator is added to an archival description, the creator name is also added as a name access point in the Access points information area of the archival description. Doing so conforms to the recommendations found in ISAAR-CPF 1.5 and 1.6, and 1.8:
1.5 - There are many reasons why separate capture and maintenance of this type of contextual information is a vital component of archival description. The practice enables the linking of descriptions of records creators and contextual information to descriptions of records from the same creator(s) that may be held by more than one repository and to descriptions of other resources such as library and museum materials that relate to the entity in question. Such links improve records management practices and facilitate research.
1.6 - Where a number of repositories hold records from a given source they can more easily share or link contextual information about this source if it has been maintained in a standardized manner. Such standardization is of particular international benefit when the sharing or linking of contextual information is likely to cross national boundaries. The multinational character of past and present record keeping creates the incentive for international standardization which will support the exchange of contextual information. For example, processes such as colonialization, immigration and trade have contributed to the multinational character of recordkeeping.
1.8 - Archival authority records are similar to library authority records in as much as both forms of authority record need to support the creation of standardized access points in descriptions. The name of the creator of the unit of description is one of the most important of such access points. Access points may rely on the use of qualifiers that are deemed essential to clarify the identity of the entity thus named, so that accurate distinctions may be made between different entities that have the same or very similar names.
By generating a creator name access point from an authority record, AtoM thereby supports the linking of archival descriptions related by creator by using a standardized name (as access point) drawn from the authority record. Clicking on a name access point in an archival description will bring a user to the AtoM ISAAR-CPF Authority Record for the name. Name entity types can be defined in the authority record as either a person, a family, or corporate body.
AtoM also allows users to add new name access points on the fly, so other important names can be associated with an archival description. When a user adds a name access point, a new authority record for the added entry is generated, and the access point is automatically listed with the qualification of “(subject)” next to the link, for added clarity about the role of the named entity. Authorized users (e.g., authenticated editors or administrators, etc.) can then add descriptive contextual information to the authority record. If an added name is the creator of another fonds or collection in AtoM, this relationship can be defined through the authority record, just as relationships between other entities can be defined as either hierarchical, temporal, associative, or family. Similarly, the relationship to the linked archival description can be managed by defining the Nature of relationship in the Relationships Area of the Authority record.
In contrast, subject access points are managed via the taxonomies, and are intended to add topical information about events, objects, etc. covered in the materials of a fonds/collection, allowing users to gain a sense of the topics covered therein, obtain better search results, and easily view other archival descriptions that contain materials on the same subject. Clicking on a subject access point will bring the user to a search results page, displaying summary descriptive information about descriptions that also contain the same subject access point. Authorized users (ex: editors, administrators) can add subject access points on the fly straight from the archival description edit page (instructions above, and they can provide descriptive summaries and manage hierarchical relationships of the access point by navigating to Manage > Taxonomies > Subjects.
In summary, Name access points support ISAAR-CPF’s requirements, and can be thought of as similar to the 245$c, 700, 710, 600, and 610 fields in a library MARC record (depending on the type of relationship, as defined in the authority record). In contrast, Subject access points relate to topical information and general subject terms, similar to the 650 field in a library MARC record.
For information on working with authority records in AtoM, see:
Manage hierarchical taxonomies
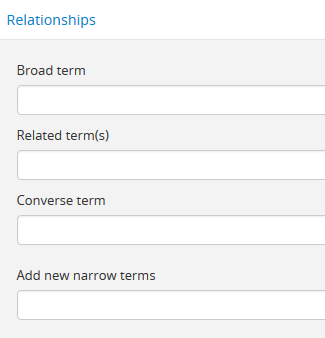
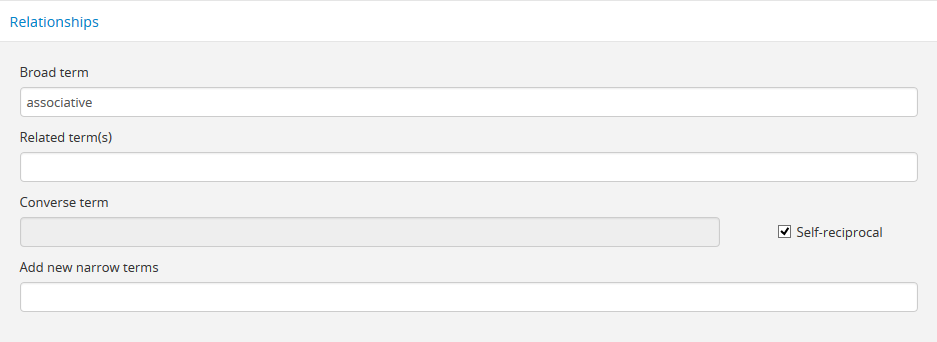
The edit fields available in the terms edit page Relationships area
In AtoM, the term edit page includes a special section (the “Relationships” area) that allows users to create hierarchical thesauri in accordance with ISO 2788. This section will outline how to use the fields in this area to manage broader, related, and narrower terms. All of the following instructions involve first navigating to the term you would like to alter, and entering edit mode:
- In the main menu located in the AtoM header bar, click the
“Manage” menu and select “Taxonomies”
from the drop-down menu. AtoM will redirect you to a list of the
the taxonomies available in AtoM.
- Click on the taxonomy you want to edit to expand it and view the terms associated with the taxonomy. You can use the dedicated search bar on the terms page to search for your term by name, or you can browse the terms listed in the taxonomy. When you have found the term you would like to edit, click on it to navigate to the term’s view page.
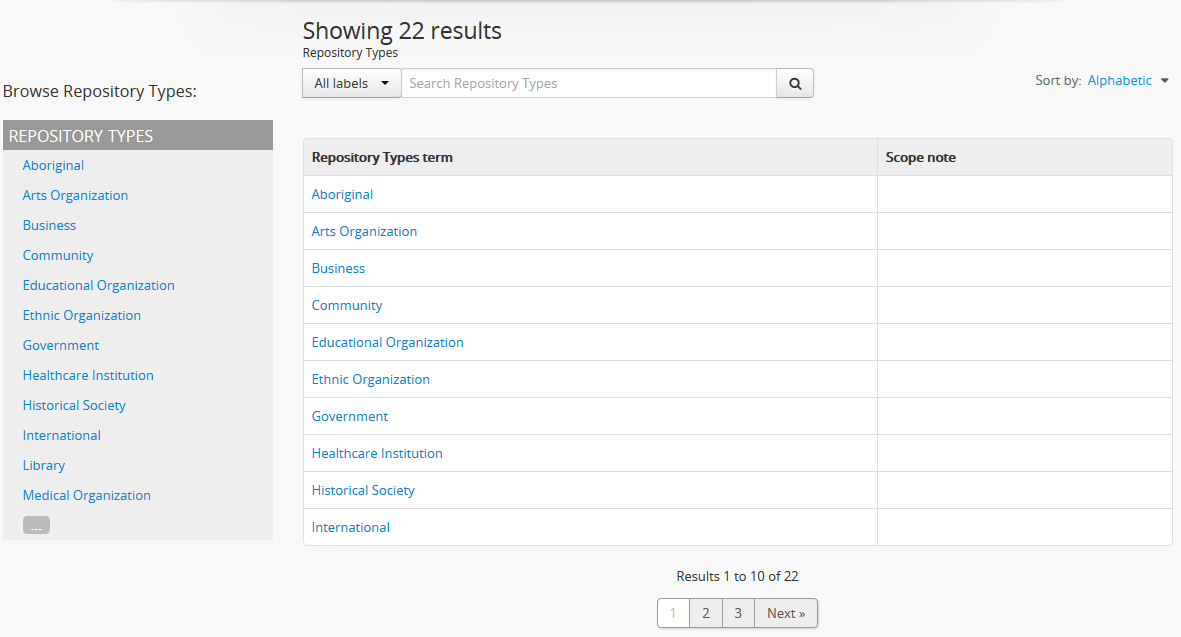
An example taxonomy page - the Repository types taxonomy
- Click on the “Edit” button located in the button block at the bottom of the term page to enter edit mode. AtoM will redirect you to the term’s edit page.
You are now ready work with term relationships in AtoM. You can:
Add/edit a broader term
To create a hierarchical parent/child relationship between terms, AtoM allows you to add an existing record as a broader term, via an auto-complete drop-down menu.
Important
You cannot create a new term by adding it to the Broader term field - to add a broader term, the term must already have been created in AtoM. To create new terms in AtoM, see above. A term can only have one broader term - you cannot add multiple broader terms.
To add or edit a broader term in AtoM
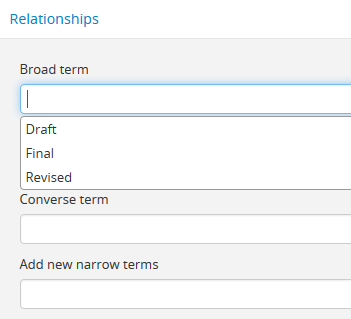
An example of selecting a broad term from the existing terms available within the Description Statuses taxonomy
- In the Relationships area of the term’s edit page, begin typing the name of the broader term into the “Broader term” field.
- As you type, atom will search available term records (those that are part of the same taxonomy) and populate the field’s drop-down menu with matching terms.
- When you see the term you would like to add as a broader (i.e. parent) term, click on it - it will be added to the field.
- If you wish to edit or remove an existing broader term, place your cursor in the field and delete the existing term. The drop-down menu will show the available terms that you can add - follow steps 1-3 to add the desired term. Leave the field blank if you do not wish to link the term to a broader term.
- When you are finished, click the “Save” button in the button block at the bottom of the term’s edit page. AtoM will redirect you to the term’s view page, where you can review your changes. You can click the “Edit” button in the button block to make further changes if needed.
Add/edit a narrower term
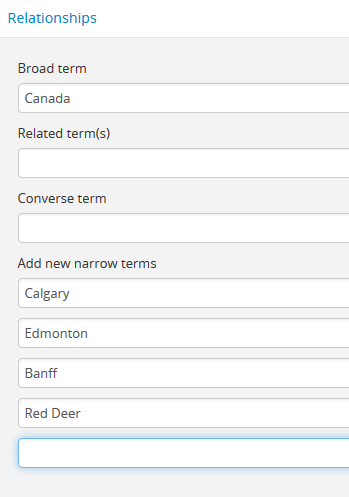
An example of adding new narrower terms to a a place term. In this example, cities are being added as narrower terms to “Alberta” (A Canadian province) in the Places taxonomy
AtoM will allow you to add multiple new narrower terms (i.e. child terms) to a term. This is intended to simplify the workflow for users who are building complex hierarchical taxonomies on the fly - by beginning with the top-level terms, users can generate new narrower terms from the edit screen of an existing term, and then supplement the narrower term records later as necessary.
Important
You cannot add existing terms as narrower terms using this method - instead, navigate to the narrower term record and add the corresponding broader term to it, following the instructions listed above.
To add new narrower terms on the fly from an existing term:
- In the Relationships area of the term’s edit page, enter the name of the new narrower term into the “Add new narrower term” field.
- When you have entered the new term’s name, press enter, or click your cursor out of the input field - AtoM will provide a new input field below so you can add further new narrower terms (i.e. child terms).
- Continue adding narrower terms as desired. When you are finished, click the “Save” button in the button block at the bottom of the term’s edit page.
- AtoM will redirect you to the term’s view page so you can review your work. The new narrower terms will appear as hyperlinks - clicking on one will take you to the related narrower term’s view page where, if you want, you can edit the narrower term to supplement it further (instructions below).
Note
You cannot remove a narrower term by entering edit mode on the related broader term’s record. To remove a hierarchical relationship between two records, navigate to the child term (e.g. the narrower term), enter edit mode, and delete the value from the “Broader term” field in the Relationships area. When you save the record, the two terms will no longer be hierarchically related.
Add/edit a related term
In AtoM, you can also create associative relationships between related terms. A term can have multiple relationships. This can be a useful way of managing complex hierarchies, and drawing users to other terms they may be interested in viewing.
Note
You cannot create new terms on the fly by adding a new value to the related terms field - the related term must already exist. See above for instructions on how to create a new term in AtoM.
To add a related term to an existing term in AtoM:
- In the Relationships area of the term’s edit page, begin typing the name of the related term into the “Related term” field.
- As you type, atom will search available term records (those that are part of the same taxonomy) and populate the field’s drop-down menu with matching terms.
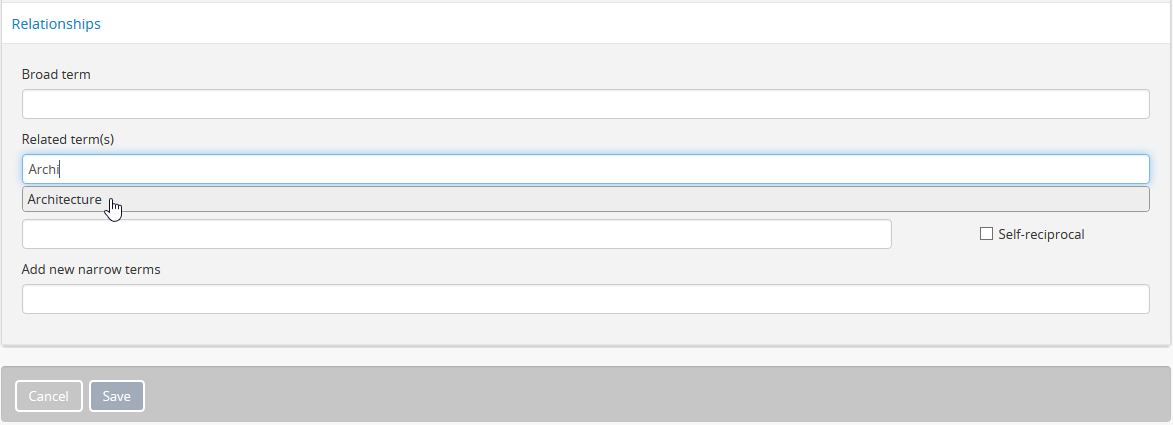
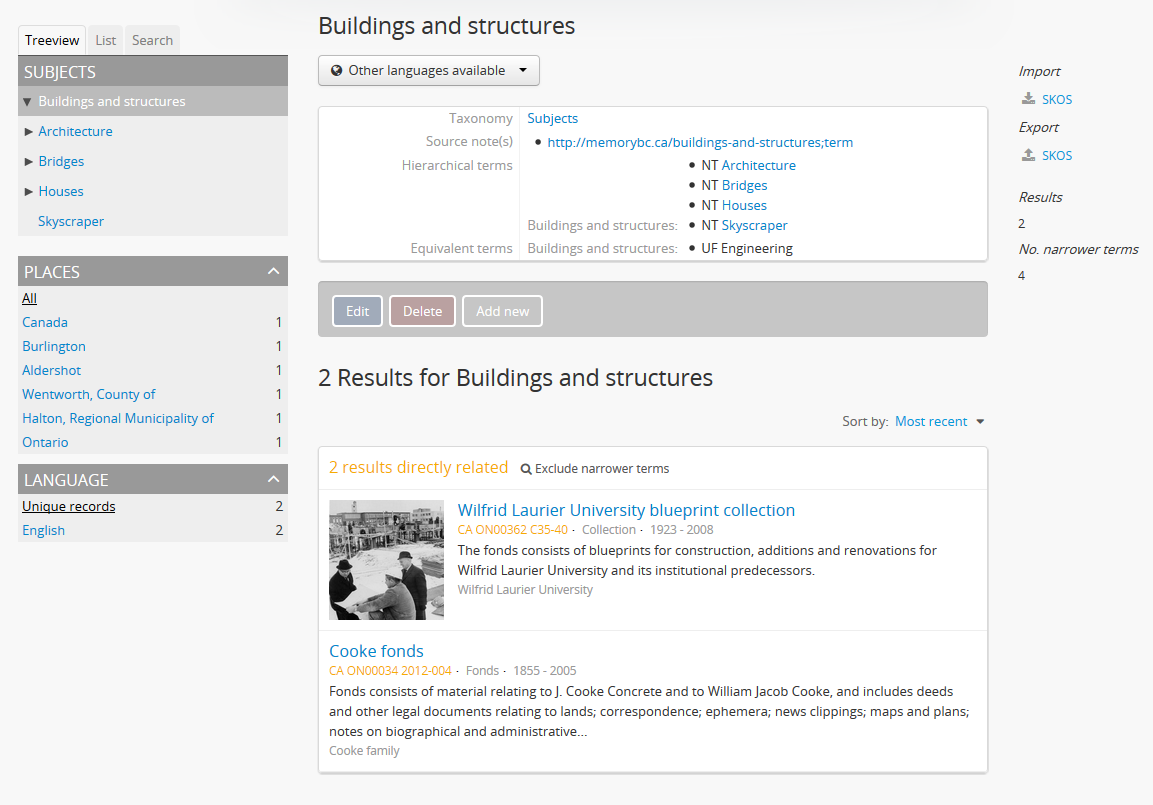
An example of adding a related term to an existing term in the subjects taxonomy - “Buildings and structures” is being related to “Architecture”
- When you see the term you would like to add as a related term, click on it - it will be added to the field. Remeber, you cannot create new terms from this field - they must already exist in AtoM to be added as related terms. For instructions on creating a new term, see above.
- Once you have selected the related term from the drop-down menu, AtoM will provide a new input field below so you can add further related terms. Continue inputting related terms as needed.
- If you need to edit or remove a related term you have just added, place your cursor to the left of the term - an X icon will appear in place of the bullet next to the term. You can click the X to remove the term.
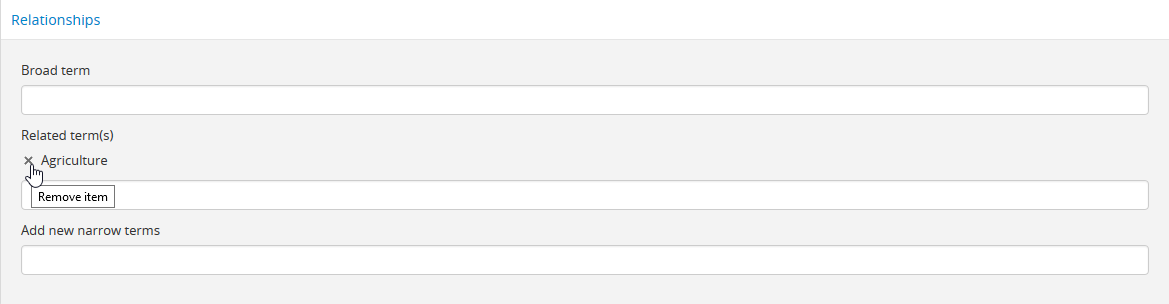
Place your cursor to the left of a term to see the option to remove it - the bullet icon will change to an X icon. Click to remove the term.
- When you are finished, click the “Save” button in the button block at the bottom of the term’s edit page. AtoM will redirect you to the term’s view page, where you can review your changes. You can click the “Edit” button in the button block to make further changes if needed.
Add/edit a converse term
In AtoM, terms with matching or related opposite terms (such as “parent of” and its converse, “child of”) used to describe relationships are known as converse terms. If a term has no opposite but itself (for example, “sibling of”), it can be marked as “self-reciprocal”, meaning its converse term is itself. AtoM includes a number of default relationship terms for use in the authority record Relationship dialogue (more information here). These default terms have been given converse or self-reciprocal relationships to support their use in the ISAAR-based authority record template, but the default terms, and their relationships, can be edited users with the appropriate edit permissions.
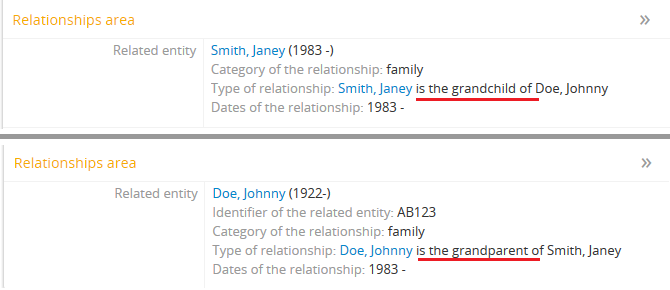
An example of converse terms on two related authority records
Important
Though the field is available in all term edit pages, the “Converse term” field is currently only used in AtoM in the Actor Relation Type taxonomy. This taxonomy is used to supply terms to the Relationships dialogue, when two authority records are linked. For more information on creating relationships between authority records in AtoM, see: Create a relationship between two authority records.
These default terms and their relationships to each other can be edited and managed in the Actor Relation Type taxonomy, and new terms can be added as well. Below is an overview of the default terms included and their relationships, and instructions on how to add new converse relationships.
Default Actor relation type terms in AtoM
AtoM comes with several pre-loaded default terms in the Actor relation type taxonomy. The parent terms (associative, hierarchical, family, and temporal) are all taken directly from the International Council on Archives’ ISAAR-CPF standard - the international standard for the creation of authority records upon which the AtoM authority record edit template is based.
The child terms, nested under the 4 parent terms mentioned above, are taken from some of the examples used in the ISAAR-CPF standard when describing relationships. Here is a list of the default terms included in AtoM in this taxonomy:
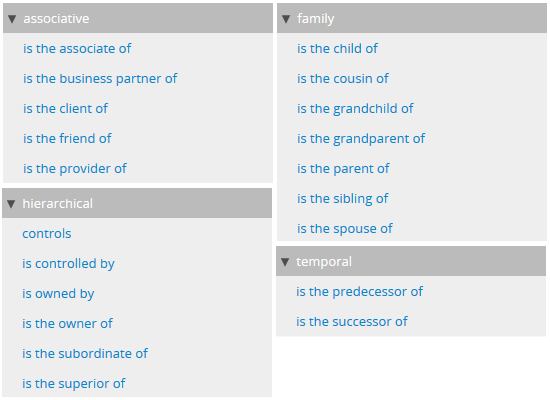
The default terms included in the Actor relation type taxonomy
Some of these terms have a converse (e.g. opposite and reciprocal) relationhip to other sibling terms. Others are self-reciprocal (e.g. they act as their own converse term as well). For example:
- Under the family term:
- is the parent of and is the child of are converse terms
- is the sibling of is a self-reciprocal term
Below is an image outlining all the default relationships between terms in the Actor relation type taxonomy:
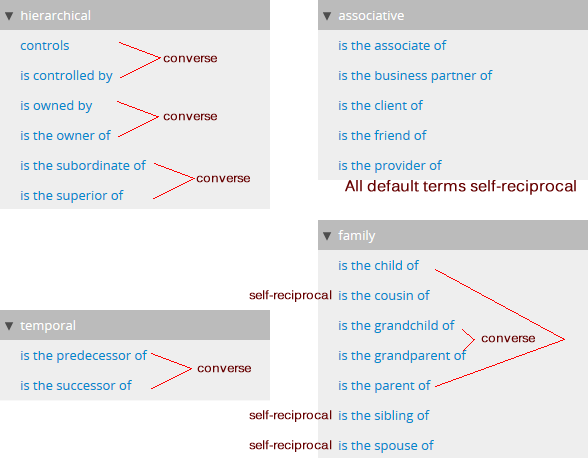
The default terms included in the Actor relation type taxonomy, and their relationships (as either converse to another sibling term, or self-reciprocal)
Add a new converse relationship
To create a new converse relationship between terms in AtoM:
- In the Relationships area of the term’s edit page, begin typing the name of the related term into the “Converse term” field.
- As you type, atom will search available term records (those that are part of the same taxonomy) and populate the field’s drop-down menu with matching terms.
- When you see the term you would like to add as a related term, click on it - it will be added to the field.
- You can also create a new converse term directly from the converse term field. If the term you have entered in the converse term field does not yet exist, AtoM will create it when saving your edits.
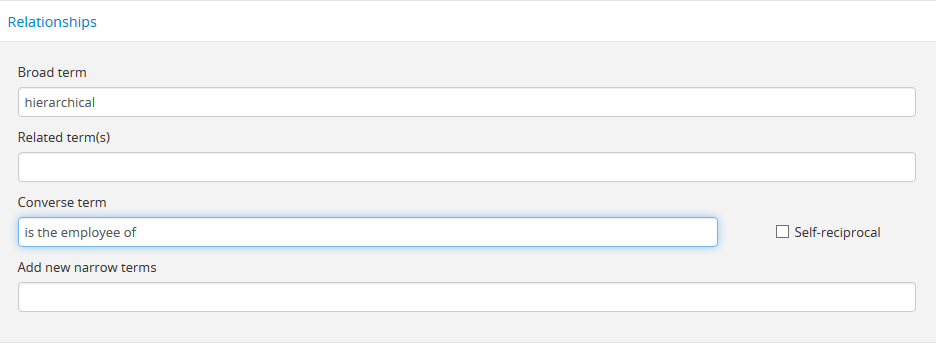
- If the term is self-reciprocal, simply check the checkbox next to the converse term field. AtoM will grey-out the field:
- If you need to edit or remove a related term you have just added, place your cursor back in the field, and make your changes directly.
- When you are finished, click the “Save” button in the button block at the bottom of the term’s edit page. AtoM will redirect you to the term’s view page, where you can review your changes. You can click the “Edit” button in the button block to make further changes if needed.
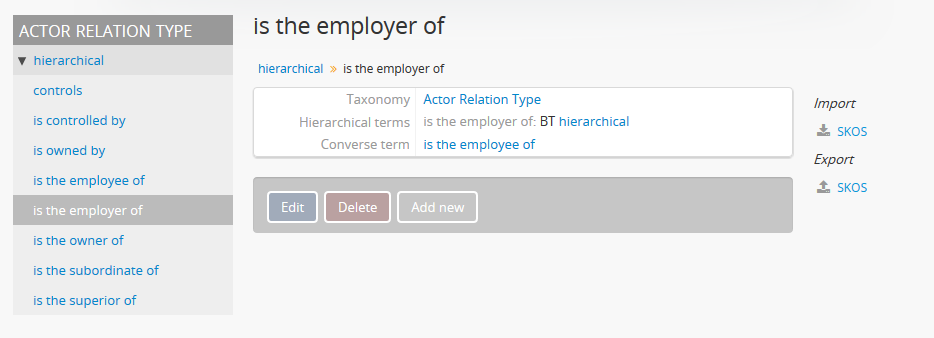
An example of a converse term’s view page
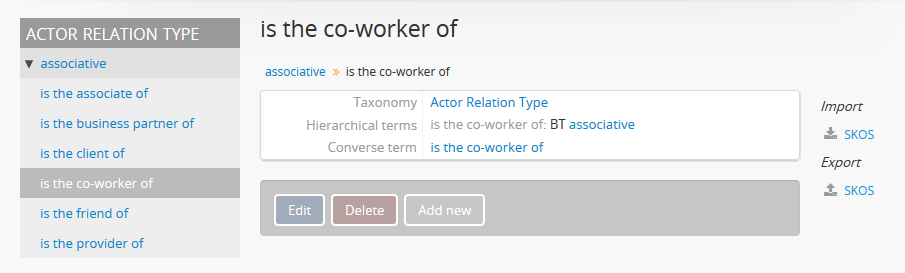
An example of a self-reciprocal term’s view page
Edit an existing term
In AtoM, an administrator can edit terms in AtoM’s taxonomies at any time. This can be useful for customizing the values of a controlled vocabulary to match local descriptive standards, adding supplemental information, managing relationships between terms, and more.
Note
AtoM ships with a fixed number of taxonomies containing default values (terms). Some terms are locked, i.e. cannot be edited or deleted, because they are used by the application’s underlying code. Most terms, however, can be edited or deleted, and all taxonomies can be assigned new terms in addition to any locked values.
Warning
AtoM’s file and item list reports are hard-coded to use the “File” and “Item” level of description terms in the “Levels of description” taxonomy. If you edit or remove these terms from the taxonomy, you may break the reports feature. For more information on file and item-level reports in AtoM, see: Reports/printing.
To edit an existing term in AtoM:
- In the main menu located in the AtoM header bar, click the
“Manage” menu and select “Taxonomies”
from the drop-down menu. AtoM will redirect you to a list of the
the taxonomies available in AtoM.
- Click on the taxonomy you want to edit to expand it and view the terms associated with the taxonomy. You can use the dedicated search bar on the terms page to search for your term by name, or you can browse the terms listed in the taxonomy. When you have found the term you would like to edit, click on it to navigate to the term’s view page.
An example taxonomy page - the Repository types taxonomy
- Click on the “Edit” button located in the button block at the bottom of the term page to enter edit mode. AtoM will redirect you to the term’s edit page.
- See the Term data entry section for guidance on working with particular fields in the term edit template.
- See the sections above for instructions on working with the fields in the Relationships area, for broader terms, related terms, and narrower terms.
- Make changes to your record as needed. You can cancel the editing process at any time by clicking the “Cancel” button in the button block at the bottom of the term edit page; no changes will be saved, and you will be redirected to the term’s view page. Note that navigating away from the edit page without first clicking Save will also result in no changes to the term record being saved.
- When you are finished with your edits, click the “Save” button in the button block at the bottom of the page. AtoM will save your changes and redirect you to the term’s view page where you can review your work. You can repeat the process as needed by clicking “Edit” again.
Subject and Place terms - an alternate workflow
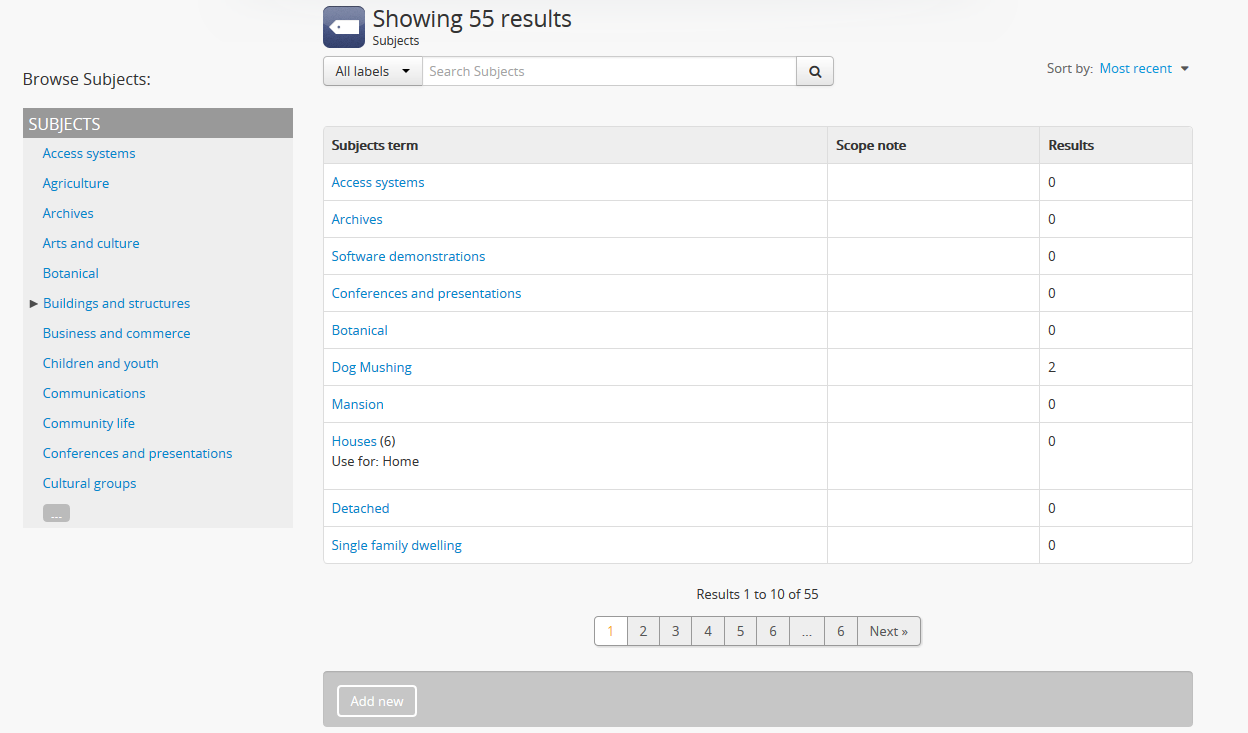
The Subject and Place terms are often those most frequently accessed by AtoM users, as they can be linked to archival descriptions as as access points, and are therefore visible to public users. To simplify the workflow for authenticated users, the button block will be visible to logged-in users directly on the subject and place browse pages. The following example demonstrates this for the subjects browse - however the workflow will be the same for the places browse page.
- Using the browse menu located in the AtoM header bar, navigate to Browse > Subjects. AtoM will redirect you to the Subjects browse page. For more information on the Browse menu, see: Browse menu. For general information on browsing in AtoM, see Browse
- The AtoM browse page includes a list of subjects linked to archival descriptions. For more information on browsing subjects and places, see: Browse. When logged in, users will see a button block with an Add button directly on the subjects (or places) browse page.
- You can also select a term from the browse page. AtoM will redirect you to a page listing descriptions in which the chosen term has been added as an access point. On the term page, the button block will also be visible so users can directly edit or delete the term (or add new terms) without having to navigate to the Taxonomy via Manage > Taxonomies.
- From here, you can follow steps 2-7 above as needed to edit your terms.
Delete a term
In general, users can delete terms from taxonomies via the user interface. Note that some terms are locked, meaning that they cannot be deleted, because they are used by the application’s underlying code. For an example, please see the tip section at the top of this page. Most terms, however, can be edited or deleted, and all taxonomies can be assigned new terms in addition to any locked values. To delete a term, a user must also have a user account with sufficient access privileges to access the relevant taxonomy. For more information on access privileges, see User roles and Edit permissions.
To delete a term in AtoM:
- In the main menu located in the AtoM header bar, click the
“Manage” menu and select “Taxonomies”
from the drop-down menu. AtoM will redirect you to a list of the
the taxonomies available in AtoM.
- Click on the taxonomy you want to edit to expand it and view the terms associated with the taxonomy. You can use the dedicated search bar on the terms page to search for your term by name, or you can browse the terms listed in the taxonomy. When you have found the term you would like to edit, click on it to navigate to the term’s view page.
An example taxonomy page - the Repository types taxonomy
- At the bottom of the term view page, click on the “Delete” button in the button block. Remember, locked terms cannot be deleted.
- You will be redirected to a page where AtoM asks you to confirm your delete request. If the term is used in any way in one or more archival descriptions, a count of related descriptions from which the term will be removed is supplied. Additionally, if the term has narrower (e.g. child) terms, these will also be deleted - AtoM will list all narrower terms that will also be deleted in the confirmation page, so you can review the consequences of your actions before proceeding.
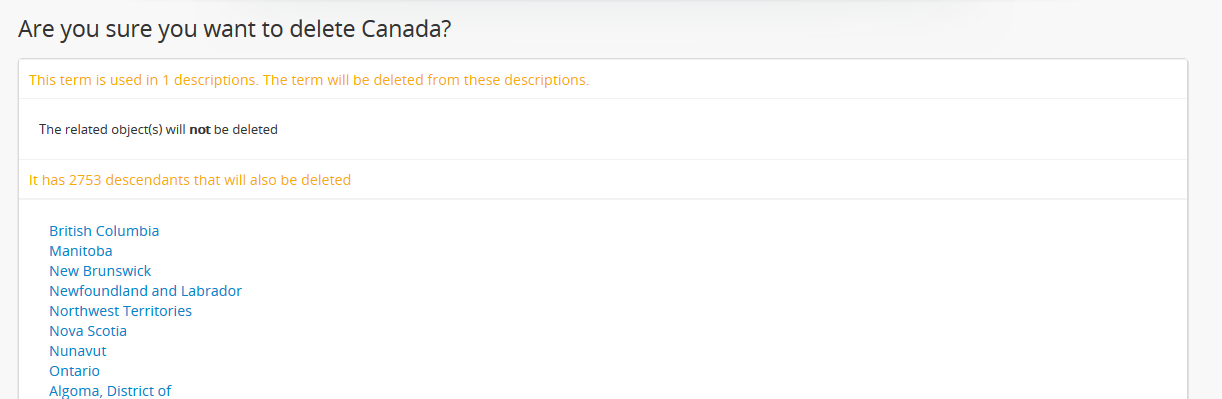
An example of the deletion confirmation page for a place term with many descendants (narrower terms) - in this case, the term “Canada” has 2753 narrower terms that will also be deleted, and “Canada” is used as a place access point in 1 archival description.
- You can cancel the delete request by clicking the “Cancel” button in the button block at the bottom of the confirmation page. Note that navigating away to any other page without clicking the “Delete” button will also result in no terms being deleted.
- If you are certain you would like to delete the term, click the “Delete” button at the bottom of the confirmation page. AtoM will delete the term and return you to the related taxonomy view page.
Important
Consequences of deleting a term:
- The term is removed from all related archival descriptions, authority records, archival institutions, etc.
- The related records are not deleted - e.g. if you delete a place term used as an access point on an archival description, the place term will be removed from the related description, but th archival description itself will not be deleted
- Any narrower terms (e.g. descendants, or child terms) that are nested under the term will also be deleted.