Archival Institutions
Archival institutions are one of the core entity types in AtoM and provide users with the means of managing information about repositories and other institutions and organizations that hold archival materials or other cultural heritage items and artifacts.
In AtoM, archival institution descriptions are structured into information areas based on the ICA’s International Standard for Describing Institutions with Archival Holdings (ISDIAH). The ISDIAH glossary describes an archival institution as: “An organization which keeps and preserves archival material and makes it accessible to the public.” While generally targeted at institutions whose primary function is to collect and keep archives and make them publicly available, the ISDIAH introduction goes on to note that:
…other entities such as cultural institutions (libraries, museums), businesses, families or individuals may hold archives. This standard, or an appropriate subset of its elements, can be applied to all entities which provide access to the records they hold.
Information captured in the archival institution description template is comprehensive, but relates specifically to the repository’s role collecting and providing access to cultural heritage materials. In addition to capturing identity and history information, the ISDIAH standard provides information areas to record information about collection policies,services offered, buildings, accessibility, and more. Consequently, the archival institution record should be considered distinct from, but complementary to, that of an authority record. The ISDIAH Introduction notes that:
As corporate bodies, persons or families, the holders of archival materials may be described in ISAAR(CPF) compliant authority records including the appropriate elements of description as indicated in ISDIAH. Otherwise, the description of holders may be included in separate authority files.
In AtoM, archival descriptions can be linked to archival institutions and the holdings of an institution can be browsed even when AtoM is used as a multi-repository system. On all related archival description view pages, the institution’s name and logo will appear as hyperlinks to the archival institution record; similarly, an archival institution’s page will list its holdings as hyperlinks to related archival descriptions. Institutions can also be themed in AtoM - when a background color is added to the archival institution, the same background color will appear behind all related archival descriptions to highlight the relationship.
Below are instructions for using the Archival institution module in AtoM to:
- Add a new archival institution
- Edit an existing archival institution
- Add access points to your archival institution
- Link an archival description to an archival institution
- Edit the theme of an archival institution page
- Set a digital object upload limit for an archival institution
- Delete an archival institution
For information on working with specific fields with AtoM’s archival institution edit page, see:
- International Standard for Describing Institutions with Archival Holdings (ISDIAH)
See also
Note
By default, only an authenticated (i.e. logged in) administrator can add, edit, update or delete an archival institution. For more information on edit privileges and user roles see: User roles. For information on logging in, see: Log in. Administrators can also change the access privleges associated with a user account - for more information, see: Edit user permissions.
Add a new archival institution
This section contains instructions on how to Add a new archival
institution in AtoM. There are three
main ways to add an archival institution record in AtoM - doing so via the
 “Add” menu is the easiest, but to accommodate
different workflows, archival institution records can also be added from an
archival description or from the view page of another archival
institution. Below are instructions to add a new archival institution:
“Add” menu is the easiest, but to accommodate
different workflows, archival institution records can also be added from an
archival description or from the view page of another archival
institution. Below are instructions to add a new archival institution:
For specific information on the fields in the archival institution’s edit page, see: ISDIAH template
Add a new archival institution from the main menu
A new archival institution can be added at any time, from anywhere in the application, via the main menu.
Note
Administrators must be logged-in in order to add a new archival institution. For more information on logging in, see: Log in. See User roles for more information on groups and default permissions in AtoM.
To create a new archival institution:
- In the main menu located in the header bar, click the
“Add” menu and select “Archival institution” from the
drop-down menu.
- AtoM takes you to a blank edit page for data entry.
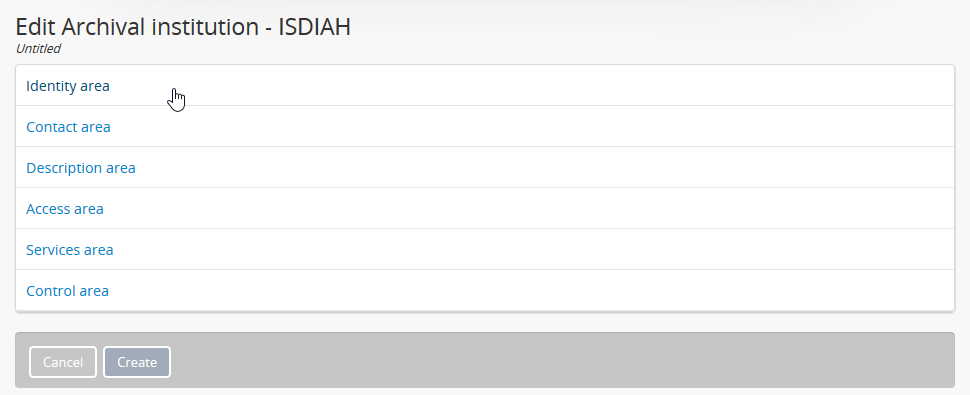
- On loading, the edit page displays the record with all information areas closed; click on an information area to access the fields grouped under it. Enter data as required.
- You can quit the process at any time by clicking the “Cancel” button in the button block; any data already entered will not be saved and no new record will be added. Note that simply navigating away from the page by any other means, without first clicking “Create” will also result in no new record being created.
- To save a new record, click the “Create” button in the button block at the bottom of the record.

Once the new archival institution is saved, you will be redirected to the record’s view page, where you can review your work. Clicking “Edit” in the button block at the bottom of the record will re-open the archival institution in edit mode.
Add a new archival institution from an archival description edit page
A new archival institution can be generated from an archival description record at any time; it does not first have to be created separately.
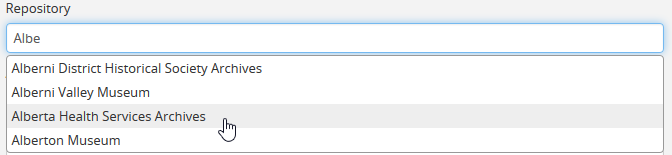
An archival institution can be added via a value list that appears in a drop-down menu - as you type data into the “Repository” field, the value list will narrow its options to present related suggestions. If the archival institution already exists, you can select the name from the values and a link will be created.
If the archival institution does not already exist, however, new names can be added “on the fly” by typing and entering the name of the archival institution in the designated field; an archival institution record will be automatically created once you click the “Create” button in the button block at the bottom of the record.
Whenever a new archival institution is added to an archival description, a new record for that name will be generated when the archival description is saved. Because each edit template uses different labels for the field to add a new archival institution, template specific instructions have been included below.
ISAD(G) edit template
- In the “Context area” information area of the ISAD(G) template, navigate to the “Repository” field and enter a new name.
- The name will be saved as a new archival institution when you save the archival description.
Rules for Archival Description (RAD) edit template
- In the “Title and statement of responsibility area” information area of the RAD template, navigate to the “Repository” field and enter a new institution name.
- The name will be saved as a new archival institution when you save the archival description.
Describing Archives: A Content Standard (DACS) edit template
- In the “Identity elements” information area of the DACS template, navigate to the “Name and location of repository” field and enter a new name.
- The name will be saved as a new archival institution when you save the archival description.
Dublin Core Version 1.1 (DC) edit template
- In the “Elements area” information area of the Dublin Core template, navigate to the “Relation(isLocatedAt)” field and enter a new name.
- The name will be saved as a new archival institution when you save the archival description.
Metadata Object Description Schema (MODS) edit template
- In the “Elements area” information area of the MODS template, navigate to the “Repository” field and enter a new name.
- The name will be saved as a new archival institution when you save the archival description.
The newly created archival institution will then have to be edited to include necessary data. To edit the archival institution record, see the Edit an existing archival institution section of this page.
Add a new archival institution from the view page
A new archival institution can also be added to AtoM from the view page of any other archival institution via the Add new button in the button block. To do so:
- Navigate to an existing archival institution in AtoM. You can do this by browsing or by searching for a specific archival institution - see Access content for more information on navigation in AtoM.
- At the bottom of the archival institution view page, you will see the button block with several options (Edit, Delete, and Add new). Click the Add new button.

- AtoM takes you to a blank edit page for data entry. On loading, the edit page displays the record with all information areas closed; click on an information area to access the fields grouped under it. Enter data as required.
- You can quit the creation process at any time by clicking the “Cancel” button in the button block; any data already entered will not be saved, and no new record will be created. Note that simply navigating away from the page by any other means, without first clicking “Create” will also result in no new record being created.
- To save the new record, click the “Create” button located in the button block at the bottom of the record.
Once the new archival institution is saved, you will be redirected to the record’s view page, where you can review your work. Clicking “Edit” in the button block at the bottom of the record will re-open the archival institution in edit mode.
Edit an existing archival institution
This section contains instructions on how to edit an existing archival institution, after it has been created. For information on how to theme your archival institution, see below.
Note
Only an authenticated (i.e. logged in) administrator user can edit or update an archival institution. For more information on edit privileges and user roles see: User roles.
An archival institution’s description can be edited at any time.
To edit an existing archival institution:
- First, navigate to the archival institution you wish to edit. You can do this by browsing or searching for the archival institution by name. See access content for more information on navigation in AtoM.
- Switch from view mode to edit mode by clicking the “Edit” button in the button block located at the bottom of the record, or by clicking on one of the information area headings; this takes you to the record’s edit page.
- On loading, the edit page displays the record with all information areas closed; click on an information area to access the fields grouped under it.
- Add and/or revise data as required. See ISDIAH template for field-specific guidance.
- You can quit the create process at any time by clicking the “Cancel” button in the button block; any changes made will not be saved. Note that simply navigating away from the page by any other means, without first clicking “Save” will also result in no changes being saved to the archival institution.
- To save your edits, click the “Save” button located in the button block at the bottom of the record.

You will be redirected to the view page for the edited archival institution, where you can review your work.
Add access points to your archival institution
To improve browsing in a multi-repository system and to enhance the information available to end-users about your institution, you can add custom access points to your archival institution via the edit page of your repository.
AtoM includes 5 facets drawn from data added to your archival institution:
- Archive type: Limits results to those with a type matching data in the “Type” field in the Identity area of the ISDIAH archival institution edit template
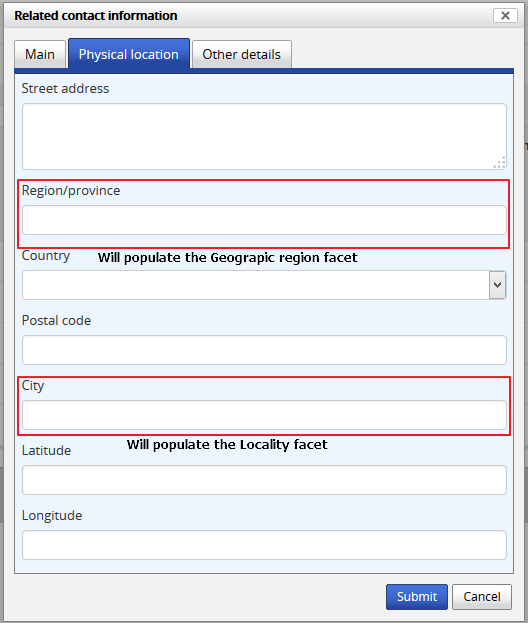
- Geographic region: Limits results to those matching data entered into the “Region/province” field in the physical location tab of the contact dialogue (available in the “Contact” area of the ISDIAH archival institution edit template)
- Geographic subregion: Limits results to those institutions with a matching access point added to the “Geographic subregion” field in the Access points area of the ISDIAH archival institution record
- Locality: Limits results to those matching data entered into the “City” (e.g. city, town, etc) field in the physical location tab of the contact dialogue (available in the “Contact” area of the ISDIAH archival institution edit template)
- Thematic area: Limits results to those institutions with a matching access point added to the “Thematic area” field in the Access points area of the ISDIAH archival institution record
See also
The Geographic region and Locality facets are automatically populated based on data entered into the contact information fields available in the Contact area of the archival institution edit page, and the Archive type facet is similarly automatically populated based on data entered into the “Type” field in the Identity area.
The Geographic subregion and Thematic area facets are managed as
access points, and must be manually added in the
Access points area of the archival institution
edit page. Similar to the place and subject access point
fields available on archival descriptions, all
access points included by default or added by users are managed as
terms in a taxonomy, which users can manage directly via
 Manage > Taxonomies. For more information on working with terms and
taxonomies in AtoM, see: Terms.
Manage > Taxonomies. For more information on working with terms and
taxonomies in AtoM, see: Terms.
The Geographic subregion access point is intended to support better regional browsing in a multi-repository system, especially in state, regional, or provincial union catalogues or networks where Region is not specific enough. For example, Southern Alberta, Northern Alberta, and Central Alberta might be terms used in a province-wide union catalogue for Alberta, a province in Canada. AtoM does not include any default terms in this taxonomy. Users can add new terms directly to the taxonomy (see: Add a new term from the Manage Taxonomy screen), or by entering new terms to the Geographic subregion field in the archival institution edit template (instructions on how to do this below).
The Thematic area access point is intended to assist users in identifying major collecting areas of an archival institution by offering them a sense of the subject matter addressed in the holdings of the institution. AtoM includes a number of default terms (included in both French and English) in the Thematic area taxonomy, derived from the terms used in the Canadian Council of Archives’ Directory of Archives:
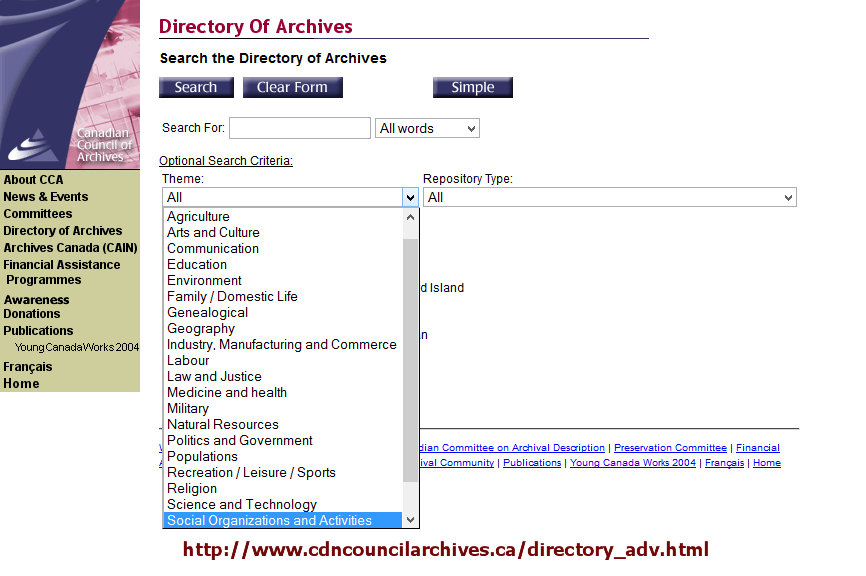
An image of the CCA’s Directory of Archives, showing the Theme terms that were used to create the default terms in AtoM’s Thematic area taxonomy.
All default Thematic area terms can be edited or deleted by users with the appropriate edit permissions, and new terms can be added directly to the taxonomy (see: Add a new term from the Manage Taxonomy screen), or by entering new terms to the Thematic area field in the archival institution edit template (instructions on how to do this below).
To add new Geographic subregion or Thematic area access points:
- Navigate to the archival institution to which you would like to add a new access point. You can do this either by searching or browsing - for more information on navigation in AtoM, see Access content.
- At the bottom of the archival institution’s view page, you will see the button block with several options. Click the “Edit” button, or click on any of the information area headers, to enter edit mode.
The button block available on an archival institution
- Navigate to the Access points information area at the bottom of the edit page, and begin typing your access point into the relevant field. Wait a moment and do not press enter immediately - the access point fields will auto-complete any matching terms in a drop-down menu, allowing you to see if your access point already exists.
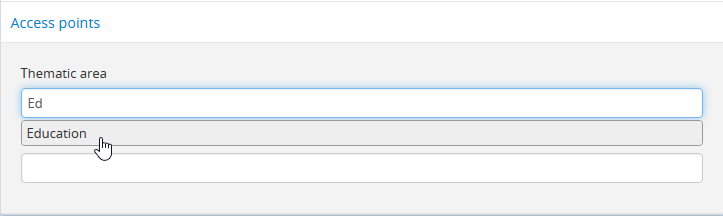
When you begin typing in an access point field, the drop-down will provide matching suggestions - select from the list to use an existing term, or enter a new term. Be careful: if you type the full name of an existing term and press enter (instead of selecting from the list), you could accidentally create a duplicate term!
- If a matching term DOES exist, select from the drop-down list and save the archival institution by using the “save” button in the button block at the bottom of the edit page.
Important
If you are not careful, it is easy to accidentally create duplicate terms! To avoid duplication, matching terms must be selected from the auto-complete drop-down - otherwise, even exact matches will create duplicates when the user presses enter.
- If a matching term does not exist, press the Tab key to exit the field, or use your cursor. A new term will be created in the related taxonomy (e.g. Geographic subregion or Thematic area) when the archival institution is saved.
- You can add multiple terms at a time - when you exit the field with your cursor, AtoM will provide a new blank field. Repeat steps 4-5 as necessary. If you need to edit or remove a term you have just added, place your cursor to the left of the term - an X icon will appear in place of the bullet next to the term. You can click the X to remove the term.
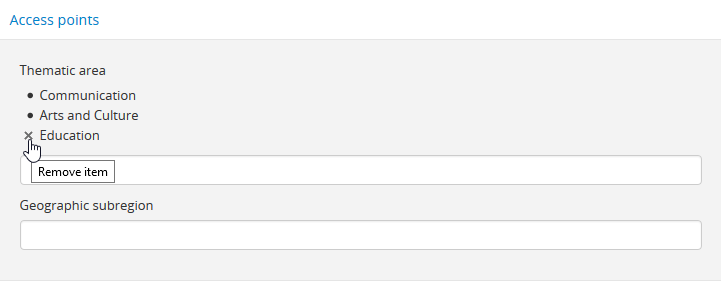
Place your cursor to the left of a term to see the option to remove it - the bullet icon will change to an X icon. Click to remove the term.
- At the bottom of the institution’s edit page, click the “Save” button in the button block when you are done editing. AtoM will reload the archival institution in view mode, and your new access point(s) will appear in the Access points information area.

An image of access points on an archival institution’s view page, after saving. Note how each is qualified with the related taxonomy in parentheses after the term.
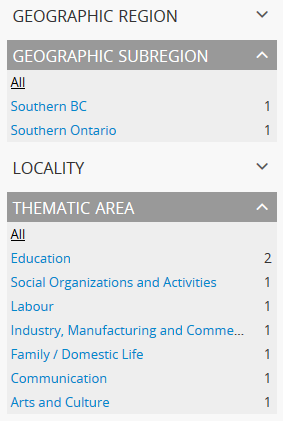
- Your access points can now be used as facet filters on the archival institution browse page. For more information see:
Link an archival description to an archival institution
Links between existing archival institution and existing archival descriptions can be added at any time by an authenticated (i.e. logged in) administrator with sufficient edit permissions. For more information on types of users and edit permissions, see User roles. You will need to create the link from the archival description you wish to link.
Tip
When linking a repository to an archival description, link only at the top level of description (e.g. fonds, collection, etc)- AtoM will automatically inherit the repository to lower levels of description (e.g. children). If you link at all levels, it can not only impact performance, but it will also mean that each lower-level description will appear in the holdings list, instead of just the parent description. For more on the holdings list, see: Browse the holdings of an institution.
To link an archival description to an archival institution:
- First, navigate to the archival description you wish to edit. You can do this by browsing or searching for the archival description - see Access content for more information on navigation in AtoM.
- Switch from view mode to edit mode by clicking “Edit” button in the button block, or by clicking on one of the information area headings; this takes you to the record’s edit page.

- To create a link to an archival institution, follow the steps above for “adding a new archival institution” - however, instead of entering a new name, begin typing the name of the archival institution to which you would like to create a link. The name field is an auto-complete - as you type, matching results will load in a drop-down menu below the field. When you see the archival institution you would like to link, click on it to select it.
Important
This method makes use of an auto-complete field to find the right archival institution as you begin to type its name/title. Be sure to pick the record from the drop-down when it appears - if you type the full name and press enter, a new archival institution will be generated instead of a link being created to an existing one! If, however, you wish to add a new archival institution from the archival description’s edit page, see above.
- When you are done editing the record, save the archival description by scrolling down and pressing “Save” in the button block.
- The archival description will reload in view mode. You should be able to see the archival institution as a hyperlink on the archival description. Follow the link to ensure you have linked to the proper archival institution. The linked archival description will also appear in the “Holdings” section of the Context menu of the archival institution’s view page.
Edit the theme for an existing archival institution
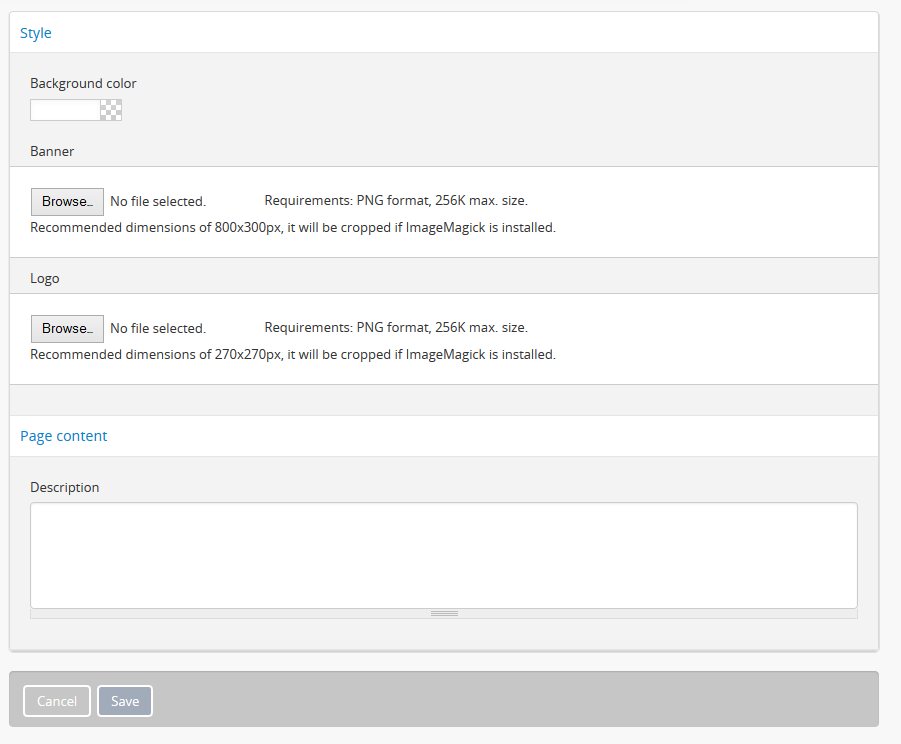
AtoM 2.0 introduces a new design feature for users that allows them to customize their archival institution’s page by adding/editing an institution logo and/or banner, as well as choose a specific background color for their institution’s page. Once added, the background color and logo will appear on all of the institution’s related archival descriptions (see above for information on how to create a link between an archival description and an archival institution).
Additionally, users can add custom HTML and inline CSS to a description area for specific highlighted content. These features can be especially useful in a multi-repository system as they help users visually identify where archival descriptions are held, and allow for an institution in a multi-repository system such a network or provincial/state portal to better match their institution’s local branding. Editing the theme of your archival institution is comprised of four main elements:
- Change the background color
- Add/edit a logo
- Add/edit a banner
- Add/edit a custom description
- Add a Google map
Change the background color of an archival institution
This new design feature allows authenticated (i.e. logged in) administrators to customize their archival institution record by changing the background color of the page. Users can choose and modify (i.e. hue, tint) a color from a pre-determined color palette. Changing the background color in an archival institution edit page will automatically change the background color of all the archival description pages linked to that specific institution.
To change the background color of an archival institution page:
- First, navigate to the archival institution whose theme you wish to edit. You can do this by browsing or searching for the archival institution by name. See access content for more information on navigation in AtoM.
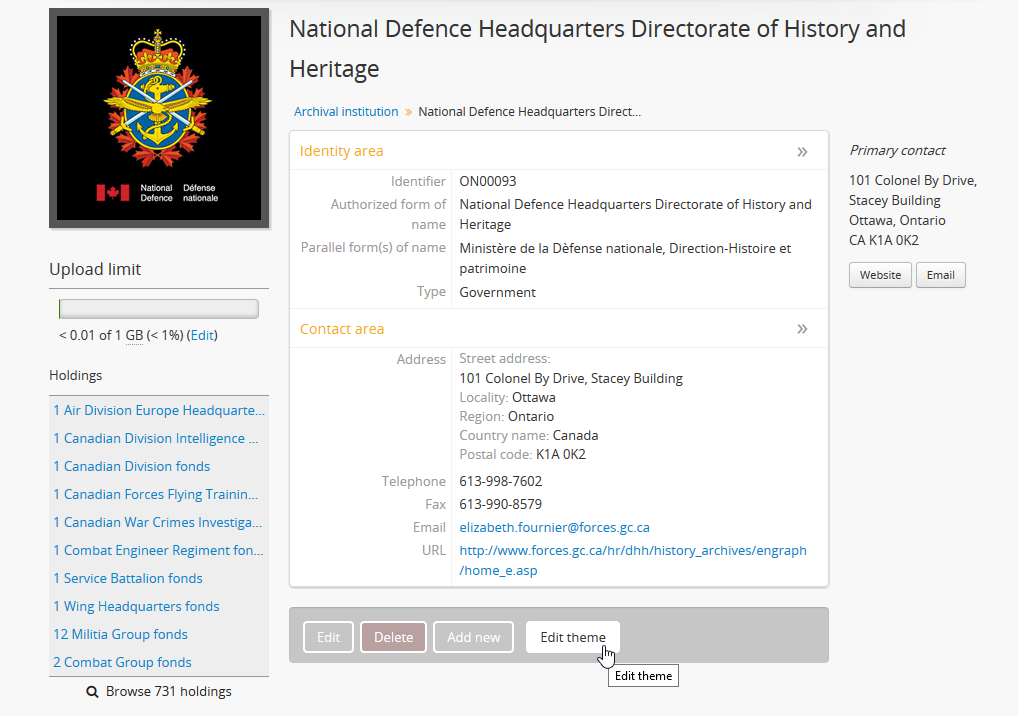
- Click on the “Edit theme” button in the button block at the bottom of the archival institution’s edit page.

- AtoM will reload load the institutions theme edit page. From here, authenticated users can change the background color, upload a logo and/or banner, and add custom content.
- In the “Style” area, click on the Background color (you can click on the title, the color swatch, or text box showing the hex color code). A color picker will appear as a drop-down menu.

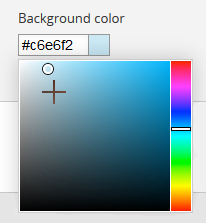
- Select the color that you would like to use as the background for your archival institution record. This color will appear as the background for all related archival descriptions as well. Use the slider on the right of the color picker drop-down to select a hue - you can click or drag the slider bar to dynamically change the color in the palette. Use the palette to select a tint - you can click or drag in the palette to dynamically change the color. There is also a text-box provided where you can manually enter a hex color code if you with. The selected color will be displayed in the small preview box next to the hex color code text-box. You can click anywhere outside of the the color picker to hide the drop-down.
- You can quit the theming process at any time by clicking the “Cancel” button in the button block; any changes made will not be saved. Note that simply navigating away from the page by any other means, without first clicking “Save” will also result in no changes being saved to the archival institution.
- When you have selected your new background color, click “Save” in the button block at the bottom of the page. AtoM will reload the archival institution in view mode, where you can review how the new color looks. If needed, you can repeat steps 2-6 until you are happy with the selection.
Important
Be sure to check the appearance of titles, text, and hyperlinks on your archival institution page and on any related archival descriptions. Some color choices make decrease accessibility, and make titles, text, and hyperlinks harder for users to read.
Add/edit a logo to an existing archival institution
Authenticated (i.e. logged in) administrators also have the option to customize the archival institution record by adding a logo to the institution’s page. Below are instructions to add a logo and edit and/or delete an existing logo for an archival institution.
Add a logo for an archival institution
- First, navigate to the archival institution you wish to edit. You can do this by browsing or searching for the archival institution - see Access content for more information on navigation in AtoM.
- Switch from view mode to edit mode by clicking “Edit theme” button in the button block.
- From here, authenticated users can upload a logo. In the “Style” area, under the “Logo” field, click the “Browse” button.
- A separate window will open; select the image on your computer that you’d like to add as the logo for the institution. Note that AtoM supports only specific sizing requirements with regards to the logo images (See below).
Note
AtoM requires that the image uploaded as the institution logo be in PNG format. The image cannot exceed 256k in size. If the image selected for upload does not meet these requirements, you will receive an error message below the “Logo” field after clicking the “Save” button, and your upload will not be saved.
Ideally, the image size should be between 200x200 and 270x270 pixels square. If the image you upload does not meet these sizing specifications, it will be automatically cropped by ImageMagick to meet the requirements listed above.
- You can quit the theming process at any time by clicking the “Cancel” button in the button block; any changes made will not be saved. Note that simply navigating away from the page by any other means, without first clicking “Save” will also result in no changes being saved to the archival institution.
- When you have selected your logo, click “Save” in the button block at the bottom of the page. AtoM will reload the archival institution in view mode, where you can review the logo. If needed, you can repeat step 2 through 4 until you are happy with the selection.
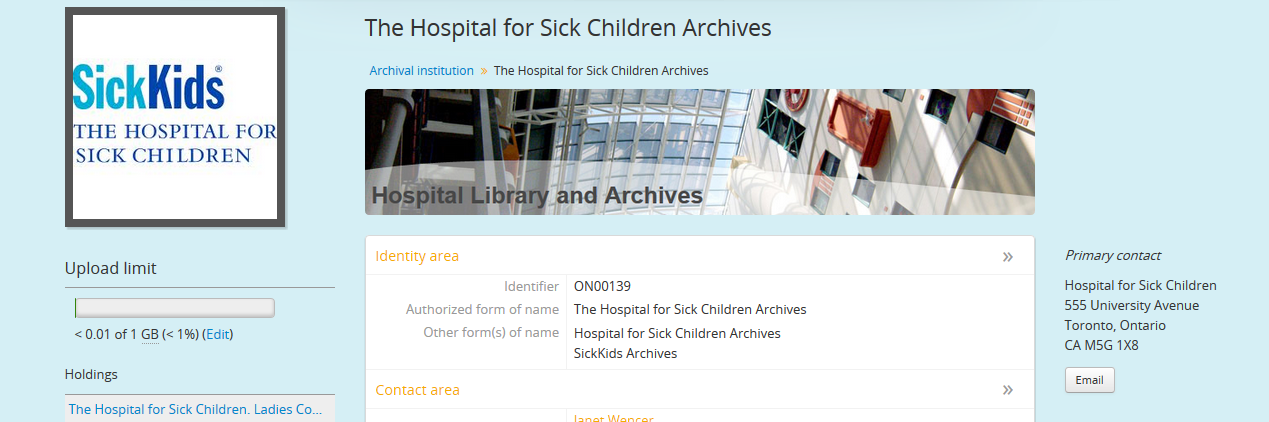
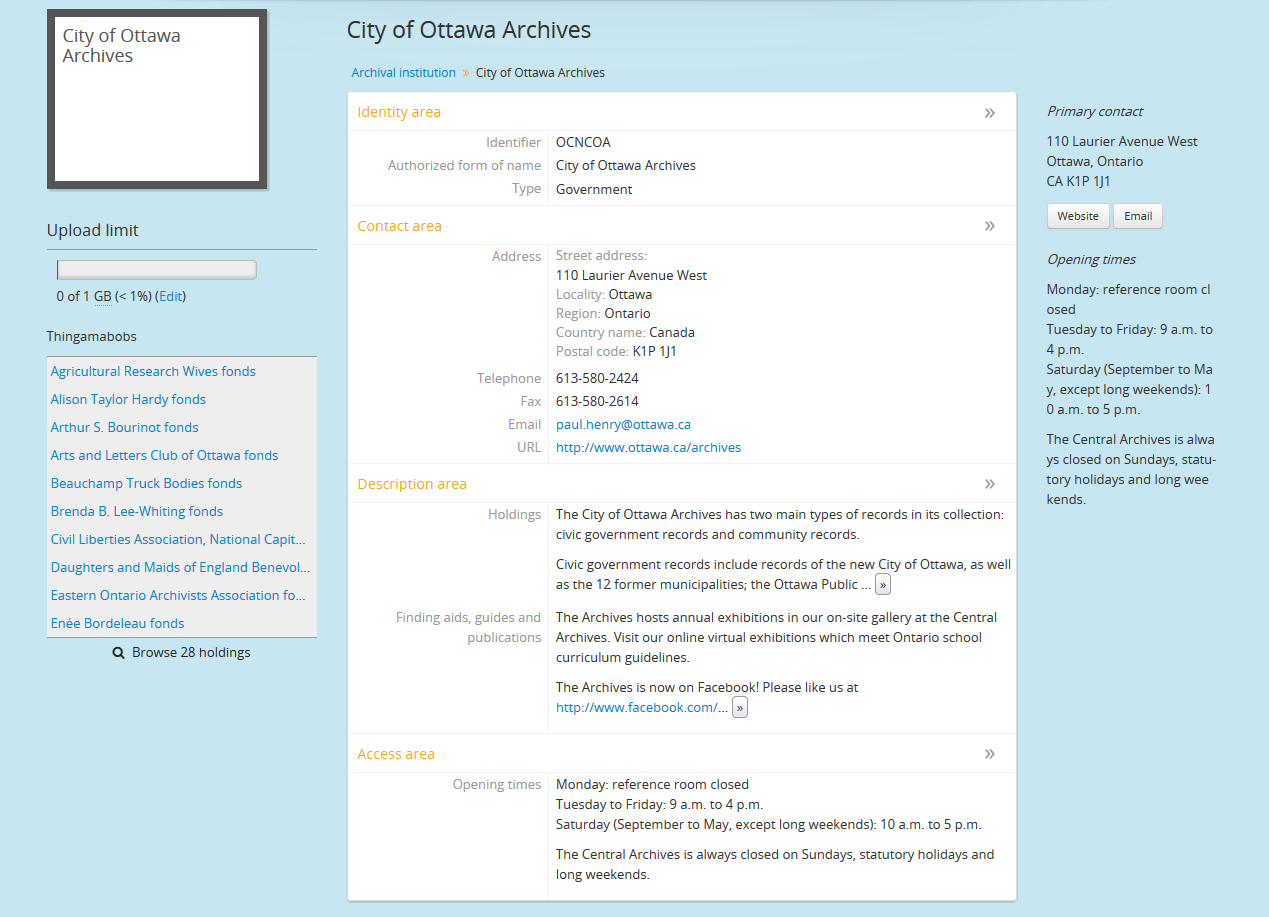
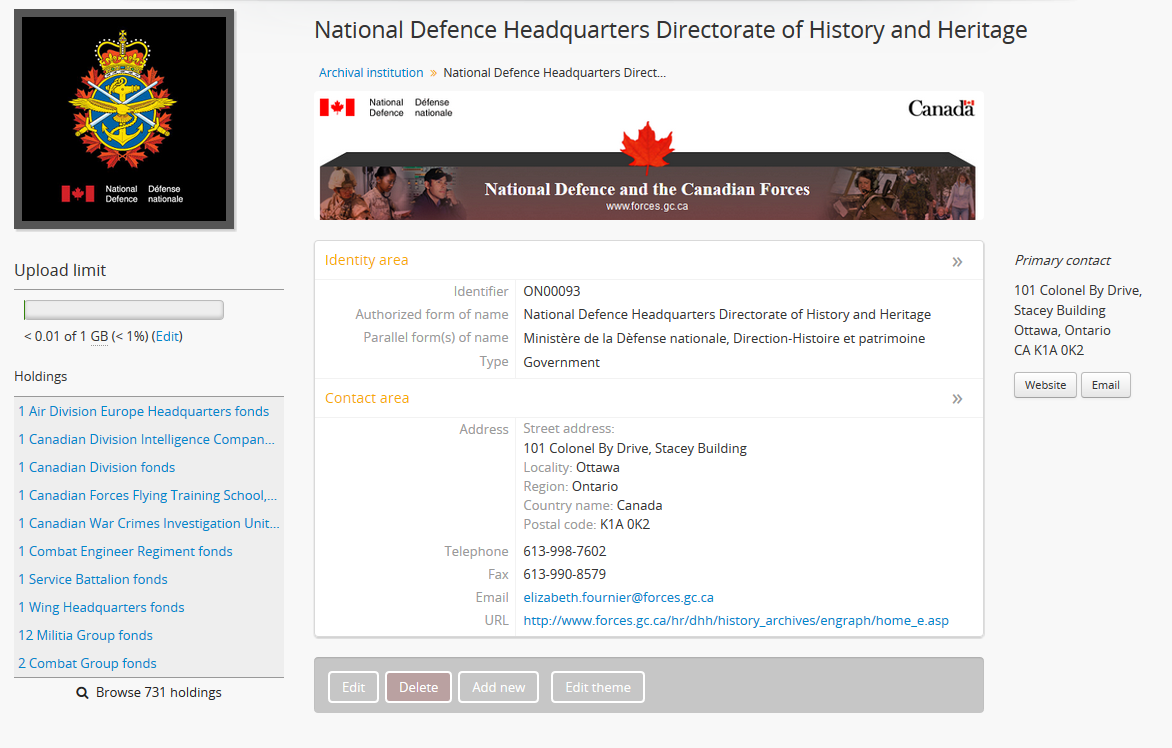
Once uploaded, the logo will appear above the “Upload limit” section of the Context menu, in the top left-hand corner of the archival institution’s view page. This logo will also appear when browsing archival institutions in AtoM, appearing above the name of the archival institution, as well as on any archival description page linked to the archival institution.
Edit/remove an existing logo for an archival institution
To edit an existing logo:
- Navigate to the archival institution you wish to edit. You can do this by browsing or searching for the archival institution - see Access content for more information on navigation in AtoM.
- Switch from view mode to edit mode by clicking “Edit theme” button in the button block.
- From here, navigate to the “Style” area, under the “Logo” field, click the “Browse” button under the existing logo.
- A separate window will open; select the image on your computer that you’d like to replace the existing logo with. See the previous section for direction on AtoM sizing requirements for logo images.
- You can quit the theming process at any time by clicking the “Cancel” button in the button block; any changes made will not be saved and the existing logo will remain as such. Note that simply navigating away from the page by any other means, without first clicking “Save” will also result in no changes being saved to the archival institution.
- Once you’ve selected your logo, check the box next to “Remove the current file”, located below the existing logo, and click “Save” in the button block at the bottom of the page. AtoM will reload the archival institution in view mode.
Important
You must refresh your browser in order to see the changes made to archival institution’s logo!
- If needed, you can repeat step 2 through 4 until you are happy with the selection of your logo.
To remove an existing logo:
- Navigate to the archival institution you wish to edit. You can do this by browsing or searching for the archival institution - see Access content for more information on navigation in AtoM.
- Switch from view mode to edit mode by clicking “Edit theme” button in the button block.
- From here, navigate to the “Logo” field under the “Style” area; check the box next to “Remove the current file”, located under the current logo image.
- You can quit the theming process at any time by clicking the “Cancel” button in the button block; any changes made will not be saved and the existing logo will remain as such. Note that simply navigating away from the page by any other means, without first clicking “Save” will also result in no changes being saved to the archival institution.
- Once you’ve checked the box, click “Save” in the button block at the bottom of the page. AtoM will reload the archival institution in view mode, where the logo will have been removed.
A new logo can be added again at any time. See Add a new logo.
Add/edit a banner to an existing archival institution
Authenticated (i.e. logged in) administrators can further customize their archival institution page by adding a banner. Once uploaded, the banner will appear on the archival institution’s view page, below the institution’s name. Unlike the institution’s logo, the banner will not appear on any archival description pages linked to the archival institution. Below are instructions to add a banner and edit and/or delete an existing banner for an archival institution.
Add a banner for an archival institution
- Navigate to the archival institution you wish to edit. You can do this by browsing or searching for the archival institution - see Access content for more information on navigation in AtoM.
- Switch from view mode to edit mode by clicking “Edit theme” button in the button block.
- From here, authenticated users can upload a banner. In the “Style” area, under the “Banner” field, click the “Choose file” button.

- A separate window will open; select the image on your computer that you’d like to add as the banner for the institution. Note that AtoM supports only specific sizing requirements with regards to the banner images (See below).
Note
AtoM requires that the image uploaded as the banner be in PNG format. The image cannot exceed 256k in size. If the image selected for upload does not meet these requirements, you will receive an error message reading “Invalid mime type” will appear below the “Banner” field after clicking the “Save” button.
Ideally, the image size should be between 100 and 300 pixels in height, and should not exceed a 800 pixels width. If the image you upload does not meet these sizing specifications, it will be automatically cropped by ImageMagick to meet the requirements listed above.
- You can quit the theming process at any time by clicking the “Cancel” button in the button block; any changes made will not be saved. Note that simply navigating away from the page by any other means, without first clicking “Save” will also result in no changes being saved to the archival institution.
- When you have selected your banner, click “Save” in the button block at the bottom of the page. AtoM will reload the archival institution in view mode, where you can review the banner. If needed, you can repeat step 2 through 4 until you are happy with the selection.
Edit/remove an existing banner for an archival institution
To edit an existing banner:
- Navigate to the archival institution you wish to edit. You can do this by browsing or searching for the archival institution - see Access content for more information on navigation in AtoM.
- Switch from view mode to edit mode by clicking “Edit theme” button in the button block.
- From here, navigate to the “Style” area, under the “Logo” field, click the “Choose file” button under the existing logo.
- A separate window will open; select the image on your computer that you’d like to replace the existing banner with. See the previous section for direction on AtoM sizing requirements for banner images.
- You can quit the theming process at any time by clicking the “Cancel” button in the button block; any changes made will not be saved and the existing banner will remain as such. Note that simply navigating away from the page by any other means, without first clicking “Save” will also result in no changes being saved to the archival institution.
- Once you’ve selected your banner, check the box next to “Remove the current file”, located below the existing banner, and click “Save” in the button block at the bottom of the page. AtoM will reload the archival institution in view mode.

Important
You must refresh your browser in order to see the changes made to archival institution’s banner!
- If needed, you can repeat step 2 through 4 until you are happy with the selection of your banner.
To remove an existing banner:
- Navigate to the archival institution you wish to edit. You can do this by browsing or searching for the archival institution - see Access content for more information on navigation in AtoM.
- Switch from view mode to edit mode by clicking “Edit theme” button in the button block.
- From here, navigate to the “Banner” field under the “Style” area; check the box next to “Remove the current file”, located under the current banner image.
- You can quit the theming process at any time by clicking the “Cancel” button in the button block; any changes made will not be saved and the existing logo will remain as such. Note that simply navigating away from the page by any other means, without first clicking “Save” will also result in no changes being saved to the archival institution.
- Once you’ve checked the box, click “Save” in the button block at the bottom of the page. AtoM will reload the archival institution in view mode, where the banner will have been removed.
A new banner can be added again at any time. See Add a new banner.
Add a custom description to an archival institution
Users can also add custom HTML and inline CSS to an archival institution page, to further customize its content and display. This can be used to add important information (e.g. holiday hours; emergency closures) either temporarily or permanently; to embed external content such as a YouTube video or a locally hosted image; to add shortcuts to custom searches (especially in a multi-repository system such as a network or portal site); and more.
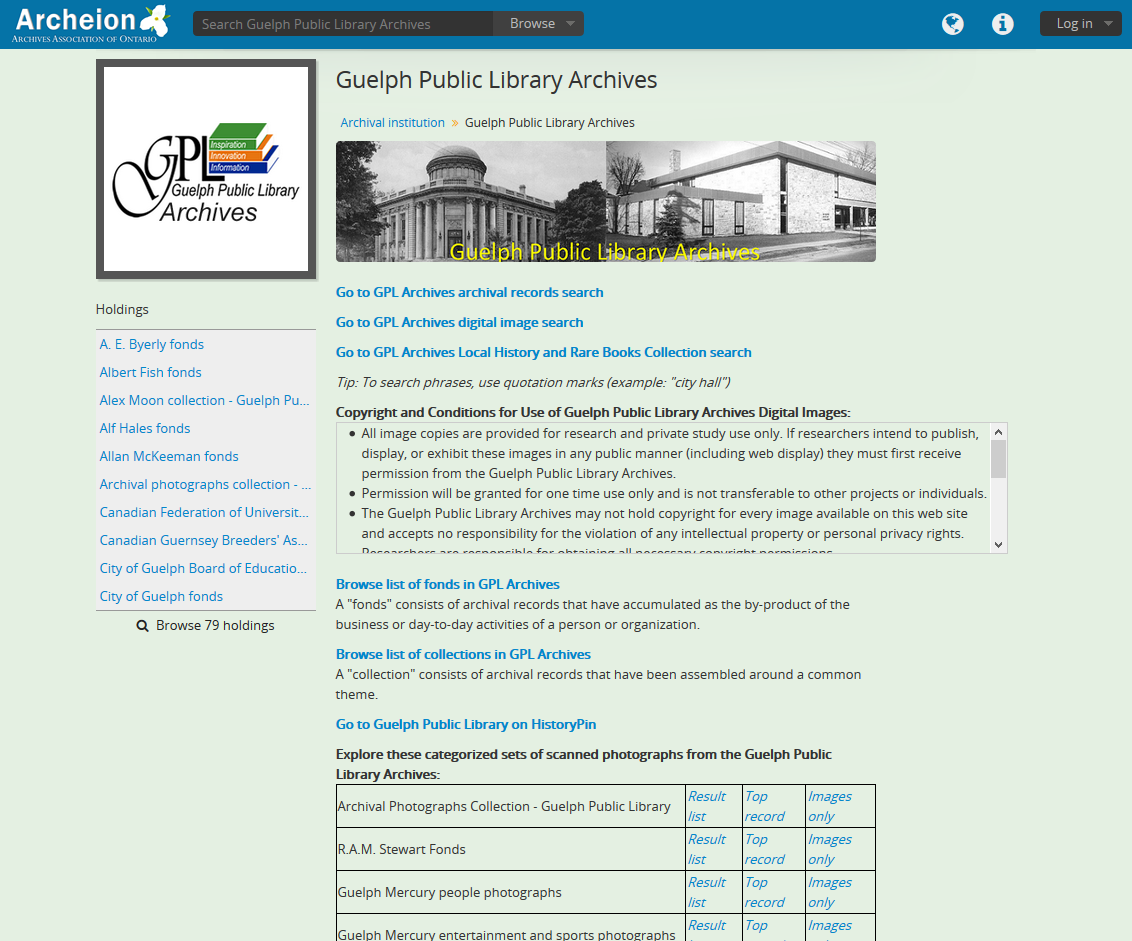
The Guelph Public Library Archives has extensively customized their content in Archeion, the Archives Association of Ontario’s portal site. See it here.
To add a custom description to an archival institution
- Navigate to the archival institution you wish to edit. You can do this by browsing or searching for the archival institution - see Access content for more information on navigation in AtoM.
- Switch from view mode to edit mode by clicking “Edit theme” button in the button block.
- From here, users can add custom HTML and in-line CSS to personalize their archival institution page. Scroll down to the information area named “Page content”, where you will find a field named “Description.”
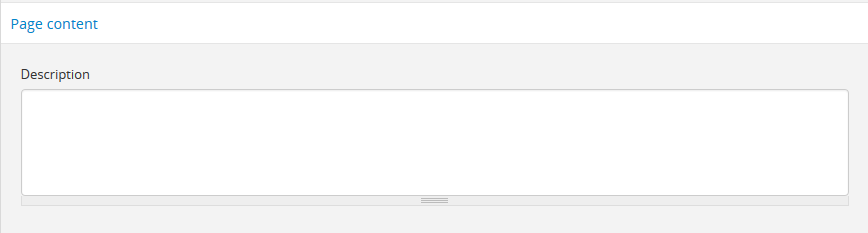
- Begin adding you custom HTML and in-line CSS. Content that is added to this area will appear, when saved, below an uploaded banner, and above the institution’s description information areas.

- You can quit the theming process at any time by clicking the “Cancel” button in the button block; any changes made will not be saved and the existing logo will remain as such. Note that simply navigating away from the page by any other means, without first clicking “Save” will also result in no changes being saved to the archival institution.
- When you have finished adding your custom content, click “Save” in the button block at the bottom of the page. AtoM will reload the archival institution in view mode, where you can review your work. If needed, you can repeat steps 2 through 4 until you are happy with the outcome.
Add a Google map to an archival institution
Users can add a Google map to the view page for an archival institution showing the location of the institution. These instructions require an administrator who can make changes to AtoM’s settings via the user interface.
Institution view page with Google map
- First, you will need to set up a Google account if you do not already have one.
- Next, request an API key from Google.
- Navigate to
 Admin > Settings and scroll down to near the bottom
of the Global settings page. Add your Maps API key to the field marked
“Google Maps JavaScript API key setting.” For more information, see:
Google Maps JavaScript API key setting. Don’t forget to save your settings after making
changes, using the button block at the bottom of the Settings page.
Admin > Settings and scroll down to near the bottom
of the Global settings page. Add your Maps API key to the field marked
“Google Maps JavaScript API key setting.” For more information, see:
Google Maps JavaScript API key setting. Don’t forget to save your settings after making
changes, using the button block at the bottom of the Settings page. - Maps will only appear on an institution’s view page if the latitude and longitude coordinates are added to the Contact information for the repository. For more information on how to edit your repository record, see: Edit an existing archival institution.
Important
For all latitude and longitude fields in AtoM, you need to use the Signed degrees format (e.g. DDD.dddd) for the data to work! Degree/minute/second (DMS) and cardinal based formats (e.g. DDD MM SS + compass direction) will not work and the map will not be generated properly.
When only one field is provided, latitude values should be entered first, followed by a comma before the longitude values.
Here is an example of the latitude and longitude for Vancouver, BC, Canada:
Correct format: (signed degrees)
- 49.246292, -123.116226
Will not work in AtoM: (DMS cardinal)
- 49° 14’ 46.6512” N, 123° 6’ 58.4136” W
- When the archival institution record is saved with the latitude and longitude coordinates added to the Contact area, the map will appear at the top of the view page.
Tip
There is also a command-line tool that can be run by a system administrator that will use repository contact information and address data to automatically populate all latitude and longitude fields. This can be really useful in a multi-repository system when you want to enable this maps feature, but don’t want to manually find and add all of the latitude and longitude coordinates. For more information, see:
Set digital object upload limit for an archival institution
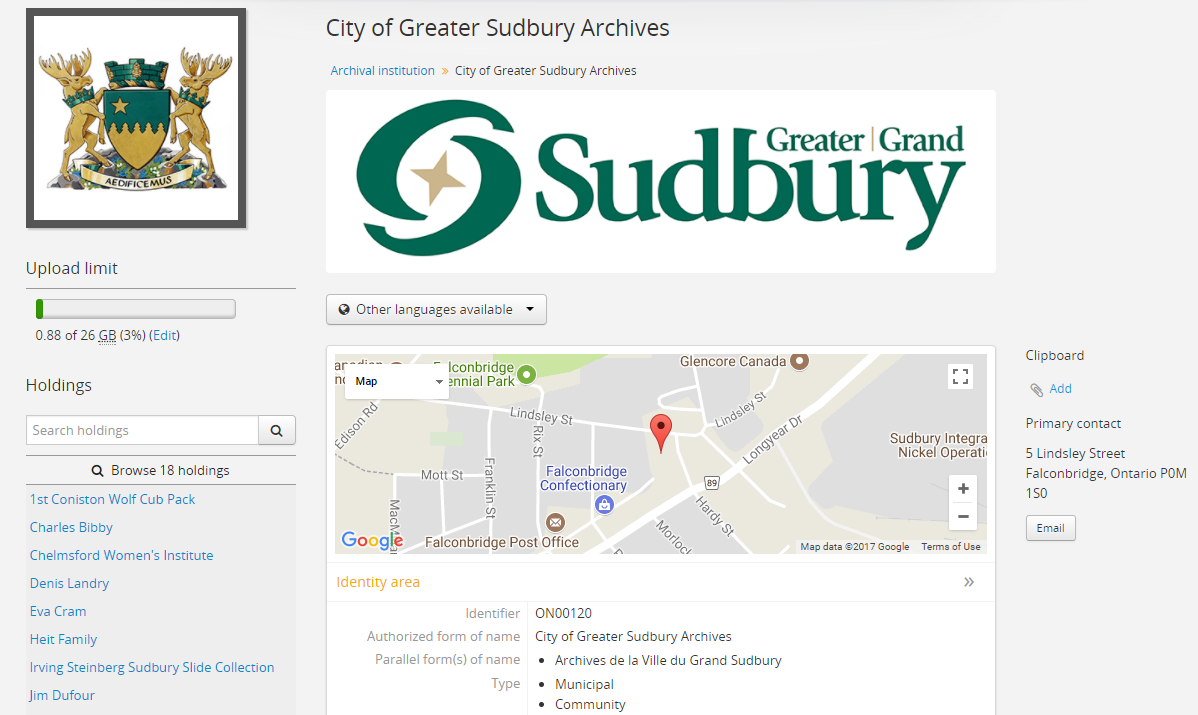
When viewing an archival institution in AtoM, an “Upload limit” bar is displayed in the context menu on the the left-hand side of the institution’s page.
Note
By default, only authenticated (i.e. logged in) users can view the “Upload limit” bar, and only an authenticated administrator can edit the upload limit. For more information on edit privileges and user roles see: User roles. For information on logging in, see: Log in.
Note that an administrator can also disable the display of this widget, which can sometimes be useful for improving page load performance. See above:
Additionally, note that a system administrator can configure a global upload limit - see:
To set the digital object upload limit for an archival institution:
- Navigate to the archival institution you wish to edit. You can do this by browsing or searching for the archival institution - see Access content for more information on navigation in AtoM.
- Click the “Edit” link located below the “Upload limit” bar on the left-hand side of the page.
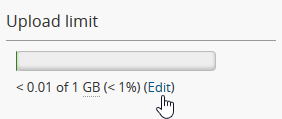
- A dialogue box will appear that will allow for 1 of 3 options:
- Disable uploads will prevent users from uploading any digital objects.
- Limit uploads to _____ GB will allow an administrator to set a specific upload limit per archival institution.
- Allow unlimited uploads is the default setting in AtoM that places no restrictions on an authenticated user’s digital object uploads.
- You can quit the process at any time by clicking the “Cancel” button, or the exiting (i.e. clicking “X”) the window. Any changes made will not be saved.
- When you’ve made your selection, click the “Save” button. The archival
institution’s view page will display your
changes made according to :
- If you selected Disable uploads, the Upload limit bar will automatically be removed and the Upload limit section will indicate that the uploads have been disabled.
- If you selected Allow unlimited uploads, the Upload limit bar will automatically be removed and the Upload limit section will indicate the institution’s current uploaded amount, as well as the limit, which will be Unlimited (e.g. “2.65 GB of Unlimited”).
- If you selected a specific number of GB as an upload limit, that number will appear below the Upload limit bar, alongside the institution’s current uploaded amount (e.g. “2.56 of 10 GB”).
- Additional changes to the Upload limit can be made at any time by following the steps 2 through 5.
Important
The limits set here are different than the execution limits set by your system administrator. For more information, see: Execution limits.
For more information on managing digital objects, see also:
Delete an archival institution
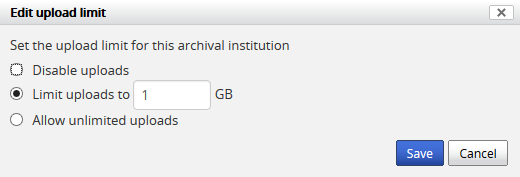
Follow the instructions below to delete an archival institution in AtoM:
- Navigate to the archival institution record you want to delete. You can do this by browsing or Search for the archival description - see Access content for more information on navigation in AtoM.
- Scroll to the bottom of the institution’s view page and click the Delete button in the button block.
- AtoM will provide a warning and prompts you to confirm that you really wish to delete the institution. To delete the record, click the Delete button.
- AtoM deletes the record and opens the archival institution browse results page.
Note
Deleting the archival institution record removes the archival institution from the repository field in linked archival descriptions but does not remove the archival descriptions themselves.