Import and export from the command-line
AtoM supports import and export via the user interface, and these tasks are executed as jobs and performed asynchronously in the background to avoid timeouts in the browser. Jobs in AtoM are handled by Gearman, and the status of AtoM jobs can be seen in the user interface via the Manage > Jobs page. For more information, see: Manage jobs and Asynchronous jobs and worker management.
However, there may be occasions where it is more efficient to import directly from the command-line. For example, XML files can only be imported one at a time via the user interface, but the command-line task supports bulk XML import. Also, the user interface only supports the import of the basic authority record CSV - though additional CSVs for relationships and alternate forms of name can be imported via the command-line to further supplement your data. As a final example, the Digital object load task (described below) is only available via the command-line.
The following will outline the options available for command-line imports and exports in AtoM.
Jump to:
- Bulk import of XML files
- Bulk export of XML files
- Import CSV files via the command-line
- Load digital objects via the command line
- Exporting CSV files from the command-line
See also
The following pages in the User Manual relate to import and export. We strongly recommend reviewing the CSV preparation recommendations found on the CSV import page prior to import CSV data.
Bulk import of XML files
While XML files can be imported individually via the user interface
(see: Import XML), it may be desireable to import multiple
XML files through the command line. The import:bulk command-line task can
be used to import the following types of XML data:
- MODS and EAD 2002 (for archival description data)
- SKOS RDF XML (for term data import into a taxonomy)
- EAC-CPF XML (for authority record data)
The primary documentation on preparing for XML imports, and on how matching behavior is handled for some of the import options, is maintained in the User Manual. See:
Warning
You can only import one type of XML at a time with this task. For example,
do not attempt to import EAC CPF and EAD 2002 XML at the same time.
Instead, you should import one entity type first, and then the
other with a separate import:bulk command
Below is the basic syntax for the bulk XML import task:
php symfony import:bulk /path/to/my/xmlFolder
Using the import:bulk command
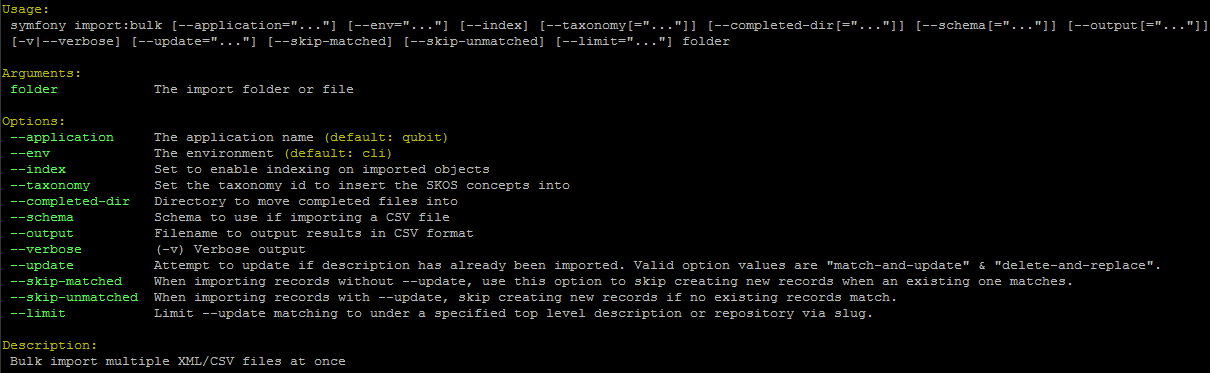
By typing php symfony help import:bulk into the command-line without
specifying the path to a directory of XML files, you can see the options
available on the import:bulk command, as pictured above.
The --application, --env, and --connection options should not be
used - AtoM requires the uses of the pre-set defaults for symfony to be
able to execute the import.
The --index option is used to enable the rebuilding of the search index as
part of the import task. When using the user interface to
import XML files, the import is indexed automatically - but when running
an import via the command-line interface, indexing is disabled by default.
This is because indexing during import can be incredibly slow, and the
command-line is generally used for larger imports. Generally, we recommend a
user simply clear the cache and rebuild the search index following an import -
from AtoM’s root directory, run:
php symfony cc & php symfony search:populate
However, if you would like to index the import as it progresses, the
--index option can be used to enable this.
The --taxonomy option is used to assist in the import of SKOS xml files,
such as places and subjects, ensuring that
the terms are imported to the correct taxonomy. As
input, the --taxonomy option takes a taxonomy ID - these are permanent
identifiers used internally in AtoM to manage the various taxonomies, which
can be found in AtoM in /lib/model/QubitTaxonomy.php (see on GitHub
here).
Tip
SKOS imports can also be completed via the user interface from a remote URL or a local file. In the user interface, multiple SKOS serializations can be used, while only SKOS XML can be imported with this task. See the primary SKOS import documentation in the User Manual:
Example use: Importing terms to the Places taxonomy
php symfony import:bulk --taxonomy="42" /path/to/mySKOSfiles
Example use: Importing terms to the Subjects taxonomy
php symfony import:bulk --taxonomy="35" /path/to/mySKOSfiles
Below is a list of some of the more commonly used taxonomies in AtoM, and
their IDs. This list is NOT comprehensive - to see the full list, navigate to
/lib/model/QubitTaxonomy.php, or visit the Github link above.
| Taxonomy name | ID |
|---|---|
| Places | 42 |
| Subjects | 35 |
| Genres | 78 |
| Level of description | 34 |
| Actor entity type (ISAAR) | 32 |
| Thematic area (repository) | 72 |
| Geographic subregion (repository) | 73 |
The --completed-dir option is used to automatically move files (e.g. XML
files during an import) into a completed directory after they have imported.
This can be useful during troubleshooting, to determine which files have
imported and which have failed. The option takes a file path to the chosen
directory as its parameter. You must manually create the directory first - the
task will not automatically generate one at the specified location. Example
use:
php symfony import:bulk --completed-dir="/path/to/my/completed-directory"
/path/to/my/importFolder
The --schema option is deprecated and should not be used.
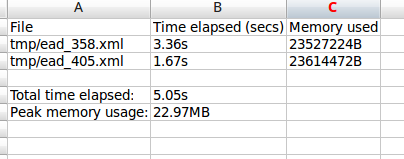
The --output option will generate a simple CSV file containing details of
the import process, including the time elapsed and memory used during each
import. To use the option, you mush specify both a path and a filename for the
CSV file to output. For example:
php symfony import:bulk --output="/path/to/output-results.csv"
/path/to/my/importFolder
The CSV contains 3 columns. The first (titled “File” in the first row) will list the path and filename of each imported file. The second column (titled “Time elapsed (secs)” in the first row) indicates the time elapsed during the import of that XML file, in seconds, while the third column (titled “Memory used”) indicates the memory used during the XML import of that file, in bytes. Also included, at the bottom of the CSV, are two summary rows: Total time elapsed (in seconds), and Peak memory usage (in megabytes).
The --verbose option will return a more verbose output as each import is
completed. Normally, after the import completes, a summary of the number of
files imported, the time elapsed, and the memory used:
Successfully imported [x] XML/CSV files in [y] s. [z] bytes used."
… where [x] is the number of files imported, [y] is a count of the time elapsed in seconds, and [z] is the memory used in bytes.

If the --verbose command-line option is used (or just -v for short),
the task will output summary information for each XML file imported, rather
than a total summary. The summary information per file includes file name,
time elapsed during import ( in seconds), and its position in the total count
of documents to import. For example:
[filename] imported. [x]s [y]/[z] total
… where [x] is the time elapsed in seconds, [y] is the current file’s number and [z] is the total number of files to be imported.

The --update option can be used when you want to use an XML import to
update existing archival descriptions, instead of creating new records. There
are 2 modes, but only the --update="delete-and-replace mode is supported
for XML imports. When used, AtoM will attempt to identify matching records,
and then delete the match before proceeding with the XML import as a new
record. For more information on how AtoM attempts to match incoming XML
imports to existing records, see:
Important
The --update option will only work with EAC-CPF and EAD 2002 XML
imports. It cannot be used for MODS or SKOS XML imports via the
command-line. Only the “Delete and replace” mode will work with the update
option.
Related enities that were linked to the matched and deleted records are not also deleted - if you want them removed, they must be manually deleted separately. Simliarly, on import of the replacement record(s), recreating the previous links to other related entities is not guaranteed - AtoM proceeds with the replacement import as if it were new, and uses the matching and linking criteria described in the links above to determine if it should link to existing related entities or create new ones.
We strongly recommend you review the User Manual documentation, as it contains further details:
The --limit option can be used with --update to increase the
likelihood of a successful match by limiting the match criteria to either
records belonging to a specific repository, or matching a specific existing
top-level description (for archival description imports). For more
information on how entities can be linked to a repository, see:
- Link an archival description to an archival institution
- Link an authority record to a repository as its maintainer
The --limit option takes the slug of the related repository
or top-level archival description as its value. For example, to
import a folder of EAD 2002 XML descriptions called “my-updates”, deleting
any existing matches but limit the matching criteria to those descriptions
linked to a repository with the slug “my-repository”, your command might
look like this:
php symfony import:bulk --update="delete-and-replace" --limit="my-repository"
/path/to/my-updates
Important
The --limit option can only be used in conjunction with the
--update="delete-and-replace" option. This means it can only be used
for EAD 2002 and EAC-CPF XML. When importing EAC-CPF
authority record data, you can only use a repository slug as the
limiter. See the links above to the primary User Manual documentation for
more information.
Normally, when attempting to match records, if AtoM fails to find a match
candidate, it will proceed to import the row as a new record. However, you can
use the --skip-unmatched option with --update to change this default
behavior. When --skip-unmatched is used, then any records that do not
match will be ignored during the import, and reported in the console log shown
on the Job details page of the related import job (see:
Manage jobs for more information). This is recommended if you are
intending to only import updates to existing records. Note that
--skip-unmatched will not work if it is not used in conjunction with the
--update option.
Similarly, with new imports, you can use the --skip-matched option to skip
any records that AtoM identifies as matching those you have already imported.
This can be useful if you are uncertain if some of the XML records
have been previously imported - such as when passing records to a portal site
or union catalogue. Any XML data that appear to match records will be ignored
during the import, and reported in the console log shown on the
Job details page of the related import job. For more
information on how AtoM attempts to match incoming imports to
existing records, see:
Bulk export of XML files
While XML files can be exported individually via the user interface (see: Export XML), it may be desireable to export multiple XML files, or large files (typically larger than 1 MB) through the command line. This can avoid browser-timeout issues when trying to export large files, and it can be useful for extracting several descriptions at the same time. XML files will be exported to a directory; you must first create the target directory, and then you will specify the path to it when invoking the export command:
php symfony export:bulk /path/to/my/xmlExportFolder
Note
There is also a separate bulk export command for EAC-CPF XML files (e.g. for exporting authority records via the command-line. It uses the same CLI options as the EAD XML export task. See below below for syntax; see the EAD usage guidelines for how to use the available options.
Important
The Inherit reference code (information object) setting also determines how the
<unitid> element in the EAD XML is populated. If the inheritance is
turned on, then AtoM will populate all descendant records in the EAD XML
with the full inherited reference code. If inheritance is turned off, AtoM
will only add the identifier for that record in the <unitid> on export.
This allows users exporting to a different source system that does not have
a reference code inheritance setting to maintain a full reference code at
all levels in the target system. However, if you are exporting from one
AtoM instance to another (for example, from a local institution to a
portal site), you might want to consider how this will impact your record
display in the target system - if you have reference code inheritance
turned on when you export, and the target AtoM instance also has the
setting turned on, you may end up with duplication in the display!
Using the export:bulk command
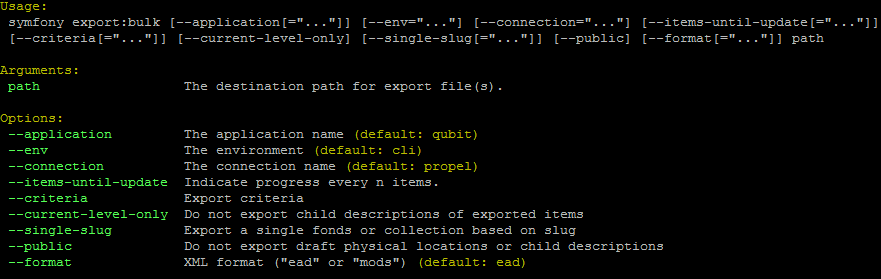
By typing php symfony help export:bulk into the command-line without
specifying the path to the target directory of exported XML files, you can see
the options available on the export:bulk command, as pictured above.
The --application, --env, and --connection options should not be
used - AtoM requires the uses of the pre-set defaults for symfony to be
able to execute the import.
The --items-until-update option can be used for a simple visual
representation of progress in the command-line. Enter a whole integer, to
represent the number of XML files that should be exported before the
command-line prints a period (e.g. . ) in the console, as a sort of
crude progress bar. For example, entering --items-until-update=5 would
mean that the import progresses, another period will be printed every 5 XML
exports. This is a simple way to allow the command-line to provide a visual
output of progress.
Example use reporting progress every 5 rows:
php symfony export:bulk --items-until-update=5 /path/to/my/exportFolder
This can be useful for large bulk exports, to ensure the export is still progressing, and to try to roughly determine how far the task has progressed and how long it will take to complete.
The --format option will determine whether the target export uses EAD XML,
or MODS XML. When not set, the default is to export using EAD. Example use:
php symfony export:bulk --format="mods" /path/to/my/exportFolder
The --criteria option can be added if you would like to use raw SQL to
target specific descriptions.
Example 1: exporting all draft descriptions
php symfony export:bulk --criteria="i.id IN (SELECT object_id FROM status
WHERE status_id = 159 AND type_id = 158)" /path/to/my/exportFolder
If you wanted to export all published descriptions instead, you could simply
change the value of the status_id in the query from 159 (draft) to 160
(published).
Example 2: exporting all descriptions from a specific repository
To export all descriptions associated with a particular archival institution, you simply need to know the slug of the institution’s record in AtoM. In this example, the slug is “example-repo-slug”:
php symfony export:bulk --criteria="i.repository_id = (SELECT object_id FROM
slug WHERE slug='example-repo-slug')" /path/to/my/exportFolder
Example 3: exporting specific descriptions by title
To export 3 fonds titled: “779 King Street, Fredericton deeds,” “1991 Canada Winter Games fonds,” and “A history of Kincardine,” You can issue the following command:
sudo php symfony export:bulk --criteria="i18n.title in ('779 King Street,
Fredericton deeds', '1991 Canada Winter Games fonds', 'A history of
Kincardine')" path/to/my/exportFolder
You could add additional archival descriptions of any level of description into the query by adding a comma then another title in quotes within the ()s.
The --current-level-only option can be used to prevent AtoM from exporting
any children associated with the target descriptions.
If you are exporting fonds, then only the fonds-level description
would be exported, and no lower-level records such as series, sub-series,
files, etc. This might be useful for bulk exports when the intent is to submit
the exported descriptions to a union catalogue or regional portal that only
accepts collection/fonds-level descriptions. If a lower-level description
(e.g. a series, file, or item) is the target of the export, it’s
parents will not be exported either.
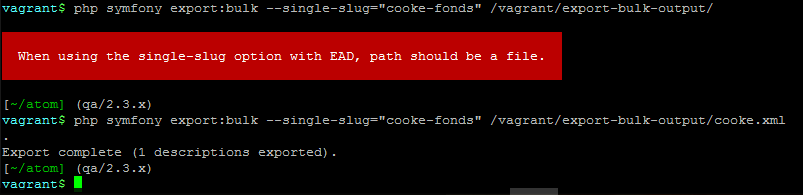
The --single-slug option can be used to to target a single archival
unit (e.g. fonds, collection, etc) for export, if you know the slug of
the target description.
Example use
php symfony export:bulk --single-slug="test-export"
/path/to/my/directory/test-export.xml
Important
For the export task to succeed when using the --single-slug option, you
must specify not just a target output directory, but a target output file
name. Exporting to path/to/my/directory/ will result in nothing being
exported - you will be given a warning that the path should be a file -
while exporting to path/to/my/directory/some-filename.xml will succeed.
Note that the task cannot create new directories - but you can give the
target file any name you wish (ending in .xml); it doesn’t need to be
based on the target slug.
The --public option is useful for excluding draft records from an export.
Normally, all records in a hierarchical tree will be exported regardless of
publication status. Note that if a published record is the child of a
draft record, it will not be included when this option is used - when the
parent is skipped (as a draft record), the children are also skipped, so as not
to break the established hierarchy.
See also
Exporting EAC-CPF XML for authority records
In addition to the bulk export CLI tool for archival descriptions described above, AtoM also has a separate command-line task for the bulk export of authority records in EAC-CPF XML format.
The EAC-CPF XML standard is prepared and maintained by the Technical Subcommittee for Encoded Archival Context of the Society of American Archivists and the Staatsbibliothek zu Berlin, and a version of the Tag Library is available at:
When using the task, EAC-CPF XML files will be exported to a directory; you must first create the target directory, and then you will specify the path to it when invoking the export command:
php symfony export:auth-recs /path/to/my/xmlExportFolder
The authority record bulk export task has the same options available as the
archival description export task described above.
Some of these options will not be relevant to EAC-CPF exports (e.g. the
--current-level-only option, as authority records are not hierarchical; and
the --public option, as currently authority records do not have a
publication status), but otherwise they can be used with this task in the same
way as described for the archival description export options
above. Please refer there for more detailed usage
notes. Below is an example application, using the --criteria option:
Example: using the --criteria option to select only authority records
whose entity type is “family”
First, you will need to know the entity type ID for family. Entity type is a term maintained in the Actor entity types taxonomy - when elements from a different table in the database are linked to actors, the term ID is used. Here are the term object IDs for the Actor entity types:
| Term | Term ID |
|---|---|
| Corporate body | 131 |
| Person | 132 |
| Family | 133 |
Tip
An easy way to figure this out in the user interface is to use the related Entity type facet on the authority record browse page, and look at the resulting URL. For example, if we go to the public AtoM demo site, navigate to the Authority record browse page, and use the facet to limit the results to those records with an Entity type of family, the resulting URL is:
See the 133 in the URL? This represents the Entity type we have applied
to filter the results!
We can now use the entity type to limit our export to include only those authority records with an entity type of “Family,” like so:
php symfony export:auth-recs --criteria='a.entity_type_id=133'
path/to/my/export-folder
Import CSV files via the command-line
As of AtoM 2.4, the import and export functionality in the user interface is supported by the job scheduler, meaning that large CSV files can be imported via the user interface without timing out as in previous versions. However, there are some options available via the command-line that do not have equivalents in the user interface. For this reason, there may be times when it is preferable to import a CSV records via the CLI. Below are basic instructions for each available import type.
Jump to:
- Importing archival descriptions
- Importing events
- Importing repository records
- Importing authority records
- Import accession records
- Import deaccession records
- Display the progress of an upload via the command-line interface (CLI)
- Load digital objects via the command line
You can find all of the CSV templates on the AtoM wiki, at:
Examples are also stored directly in the AtoM codebase - see:
lib/task/import/example
Important
Please carefully review the information included on the CSV import page prior to attempting a CSV import via the command-line! Here is a basic checklist of things to review before importing a CSV:
- You are using the correct CSV template for both the type of record you want to import, and for the version of AtoM you have installed. You can
- CSV file is saved with UTF-8 encodings
- CSV file uses Linux/Unix style end-of-line characters (
/n) - All parent descriptions appear in rows above their children if you are importing hierarchicla data (such as descriptions)
The CSV import User manual documentation also includes more specific guidance for preparing a CSV for each entity type - ensure you have reviewed it carefully prior to import.
All CSV import command-line tasks should be run from the root AtoM directory.
Importing archival descriptions
Example syntax use (with the RAD CSV template):
php symfony csv:import
lib/task/import/example/rad/example_information_objects_rad.csv
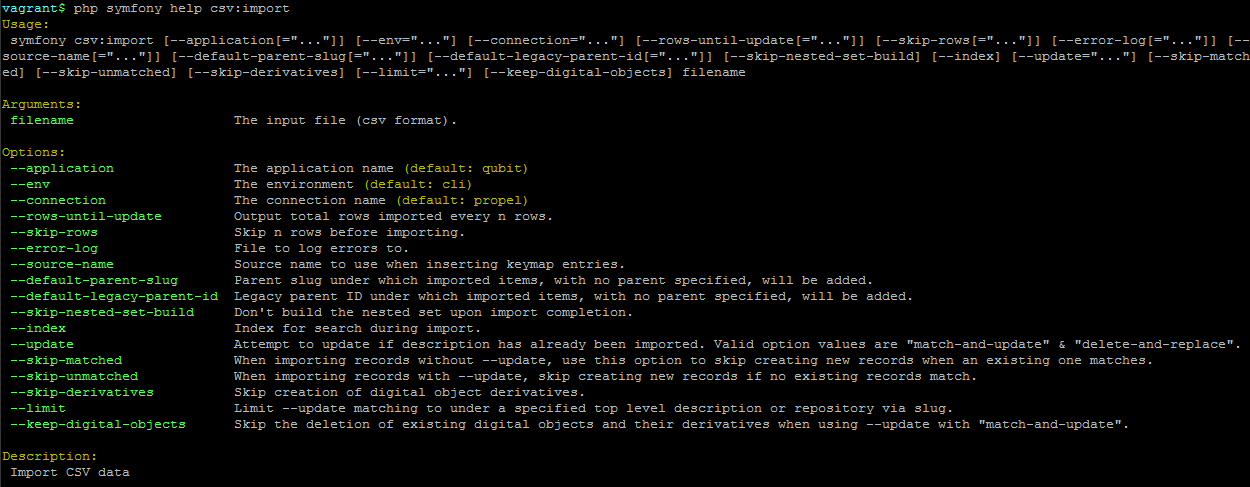
By typing php symfony help csv:import into the command-line from your root
directory, without specifying the location of a CSV, you will able able to
see the CSV import options available (pictured above). A brief explanation of
each is included below. For full archival description CSV import
documentation, please see:
- Prepare archival descriptions for CSV import
- Import new archival descriptions via CSV
- Update existing descriptions via CSV import
The --application, --env, and --connection options should not be
used - AtoM requires the uses of the pre-set defaults for symfony to be
able to execute the import.
The --rows-until-update option can be used for a simple visual
representation of progress in the command-line. Enter a whole integer, to
represent the number of rows should be imported from the CSV before the
command-line prints a period (e.g. `` . `` ) in the console, as a sort of
crude progress bar. For example, entering --rows-until-update=5 would
mean that the import progresses, another period will be printed every 5 rows.
This is a simple way to allow the command-line to provide a visual output of
progress. For further information on the --rows-until-update option and an
example of the command-line option in use, see also the section below,
Display the progress of an upload via the command-line interface (CLI).
You can use the --skip-rows option to skip X amount of rows in the CSV
before beginning the import. This can be useful if you have interrupted the
import, and wish to re-run it without duplicating the records already
imported. --skip-rows=10 would skip the first 10 rows in the CSV file,
for example. Note that this count does not include the header column, so
in fact, the above example would skip the header column, and rows 2-11 in
your CSV file.
The --error-log option can be used to specify a directory where errors
should be logged. Note that this option has not been tested by Artefactual
developers.
Use the --source-name option (described in the CSV import
documentation here) to specify a source when
importing information objects from multiple sources (with possibly conflicting
legacy IDs), or when importing updates, to match the previous import’s source
name. This will ensure that multiple related CSV files will remain related -
so, for example, if you import an archival description CSV, and then
supplement the authority records created (from
the eventActors field in the description CSV templates) with an authority
record CSV import, using the --source-name option will help to make sure
that matching names are linked and related, instead of duplicate authority
records being created. You can also use this option to relate a large import
that is broken up into multiple CSV files, or when importing updates to existing
descriptions. See the Legacy ID mapping: dealing with hierarchical data in a CSV section in the User manual
for further tips and details on the uses of this option.
Tip
When no --source-name is set during import, the filename of the CSV
will be used by default instead.
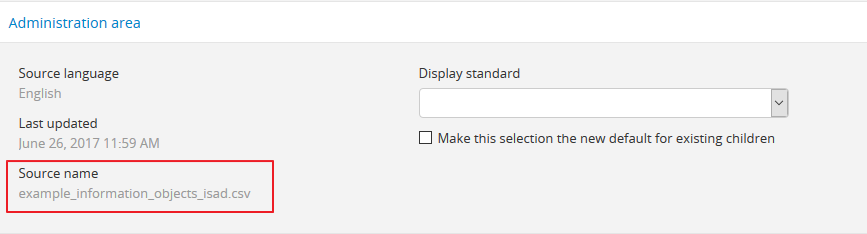
You can always check what source name was used for records created via an import by entering into edit mode and navigating to the Administration :term:` area <information area>` of the edit page - the source name used will be diplayed there:
The --default-legacy-parent-id option will allow the user to set a default
parentID value - for any row in the CSV where no parentID value is
included and no qubitParentSlug is present, this default value will be
inserted as the parentID.
Similarly, the --default-parent-slug option allows a user to set a
default qubitParentSlug value - wherever no slug value or parentID /
legacyID is included, AtoM will populate the qubitParentSlug with the
default value. If you are importing all rows in a CSV file to one parent
description already in AtoM, you could use the --default-parent-slug option
to specify the target slug of the parent, and then leave the legacyID,
parentID, and qubitParentSlug columns blank in your CSV. Note that this
example will affect ALL rows in a CSV - so use this only if you are
importing all descriptions to a single parent!
By default, AtoM will build the nested set after an import task. The
nested set is a way to manage hierarchical data stored in the flat tables of a
relational database. However, as Wikipedia notes, “Nested sets are very slow for
inserts because it requires updating left and right domain values for all
records in the table after the insert. This can cause a lot of database thrash
as many rows are rewritten and indexes rebuilt.” When performing a large import,
it can therefore sometimes be desirable to disable the building of the nested
set during the import process, and then run it as a separate command-line task
following the completion of the import. To achieve this, the
--skip-nested-set-build option can be used to disable the default behavior.
NOTE that the nested set WILL need to be built for AtoM to behave as expected. You can use the following command-line task, from the AtoM root directory, to rebuild the nested set if you have disabled it during import:
php symfony propel:build-nested-set
The task is further outlined on the Command line tools page - see: Rebuild the nested set.
Tip
Want to learn more about why and how nested sets are used? Here are a few great resources:
- Mike Hyllier’s article on Managing Hierarchical data in MySQL
- Evan Petersen’s discussion of nested sets
- Wikipedia’s Nested set model
Similarly, when using the user interface to perform an import, the import is indexed automatically - but when running an import via the command-line interface, indexing is disabled by default. This is because indexing during import can be incredibly slow, and the command-line is generally used for larger imports. Generally, we recommend a user simply clear the cache and rebuild the search index following an import - from AtoM’s root directory, run:
php symfony cc && php symfony search:populate
However, if you would like to index the import as it progresses, the
--index option can be used to enable this. This is useful if you have a
large database, and don’t want to have to re-index everything. For more
information on indexing options, see: Populate search index.
The --update option can be used when you want to use a CSV import to
update existing archival descriptions, instead of creating new records. There
are 2 modes: --update="match-and-update" and
--update="delete-and-replace. When used, AtoM will attempt to identify
matching archival descriptions and, depending on which option is used, either
update them in place, or delete the match and replace it with the new
description in the CSV. For more information on how AtoM attempts to match
incoming imports to existing descriptions, see:
Matching criteria for archival descriptions.
For the “match-and-update” option, AtoM will update any information object related columns that have new data. Columns in the related CSV row that are left blank will not delete existing data - instead, they will be ignored and any existing data in the related field will be preserved.
Important
AtoM can only update description fields that are stored in the primary information object database table using this method. This means that related entities (such as events, creators, access points, etc.) cannot be deleted or updated with this method. You can add additional related entities, but the old ones will be left in place. There is code to prevent duplication however - so if you have left the same creator/event information as previously, it will be ignored.
The one exception to this is updating the biographical or administrative history of a related authority record, which requires specifc criteria. See scenario 2B in the following section of the User manual: Attempting to match to existing authority records on import.
Additionally, in AtoM notes are stored in a different database table - this includes the General note, Archivist’s note, and the RAD- and DACS-specific note type fields in AtoM’s archival description templates. This means that in addition to related entities, notes cannot be deleted or updated with this method
If you wish to make updates to these entitites or fields, consider using the “Delete and replace” update option instead - though be sure to read up on the behavior and limitations of that method as well!
With the “delete-and-replace” option, the matched archival description and any descendants (i.e. children) will be deleted prior to import. Note that related entities are not deleted - such as linked authority records, terms such as subject, place, or genre access points, accessions, etc. If you want these removed as well, you will need to manually delete them from the user interface following the delete-and-replace import. On import of the replacement record, AtoM will also not automatically link to the same entities. Instead, it will use the existing matching logic to determine if it should link to an existing linked record, or create a new one. For more information on how AtoM determines whether or not to link to an existing authority record, see: Attempting to match to existing authority records on import.
See also
The AtoM user manual further explains these options, as they are available on the Import page in the user interface. See:
The --limit option can be used with --update to increase the
likelihood of a successful match by limiting the match criteria to either
records belonging to a specific repository, or matching a specific existing
top-level description. It takes the slug of the related repository or
top-level archival description as its value. For example, to import a
CSV called “my-updates.csv” and update the descriptions of the John Smith
Fonds, your command might look like this:
php symfony csv:import --update="match-and-update" --limit="john-smith-fonds"
/path/to/my-updates.csv
Normally, when attempting to match records, if AtoM fails to find a match
candidate, it will proceed to import the row as a new record. However, you can
use the --skip-unmatched option with --update to change this default
behavior. When --skip-unmatched is used, then any records that do not
match will be ignored during the import, and reported in the console log shown
on the Job details page of the related import job (see:
Manage jobs for more information). This is recommended if you are
intending to only import updates to existing records. Note that
--skip-unmatched will not work if it is not used in conjunction with the
--update option.
Warning
It is very difficult to use the --skip-unmatched option with a
--update="delete-and-replace when working with hierarchical data. Once a
match is found for the top-level description (e.g. the root
parent record), AtoM will then proceed to delete the original
description and all of its children (e.g.
lower level records). This means that when AtoM gets to the next child row
in the CSV, it will find no match in the database - because it has already
deleted the children - and the records will therefore be skipped and not
imported.
Unless you are only updating standalone descriptions (e.g. descriptions
with no children), we do not recommend using the --skip-unmatched
with --update="delete-and-replace.
Similarly, with new imports, you can use the --skip-matched option to skip
any records that AtoM identifies as matching those you have already imported.
This can be useful if you are uncertain if some of the records in your CSV
have been previously imported - such as when passing records to a portal site
or union catalogue. Any records that appear to match existing archival
descriptions will be ignored during the import, and reported in the console
log shown on the Job details page of the related import
job. For more information on how AtoM attempts to match incoming imports to
existing descriptions, see: Matching criteria for archival descriptions.
Normally during an update import when using match-and-update, the digital
object will be deleted and re-imported as part of the update, even if the path
or URI provided is the same - this is in case the digital object itself has
changed at the source. However, there are 2 ways users can avoid this. The
first is to include a digitalObjectChecksum column in the import CSV, and
to populate the row with the exact same checksum used by AtoM when uploading
the digital object (this can be seen in the file path to the
master digital object). If you export a CSV with a digital object from
AtoM, the checksum column and value is included in the export (see:
CSV export). However, if you do not have the checksum value handy and
you don’t want or need the digital object to be deleted and re-imported,
then the other way to skip this process is to use the
--keep-digital-objects option. When this option is used with
--update="match-and-update", then the deletion of the existing digital
object and its derivatives will be skipped.
Finally, the --skip-derivatives option can be used if you are using the
Digital object-related import columns to import a digital object attached to
your description(s). For every digital object uploaded, AtoM creates two
derivative objects from the master digital object: a thumbnail
image (used in search and browse results) and a reference display copy
(used on the view page of the related archival description). The
master digital object is the unaltered version of a digital object
that has been uploaded to AtoM. When the --skip-derivatives option is
used, then the thumbnail and reference display copy of your linked digital
object will not be created during the import process. You can use the
digital object derivative regeneration task to create them later, if desired -
see: Regenerating derivatives.
Importing events
Read more about importing events in the AtoM User manual documentation, here:
Example use - run from AtoM’s root directory:
php symfony csv:event-import lib/task/import/example/example_events.csv
There are also various command-line options that can be used, as illustrated in the options depicted in the image below:
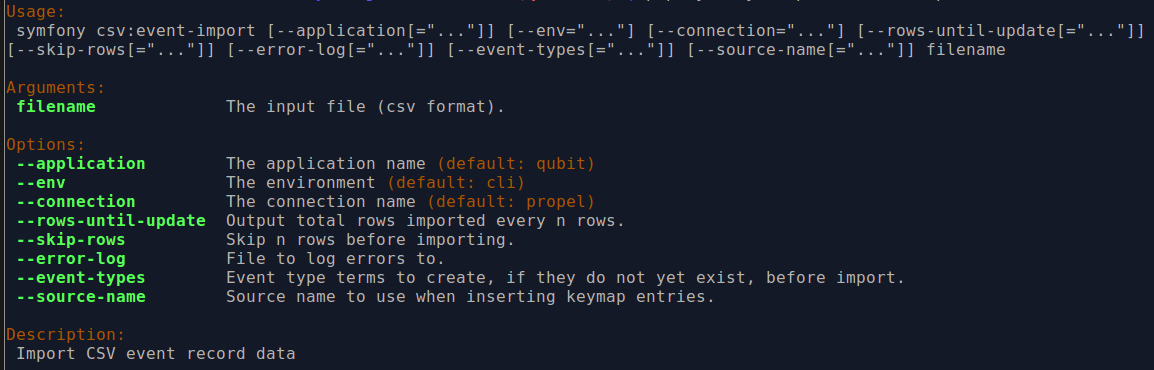
By typing php symfony help csv:event-import into the command-line from your
root directory, without specifying the location of a CSV, you will able able to
see the CSV import options available (pictured above). A brief explanation of
each is included below.
The --application, --env, and --connection options should not be
used - AtoM requires the uses of the pre-set defaults for symfony to be
able to execute the import.
The --rows-until-update, --skip-rows, and --error-log options can
be used the same was as described in the section
above on importing descriptions. For more
information on the --rows-until-update option, see also the section below,
Display the progress of an upload via the command-line interface (CLI).
Use the --source-name to specify a source importing to a AtoM installation
in which information objects from multiple sources have been imported, and/or
to associate it explicitly with a previously-imported CSV file that used the
same --source-name value. Further information is provided in the section on
legacy ID mapping in the User Manual - see: Legacy ID mapping: dealing with hierarchical data in a CSV.
The --event-types option is deprecated, and no longer supported in AtoM.
Importing repository records
Example use - run from AtoM’s root directory:
php symfony csv:repository-import
lib/task/import/example/example_repositories.csv
There are also various command-line options that can be used, as illustrated in the options depicted in the image below:
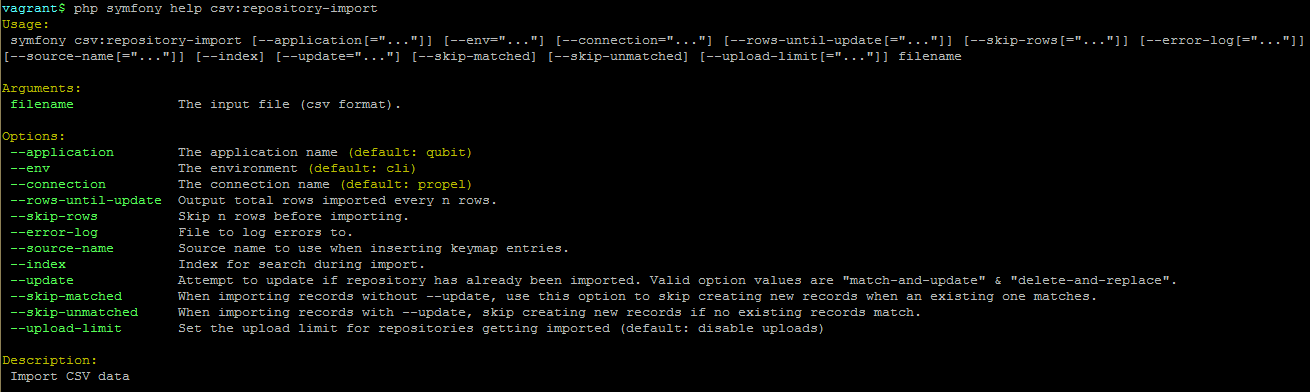
By typing php symfony help csv:repository-import into the command-line from
your root directory, without specifying the location of a CSV, you will able
able to see the CSV import options available (pictured above). A brief
explanation of each is included below. For full details on
archival institution CSV imports, please see:
The --application, --env, and --connection options should not be
used - AtoM requires the uses of the pre-set defaults for symfony to be
able to execute the import.
The --rows-until-update, --skip-rows, and --error-log options can
be used the same was as described in the section
above on importing descriptions. For more
information on the --rows-until-update option, see also the section below,
Display the progress of an upload via the command-line interface (CLI).
Use the --source-name option (described in the CSV import
documentation here) to specify the source name
that will be added to the keymap table. This can be useful for improving the
matching logic when importing updates - you can specify the same source name
used as the was used during the original import for greater matching. By
default in AtoM, when no source name is specified during import, the CSV
filename will be stored in the keymap table as the source name.
The --index option will progressively add your imported repository records
to AtoM’s search index as the import progresses. Normally when using the
user interface to perform an import, the import is
indexed automatically - but when running an import via the command-line
interface, indexing is disabled by default. This is because indexing during
import can sometimes be incredibly slow, and the command-line is generally used
for larger imports. Generally, we recommend a user simply clear the cache and
rebuild the search index following an import - from AtoM’s root directory, run:
php symfony cc && php symfony search:populate
However, if you would like to index the import as it progresses, the
--index option can be used to enable this. This is useful if you have a
large database, and don’t want to have to re-index everything. For more
information on indexing options, see: Populate search index.
The --update option can be used when you want to use a CSV import to
update existing archival institutions, instead of creating new records. There
are 2 modes: --update="match-and-update" and
--update="delete-and-replace. When used, AtoM will attempt to identify
matching archival institution records and, depending on which option is used,
either update them in place, or delete the match and replace it with the new
repository record in the CSV. The matching criteria for repository records is
based on an exact match on the authorized form of name of the existing
repository. This means that you cannot use the --update option to update
the name of your existing repositories, or AtoM will fail to find the correct
match on import.
Tip
You can read more about each update option in the User Manual:
For the “match-and-update” option, AtoM will update any repository record related columns that have new data. Columns in the related CSV row that are left blank will not delete existing data - instead, they will be ignored and any existing data in the related field will be preserved.
Important
At this time, not all fields in the archival institution record can be updated. Primarily, these are fields that are found in other tables in the AtoM database than the primary repository record table. For further details, see: Updating repository records in place via CSV import.
With the “delete-and-replace” update option, AtoM will delete the matches prior to importing the CSV data as a new record to replace it.
Note that only the matched repository record is deleted during this process. Any related/linked entities (such as an authority record linked as being maintained by the repository, Thematic area or other repository access points, and linked archival descriptions) are not automatically deleted. If you also want these fully removed, you will have to find them and manually delete them via the user interface after the import.
Once the original matched repository record has been deleted, the CSV import proceeds as if the record is new. That is to say, just as AtoM does not automatically delete entities related to the original archival institution, it also not automatically re-link previously related entities.
Warning
This means that if your archival institution record is linked to descriptions, using the “Delete and replace” method will unlink all descriptions - these will not be automatically re-linked with the new import!
We recommend you only use the “Delete and replace” method with repository records that are not currently linked to other entities.
Normally, when attempting to match records, if AtoM fails to find a match
candidate, it will proceed to import the row as a new record. However, you can
use the --skip-unmatched option with --update to change this default
behavior. When --skip-unmatched is used, then any records that do not
match will be ignored during the import, and reported in the console log shown
on the Job details page of the related import job (see:
Manage jobs for more information). This is recommended if you are
intending to only import updates to existing records. Note that
--skip-unmatched will not work if it is not used in conjunction with the
--update option.
Similarly, with new imports, you can use the --skip-matched option to skip
any records that AtoM identifies as matching those you have already imported.
This can be useful if you are uncertain if some of the records in your CSV
have been previously imported - such as when passing records to a portal site
or union catalogue. Any records that appear to match existing repository
records (based on the authorized form of name) will be ignored during the
import, and reported in the console log shown on the
Job details page of the related import job.
You can use the --upload-limit option to specify the default upload limit
for repositories which don’t specify their uploadLimit in the CSV file. That
is, if for example you performed a CSV import with the command-line option of
--upload-limit=5, then for every repository in the CSV that does NOT have a
value in the uploadLimit column, the default value of 5 GBs will be assigned.
For more information on this functionality in the
user interface, see: Set digital object upload limit for an archival institution.
Importing authority records
The authority record import tool allows you to import data about people, familiies, and organizations. A typical authority record import can be conducted via the user interface - for more information, see: Import new authority records via CSV. However, inn addition to importing data detailing these entities, the command-line tool also allows the simultaneous import of supplementary data (in separate CSV files) on how these entities relate to each other and alternate names by which these entities are known.
You can view the example CSV files for authority records in the AtoM code (at
lib/task/import/example/authority_records/) or they can be downloaded
directly here:
The primary documentation for preparing the main authority record CSV template can be found in the User Manual, here:
However, the basic information on preparing the supplementary Actor Relationships CSV and the Actor Aliases will be described below.
Alternate names CSV
This CSV template, also known as the Aliases CSV template, can be imported at the same time as the Authority record CSV template to supply addtional forms of name. The ISAAR-CPF standard upon which the AtoM authority record template is based includes 3 fields for alternate forms of name:
- Parallel form(s) of name
- Standardized form(s) of name according to other rules
- Other form(s) of name
Consult the related standard for more information. For guidance on data entry and a link to the related standard, see ISAAR-CPF template.
The Alternate names CSV is very simple, comprised of just 4 columns:
- The
parentAuthorizedFormOfNameshould match exactly a target name in the related authority record CSV being imported. The aliases (or alternate names) included in the Aliases CSV will be associated with that actor’s authority record following import. - The
alternateFormshould include the alternate name or alias you wish to import. - The
formTypecolumn contains data about what kind of alternate is being created. Each alias can be one of three forms: a parallel form, a standardized form according to other descriptive practices, or an “other” form. Enter either “parallel”, “standardized”, or “other” as a value in this the cells of this column. For more information on the distinction between these three types of alternate names, please consult the International Council on Archives’ ISAAR-CPF standard - specifically sections 5.1.3 to 5.1.5. - The
culturecolumn indicates to AtoM the language of the descriptions being uploaded. This column expects two-letter ISO 639-1 language code values - for example, “en” for English; “fr” for French, “it” for Italian, etc. See Wikipedia for a full list of ISO 639-1 language codes.
Relationships CSV
The Relationships CSV template can be imported at the same time as the Authority record CSV template to create relationships between actors (i.e. authority records. For more information on this functionality as seen in the user interface, see: Create a relationship between two authority records.
The Relationships CSV contains 8 columns:
- The
sourceAuthorizedFormOfNameis used to specify one of the actors included in the Authority record CSV upload. This field should match exactly one of the actors listed in theauthorizedFormOfNamecolumn of the Authority record CSV. - The
targetAuthorizedFormOfNameis also used to specify another one of the actors in the Authority record CSV upload - the actor with which you intend to create a relationship. The values entered into this column should match exactly one of the actors listed in theauthorizedFormOfNamecolumn of the Authority record CSV. - The
categorycolumn contains data about the type of relationship you are creating, and maps to ISAAR 5.3.2 Category of Relationship. The terms recommended in the ISAAR standard are maintained in the Actor Relation Type taxonomy in AtoM. Values entered should be either “associative”, “family”, “hierarchical”, or “temporal”. For more information on the distinction between these terms, please consult the International Council on Archives’ ISAAR-CPF standard - specifically, section 5.3.2. - The
datefield is a free-text string field that will allow a user to enter a date or date range for the relationship. It allows the use of special characters and typographical marks to indicate approximation (e.g. [ca. 1900]) and/or uncertainty (e.g. [199-?]). Use thestartDateandendDatefields to enter ISO-formated date values (e.g. YYYY-MM-DD, YYYY-MM, or YYYY) that correspond to the free-text date field. Public users in the interface will see thedatefield values when viewing relationships; thestartDateandendDatevalues are not visible, and are used for date range searching in the application. - The
culturecolumn indicates to AtoM the language of the descriptions being uploaded. This column expects two-letter ISO 639-1 language code values - for example, “en” for English; “fr” for French, “it” for Italian, etc. See Wikipedia for a full list of ISO 639-1 language codes.
Importing authority records
Example use - run from AtoM’s root directory:
php symfony csv:authority-import lib/task/import/example/authority_records/example_authority_records.csv
There are also various command-line options that can be used, as illustrated in the options depicted in the image below:
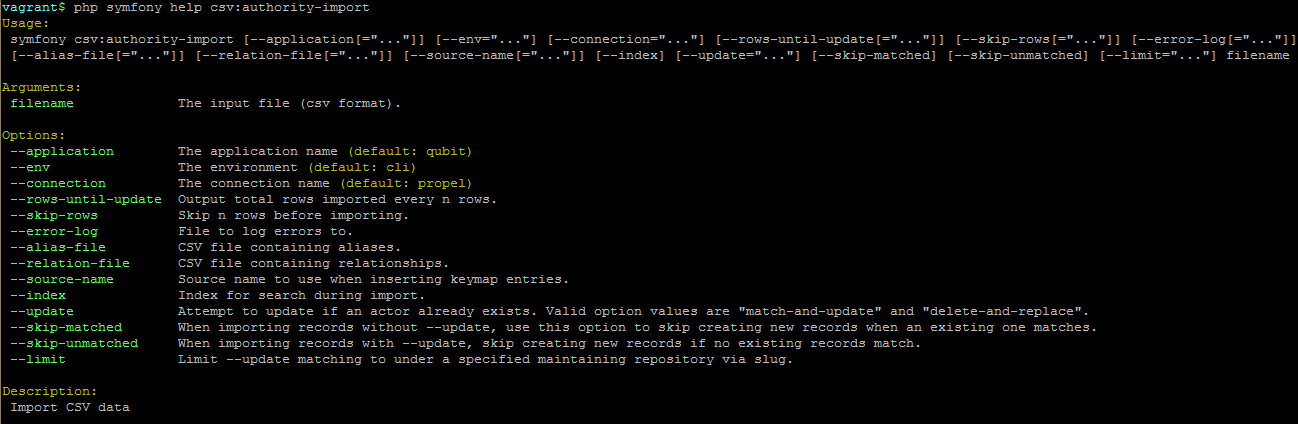
By typing php symfony help csv:authority-import into the command-line from
your root directory, without specifying the location of a CSV, you will
able able to see the CSV import options available (pictured above). A brief
explanation of each is included below.
The --application, --env, and --connection options should not be
used - AtoM requires the uses of the pre-set defaults for symfony to be
able to execute the import.
The --rows-until-update, --skip-rows, --error-log, and --index
options can be used the same was as described in the section
above on importing descriptions. For more
information on the --rows-until-update option, see also the section below,
Display the progress of an upload via the command-line interface (CLI).
The --alias-file and --relation-file options are used to import
accompanying alternate name (aka Alias data) and relationship CSV files at
the same time as the authority record CSV import. An example of each will be
given below, though they can be used together. Jump to:
Use the --source-name option (described in the CSV import
documentation here) to specify the source name
that will be added to the keymap table. This can be useful for improving the
matching logic when importing updates - you can specify the same source name
used as the was used during the original import for greater matching. By
default in AtoM, when no source name is specified during import, the CSV
filename will be stored in the keymap table as the source name.
The --index option will progressively add your imported authority records
to AtoM’s search index as the import progresses. Normally when using the
user interface to perform an import,
the import is indexed automatically - but when running an import via the
command-line interface, indexing is disabled by default. This is because
indexing during import can sometimes be incredibly slow, and the command-line
is generally used for larger imports. Generally, we recommend a user simply
clear the cache and rebuild the search index following an import - from AtoM’s
root directory, run:
php symfony cc && php symfony search:populate
However, if you would like to index the import as it progresses, the
--index option can be used to enable this. This is useful if you have a
large database, and don’t want to have to re-index everything. For more
information on indexing options, see: Populate search index.
The --update option can be used when you want to use a CSV import to
update existing authority records, instead of creating new records. There
are 2 modes: --update="match-and-update" and
--update="delete-and-replace. When used, AtoM will attempt to identify
matching authority records and, depending on which option is used,
either update them in place, or delete the match and replace it with the new
repository record in the CSV. The matching criteria for authority records is
based on an exact match on the authorized form of name of the existing
authority record. This means that you cannot use the --update option to
update the authorized form of name of your existing authority records, or AtoM
will fail to find the correct match on import. Note that at this time, the
update options only work with the data found in the primary Authority
record CSV template - --update cannot update Relations and Alias data.
Tip
You can read more about each update option in the User Manual:
For the “match-and-update” option, AtoM will update any authority record related columns that have new data. Columns in the related CSV row that are left blank will not delete existing data - instead, they will be ignored and any existing data in the related field will be preserved.
Important
At this time, not all fields in the authority record template can be updated. Primarily, these are fields that are found in other tables in the AtoM database than the primary authority record table. For further details, see: Update authority records in place via CSV import.
With the “delete-and-replace” update option, AtoM will delete the matches prior to importing the CSV data as a new record to replace it.
Note that only the matched authority record is deleted during this process. Any related/linked entities (such as a repository linked as the authority record’s maintainer, other authority records linked via a relationship, Occupation access points, and linked archival descriptions) are not also automatically deleted. If you also want these fully removed, you will have to find them and manually delete them via the user interface after the import.
Once the original matched authority record has been deleted, the CSV import proceeds as if the record is new. That is to say, just as AtoM does not automatically delete entities related to the original archival institution, it also not automatically re-link previously related entities.
Warning
This means that if your authority record is linked to descriptions, a repository, or other authority records, using the “Delete and replace”method will unlink all descriptions, repositories, and authority records - these will not be automatically re-linked with the new import!
We recommend you only use the “Delete and replace” method with authority records that are not currently linked to other entities.
For more information on linking authority records, see:
The --limit option can be used with --update to increase the
likelihood of a successful match by limiting the match criteria to records
linked to a specific repository as its maintainer.
This option takes the slug of the related repository as its value. For
example, to import a CSV called “my-updates.csv” and update an authority
record for Jane Doe belonging to the Example Archives, your command might look
something like this example:
php symfony csv:authority-import --update="match-and-update"
--limit="example-archives" /path/to/my-updates.csv
Normally, when attempting to match records, if AtoM fails to find a match
candidate, it will proceed to import the row as a new record. However, you can
use the --skip-unmatched option with --update to change this default
behavior. When --skip-unmatched is used, then any records that do not
match will be ignored during the import, and reported in the console log shown
on the Job details page of the related import job (see:
Manage jobs for more information). This is recommended if you are
intending to only import updates to existing records. Note that
--skip-unmatched will not work if it is not used in conjunction with the
--update option.
Similarly, with new imports, you can use the --skip-matched option to skip
any records that AtoM identifies as matching those you have already imported.
This can be useful if you are uncertain if some of the records in your CSV
have been previously imported - such as when passing records to a portal site
or union catalogue. Any records that appear to match existing authority
records (based on the authorized form of name) will be ignored during the
import, and reported in the console log shown on the
Job details page of the related import job.
Importing alternate names (Alias data)
Alternate names are defined in a separate CSV file. Each alias can be one of three forms: a parallel form, a standardized form, or “other” form. See the section on data entry above for further guidance.
An example CSV template file of supplementary alias data is available in the
AtoM source code ( at
lib/task/import/example/authority_records/example_authority_
record_aliases.csv
) or can be downloaded here:
The Alternate names CSV file must be imported at the same time as its related
Authority record CSV file. The --alias-file command-line option is used
to specify a separate path to the Alternate names CSV, with a back slash
( \ ) used to separate it from the path of the original authority record
CSV, as shown below.
Example import of authority records and corresponding aliases:
php symfony csv:authority-import lib/task/import/example/authority_records/example_authority_records.csv \
--alias-file=lib/task/import/example/authority_records/example_authority_record_aliases.csv
Importing Relations data
Relations between authority records are also defined in a separate CSV file. Each relationship can be either hierarchical, temporal, family, or associative. See the section on data entry above for further guidance.
An example CSV template file of relation data is available in the AtoM source
code ( at
lib/task/import/example/authority_records/example_authority_record_relat
ionships.csv
) or can be downloaded here:
The Relationships CSV file must be imported at the same time as its related
Authority record CSV file. The --relation-file command-line option is used
to specify a separate path to the Relationships names CSV, with a back slash
( \ ) used to separate it from the path of the original authority record
CSV, as shown below.
Example import of authority records and corresponding relationships:
php symfony csv:authority-import lib/task/import/example/authority_records/example_authority_records.csv \
--relation-file=lib/task/import/example/authority_records/example_authority_record_relationships.csv
Import accession records
The accession record import tool allows you to import data about your
accessions. Additionally, when importing descriptions as well, you can use the
subsequent archival description CSV import to create a link between
your accession records and your descriptions, by adding an accessionNumber
column in the archival description CSV and populating it with the exact
accession number(s) used during your accessions data import.
Alternatively, you can use the qubitParentSlug column to link existing
descriptions in AtoM to new or updated accessions records via your import -
for more details see the User Manual: Prepare accession records for CSV import.
An example CSV template file is available in the
lib/task/import/example/example_accessions.csv directory of AtoM, or it
can be downloaded here:
The primary documentation for preparing your accession record data in a CSV file for import can be found in the User Manual:
Please review the guidance provided there carefully prior to running a command line import. The use of the command-line task and its options are outlined below.
Example use - run from AtoM’s root directory:
php symfony csv:accession-import /path/to/my/example_accessions.csv
There are also a number of options available with this command-line task.

By typing php symfony help csv:accession-import into the command-line from
your root directory, without specifying the location of a CSV, you will
able able to see the CSV import options available (pictured above). A brief
explanation of each is included below.
The --application, --env, and --connection options should not be
used - AtoM requires the uses of the pre-set defaults for symfony to be
able to execute the import.
Use the --source-name to specify a source importing to a AtoM installation
in which accessions and information objects from multiple sources have been
imported, and/or to associate it explicitly with a previously-imported CSV
file that used the same --source-name value. An example is provided in the
section on legacy ID mapping in the User Manual - see:
Legacy ID Mapping.
The --rows-until-update, --skip-rows, --error-log, and --index
options can be used the same was as described in the section
above on importing descriptions. For more
information on the --rows-until-update option, see also the section below,
Display the progress of an upload via the command-line interface (CLI).
The --index option will progressively add your imported accession records
to AtoM’s search index as the import progresses. Normally when using the
user interface to perform an import,
the import is indexed automatically - but when running an import via the
command-line interface, indexing is disabled by default. This is because
indexing during import can sometimes be incredibly slow, and the command-line
is generally used for larger imports. Generally for very large imports we
recommend a user simply clear the cache and rebuild the search index following
an import - from AtoM’s root directory, run:
php symfony cc && php symfony search:populate
However, if you would like to index the import as it progresses, the
--index option can be used to enable this. This is useful if you have a
large database, and don’t want to have to re-index everything. For more
information on indexing options, see: Populate search index.
Import deaccession records
The deaccession import tool allows you to import data about deaccession activies, which can be appended to accession records in AtoM. For more general information on working with deaccession records in AtoM, consult the User manual: Deaccession records. For the task to succeed, an accession number for an existing accession must be provided for each row - it is not possible to create new accession records while importing deaccession CSV data.
An example CSV template file is available in the
lib/task/import/example/example_deaccessions.csv directory of AtoM,
or it can be downloaded here:
The expected CSV will have 7 columns, corresponding to various fields available in the Deaccession record template. These include:
- accessionNumber: expects the accession number of an existing accession record in AtoM as input. If no match is found for an existing accession, the console will provide a warning, the row will be skipped, and the task will continue.
- deaccessionNumber: an identifier for the deaccession. Free text, will support symbols and typographical marks such as dashes and slashes.
- date: expects a date value in ISO-8601 format (YYYY-MM-DD).
- scope: expects one of the controlled terms from the “Scope” field in the AtoM deaccession record template. English options include “Whole” and “Part”.
- description: Free-text. Identify what materials are being deaccessioned.
- extent: Free-text. Identify the number of units and the unit of measurement for the amount of records being deaccessioned.
- reason: Free-text. Provide a reason why the records are being deaccessioned.
- culture: Expects a 2-letter ISO 639-1 language code as input (e.g.: en, fr, es, pt, etc).
Example use - run from AtoM’s root directory:
php symfony csv:deaccession-import /path/to/my/example_accessions.csv
There are also a number of options available with this command-line task.
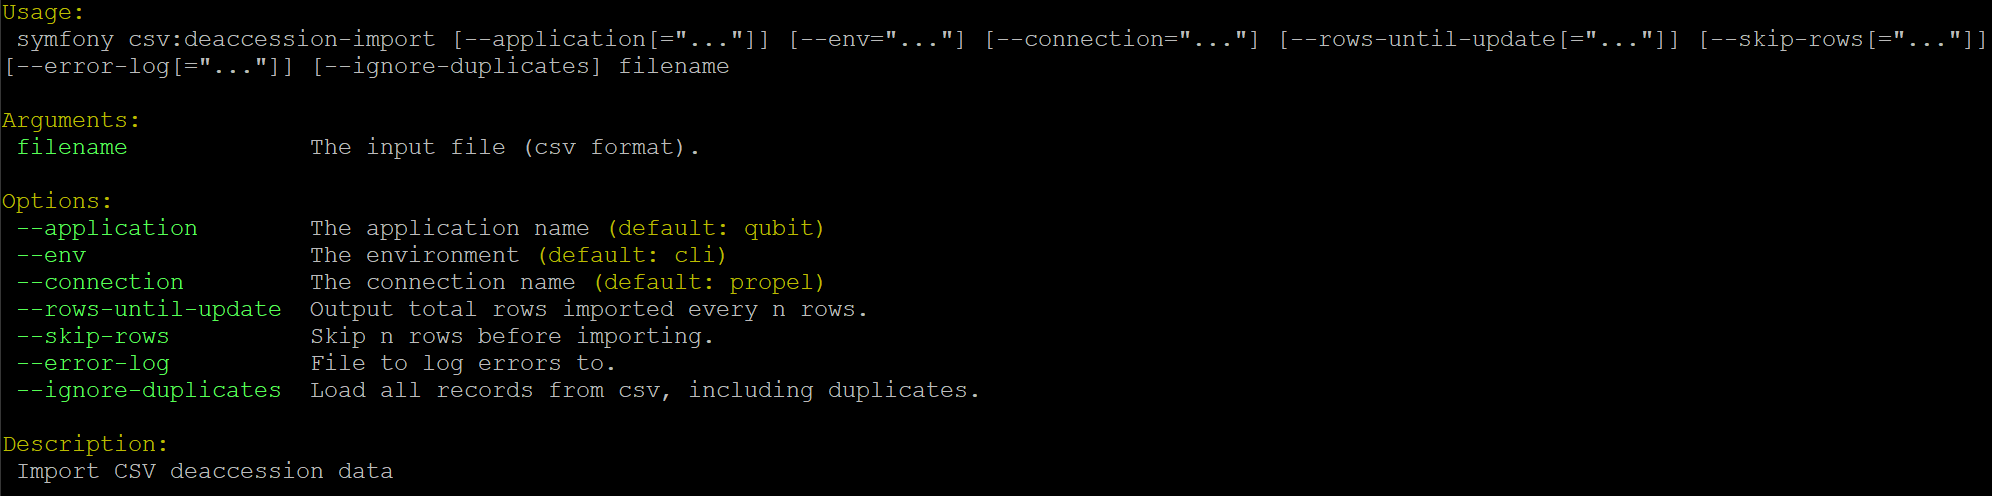
By typing php symfony help csv:deaccession-import into the command-line from
your root directory, without specifying the location of a CSV, you will
be able to see the CSV import options available (pictured above). A brief
explanation of each is included below.
The --application, --env, and --connection options should not be
used - AtoM requires the uses of the pre-set defaults for symfony to be
able to execute the import.
The --rows-until-update, --skip-rows, and --error-log options can
be used the same was as described in the section
above on importing descriptions. If you
wish a summary of warnings reported in the console log, you can use the
--error-log option - it takes a path to a new text file as input, and
will copy all console warnings to this log file. Acceptable file extensions for
the log file are .txt or .log. For more information on the
--rows-until-update option, see also the section below,
Display the progress of an upload via the command-line interface (CLI).
More than 1 row of data (i.e more than 1 deaccession record) can be associated
with the same accession record. To prevent accidental exact duplicates, by
default AtoM will skip any rows where all data is identical to a row
preceding it, and will report the skipped record in the console log. If you
are intentionally importing duplicate deaccession records, you can use the
--ignore-duplicates option.
Display the progress of an upload via the command-line interface (CLI)
The various CSV import tools allow the use of the --rows-until-update
command-line option to display the current row of CSV data being imported.
This is an extremely simplified way to indicate progress graphically via the
command-line - the user sets a numerical value for the number of rows the task
will progress before an update, and then the task will output a dot (or period
) in the command-line every time the indicated number of rows has been
processed in the current CSV.
Example use reporting progress every 5 rows:
php symfony csv:import
lib/task/import/example/rad/example_information_objects_rad.csv
--rows-until-update=5
This can be useful for large imports, to ensure the import is still progressing, and to try to roughly determine how far the task has progressed and how long it will take to complete.
Load digital objects via the command line
Known as the Digital object load task, this command-line tool will allow a user to bulk attach digital objects to existing information objects (e.g. archival descriptions) through the use of a simple CSV file.
This task will take a CSV file as input, which contains two columns:
filename and EITHER information_object_id OR identifier as
the second column; the script will fail if these column headers are not present
in the first row of the CSV file, and it will fail if there are more than 2
columns - you must choose which variable you prefer to work with ( identifier or
object ID) for the second column. Each will be explained below.
The filename column contains the full (current) path to the digital asset
(file). The information_object_id or identifier column identifies the
linked information object. AtoM does not allow more than one digital object
per information object (with the exception of derivatives), and each digital
object must have a corresponding information object to describe it, so this
one-to-one relationship must be respected in the CSV import file.
The information_object_id is a unique internal value assigned to each
information object in AtoM’s database - it is not visible via the
user interface and you will have to perform a SQL query to find it out
- a sample SQL query with basic instructions has been included below.
The identifier can be used instead if preferred. A
description’s identifier is visible in the
user interface, which can make it less difficult to discover. **
However,**, if the target description’s identifier is not unique throughout
your AtoM instance, the digital object may not be attached to the correct
description - AtoM will attach it to the first matching identifier it finds.
Finding the information_object_id
The information_object_id is not a value that is accessible via the
user interface - it is a unique value used in AtoM’s database. You can,
however, use SQL in the command-line to determine the ID of an information
object. The following example will show you how to use a SQL query to find the
information_object_id, if you know the slug of the description:
First, you will need to access mysqlCLI to be able to input a SQL query. To do this, you will need to know the database name, user name, and password you used when creating your database during installation. If your database is on a different server (e.g. if you are trying to SSH in to access your database server), you will also need to know the hostname - that is, the IP address or domain name of the server where your database is located.
The following is an example of the CLI command to enter to access mysqlCLI:
mysql -u root -pMYSECRETPASSWORD atom
-u= user. If you followed our installation instructions, this will beroot-p= password. Enter the password you used during installation right after the-p. If you did not enter a password, include the-pon its own. If you are prompted later for a password and didn’t use one, just press enter.-h= hostname. If your database is on a different server, supply either an IP address, or the domain name, where it is located.atom= your database name. If you followed our installation instructions, this will beatom; otherwise enter the database name you used when installing AtoM.
You may be prompted for your password again. If so, enter it. If you did not use a password during installation, simply press enter.
Your command prompt should now say something like
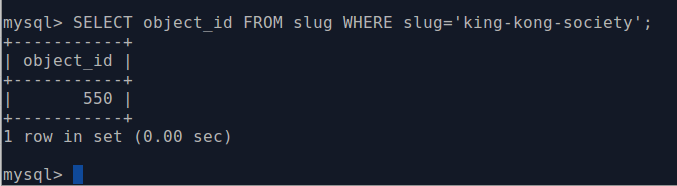
mysql>. You can now enter a SQL query directly.The following example SQL command will return the information_object_id for a desription, when the information object’s slug is known:
SELECT object_id FROM slug WHERE slug='your-slug-here';
The query should return the object_id for the description. Here is an example:
- Enter
quitto exit mysqlCLI.
Using the digital object load task
Before using this task, you will need to prepare:
- A CSV file with 2 columns - EITHER
information_object_idandfilename, ORidentifierandfilename - A directory with your digital objects inside of it
Important
You cannot use both information_object_id and identifier in the
same CSV - it must be one or the other. If you use the identifier, make
sure your target description identifiers are unique in AtoM - otherwise
your digital objects may not upload to the right description!
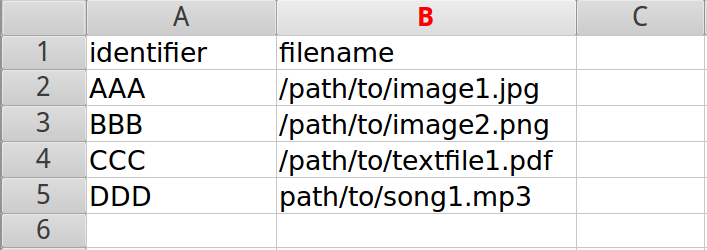
Here is a sample image of what the CSV looks like when the identifier is used, and the CSV is prepared in a spreadsheet application:
Tip
Before proceeding, make sure that you have reviewed the instructions
above, to ensure that your CSV will work when
used with the digitalobject:load task. The key point when creating a
CSV is to ensure the following:
- CSV file is saved with UTF-8 encodings
- CSV file uses Linux/Unix style end-of-line characters (
/n)
You can see the options available on the CLI task by typing in the following command:
php symfony help digitalobject:load
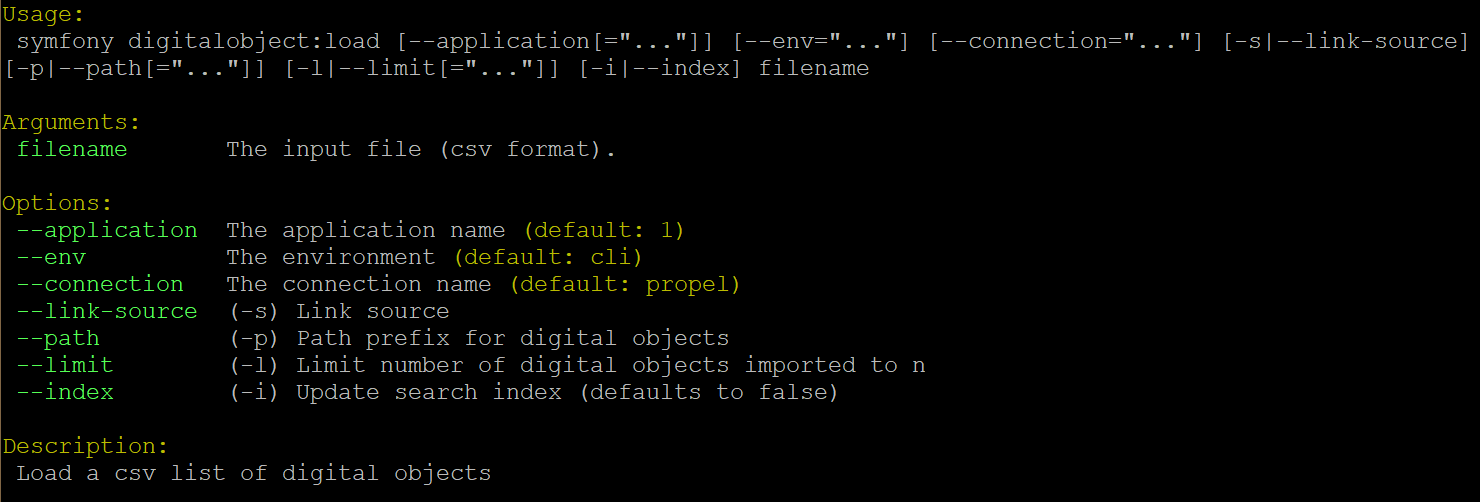
The --application, --env, and --connection options should not be
used - AtoM requires the uses of the pre-set defaults for symfony to be
able to execute the import.
By default, the digital object load task will not index the collection as
it runs. This means that normally, you will need to manually repopulate the
search index after running the task. Running without indexing allows the task
to complete much more quickly - however, if you’re only uploading a small set
of digital objects, you can choose to have the task index the collection as it
progresses, using the --index (or -i) option
The --limit option enables you to set the number of digital objects imported
via CSV using the digital object load task.
The --link-source option could apply in a use case where an institution
might typically store master digital objects in a separate local repository.
Rather than maintain multiple copies of every digital object, you could use the
--link-source option to load objects via local filepath stored to a source
file in the database. Essentially, when you use the --link-source option,
the digital object load task will behave like an external digital object being
uploaded via URI, and ultimately, the source “master” file(s) are not copied to
the uploads directory.
Note
When using the --link-source option, local derivatives are still
generated and stored in the uploads directory per usual.
The --path option will allow you to simplify the filename column in your
CSV, to avoid repetition. If all the digital objects you intend to upload are
stored in the same folder, then adding /path/to/my/folder/ to each object
filename seems tedious - your filename column will need to look something
like this:
filename
/path/to/my/folder/image1.png
/path/to/my/folder/image2.jpg
/path/to/my/folder/text1.pdf
etc...
To avoid this when all digital objects are in the same directory, you can use
the --path option to pre-supply the path to the digital objects - for each
filename, the path supplied will be appended. Note that you will need to
use a trailing slash to finish your path prefix - e.g.:
php symfony digitalobject:load --path="/path/to/my/folder/"
/path/to/my/spreadsheet.csv
TO RUN THE DIGITAL OBJECT LOAD TASK
php symfony digitalobject:load /path/to/your/loadfile.csv
NOTES ON USE
If an information object already has a digital object attached to it, it will be skipped during the import
Remember to repopulate the search index afterwards if you haven’t used the
--indexoption! For more information, see: Populate search index.php symfony search:populate
Regenerating derivatives
Sometimes the digitalobject:load task won’t generate the thumbnail
and reference images properly for digital
objects that were loaded (e.g. due to a crash or absence of convert installed,
etc.). In this case, you can regenerate these thumbsnail/reference images using
the following command:
php symfony digitalobject:regen-derivatives
Warning
All of your current derivatives will be deleted! They will be replaced with new derivatives after the task has finished running. If you have manually changed the thumbnail or reference display copy of a digital object via the user interface (see: Edit digital objects), these two will be replaced with digital object derivatives created from the master digital object.
For more information on this task and the options available, see: Regenerating derivatives.
Index your content after an import
After any kind of import, you’ll want to index your content so it can be searched by users. To do so, enter the following into the command-line:
php symfony search:populate
Tip
If you have used the --index option while running your command-line
imports, then you will not need to reindex - when used, the --index
option will progressively add records to the search index as they are
created during the import process.
For more information on search index population in AtoM, see: Populate search index.
Exporting CSV files from the command-line
The CSV export task is a command-line task that will allow a system administrator with access to the root AtoM directory to export some or all archival descriptions held in AtoM in CSV format. This template is the same as that used for CSV import (AtoM 2.3 and higher), and the export produced can therefore also be used to import data into another AtoM instance.
Example use - run from AtoM’s root directory:
php symfony csv:export /path/to/my/export-location/example.csv
If you specify just a path to a directory, AtoM will generate a name for the CSV. If you wish to name your CSV file, then you can specify the target filename in the path (e.g. in the above example, “example.csv” is the target filename).
CSV export task options
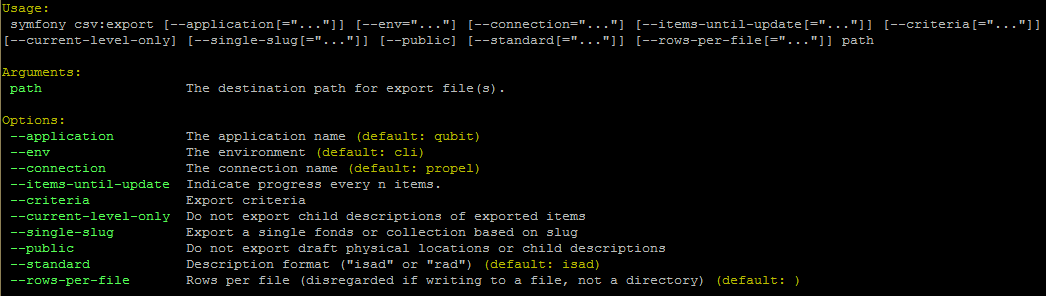
By typing php symfony help csv:export into the command-line from your root
directory, without specifying an export location of the CSV, you will able
able to see the CSV import options available (pictured above). A brief
explanation of each is included below.
The --application, --env, and connection options should not be
used - AtoM requires the uses of the pre-set defaults for symfony to be
able to execute the export.
The --items-until-update option can be used for a simple visual
representation of progress in the command-line. Enter a whole integer, to
represent the number of rows should be imported from the CSV before the
command-line prints a period (e.g. `` . `` ) in the console, as a sort of
crude progress bar. For example, entering --items-until-update=5 would
mean that the import progresses, another period will be printed every 5 rows.
This is a simple way to allow the command-line to provide a visual output of
progress.
The --criteria option can be added if you would like to use raw SQL to
target specific descriptions.
Example 1: exporting all draft descriptions
php symfony csv:export --criteria="i.id IN (SELECT object_id FROM status
WHERE status_id = 159 AND type_id = 158)" /path/to/my/exportFolder
If you wanted to export all published descriptions instead, you could simply
change the value of the status_id in the query from 159 (draft) to 160
(published).
Example 2: exporting all descriptions from a specific repository
To export all descriptions associated with a particular archival institution, you simply need to know the slug of the institution’s record in AtoM. In this example, the slug is “example-repo-slug”:
php symfony csv:export --criteria="i.repository_id = (SELECT object_id FROM
slug WHERE slug='example-repo-slug')" /path/to/my/exportFolder
Example 3: exporting specific descriptions by title
To export 3 fonds titled: “779 King Street, Fredericton deeds,” “1991 Canada Winter Games fonds,” and “A history of Kincardine,” You can issue the following command:
sudo php symfony csv:export --criteria="i18n.title in ('779 King Street,
Fredericton deeds', '1991 Canada Winter Games fonds', 'A history of
Kincardine')" path/to/my/exportFolder
You could add additional archival descriptions of any level of description into the query by adding a comma then another title in quotes within the ()s.
The --current-level-only option can be used to prevent AtoM from exporting
any children associated with the target descriptions.
If you are exporting fonds, then only the fonds-level description
would be exported, and no lower-level records such as series, sub-series,
files, etc. This might be useful for bulk exports when the intent is to submit
the exported descriptions to a union catalogue or regional portal that only
accepts collection/fonds-level descriptions. If a lower-level description
(e.g. a series, file, or item) is the target of the export, its
parents will not be exported either.
The --single-slug option can be used to to target a single archival
unit (e.g. fonds, collection, etc) for export, if you know the slug of
the target description.
Example use
php symfony csv:export --single-slug="test-export"
/path/to/my/directory/test-export.csv
The --public option is useful for excluding draft records from an export.
Normally, all records in a hierarchical tree will be exported regardless of
publication status. When using the --public option, only records
with a publication status of “Published” will be exported.
Important
If you are planning on re-importing your CSV export into another AtoM
instance, and you are using the --public option, you will need to ensure
that there are no published records that are children
of draft parents. If so, your re-import may fail!
AtoM uses the legacyID and parentID columns to manage hierarchical
relationships - but if the parent record is draft (and therefore excluded
from the export), then the parentID value for the published (and
exported) child record will point to a legacyID that is not included in
the export. We recommend you either remove such rows before trying to
re-import, or publish the parent record prior to exporting.
For more information on the legacyID and parentID columns, and how
AtoM manages hierarchical data via CSV import, see:
Legacy ID mapping: dealing with hierarchical data in a CSV and LegacyID and parentID.
The --standard option allows you to determine if the Canadian
RAD template or the international
ISAD(G) template is used when exporting. The default if
the option is not specified is ISAD(G). AtoM maintains several different
standards-based templates (see: Descriptive standards) and there are
currently 2 different CSV import/export templates - the default ISAD(G)
template, and the Canadian RAD template (because there are many different
fields in the RAD template). Other standards-template users (such as
DACS users) are encouraged to use the ISAD template.
The --rows-per-file option can be used when performing large exports, to
break the export into multiple CSV files. You can specify a whole integer
representing the number of rows to be included in a single CSV file, before
the export task will begin a new CSV. When invoking the task, remember to
specify the destination target to a directory, not a filename.
Example use
php symfony csv:export --rows-per-file="1000" /path/to/my/export-directory/
In the above example, when 1000 rows are added to the first CSV, AtoM will export it, and begin a second CSV - and so on.