Import XML
This page describes how to import archival description and authority record data in XML format via the user interface. For descriptions, this includes:
- EAD 2002 XML
- Dublin Core XML
- MODS XML
For authority records, this includes EAC-CPF XML.
See also
AtoM can also import SKOS RDF XML and CSV files. For more information, see:
XML imports in AtoM are are executed as jobs and performed asynchronously in the background to avoid timeouts in the browser. Jobs in AtoM are handled by Gearman, and the status of AtoM jobs can be seen in the user interface via the Manage > Jobs page. For more information, see: Manage jobs and Asynchronous jobs and worker management.
To import XML files, a user must be logged in as an administrator. For more information on user groups and permissions, see:
In addition to importing new records, AtoM can also attempt to identify matches on existing records and delete the matches before importing the new records as replacements. This functionality is currently only available for EAD 2002 and EAC-CPF XML imports. It will be described in greater detail below, along other import options.
Jump to:
Import archival description XML files
AtoM supports the import of EAD 2002, MODS, and simple Dublin Core XML files for archival description data. EAD 2002 XML generally contains an entire descriptive hierarchy, while MODS and DC XML files are limited to single descriptions.
With all XML imports, it is important to be aware of the available fields in the AtoM templates, as not all fields supported by the related metadata standards will necessarily have an equivalent in the current version of the corresponding AtoM templates. Additionally, because EAD 2002 is a very flexible metadata standard that offers users many different but valid ways of representing the same data, not all possible EAD representations will necessarily import as expected into AtoM.
For this reason, it is strongly recommended that you review the AtoM edit templates and the data entry pages in the AtoM documentation, and that you perform a couple test imports of representative samples prior to importing descriptive data into your production AtoM instance. See:
- Archival Descriptions
- ISAD(G) template
- DACS template
- RAD template
- Dublin Core template
- MODS template
For EAD 2002 XML archival description imports, AtoM can also attempt to identify existing top level description records that match the import record, and then delete them before importing the EAD XML as a new record. Further details on this can be found in the section below, Import EAD XML as a replacement for existing records. On new EAD 2002 imports, AtoM can also search for matches on the top-level import and skip the import if a match is found - this can be useful as a sanity check prior to import to ensure you are not accidentally creating duplicate records. In both cases, skipped records are reported in the Job details page of the related import job (see: Manage jobs for more information).
Note
This match checking is only made against the top-level description in the EAD file. Because the user interface currently only supports 1 XML import at a time, this effectively means that if a match is found and the user has enabled the “Skip” option, then the entire import will not proceed.
For more information on the matching criteria used for existing archival descriptions, see below.
Important
XML data can contain other related entities - for example, an EAD 2002 XML archival description may contain references to a repository, creator name (which will be managed as an authority record in AtoM), place/subject/genre access points. On import, AtoM will attempt to match these other entities to existing records (criteria for this will be explained in greater detail below) and link them. Where it does not find a match, AtoM will create new related entities.
This means that your XML description import could end up linking to existing terms, repositories, and authority records, or creating new access point, repository, and authority record data in addition to the descriptions.
Please review the matching criteria below closely prior to import, and be sure to review the results of your import carefully after it is complete. We strongly recommend performing a test import into a separate test instance of AtoM prior to importing directly into your production AtoM site.
Jump to:
- Matching critera for description XML imports
- Import new description XML records
- Import EAD XML as a replacement for existing records
Matching critera for description XML imports
As an archival management system, AtoM’s data model has many different entity types, which can be linked in a number of ways. This supports the reusability of information - for example, rather than recreating the biographical history of a creator in every different collection they are responsible for creating, we can create a single authority record to capture this information and then link it to multiple archival descriptions. You can read more about entity types in AtoM here: Entity types.
XML imports can contain data that AtoM treats as a different entity - meaning that on import, AtoM must decide if if should link these elements to existing entities that seem to match the incoming data, or whether it should use the available data to create new records.
With description XML imports, these elements might include:
- creator information (which AtoM stores as an authority record)
- repository information (which AtoM stores as an archival institution record)
- subject, place, and genre access points (which AtoM maintains as terms in a taxonomy)
- name access points (which AtoM stores as authority records)
When importing a record, the authorized form of name of existing records of other entity types is typically used as the matching criteria. For example, if you import a description that includes a subject access point for “automobiles”, and the term “automobiles” already exists in AtoM’s Subjects taxonomy, then AtoM will re-use the existing term and link to it instead of creating a new subject term. Note that any difference - “automobile” vs “automobiles” (pluralized) will result in a failure to match. When no exact match is found, AtoM will create a new stub record with the available data (generally just the authorized form of name), which you can then supplement later by editing it via the user interface.
Because EAD 2002 files are generally more complex, used more frequently for XML description imports into AtoM than other description XML types, and because they also include the “Delete and replace” import option (described below), they are given special attention in the following sub-sections:
On Authority records and EAD imports
AtoM tries to support the reusability of actor information through the maintenance of authority records that can be linked to archival descriptions and other entities. This, and the rationale for this, is outlined in greater detail in the following sections:
- AtoM, Authority records, Biographical histories, and Access points
- On Name vs. Subject Access Points
This also affects how actor names are handled during an EAD XML import. Some of the key behaviors are outlined below:
Creating new actor records on import
- AtoM looks for creator names in the
<origination>EAD element, and access point names (used as subjects) in<controlaccess>during an EAD import. - Similarly, any Administrative / biographical history data in an archival
description EAD import (i.e. data contained in
the
<bioghist>EAD element) will be mapped to the “History” field (ISAAR-CPF 5.2.2) in the related authority record, (generated from the data contained in the<origination>element of the EAD) and then is presented in AtoM in any related descriptions where the entity is listed as a creator. - Where multiple creator names and histories are included in an import,
<origination>and<bioghist>elements are matched 1:1 in the order they appear in the EAD. - If a
<bioghist>element is included in an EAD import, but no creator name is included, AtoM will still automatically generate a stub authority record and map the<bioghist>data to the “History” field (ISAAR-CPF 5.2.2) - the authority record will be left untitled, until the user manually adds the appropriate name to the authority record. Similarly, if there are more<bioghist>elements included in an import than creator names included in<origination>elements, the final biographical/administrative history will be mapped to an untitled authority record.
Attempting to match to existing authority records
- AtoM will attempt to find matches for current authority records. However, to avoid collisions, or situations in which multiple imports overwrite the same authority record in a multi-repository system, the approach is conservative - for a match to be made and a link to an existing record added instead of a new record being created, there must be an exact match on the authorized form of name.
- If there is no exact match, then AtoM will create a new actor record. Since AtoM does not currently have the capacity to suspend the import and ask the user whether to update an existing authority record or ignore it and create a new one, this method was chosen as the least destructive. However, this means that administrative or biographical histories CANNOT be updated via an import.
- When using the “Delete and replace” update method during an EAD import
(described further in the section below), AtoM
will also check for an exact match on any existing actor’s
biographical/administrative history before linking the incoming
description’s creator to an existing authority record. If the incoming
history in the
<bioghist>element of the EAD XML import file, as well as the authorized form of name (captured in the<origination>element of the incoming EAD record) are not exact matches, then AtoM will create a new authority record instead of linking to the existing one. This is to avoid accidentally overwriting existing authority record data in the case of an undesired match. - This means that the “Delete and replace” update method cannot be used to update existing authority records.
- This also means that users should be careful to double check authority linking behaviors in AtoM following an import, and manually perform any desired adjustments where needed.
Skipping records and finding archival description matches
With EAD 2002 XML imports, users have a few additional options. For imports of new records, users can select an option to “Skip matched records”. Additionally, AtoM can attempt to identify top-level matches and then delete them before importing the new EAD XML as a replacement. For more details, see below, Import EAD XML as a replacement for existing records.
When identifying archival description matches among existing records, AtoM will look for a match on the title, identifier, and the associated repository’s authorized form of name. If all of these criteria are not matched - e.g. if the identifier is different - then the record will not be considered a match, and depending on other user import settings, the incoming EAD file will either be skipped, or will be imported as a new record without deleting the previous record. This conservative approach is to avoid accidentally deleting near matches in a multi-repository system.
This means that you cannot use the “Delete and replace” method described below to update the title, identifier, or related repository of an archival unit. If the update file contains different information for these fields, then AtoM will fail to identify a match.
Import new description XML records
You can import EAD 2002 XML, MODS XML, or DC XML via the user interface. To do so, you must be logged in as an administrator.
To import description XML records:
- Click on the import menu menu, then click on XML.
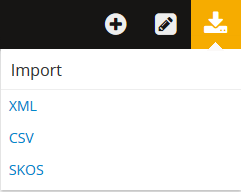
- AtoM will redirect you to the XML import page:
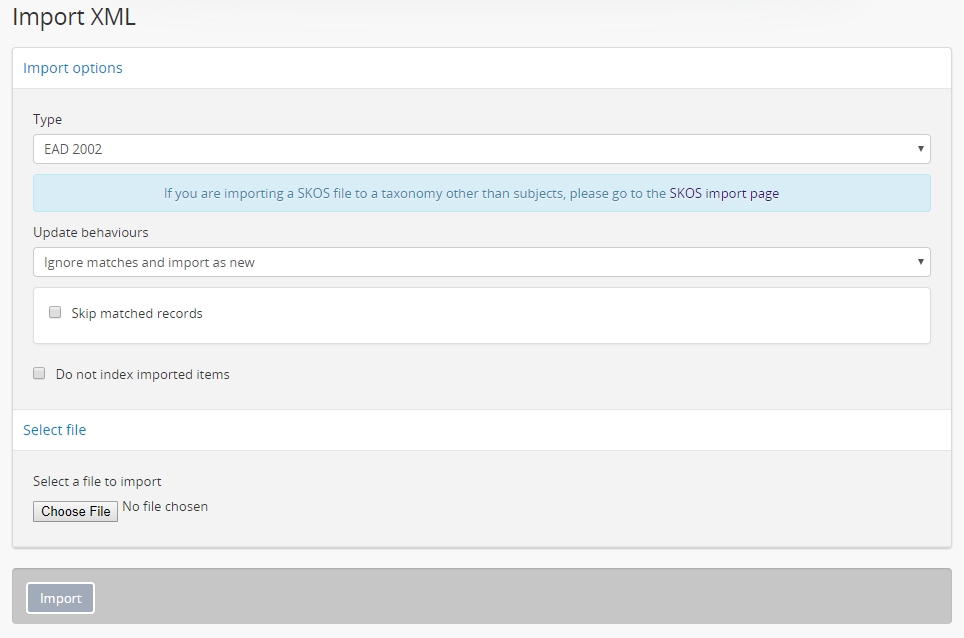
- Use the “Type” drop-down menu to select the XML type you are importing. For archival descriptions, available types are EAD 2002, MODS, and DC.
- If you are importing EAD 2002 XML, then AtoM contains some additional import options, described in steps 5-6 below. If you are importing MODS or DC XML, you can skip ahead to step 7.
- For imports of new EAD 2002 XML descriptions, make sure that the “Update behaviors” drop-down menu is set to “Ignore matches and import as new.”
- AtoM can check for existing records that seem to match the EAD 2002 XML top-level description you are about to import, and skip these record if desired - they will be reported in the Job details page of the related import job (see: Manage jobs for more information). To enable this option and skip matched records, click the checkbox labelled “Skip matched records.”
- If you do not want your files indexed during the import, you can click the checkbox labelled “Do not index imported items.” This will prevent the new records from automatically being added to AtoM’s search index.
Warning
If you do not index your records during import, they will not be discoverable via search or browse in the user interface! You will need to know the exact URL to reach them. To make them visible in the interface again, a system administrator will need to rebuild the search index. See: Populate search index.
- When you have configured your import options, click the “Browse” button to open a window on your local computer. Select the XML file that you would like to import.
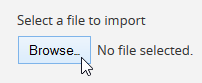
- When you have selected the file from your device, its name will appear next to the “Browse” button. Click the “Import” button located in the button block to begin your import.

Note
Depending on the size of your XML import, this can take some time to complete. Be patient! Remember, you can always check on the status of an import by reviewing the Job details page of the related import job - see: Manage jobs for more information.
- After your import has begun, AtoM will indicate that the import has been initiated. A notification at the top of the page will also provide you with a link to the Job details page of the related import job. Alternatively, you can click the “Back” button in the button block at the bottom of the page to return to the XML import page, or navigate elsewhere in the application.

Tip
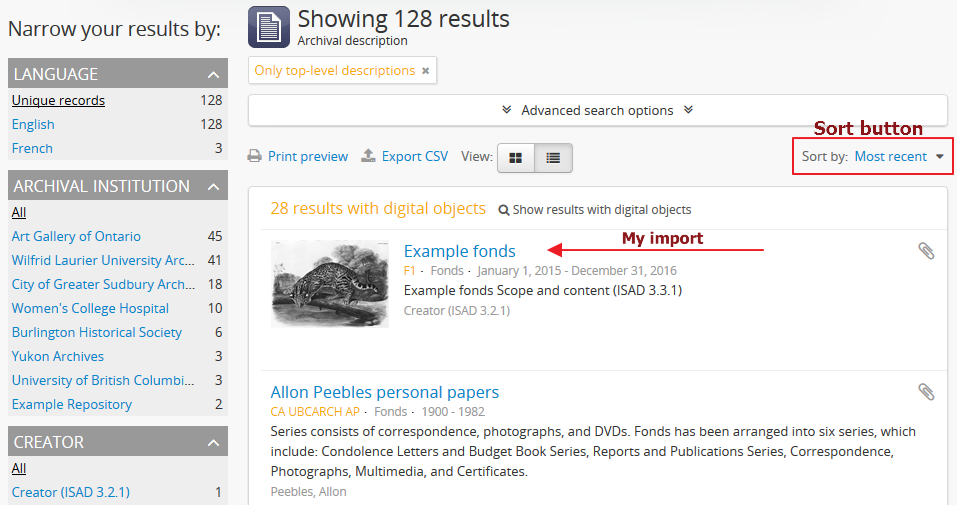
Want to find your recent imports? You can use the sort button located in the top-right hand side of the archival description browse page to change the results display to be ordered by “Most recent” if it is not already - that way, the most recently added or edited descriptions will appear at the top of the results. If you have come directly here after importing your descriptions, they should appear at the top of the results.
Import EAD XML as a replacement for existing records
AtoM can attempt to identify existing top-level archival description records that match the incoming EAD 2002 XML import, and then delete those records before proceeding with the import. This can be a useful way to replace updated records. For more information on the criteria used to identify matches, see above: Skipping records and finding archival description matches.
Note
This method is currently only available for EAD 2002 XML imports. It will not work with MODS or DC XML imports.
CSV imports have 2 methods of performing update imports. For more information, see:
Note that related entities such as linked authority records, terms (such as subject, place, and genre access points), repository records, physical storage locations, etc. are not deleted during this process. The link between them and the deleted archival description(s) is removed, but the related entities are left intact. If you want these removed as well, they will need to be manually deleted via the user interface.
Note as well that the links previously established are also not guaranteed to be re-established during the replacement import. Once the matched description is deleted, AtoM proceeds with the EAD 2002 XML import as a new record. This means that it will link to existing entities or create new linked entities based on the same criteria used for all imports - these are described above: Matching critera for description XML imports.
Tip
When using the “Delete and replace” method, we strongly suggest testing the results in a clone of your AtoM site prior to performing the replacement import in a production system.
To delete matches and import EAD XML replacement records:
- Click on the import menu menu, then click on XML.
- AtoM will redirect you to the XML import page:
- Use the “Type” drop-down menu to select EAD 2002.
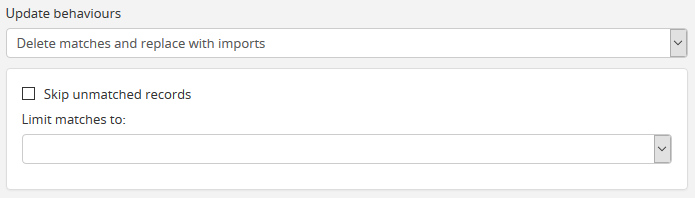
- Set the “Update behaviors” drop-down menu to “Delete matches and replace with imports.”
- AtoM’s default behavior when it cannot find a match during a “Delete and replace” import is to import the XML as new records. However, if you are only importing updates and don’t want to accidentally create duplicate new records when no match is found, you can check the “Skip unmatched records” checkbox. Any unmatched records will not be imported - instead, skipped records will be reported in the Job details page of the related import job (see: Manage jobs for more information).
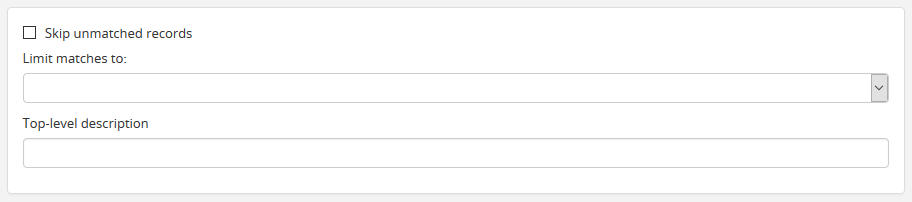
To improve the default matching behavior (described in detail above: Skipping records and finding archival description matches), you can provide further criteria to help AtoM find the correct match. You can limit the matches to either the holdings of a specific repository, or if you are updating a single archival unit, you can limit matches to a specific top-level description. To prevent contradictory options, these limiters are mutually exclusive - you cannot pick a repository AND a top-level description.
To limit your matches to the holdings of a specifc archival institution, use the drop-down menu to select the name of the related institution
To limit your matches to a specific top-level description, place your cursor in the “Top-level description” field and begin to slowly type the name of the top-level description. This field is an autcomplete menu - as you begin to type, AtoM will display matching records in the drop-down menu that will appear below. When you see the top-level description you want to use as a match limit, click on it in the drop-down menu to select it.
If you do not want your files indexed during the import, you can click the checkbox labelled “Do not index imported items.” This will prevent the new records from automatically being added to AtoM’s search index.
Warning
If you do not index your records during import, they will not be discoverable via search or browse in the user interface! You will need to know the exact URL to reach them. To make them visible in the interface again, a system administrator will need to rebuild the search index. See: Populate search index.
- When you have configured your import options, click the “Browse” button to open a window on your local computer. Select the XML file that you would like to import.
- When you have selected the file from your device, its name will appear next to the “Browse” button. Click the “Import” button located in the button block to begin your import.
Note
Depending on the size of your XML import, this can take some time to complete. Be patient! Remember, you can always check on the status of an import by reviewing the Job details page of the related import job - see: Manage jobs for more information.
- After your import has begun, AtoM will indicate that the import has been initiated. A notification at the top of the page will also provide you with a link to the Job details page of the related import job. Alternatively, you can click the “Back” button in the button block at the bottom of the page to return to the XML import page, or navigate elsewhere in the application.
Tip
Want to find your recent imports? You can use the sort button located in the top-right hand side of the archival description browse page to change the results display to be ordered by “Most recent” if it is not already - that way, the most recently added or edited descriptions will appear at the top of the results. If you have come directly here after importing your descriptions, they should appear at the top of the results.
Importing authority record XML files
AtoM supports the import of EAC-CPF XML as a means of creating authority record data. As with most XML standards, EAC-CPF is a flexible standard with many different but valid implementations possible - not all of which will be supported by AtoM’s import module. For this reason, we strongly recommend that you review the available fields in the AtoM authority record edit template, which is based on the International Council on Archive’s ISAAR-CPF standard. See:
AtoM can also attempt to identify existing authority records that match the import record, and then delete them before importing the EAC-CPF XML as a new record. Further details on this can be found in the section below, Import EAC-CPF XML as a replacement for an existing authority record. On new EAC-CPF imports, AtoM can also search for existing matches and skip the import if a match is found - this can be useful as a sanity check prior to import to ensure you are not accidentally creating duplicate records. In both cases, skipped records are reported in the Job details page of the related import job (see: Manage jobs for more information).
Important
XML data can contain other related entities - for example, an EAC-CPF XML authority record may contain references to other related authority records, or linked archival description records. The import might also contain access point data such as an Actor Occupation access point. In most cases, on import AtoM will attempt to match these other entities to existing records (criteria for this will be explained in greater detail below) and link them. Where it does not find a match, AtoM will create new related entities.
For links to related archival descriptions, AtoM does not have the ability to look for existing matches, and will therefore create new stub archival description records on import if there is information about related descriptions in your import EAC-CPF XML.
This means that your XML description import could end up linking to existing terms, repositories, and authority records, and/or creating new records for various entity types on import!
Please review the matching criteria below closely prior to import, and be sure to review the results of your import carefully after it is complete. We strongly recommend performing a test import into a separate test instance of AtoM prior to importing directly into your production AtoM site. We also suggest removing any references to related archival descriptions from the EAC-CPF prior to import. If you want to import and link authority records and descriptions, import the authority records first, and then the archival descriptions - you can see the linking criteria from archival descriptions to authority records in the section on archival description imports above: On Authority records and EAD imports.
Below you’ll find information on the matching criteria for authority record imports, how to import new authority record data, and how to identify and delete an existing authority record to replace it with an EAC CPF XML import.
Jump to:
- Matching criteria for EAC-CPF XML imports
- Importing new authority record XML files
- Import EAC-CPF XML as a replacement for an existing authority record
See also
Authority records can also be imported and updated as CSV data - see:
- Prepare authority records for CSV import
- Import new authority records via CSV
- Update authority records via CSV import
You can also import EAC-CPF XML data in bulk via the command-line. For more information, see in the Administrator’s manual:
Matching criteria for EAC-CPF XML imports
AtoM can attempt to identify existing authority records that match the import record, and then delete them before importing the EAC-CPF XML as a new record. Further details on using this can be found in the section below, Import EAC-CPF XML as a replacement for an existing authority record. On new EAC-CPF imports, AtoM can also search for existing matches and skip the import if a match is found - this can be useful as a sanity check prior to import to ensure you are not accidentally creating duplicate records. In both cases, skipped records are reported in the Job details page of the related import job (see: Manage jobs for more information).
To identify matching authority records, AtoM uses compares the authorized form of name of the existing authority records against the import data. This means that the “Delete and replace” method will fail to identify a match if you are attempting to use it to update the authorized form of name of an authority record.
You can also add an additional criteria to improve the likelihood of finding the correct match. If you have linked your authority record to a repository as its maintainer, then you can set this as a limiting option on the match. In this case, AtoM will check for a match on the authorized form of name of existing authority records, and then will also check to see if any matches are also linked to the selected repository. For more information on linking an authority record to an archival institution (a.k.a. a repository), see:
If there are other related entities in the incoming EAC-CPF XML (such as Occupation access point terms), then AtoM will look for existing terms based on the authorized form of name - if none are found, AtoM will create new records for these related entities.
Important
Currently AtoM does not check for existing matches on related archival descriptions. If your EAC-CPF XML includes information on related descriptions, AtoM will end up creating stub archival description records based on the data in the EAC-CPF record, even if there is an exact match on title among your existing descriptions!
We strongly recommend performing a test import into a separate test instance of AtoM prior to importing directly into your production AtoM site. We also suggest removing any references to related archival descriptions from the EAC-CPF prior to import. If you want to import and link authority records and descriptions, import the authority records first, and then the archival descriptions - you can see the linking criteria from archival descriptions to authority records in the section on archival description imports above: On Authority records and EAD imports.
Importing new authority record XML files
You can import EAC-CPF XML via the user interface. To do so, you must be logged in as an administrator.
To import authority record XML records:
- Click on the import menu menu, then click on XML.
- AtoM will redirect you to the XML import page:
- Use the “Type” drop-down menu to select the XML type you are importing. For authority records, select “EAC CPF” from the menu.
- For imports of new EAC-CPF XML data, make sure that the “Update behaviors” drop-down menu is set to “Ignore matches and import as new.”
- AtoM can check for existing records that seem to match the EAC-CPF XML authority record you are about to import, and skip the import if a match is found - it will be reported in the Job details page of the related import job (see: Manage jobs for more information). To enable this option and skip matched records, click the checkbox labelled “Skip matched records.”
- If you do not want your files indexed during the import, you can click the checkbox labelled “Do not index imported items.” This will prevent the new records from automatically being added to AtoM’s search index.
Warning
If you do not index your records during import, they will not be discoverable via search or browse in the user interface! You will need to know the exact URL to reach them. To make them visible in the interface again, a system administrator will need to rebuild the search index. See: Populate search index.
- When you have configured your import options, click the “Browse” button to open a window on your local computer. Select the XML file that you would like to import.
- When you have selected the file from your device, its name will appear next to the “Browse” button. Click the “Import” button located in the button block to begin your import.
Note
Depending on the size of your XML import, this can take some time to complete. Be patient! Remember, you can always check on the status of an import by reviewing the Job details page of the related import job - see: Manage jobs for more information.
- After your import has begun, AtoM will indicate that the import has been initiated. A notification at the top of the page will also provide you with a link to the Job details page of the related import job. Alternatively, you can click the “Back” button in the button block at the bottom of the page to return to the XML import page, or navigate elsewhere in the application.
Import EAC-CPF XML as a replacement for an existing authority record
AtoM can attempt to identify existing authority records that match the incoming EAC-CPF XML import, and then delete the existing matched record before proceeding with the import. This can be a useful way to replace updated records. For more information on the criteria used to identify matches, see above: Matching criteria for EAC-CPF XML imports.
Note
CSV imports have 2 methods of performing update imports. For more information, see:
Note that related entities such as linked authority records, terms (such as subject, place, and genre access points), repository records, or archival descriptions, etc. are not deleted during this process. The link between them and the deleted authority record is removed, but the related entities are left intact. If you want these removed as well, they will need to be manually deleted via the user interface.
Note as well that the links previously established are also not guaranteed to be re-established during the replacement import. Once the matched authority record is deleted, AtoM proceeds with the EAC-CPF XML import as a new record. This means that it will link to existing entities or create new linked entities based on the same criteria used for all imports - these are described above: Matching criteria for EAC-CPF XML imports.
Tip
When using the “Delete and replace” method, we strongly suggest testing the results in a clone of your AtoM site prior to performing the replacement import in a production system.
To delete matches and import EAC-CPF XML replacement records:
- Click on the import menu menu, then click on XML.
- AtoM will redirect you to the XML import page:
- Use the “Type” drop-down menu to select the XML type you are importing. For authority records, select “EAC CPF” from the menu.
- Set the “Update behaviors” drop-down menu to “Delete matches and replace with imports.”
- AtoM’s default behavior when it cannot find a match during a “Delete and replace” import is to import the EAC-CPF XML as a new record. However, if you are only importing updates and don’t want to accidentally create a duplicate new record when no match is found, you can check the “Skip unmatched records” checkbox. Any unmatched records will not be imported - instead, skipped records will be reported in the Job details page of the related import job (see: Manage jobs for more information).
To improve the default matching behavior (described in detail above: Matching criteria for EAC-CPF XML imports), you can provide further criteria to help AtoM find the correct match. You can limit the authority record matches to only those which have been linked to a specifc archival institution as the maintainer - records that have no link to a repository, or to a different repository, will be ignored. For more information on linking an authority record to a repository, see: Link an authority record to a repository as its maintainer.
To limit your matches to authority records maintained by a specifc archival institution, use the drop-down menu to select the name of the related institution.
If you do not want your files indexed during the import, you can click the checkbox labelled “Do not index imported items.” This will prevent the new records from automatically being added to AtoM’s search index.
Warning
If you do not index your records during import, they will not be discoverable via search or browse in the user interface! You will need to know the exact URL to reach them. To make them visible in the interface again, a system administrator will need to rebuild the search index. See: Populate search index.
- When you have configured your import options, click the “Browse” button to open a window on your local computer. Select the XML file that you would like to import.
- When you have selected the file from your device, its name will appear next to the “Browse” button. Click the “Import” button located in the button block to begin your import.
Note
Depending on the size of your XML import, this can take some time to complete. Be patient! Remember, you can always check on the status of an import by reviewing the Job details page of the related import job - see: Manage jobs for more information.
- After your import has begun, AtoM will indicate that the import has been initiated. A notification at the top of the page will also provide you with a link to the Job details page of the related import job. Alternatively, you can click the “Back” button in the button block at the bottom of the page to return to the XML import page, or navigate elsewhere in the application.