Settings
This section describes how to customize your AtoM application to the specific requirements of your own institution or network.
Below, you will find information on the following information areas:
- Global settings
- Clipboard settings
- DIP upload
- Default page elements
- Default templates
- Digital object derivatives
- Finding aid
- Add/Remove languages
- Identifier settings
- Inventory
- Markdown settings
- OAI repository
- Permissions
- Privacy notification
- Security panel
- Site information
- Treeview settings
- User interface labels
Each of the settings areas listed above is accessible via a list of links on the left-hand side of the settings page. Click on the appropriate link, and click save after making your changes. A notification will appear confirming that your changes have been saved.
Choose the settings area you wish to view/edit by clicking a link in the menu on the left-hand side, click “Save” when you’ve made your changes.
By default, users will first be shown the Global settings when first arriving on the Settings page. Otherwise, Settings are organized in the left-hand menu alphabetically.
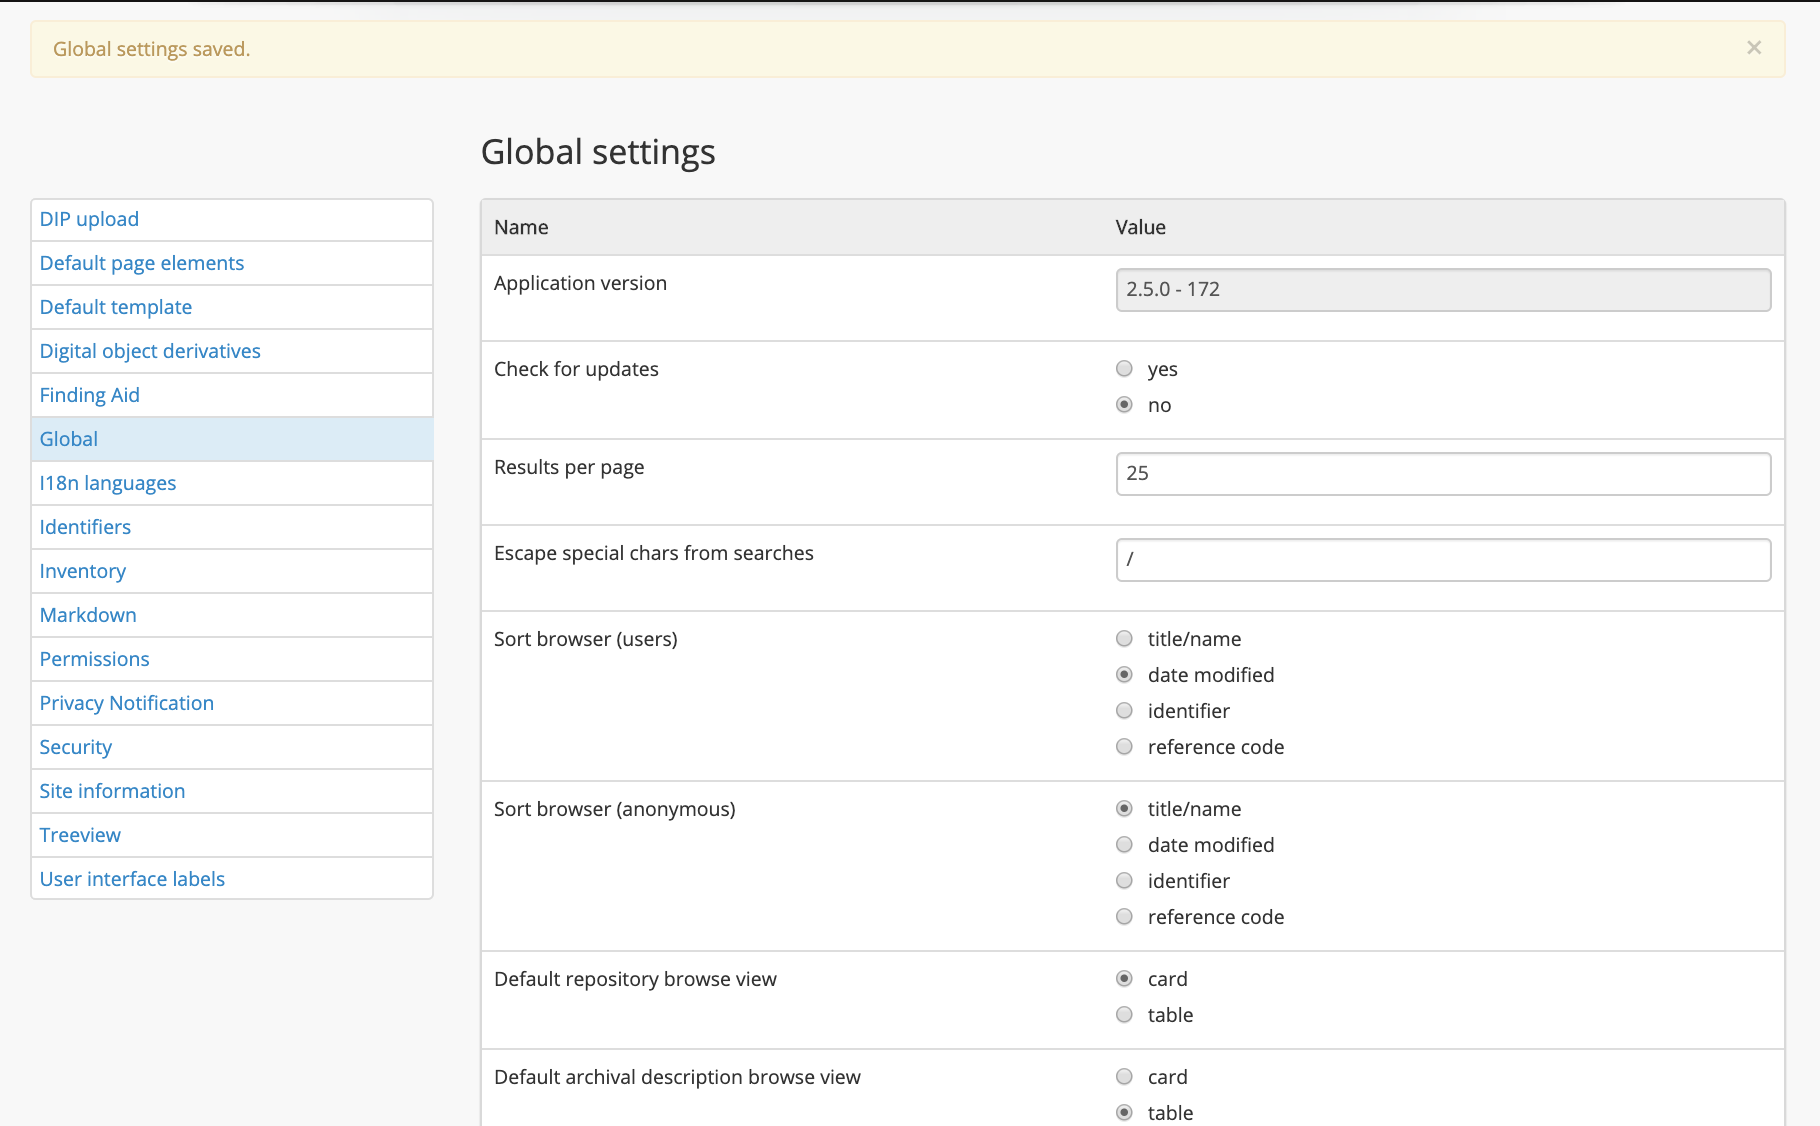
Global settings
Global settings allow administrators to control certain aspects of how AtoM appears and behaves.
To access the “Settings” menu in AtoM, click on the  Admin
menu in the main menu located in the
header bar and select “Settings” from the drop-down menu. You
will be redirected to the “Site Settings”, where a number of information
areas, including the “Global” settings, which should be
opened first by default.
Admin
menu in the main menu located in the
header bar and select “Settings” from the drop-down menu. You
will be redirected to the “Site Settings”, where a number of information
areas, including the “Global” settings, which should be
opened first by default.
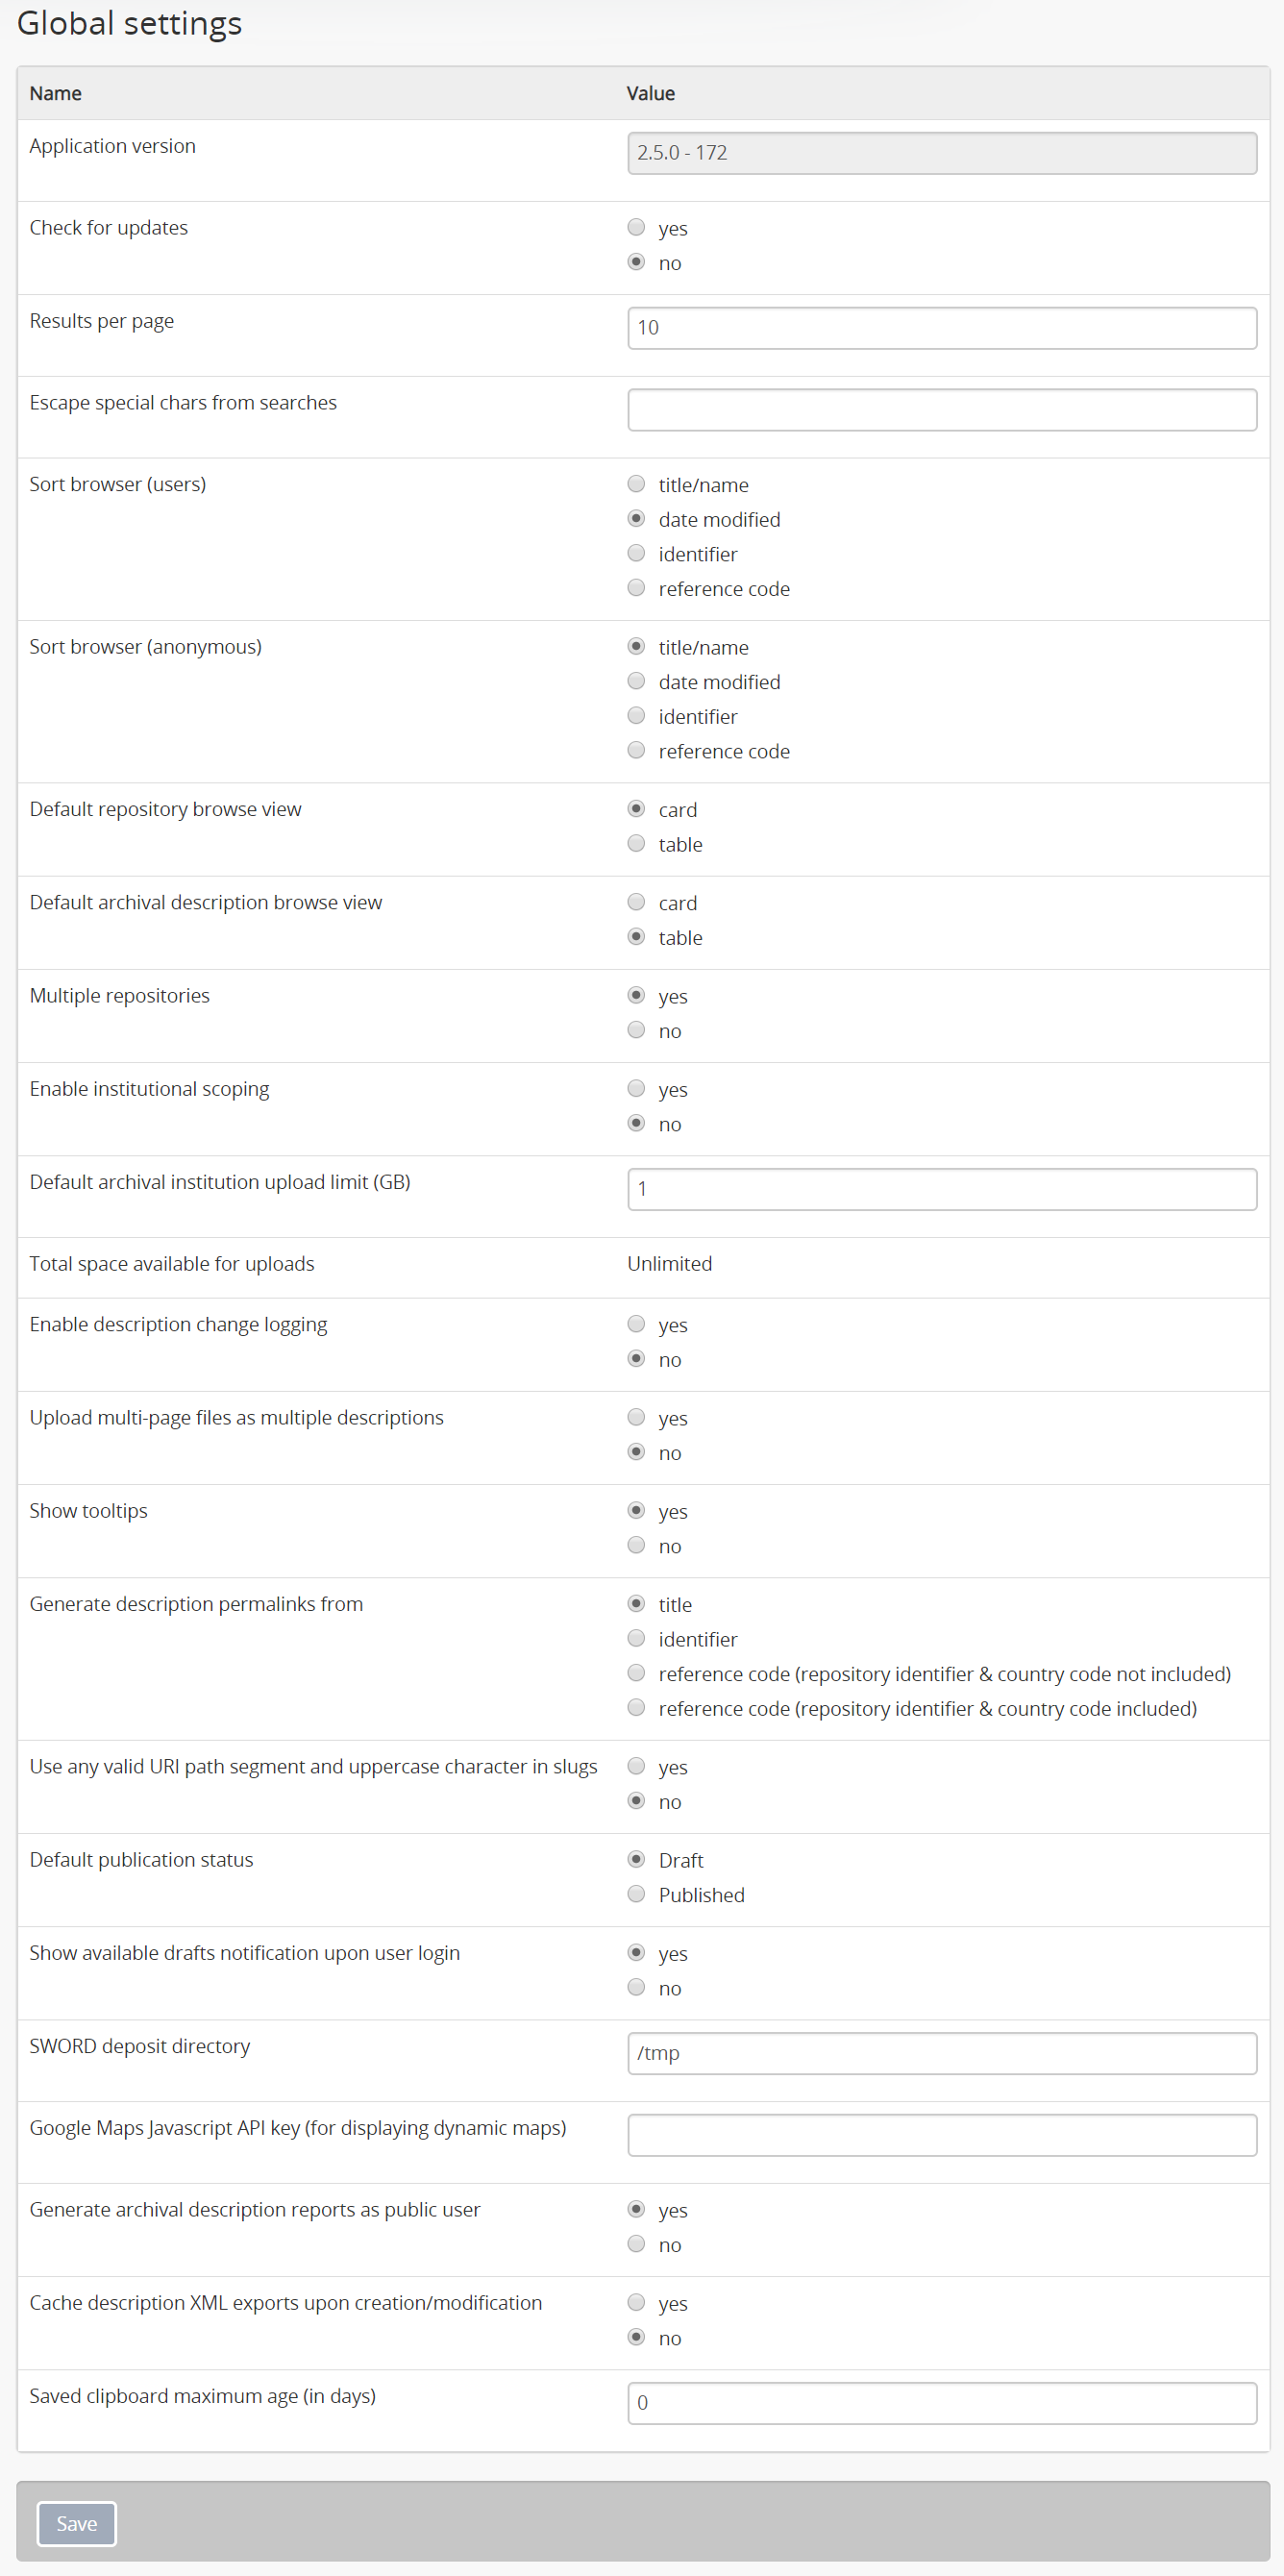
This section will describe each setting in the “Global” information area.
Jump to:
- Application version
- Check for updates
- Results per page
- Escape special characters from searches
- Sort browser (users)
- Sort browser (anonymous)
- Default repository browse view
- Default archival description browse view
- Multiple repositories
- Enable institutional scoping
- Default archival institution upload limit
- Total space available for uploads
- Enable description change logging
- Upload multi-page files as multiple descriptions
- Show tooltips
- Generate description permalinks from
- Use any valid URI path segment and uppercase character in slugs
- Default publication status
- Show available drafts notification upon user login
- SWORD deposit directory
- Cache description XML exports upon creation/modification
- Saved clipboard maximum age
Hovering over each setting field will also provide additional information on that field - it will appear in an “information box” below your cursor.
When making changes to the global settings in AtoM, don’t forget to click the “Save” button in the button block, located at the bottom of the “Global” settings information area.
Application version
This field shows the current version of the software. The value cannot be edited but is automatically updated when AtoM is upgraded to a newer release.
The second number after the dash represents the database schema version. This can be useful information to include in a support message if you are experiencing unexpected issues with your installation - if a system administrator forgets to run the upgrade task as part of a site upgrade this can lead to missing tables and/or columns in the database, which can cause unexpected errors later when trying to use AtoM.
For more information on installing AtoM and searching for different versions, see:
- Installing AtoM with:
- Upgrading
- Check for updates
Check for updates
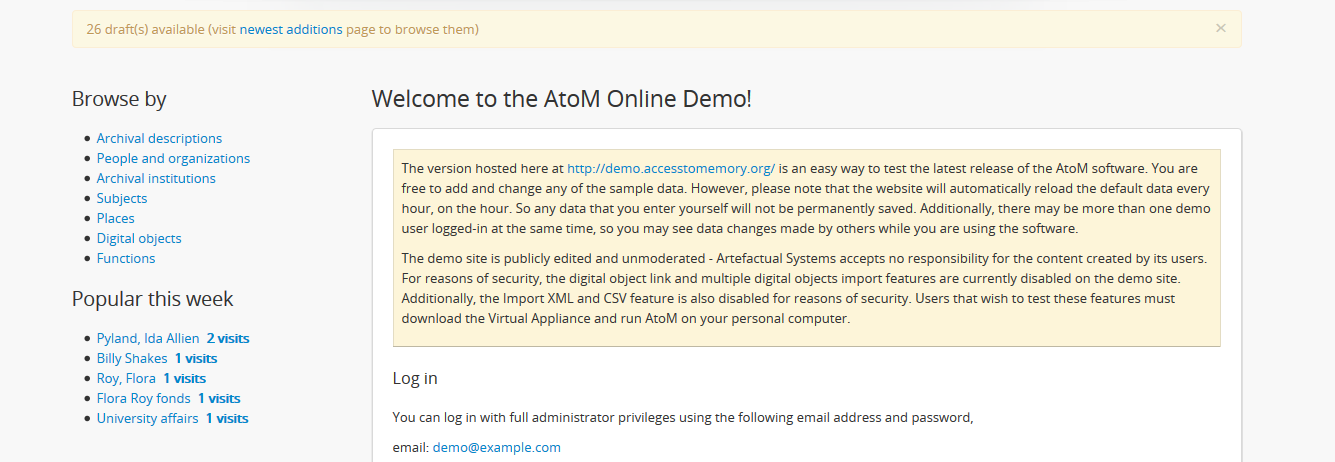
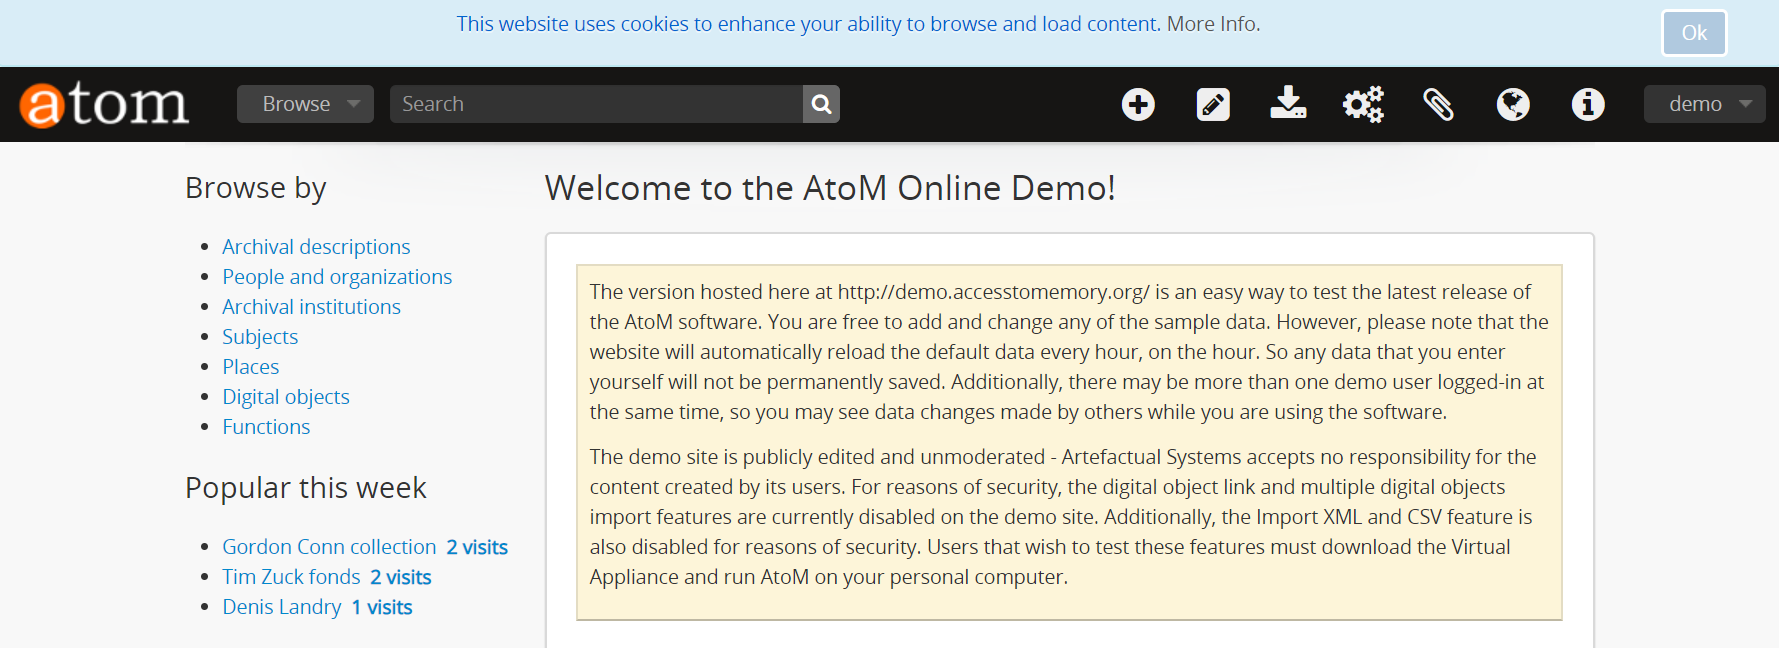
If yes is selected, authenticated (i.e. logged in) users will automatically receive a notification if a newer version of the AtoM software has been released and can be installed. This notification will appear in the browser for authenticated (i.e. logged in) users, as an orange bar across the top of the application alerting users to the newest release available.
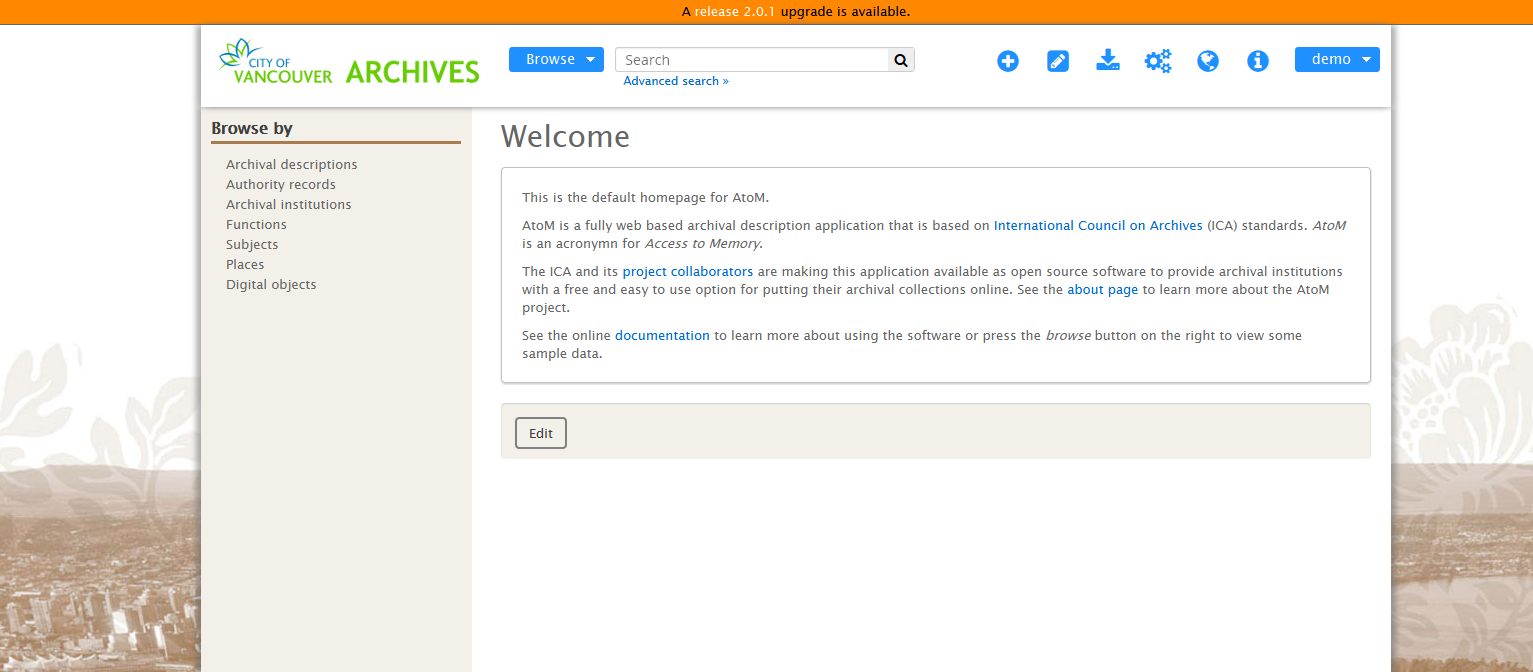
This image shows a themed AtoM installation at the City of Vancouver Archives, showing an update notification in orange at the top of the screen. Only authenticated users will see this notification.
For more information on updates, see:
Results per page
By default, AtoM lists objects in list pages and search results ten at a time, with a pager at the bottom of the page to allow users to navigate through long lists of objects. Administrators can increase or decrease this default number. Note that the minimum accepted value is 5 results per page, and the max value is 100.
For more information on navigating in AtoM, see Searching in AtoM and Navigating in AtoM.
Note
Editing this number to display a large number of results per page may affect page load times.
Escape special characters from searches
This setting allows users to define special characters that should be escaped when performing a search, to avoid errors.
AtoM uses Elasticsearch (ES)
as its search index. In ES, certain characters are normally reserved to be used as
operators in advanced searching - for more information, see:
Advanced search using the AtoM Search box - particularly,
Boolean operators. Normally, if you want to perform a search using
these special characters without them being interpreted as operators, then
you need to manually escape them with a \ leading backslash character. From
the ES documentation:
If you need to use any of the characters which function as operators in your query itself (and not as operators), then you should escape them with a leading backslash. For instance, to search for
(1+1)=2, you would need to write your query as\(1\+1\)\=2.The reserved characters are:
+ - = && || > < ! ( ) { } [ ] ^ " ~ * ? : \ /Failing to escape these special characters correctly could lead to a syntax error which prevents your query from running.
Many institutions prefer to use a / slash character as the default
Reference code separator. This can lead to errors for users trying to
search for full reference code strings. However, with this setting, you can
define characters (such as the /) that you wish to be automatically escaped
when a search string is submitted as a query.
You can add multiple escape characters to the field by separating them with commas:

Important
It is important to understand how searching works in AtoM’s ES index, to understand the consequences of escaping special characters and how it might affect search results.
ES will automatically tokenize a search string - that is, when submitting a
string such as city hall as a search, it is automatically broken into
tokens that can be searched individually and weighted for relevance when
returning results. So, city hall automatically becomes city AND
hall - that is, return records that have both city AND hall in
them. By default, spaces as well as some punctuation marks are interpreted
as breaking points between tokens, and are removed when searching to
prevent too many poor results from being returned - so for example,
city-hall would also be submitted as city hall, and searched as
city AND hall.
When you escape a special character, you are essentially telling AtoM to
ignore it in the search - so it effectively becomes a white space. Thus, a
reference code search for 01/02/03/04, when / is escaped, becomes a
command to return results that include 01 AND 02 AND 03 AND 04. This
means that you may still see unexpected results returned.
Note that users can still search for an exact string by using quotations. The special character will still be escaped and removed, but with quotations, exact order and proximity are also taken into account, producing better results.
For more search tips and tricks, see:
- Advanced search using the AtoM Search box
- Boolean operators
- Searching for phrases
- Expert searching and indexed Elasticsearch fields
You can see what Elasticsearch tokenizers and filters are implemented in AtoM in the following file:
Sort browser (users)
This setting controls the default sort order of records shown on Browse pages in AtoM - specifically, archival description results. Sorting can always be changed by users via the sort button available on related search and browse pages, but an administrator can use this setting to control the default sort when arriving on the page for the first time.
Administrators can configure default sort order for the browse display for both authenticated (i.e. logged in) and unauthenticated (i.e. public) users - this setting controls the default sort of records for logged in users, while the setting described below, Sort browser (anonymous), affects the default sort for public users.
Options available include:
- Title/name: An “alphabetic” A-Z sort (but see the IMPORTANT admonition below) based on the title or authorized form of name
- Date modified: Will sort based on the date the records were created or last modified.
- Identifier: A-Z (but see the IMPORTANT admonition below) based on the unique identifier value added to the record
- Reference code: A-Z (but see the IMPORTANT admonition below) based on the reference code associated with the description. See the related setting, Inherit reference code (information object) for more information.
Important
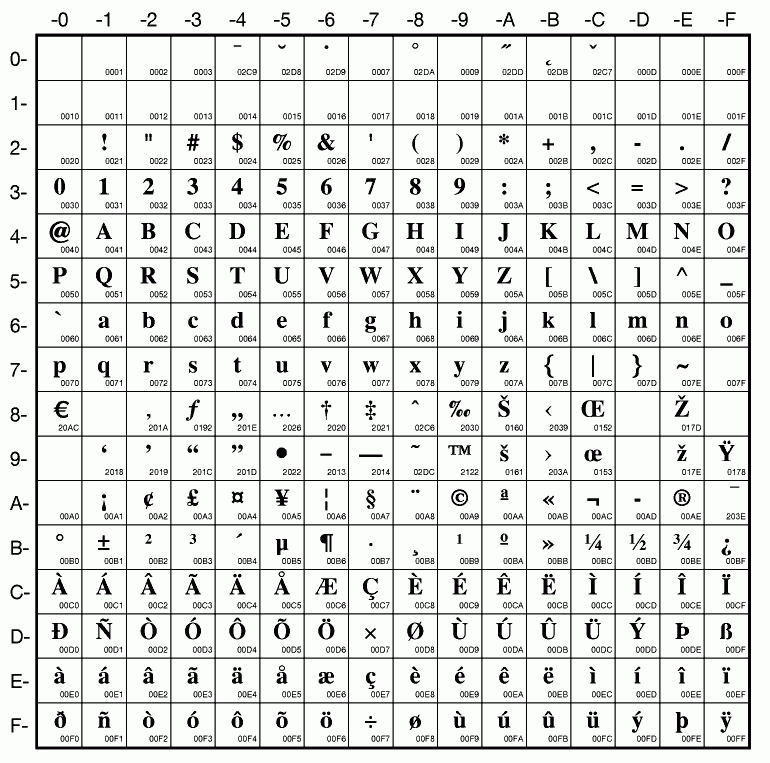
The Title/name, Identifier, and Reference code sorts are all based on what is sometimes known as ASCII sort - that is, the sort is not a true alphabetic sort as humans think of it, but rather as computers do.
Elasticsearch does not naturally apply alphabetic sort in a human-friendly way (what is often known as “natural sort” in computer science) - instead, it applies what is known as ASCII sort, based on the order of the characters in the ASCII character encoding scheme. Consequently, some results may appear out of order, depending on how the values have been entered. Artefactual hopes to improve sorting in AtoM for future releases. In the meantime, below is an image of an ASCII table - sort order is determined based on this schema - so that a description whose title starts with “A” will be preceded by one starting with a number, which in turn will be preceded by one beginning with a quotation mark, which will be preceded by a description that begins with a space before its first character. If you are concerned about sort order, be sure to consider this when naming your records.
By default in a new installation, the sort order is set to “Last updated” for authenticated users. However, users have the option to reorder the page while browsing via the sort button located at the top of most browse pages.
Sort browser (anonymous)
This setting controls the default sort order of records shown on Browse pages in AtoM - specifically, archival description results. Sorting can always be changed by users via the sort button available on related search and browse pages, but an administrator can use this setting to control the default sort when arriving on the page for the first time.
Administrators can configure default sort order for the browse display for both authenticated (i.e. logged in) and unauthenticated (i.e. public) users - this setting controls the default sort of records for public (i.e. anonymous; unauthenticated) users, while the setting described above, Sort browser (users), affects the default sort for logged in users.
Options available include:
- Title/name: An “alphabetic” A-Z sort (but see the IMPORTANT admonition below) based on the title or authorized form of name
- Date modified: Will sort based on the date the records were created or last modified.
- Identifier: A-Z (but see the IMPORTANT admonition below) based on the unique identifier value added to the record
- Reference code: A-Z (but see the IMPORTANT admonition below) based on the reference code associated with the description. See the related setting, Inherit reference code (information object) for more information.
Important
The Title/name, Identifier, and Reference code sorts are all based on what is sometimes known as ASCII sort - that is, the sort is not a true alphabetic sort as humans think of it, but rather as computers do.
Elasticsearch does not naturally apply alphabetic sort in a human-friendly way (what is often known as “natural sort” in computer science) - instead, it applies what is known as ASCII sort, based on the order of the characters in the ASCII character encoding scheme. Consequently, some results may appear out of order, depending on how the values have been entered. Artefactual hopes to improve sorting in AtoM for future releases. In the meantime, below is an image of an ASCII table - sort order is determined based on this schema - so that a description whose title starts with “A” will be preceded by one starting with a number, which in turn will be preceded by one beginning with a quotation mark, which will be preceded by a description that begins with a space before its first character. If you are concerned about sort order, be sure to consider this when naming your records.
By default in a new installation, the sort order is set to “Alphabetic” for public users. However, users have the option to reorder the page while browsing via the sort button located at the top of most browse pages.
Default repository browse view
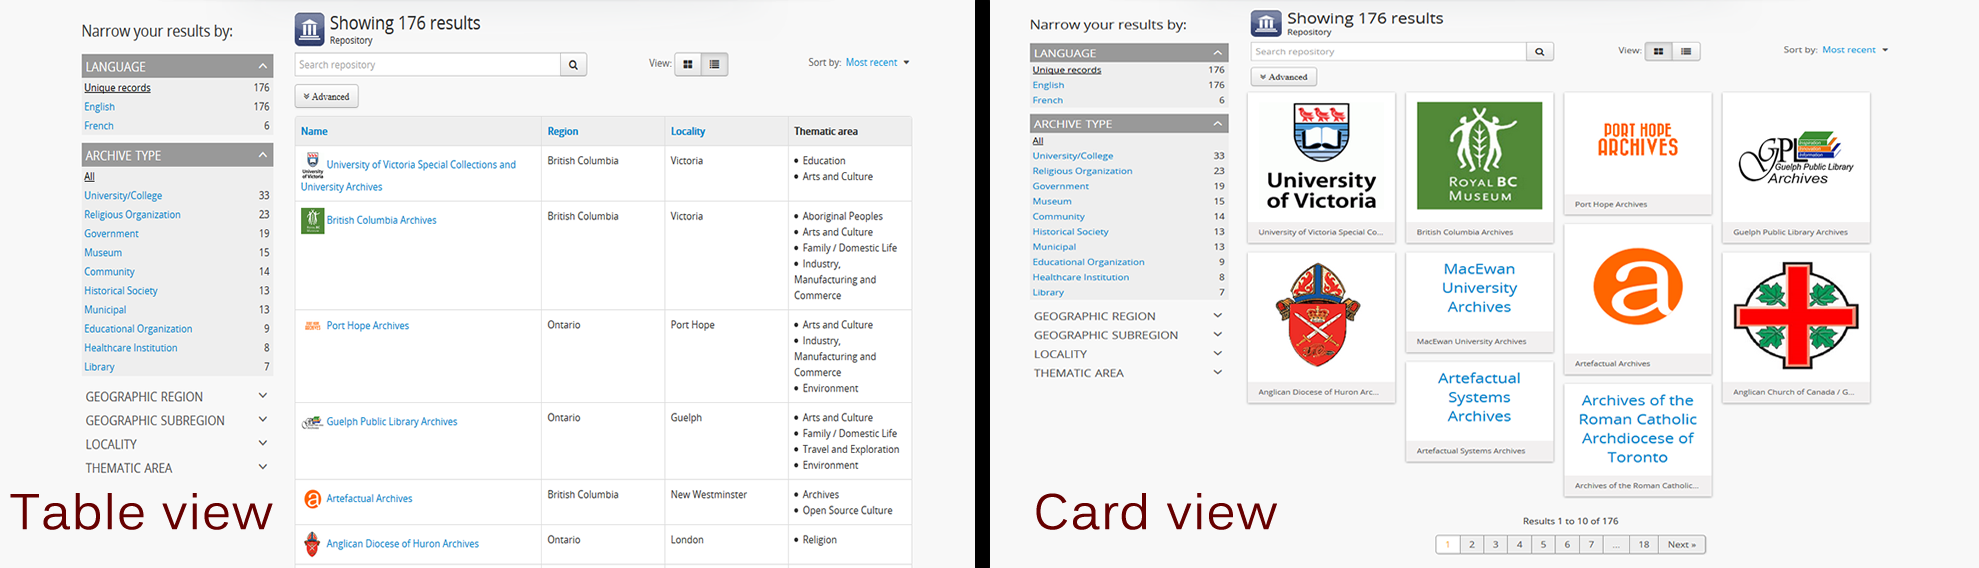
This setting will determine if the “card view” or the “table view” is the default view for the archival institution browse page, when users first arrive on the page. By default in a new installation, this setting is set to “card.”
Tip
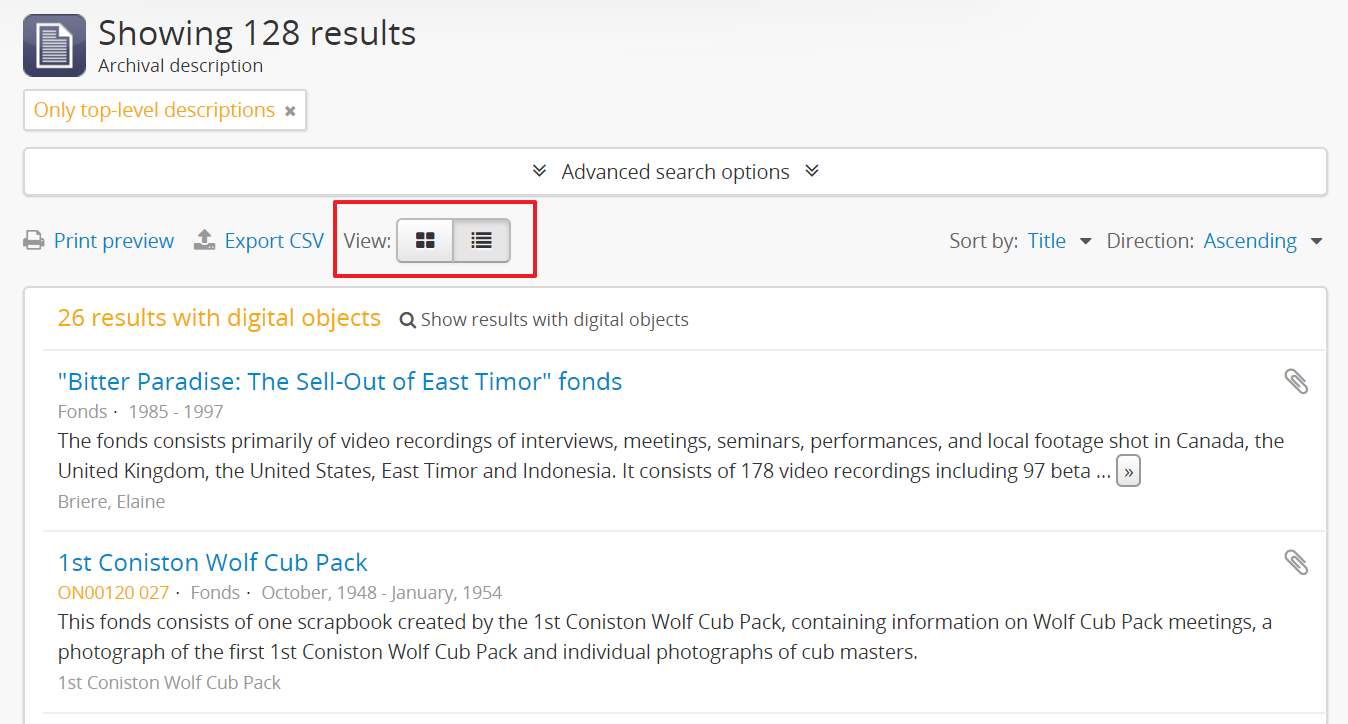
Regardless of which setting you choose, any user can easily toggle between the card view and the table view on the archival institution browse page, using the view toggle button that appears to the right of the archival institution search box:

For more information on working with archival institutions, see:
Default archival description browse view
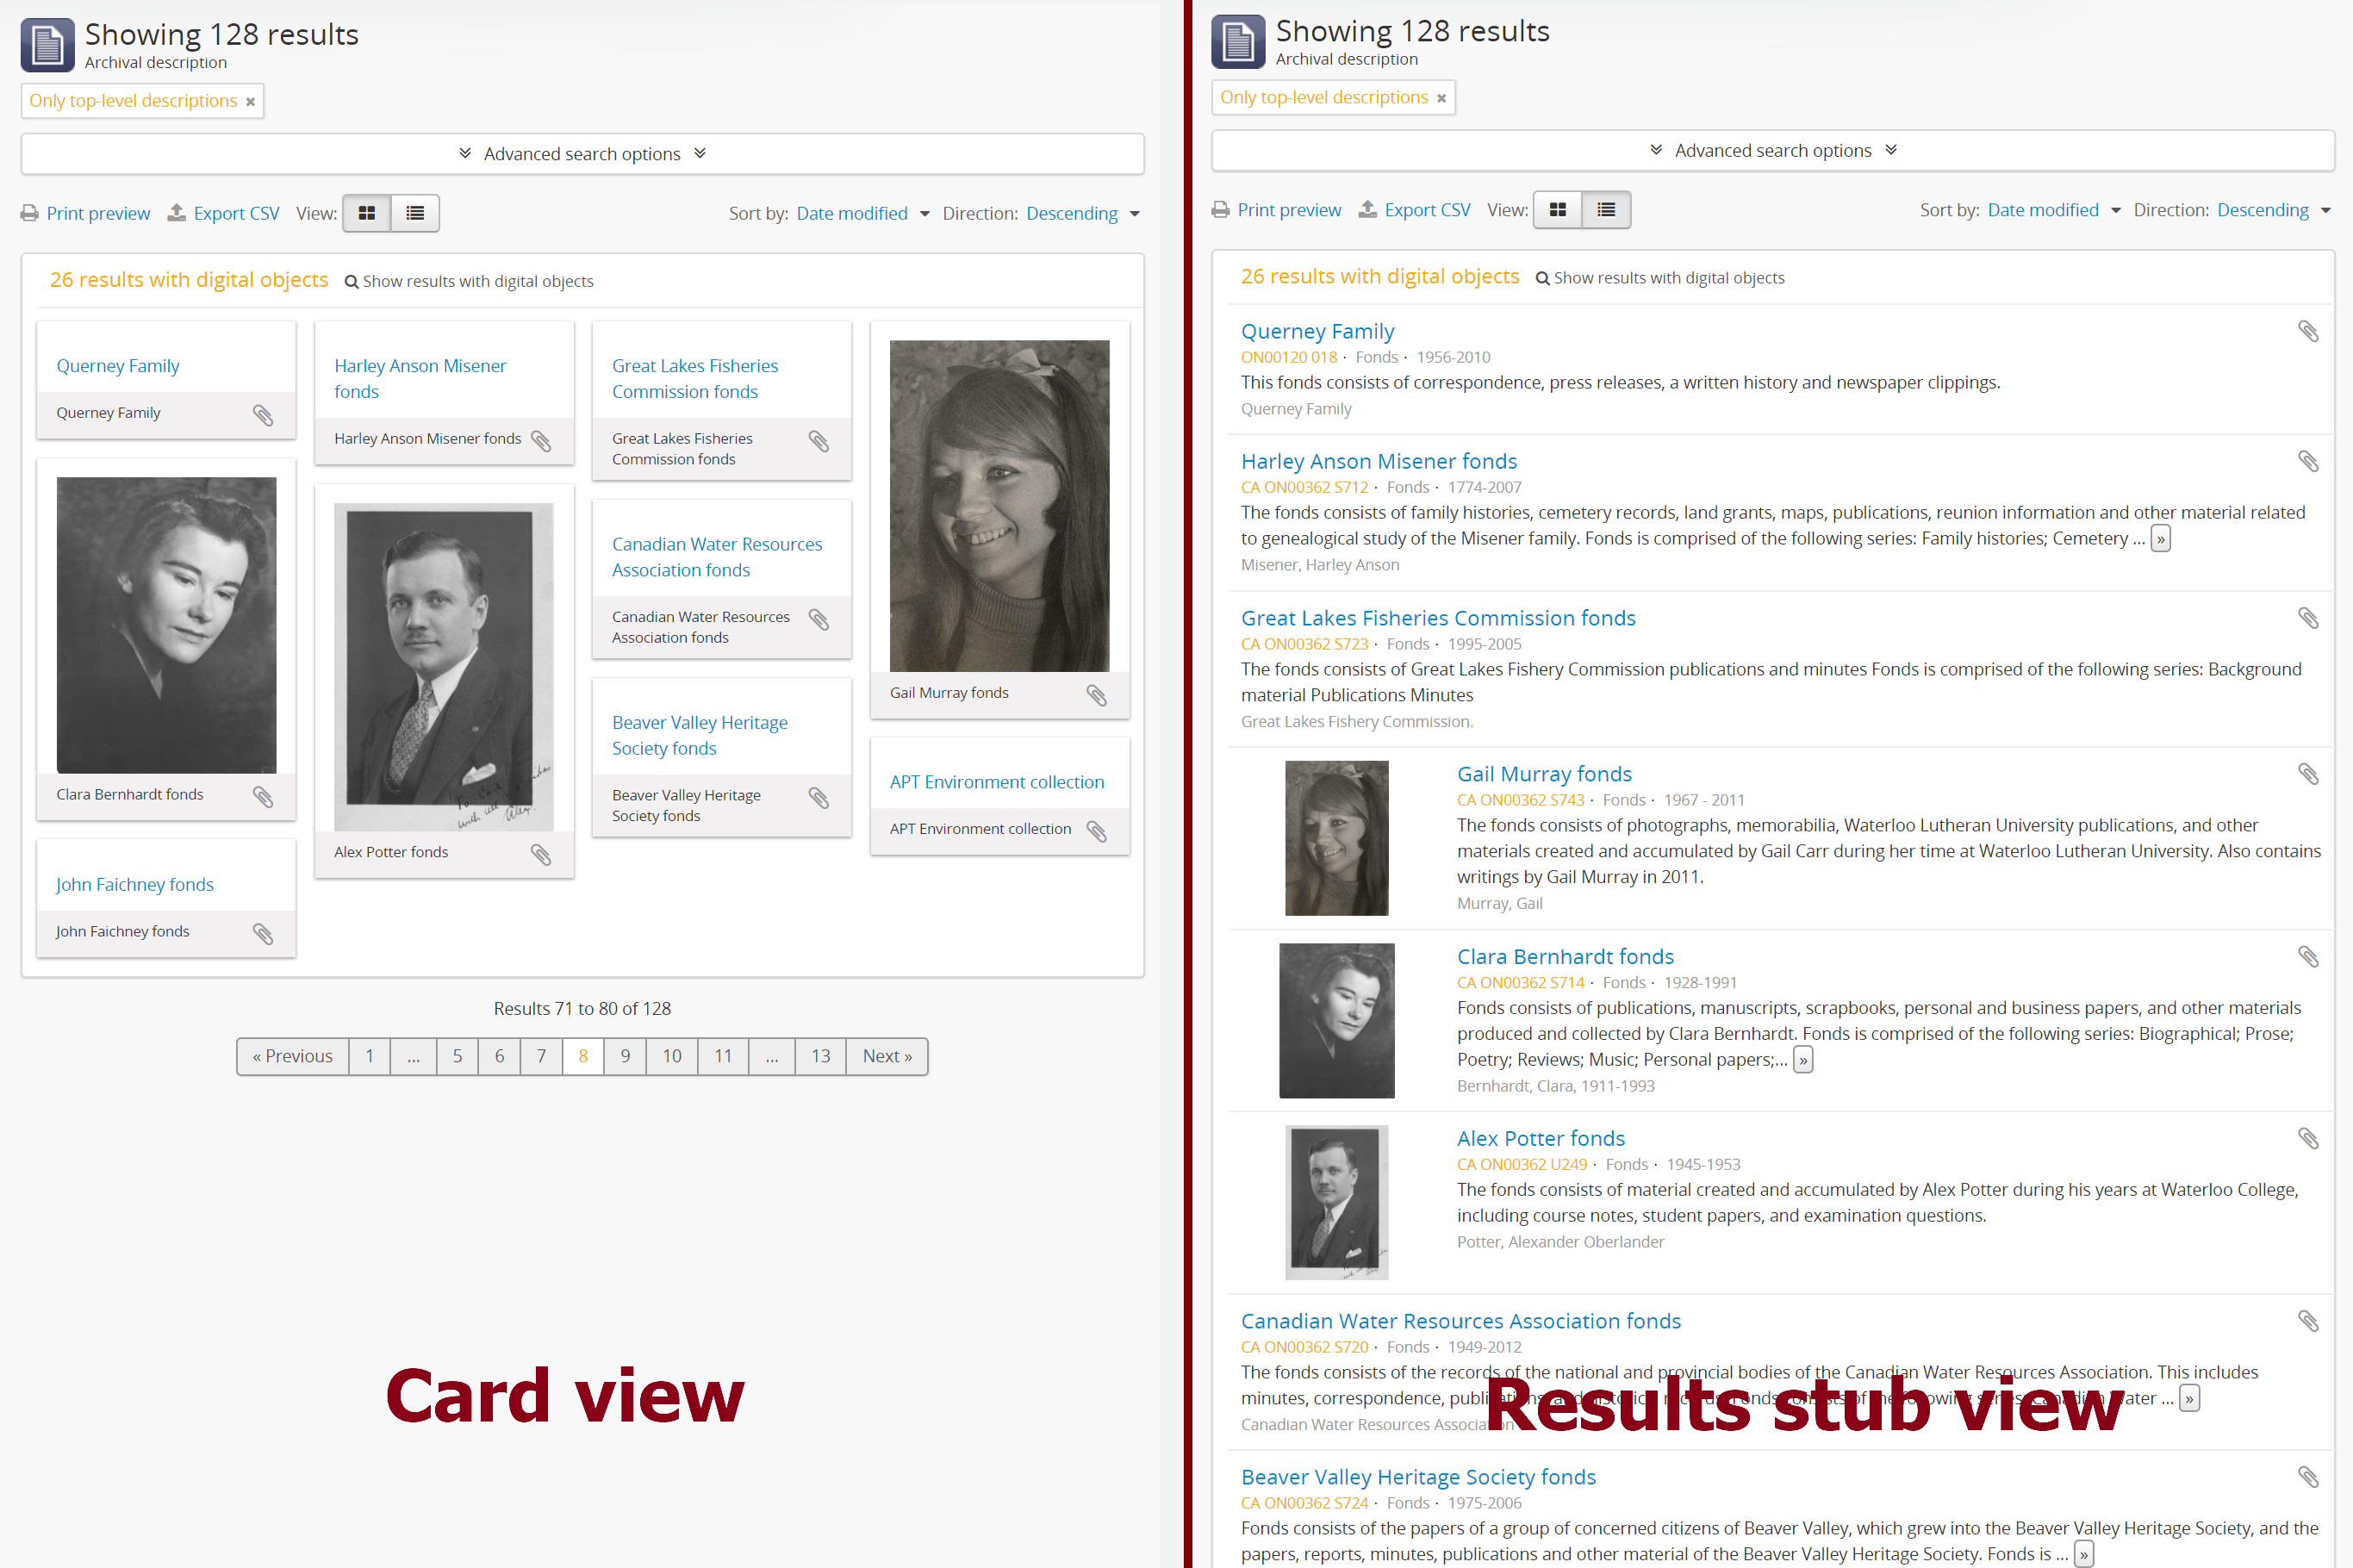
Similar to the Default repository browse view setting, this setting will determine if the “card view” (used by default on the Digital object browse page) or the “results stub view” (the default description search/browse view in new AtoM installations - called “table” in the related setting) is used when users first arrive on the archival description search/browse page. By default in a new installation, this setting is set to “table” - aka the results stub view.
Note that this setting will not affect the use of the card view on the Digital object browse page - however, an administrator could change this by altering the path in the related node of the browse menu - for more information on editing menus, see: Manage Menus.
Additionally, even once set, any user can easily toggle between the results stub view and the card view, by using the view toggle button that appears above archival description and digital object results:
For more information on working with archival descriptions, see: Archival Descriptions. For information on searching, browsing, and navigating in AtoM, see:
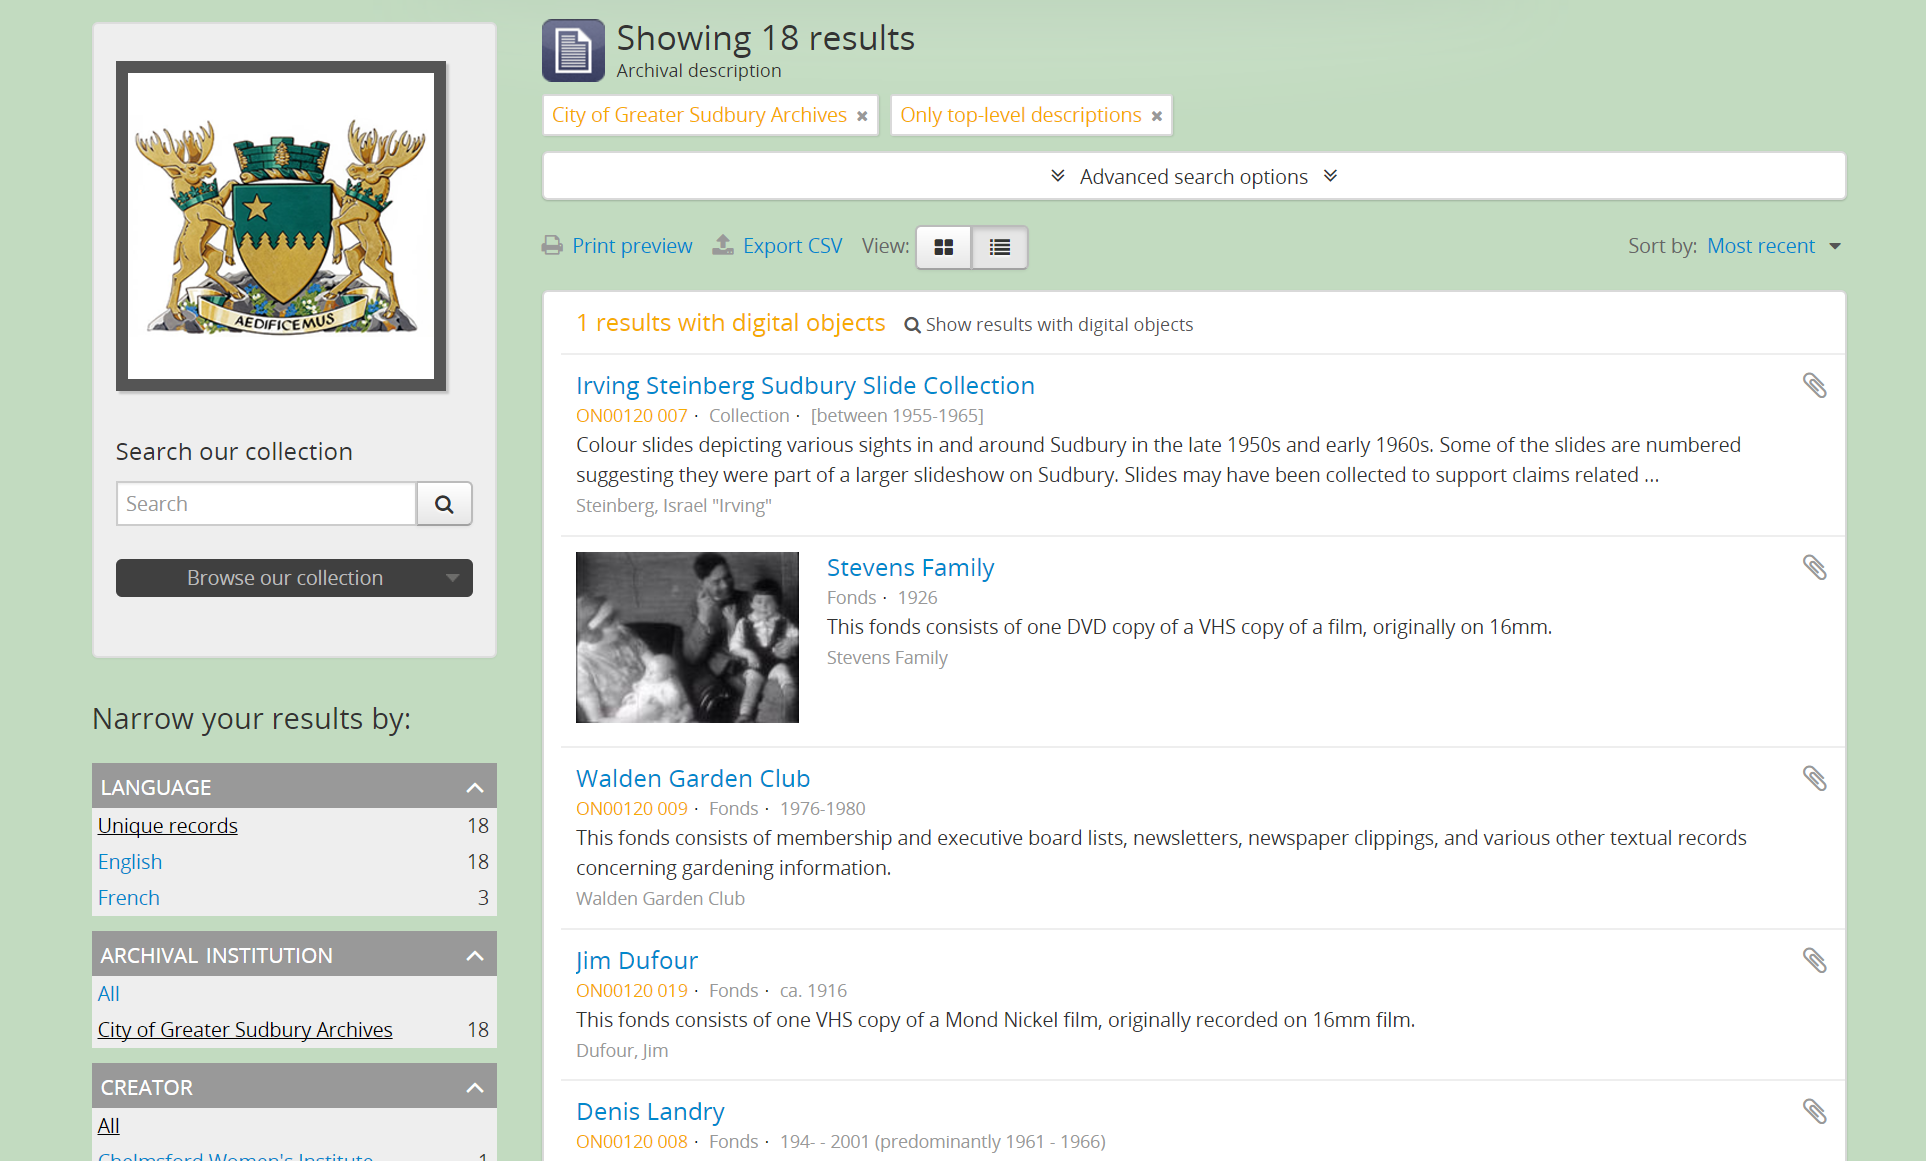
Multiple repositories
Select “yes” if your AtoM application is acting as a union list or portal for descriptions of materials held at more than one archival institution or repository. The repository will appear as a facet filter on the “Browse archival descriptions” page. Once a specific description linked to an archival institution, or a repository record has been visited, AtoM will also provide the option to filter searches in the global search box to the most recent repository - for more information, see: Institutional search box delimiters
Select “no” if your AtoM application is being used only by a single institution. By selecting “no”, the repository name will be excluded from certain displays because it will be too repetitive. Other changes include:
- Hiding the repository facet filter from archival description search and browse result pages
- Hiding the repository filter in the advanced search panel
- Hiding the Institutional search box delimiters in the global search box
- Hiding the related repository name in search/browse result stubs
Tip
The “Archival institutions” link in the Browse menu will not be
hidden by default when this setting is changed. However, an
administrator can manually remove this link by editing the Browse
menu via Admin > Menus. For more information, see:
Manage Menus.
Enable institutional scoping
Institutional scoping adds additional visual cues and user interface elements to better support searching and browsing within the holdings of one archival institution when used in a multi-repository system. We strongly recommend that the setting above, Multiple repositories, is set to “Yes” when using this setting.
When enabled (i.e. set to “Yes”), this setting will add an institution block to the repository view page, consisting of the repository logo, as well a dedicated search box and browse menu that will both return results linked to the current archival institution.
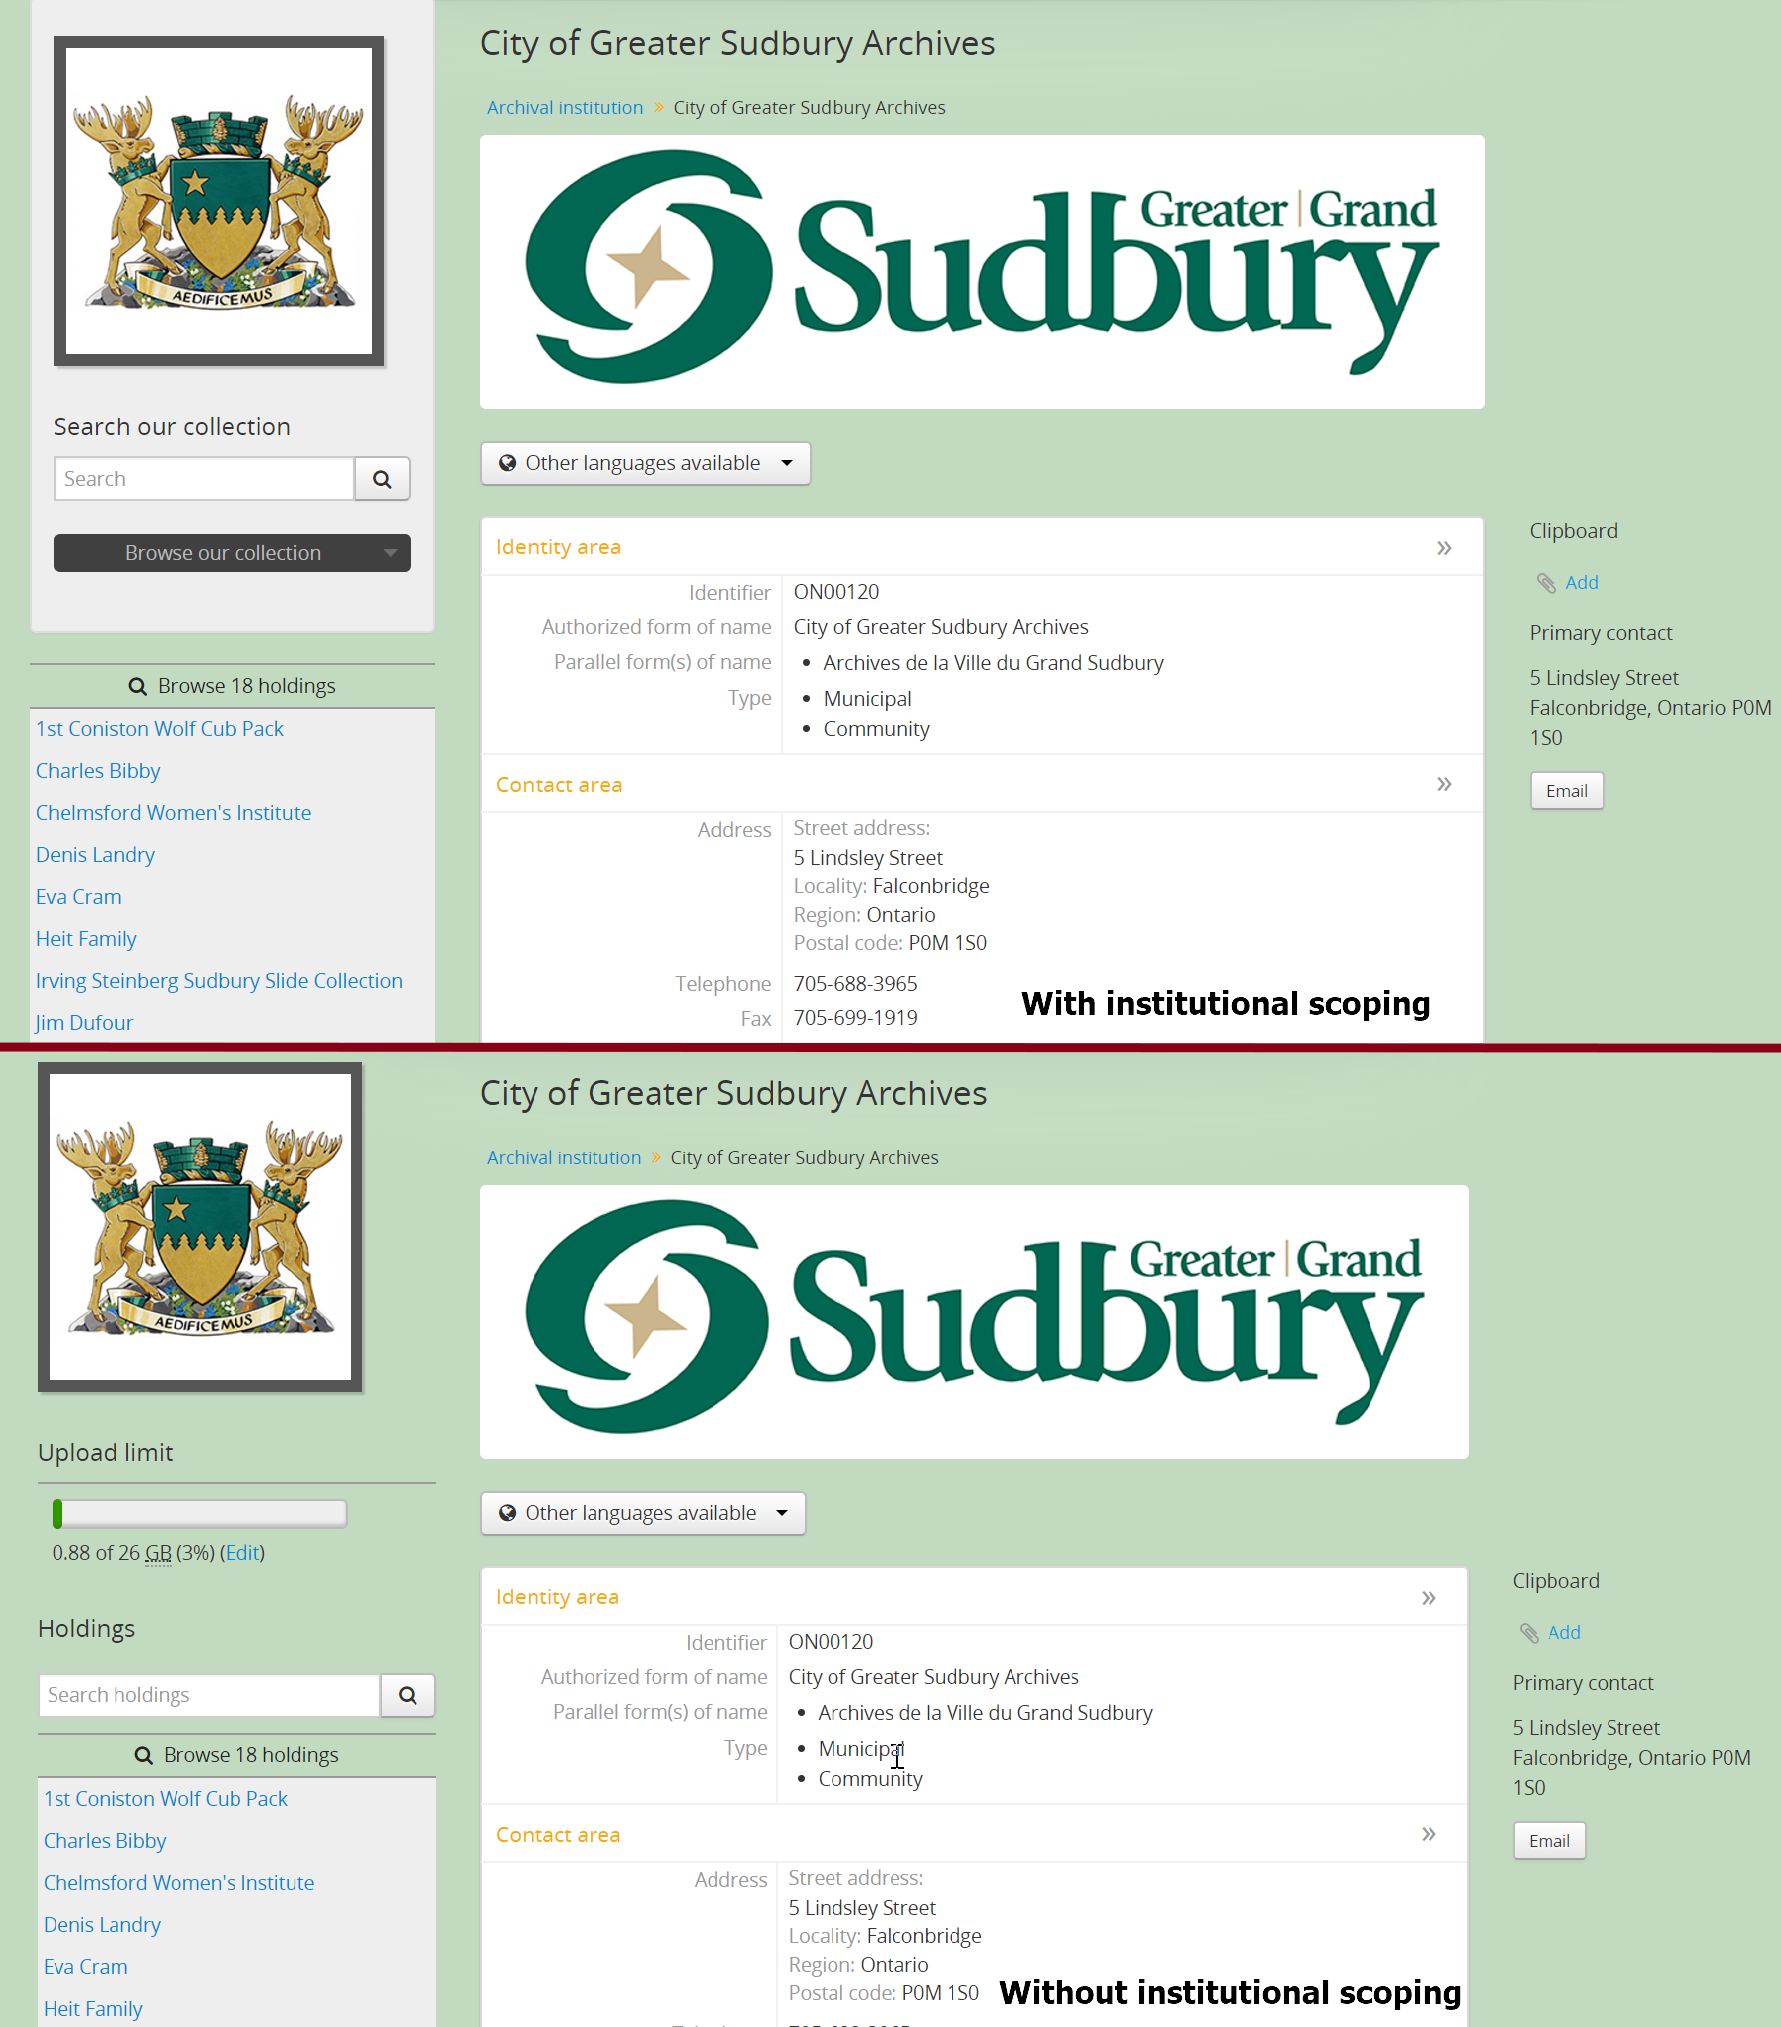
Similarly, when an archival description search or browse page is filtered (or “scoped”) to a particular repository, the institution block will appear, and (if applied) the custom background color of the institution will also be displayed behind the scoped search results.
Tip
For more information on applying a custom background color, uploading a custom repository logo, and other aspects of archival institution theming, see:
Additionally, the Institutional search box delimiters are disabled when Institutional scoping is enabled - the global search box in the AtoM header bar will only return results from all repositories, while the dedicated search box inside the institution block can be used to search the holdings of the scoped repository. As such, the institution block offers users a method of remaining “scoped” to one institution’s holdings - users can still search and browse across all repositories using the global search box and browse menu found in the AtoM header bar, but the institution block provides a method of better limiting results to one institution as a user explores.
Finally, the institution block will also appear on the view page of a related archival description, but only if the description is arrived at via one of the scoped elements - i.e. the holdings list on the repository view page, or from a scoped search or browse page. If a user arrives at the archival description via a global search or browse page, the institution block will not appear.
An administrator can customize the search box header text via Admin >
User interface labels, using the institutionSearchHoldings field - for more
information on changing these settings, see: User interface labels. At
installation, the default text label is “Search our collection.”

The institution block’s dedicted browse menu can also be customized via Admin
> Manage menus, under the browseInstitution menu - for more information
on working with menus, see: Manage Menus.

Default archival institution upload limit (GB)
Enter the upload limit in GB allowed for uploading digital objects. Use “-1” as the value for unlimited upload space. This setting can be modified by an authenticated (i.e. logged-in) administrator.
A value of “0” (zero) disables file upload.
For more information, see Upload and manage digital objects.
Tip
While this setting is global, an upload limit can also be set by an administrator on a per-repository basis, from the archival institution page. For more information, see: Set digital object upload limit for an archival institution.
Total space available for uploads
This field will display the used space for digital objects as well as the total space available. The space available is determined by a configurable setting that a system administrator can modify in one of AtoM’s configuration files - see:
Enable description change logging
This setting will enable a basic audit log for archival descriptions in AtoM. When enabled, the log will capture basic information on creation and modification events related to archival descriptions, including date, type (creation or modification), username, and/or related description title, depending on where the information is viewed. Note that the contents of specific changes made are not currently captured as part of the modification history’s audit trail.
Once enabled, authenticated (i.e. logged in) users with sufficient permissions can view the modification history for a description by opening the “More” menu in the button block at the bottom of the description’s view page, and selecting “View modification history.” For more details, see:
Users can see their own description modification history by navigating to their user profile. An administrator can view the description modification history for any user. Fore more details, see:
Additionally, an administrator can filter archival description results in the Description updates module by a specific username. For more information on using the Description updates module, see:
Upload multi-page files as multiple descriptions
Normally, a multi-page file such as a PDF is uploaded as a single digital object, linked to a single target archival description. However, it is possible to break up each page into its own digital object, and attach these to new child descriptions
Select “yes” if you would like each page of a multi-page file to be attached to a separate child-level description. For example, a PDF file with 10 pages uploaded to a description would result in 10 individual descriptions, one for each page in the file.
Select, “no” if you would like one multi-page file to be attached to a single description.
Show tooltips
Tooltips are online text designed to assist users to enter data in edit pages. While adding or editing an archival description, tooltip text is usually derived from the standards on which the edit templates are based (e.g. RAD, ISAD, etc).
Administrators can select “yes” to to have tooltips appear in edit pages as the user enters data. Selecting “no” will disable tooltips.
Generate description permalinks from
This setting allows an administrator to determine if the slug (or permalink) generated from an archival description when it is saved is derived from the title, or from the reference code of the description (for more information on how reference codes are constructed in AtoM, see above: Inherit reference code (information object)). By default, AtoM will derive the slug from the title of a description - the title will be sanitized by removing capitalization, spaces, and special characters; it will also be truncated if it exceeds a certain length. Administrators can now choose, via this setting, if they prefer that the slug is derived from the identifier or the reference code (with or without the country and repository code included) instead.
Note that this setting does not apply retro-actively to descriptions already created. It will only apply to new descriptions created after changing the setting.
Note
This setting will also be respected by the command-line task to generate slugs - see: Generate slugs. So it would be possible to update legacy descriptions in AtoM by deleting their slugs, and then generating new ones after changing this setting.
For further context on slugs in AtoM, see: Notes on slugs in AtoM
Tip
Users with sufficient edit permissions can also edit the slug associated with an archival description via the user interface, using the Rename module. For more information, see:
Use any valid URI path segment and uppercase character in slugs
This setting will affect how AtoM generates permalinks, or slugs for new records. In new installations, this setting is set to “No” by default.
When set to “No,” generated slugs will only allow digits, letters, and dashes.
Sequences of unaccepted characters (e.g. accented or special characters, etc.)
are replaced with valid characters such as English alphabet equivalents or
dashes. When set to to “Yes,” AtoM will allow upper case characters, any valid
unicode characters as specified in
RFC 3987 including accented characters,
and some special characters such as: , - _ ~ : = * @. For further details,
see:
The command-line task to generate slugs, and AtoM’s Rename module (which will allow users to edit the slug associated with an archival description) will both respect and enforce the setting going forward. However, changing this setting will not automatically alter existing slugs. For more information, see:
Default publication status
This setting determines whether new archival descriptions will automatically appear as draft records or published records. By default, public users (i.e. those who are not logged into AtoM) cannot see draft descriptions.
Note that this setting also affects imported descriptions. For more information, see Archival Descriptions - specifically, see:
Show available drafts notification upon user login
This setting, when enabled, will display a notification with a count of the number of draft archival descriptions currently available in AtoM. A link to the Description updates page is also provided if users wish to review the current available draft records - for more information on working with the Description updates page, see: Description Updates.
This notification, when enabled, will be visible to all authenticated (i.e. logged in) users.
SWORD deposit directory
The SWORD deposit directory is currently being used to support packages
deposited by Archivematica into AtoM.
If you do not know the name of your deposit directory, consult with your
systems administrator. The default is /tmp.
Google Maps Javascript API key setting
This setting allows you to store and use a Google Maps API key - AtoM relies on this setting to be able to add dynamic Google maps to the view page of a repository, and to the Metadata area of a digital object, when latitude and longitude values are provided. For more information on these features, see:
Note
For the digital object map, you must also check the “Digital object map” setting in Admin > Settings > Default page elements. See: Default page elements.
You can request a Google Maps API key free of charge - all you need is a Google account. For more information, see:
Important
There is a limitation on how many maps you can generate a day with the free version of this key. For more information, see:
Generate archival description reports as public user
This setting relates to the creation of file and item-level reports for archival descriptions, as well as finding aids - for more information, see:
This setting determines whether or not draft records and retrieval information is included in the reports generated or not - that is, physical storage information such as location, container type, and name.
When this setting is set to “Yes”, then reports generated will not include draft descriptions. Additionally, if physical storage information is hidden via the Visible elements settings, then physical storage information will also be excluded from finding aids. When set to “No”, then the reports and finding aids will include drafts and physical storage information.
Cache description XML exports upon creation/modification
AtoM includes several options for exporting archival description metadata in XML format - for more information, see: Export XML.
Additionally, users can enable the OAI plugin to allow harvesters to collect archival description metadata via the OAI-PMH protocol, in EAD 2002 or Dublin Core XML - for more information, see: OAI Repository.
Normally, when exporting or exposing archival description metadata, the XML is generated synchronously - that is, on request via the web browser. However, many web browsers have a built-in timeout limit of approximately 1 minute, to prevent long-running tasks and requests from exhausting system resources. Because of this, attempts to export or harvest EAD 2002 XML for large descriptive hierarchies can fail, as the browser times out before the document can be fully generated and served to the end user.
To avoid this, AtoM includes this setting, which allows users to pre-generate
XML exports via AtoM’s job scheduler, and then cache them in the downloads
directory. This way, when users attempt to download large XML files, they can
be served directly, instead of having to generate before the browser timeout
limit is reached.
When this setting is set to “Yes,” then anytime an archival description is created or modified via the user interface, this will automatically trigger a background job that will generate and cache EAD 2002 XML and DC XML for the related resource. With any new description or edit, two jobs are initiated - one to generate the EAD 2002 XML, and the other to generate the Dublin Core XML.
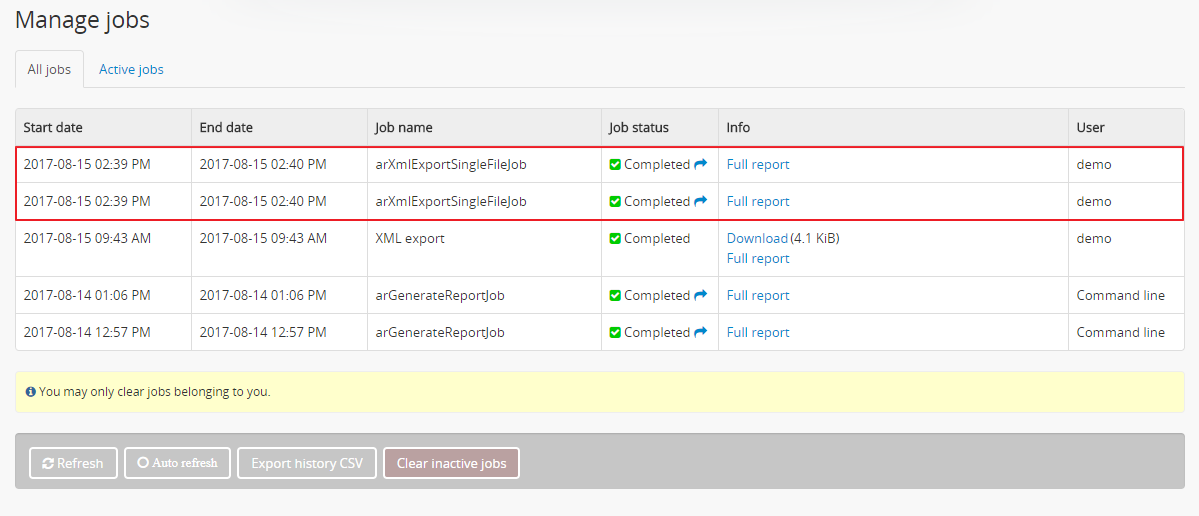
Highlighted in red is an example of the 2 jobs triggered by an edit to an archival description when the Cache XML setting is turned on - one job to generate an updated version of the cached EAD 2002 XML, and another job to generate an updated version of the cached DC XML.
The XML generated will be cached in AtoM’s downloads directory - 2
subdirectories named ead and dc will automatically be created, and the
XML will be stored by type in these two subdirectories.

When users attempt to download XML from the view page of an archival description, AtoM will check if there is a cached copy of the requested XML and if so, it will serve it. If there is no cached version available, then AtoM will fall back to the default behavior of generating the XML on request.
In an OAI-PMH request, if a cached version of the EAD 2002 XML is available,
AtoM will serve it in response to oai_ead requests - if there is not a
cached version, then AtoM will return a “Metadata format unavailable” reponse.
In contrast, if no cached DC XML exists, the OAI Repository module will
generate DC XML on the fly to respond to the request. For further information,
see: OAI Repository.
By default, cached XML files are generated for public users, meaning that draft descriptions are not included in the XML.
Important
This functionality does not cover imports - you will need to edit the record in the user interface after an import to trigger the automatic cache XML job.
Additionally, edits to related entities (such as a linked authority record, subject or place access points, etc.) will not automatically trigger an update to the cached EAD 2002 and DC XML. Again, you will need to manually edit the related description to trigger an update.
There is also a command-line task available that will generate cached EAD 2002 and DC XML for all existing descriptions. See:
If you are making many edits to your AtoM site, you may want to disable this setting until your edits are complete and then run the command-line task, to avoid constantly triggering many jobs.
Note
Archival description XML data exported via the clipboard is generated on request via AtoM’s job scheduler - the cached XML is not used. For more information on this functionality, see: Export multiple XML files using the Clipboard
Clipboard settings
These settings allow an administrator to configure and/or enable certain features related to AtoM’s clipboard functionality. For more information on using the clipboard, see:
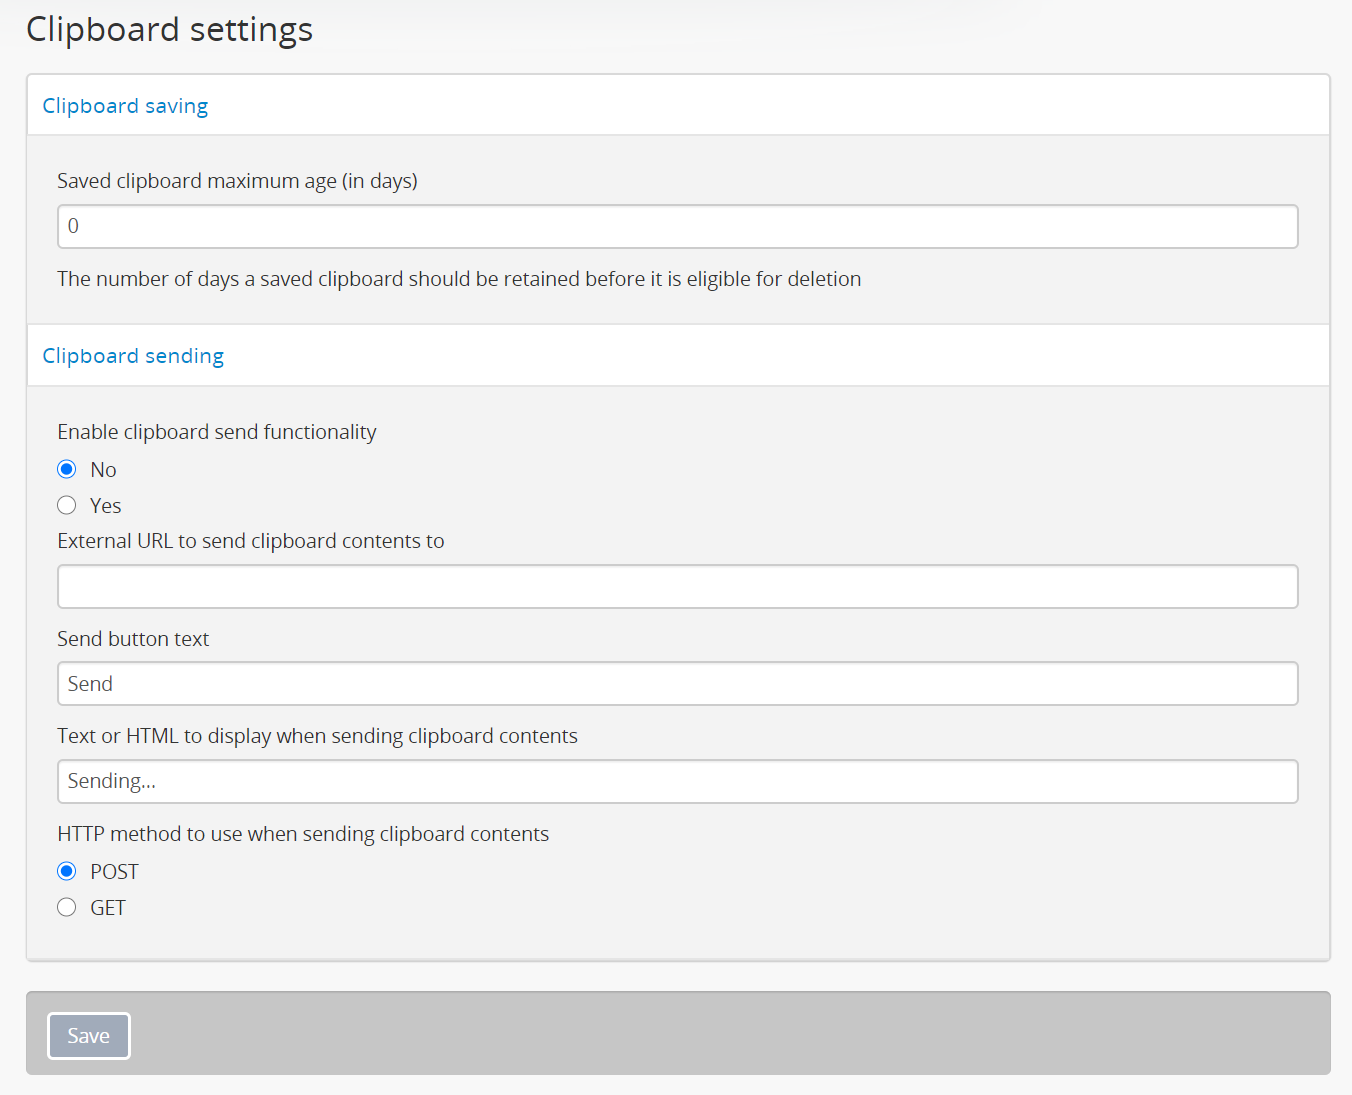
Saved clipboard maximum age
Both public and authenticated (i.e. logged in) users have the option to save results pinned to AtoM’s clipboard, and load them at a later date - for more information, see:
To avoid having AtoM’s database grow indefinitely when the clipboard is used heavily, saved clipboards are not stored indefinitely. Instead, an administrator can configure how many days saved clipboards are stored before being purged from the database.
The setting takes a numeric value that represents the number of days a saved clipboard should be stored before it is eligible for automatic deletion from the database.
Important
By default in new AtoM installations, this value is 0 - meaning that saved clipboards will be purged the following day! If you intend to allow your users to make use of the Saved clipboard feature, be sure to configure this to a reasonable value - e.g. 30 (days), etc.
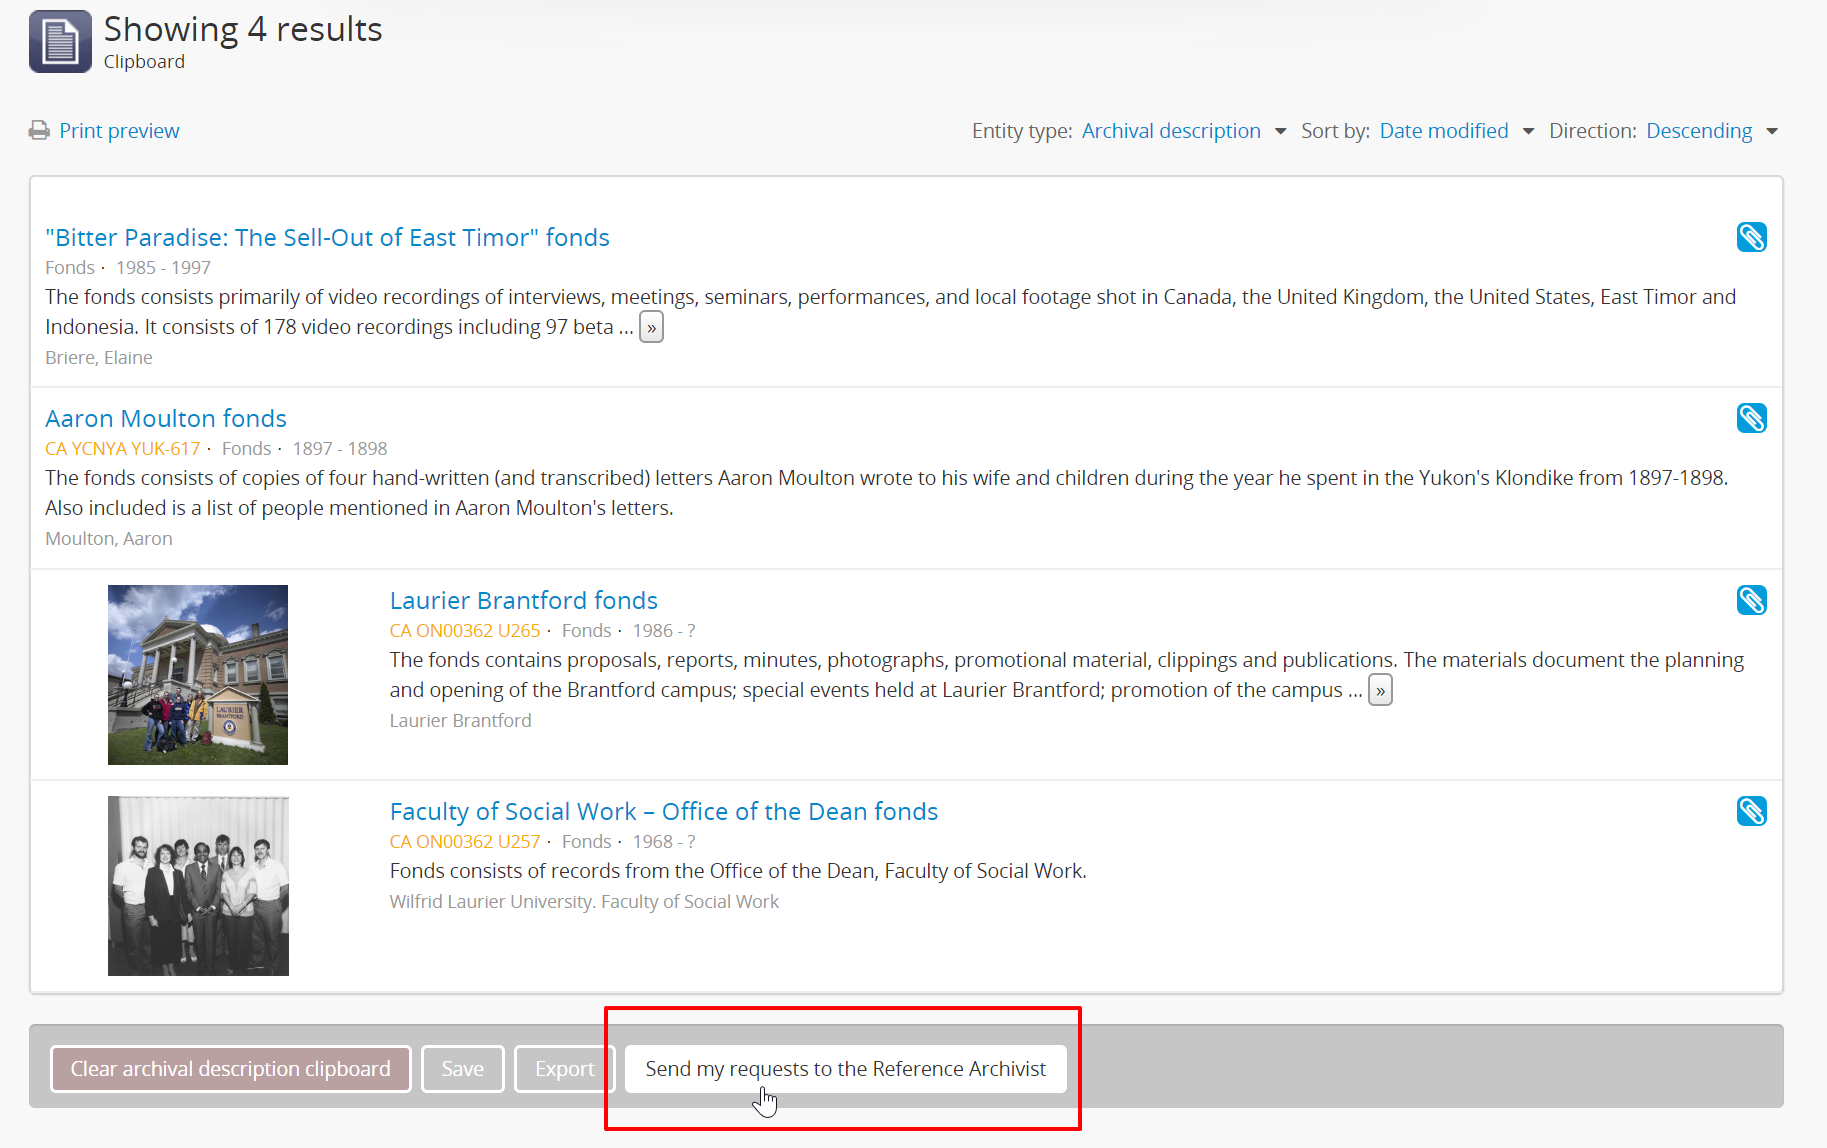
Clipboard sending
These settings can be configured to integrate the clipboard with a third-party site or application, for use in reference requests, loans, or other similar cases. When configured, it will allow results on the clipboard to be sent to a specified URL as a JSON array of slugs. Data can be sent using either HTTP POST or GET methods.
When a user adds items to the clipboard and these settings are enabled, an additional button will display on the clipboard’s view page. The button text can be customized, along with the text shown to the user while the results are being sent. When clicked, AtoM will send a JSON array of the clipboard results to the target URL, and then will redirect the user to that URL for further action.
In new installations, this functionality is disabled by default, but can be configured and enabled via the settings described below.
Enable clipboard send functionality
This setting enables or disables the Clipboard send functionality globally. When set to “No”, the Clipboard send button will not be displayed on the clipboard’s view page.
External URL to send clipboard contents to
Enter the URL to which you would like your array of clipboard results to be sent. Must be a valid HTTP or HTTPS URL.
Example value: http://myarchives.example.com/archives-request
Send button text
When the Clipboard send functionality is enabled, an additional button is added to the Clipboard’s view page. The default text in new installations is simply “Send” but an administrator can modify this as needed.
Text or HTML to display when sending clipboard contents
In the brief interval before the user is redirected to the external URL, the text added to this setting is what will be shown to the user while the clipboard results are being sent. The default text in new installations is “Sending…” but this too can be customized as desired.
Note
In most cases, this page will not be shown long enough for the user to read much text, unless the clipboard results are extensive. We recommend keeping this message fairly short and simple.
HTTP method to use when sending clipboard contents
An administrator can choose between using HTTP POST or GET methods for delivering the clipboard payload to the external site.
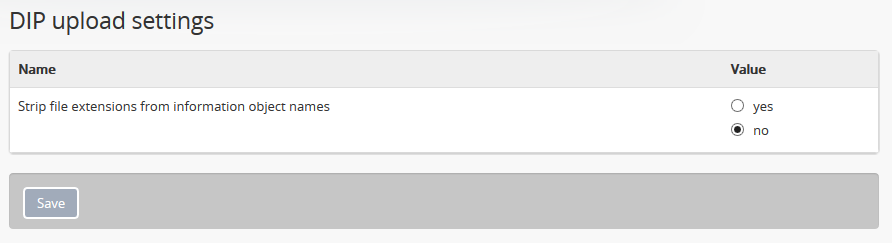
DIP upload
This setting is for users who are uploading content from a linked Archivematica instance. Archivematica is an open-source digital preservation system developed by Artefactual Systems, the same creators of AtoM. For more information, see: https://www.archivematica.org
See also
For information on DIP upload from Archivematica to AtoM, see the following page in the Archivematica documentation:
Archivematica can be used to manage and prepare digital content for long-term preservation, and can generate a Dissemination Information Package (DIP) with access-copy derivatives of your master digital object files processed in Archivematica, for upload into AtoM.
If no additional metadata is provided with the content during preparation,
then when uploaded to AtoM, AtoM will use the file names as the default titles
for the associated information objects (a.k.a.
descriptions) generated, to which the digital
objects in the DIP will be attached. However, this might produce descriptions
with titles like my-picture.jpg, or my.document.pdf.
When this setting is set to “Yes,” AtoM will automatically strip the file
extensions from the information object names automatically generated during
the DIP upload process - from the examples above, this setting would lead to
information object titles such as my-picture or my.document. Users can
still edit the description title after DIP upload to customize them as
desired.
Note that the setting will not retroactively affect existing uploads/information objects, only new information objects created during the DIP upload process from Archivematica. Similarly, the uploaded file itself is not affected (the extension is not stripped from the digital object) - only the title of the description generated so the digital object can be attached and uploaded.
Default page elements
This section allows administrators to enable or disable certain page elements. Unless they have been overridden by a specific theme, these settings will be used site-wide.
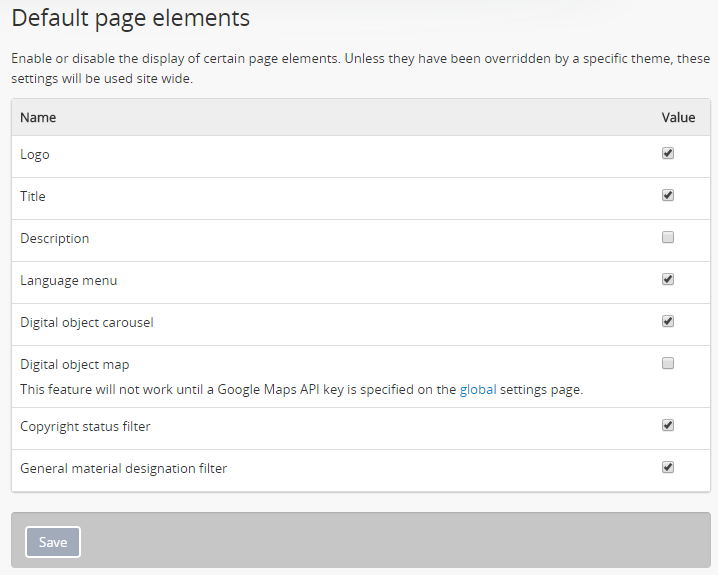
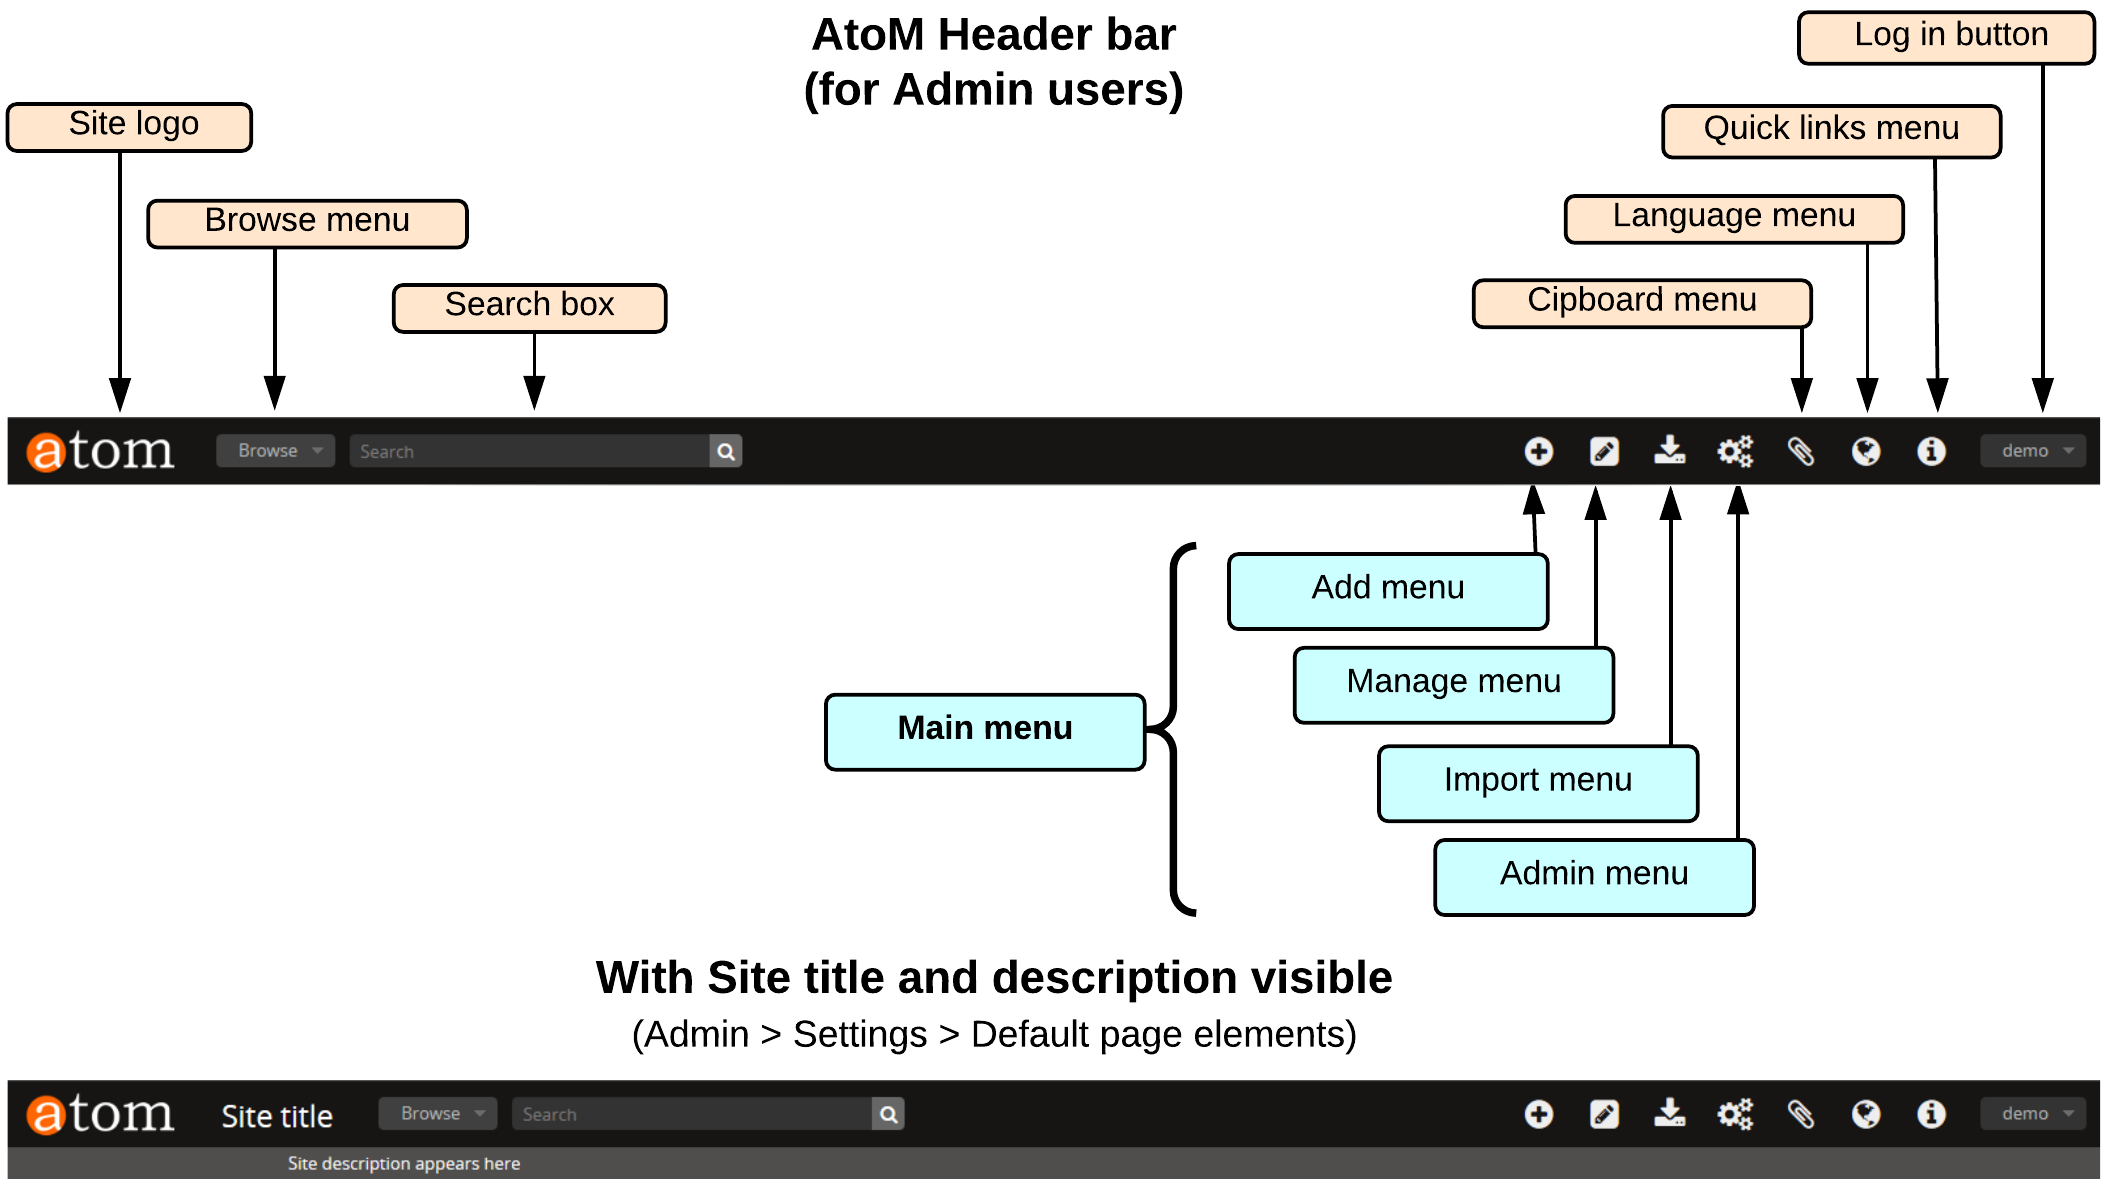
Checked boxes will display the corresponding element and unchecked boxes will hide the element. The logo, site title, site description, and language menu all appear as part of the AtoM header bar:
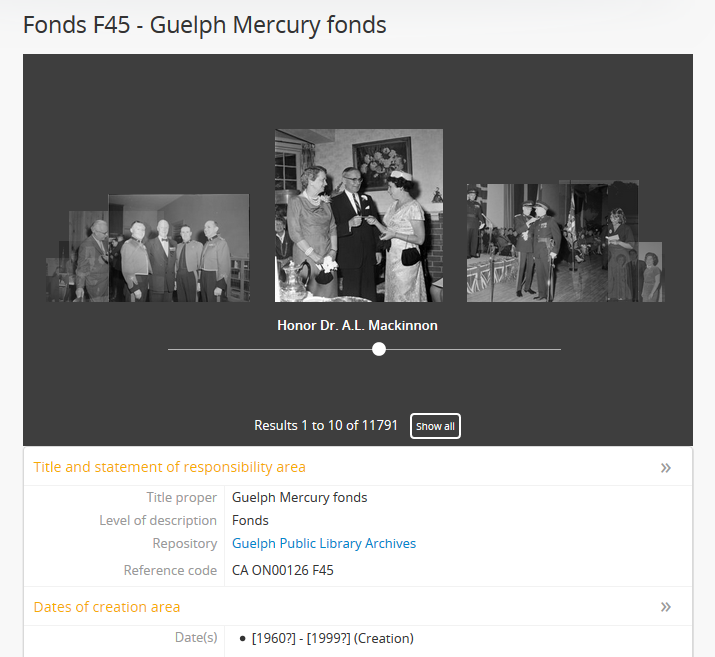
The digital object carousel appears when there are multiple digital objects attached to lower-level descriptions:
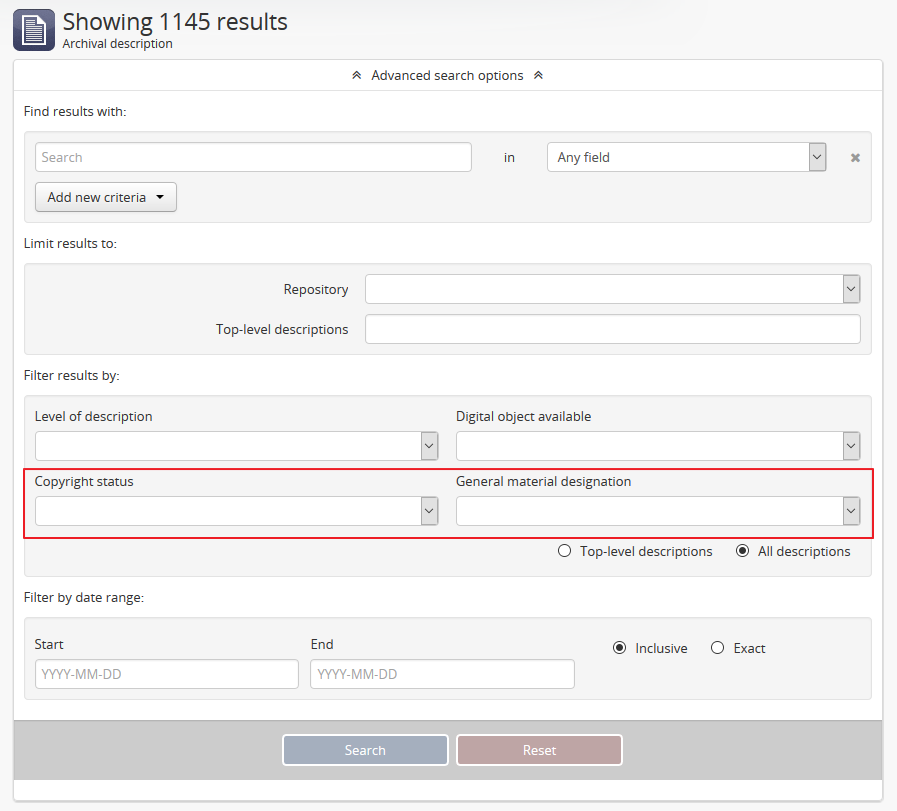
The Copyright status filter and the General material designation filter appear as filters available in the Advanced search panel. For more information on using this panel, see: Advanced search. The Copyright status filter relates to PREMIS rights added to descriptions - for more information, see: Rights. The General material designation filter is derived from the Canadian Rules for Archival Description (RAD) standard, and is only used on the RAD template.
The Digital object map setting relates to the ability for users to add basic geolocation data to digital objects, by displaying a dynamic Google map in the Digital object metadata area. For more information, see: Add dynamic maps to your digital object metadata
Important
To be able to enable this setting, you must first request a Google MAPS API Key, and the Google Maps Javascript API key setting in Admin > Settings > Global must be populated - see: Google Maps Javascript API key setting
When unchecked, the above elements will be hidden from display after you save the default page element settings. This can be useful for customization - for example, if you are not translating the content of your website and do not need the language menu, unchecking it here will remove it from the AtoM header bar. Similarly, if you are not using the Canadian RAD standard as your default template, you might want to hide the General material designation filter from the advanced search panel.
See also
Default templates
AtoM ships with default page templates for viewing and editing archival descriptions, authority records, and archival institutions. For more information on the standards on which these templates are based, see Descriptive standards.
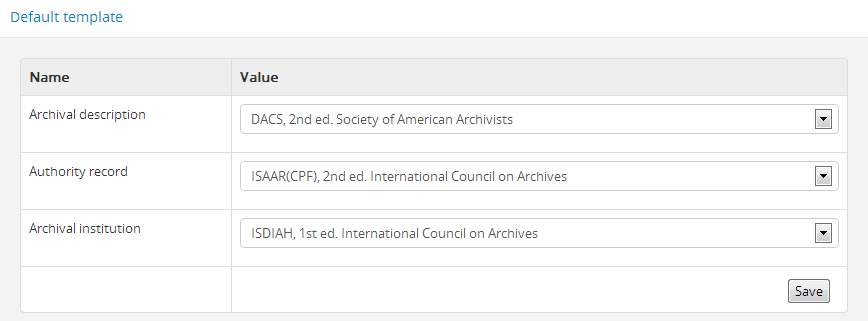
The “Name” column shows the types of entities that are described in AtoM: “Archival descriptions”, “Authority records” and “Archival institutions”. Drop-down menus of descriptive standards for each are provided under the “Value” column. Administrators may select one for each entity using the drop-down menus.
Once changes have been saved, records on the site will be able to be edited and viewed in the templates that have been selected.
Digital object derivatives
Whenever a digital object is linked to an archival description, AtoM will generate two derivative copies from the master digital object (e.g. the original) - a reference display copy, used on the archival description view page, and a thumbnail, used in search and browse results, and in the digital object carousel.
The following settings affect the way that reference derivatives are generated in AtoM.
Jump to:
See also
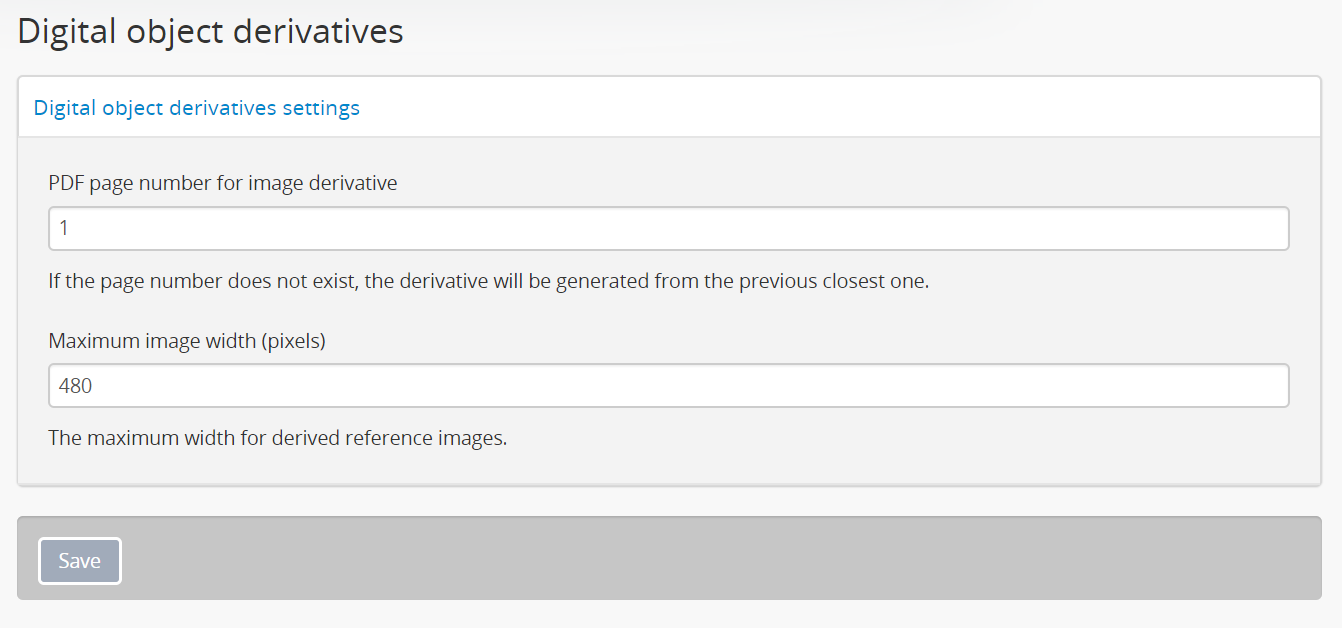
PDF page number for image derivative
This setting will affect the digital object derivatives generated by AtoM when uploading multi-page content, such as a PDF.
By default, AtoM will use the first page of multi-page content (such as a PDF) when generating the reference display copy and thumbnail images.
However, with multi-page content such as PDFs, the first page may not be useful to users browsing the content - it may be an institutional cover page used on all digitized content, a blank cover page, etc.
This setting will allow users to set a page number that should be used when generating the derivative copies. It will work for both locally uploaded content, and for PDFs linked via URL. If a system administrator runs the derivatives regeneration task, AtoM will use the setting value when regenerating PDF derivatives.
Tip
If you enter a page number that does not exist for one or more of your derivatives (for example, entering 99 as the value, when your PDF only has 9 pages), AtoM will use the closest available value (in this example, page 9) when generating the derivatives.
If you make changes, remember to click the “Save” button in the button block.
Maximum image width (pixels)
One of AtoM’s design assumptions is that the display dimensions of files users upload typically will be too large to fit into the view page for an archival description. Therefore, when you upload a file, AtoM creates a reference display copy for displaying in the view page.
AtoM ships with a default setting specifying the maximum width of the reference display copy at 480 pixels. This is the optimized width given AtoM’s field width. Administrators, however, can increase or decrease the maximum reference image width to suit the requirements of their institution or network.
See also
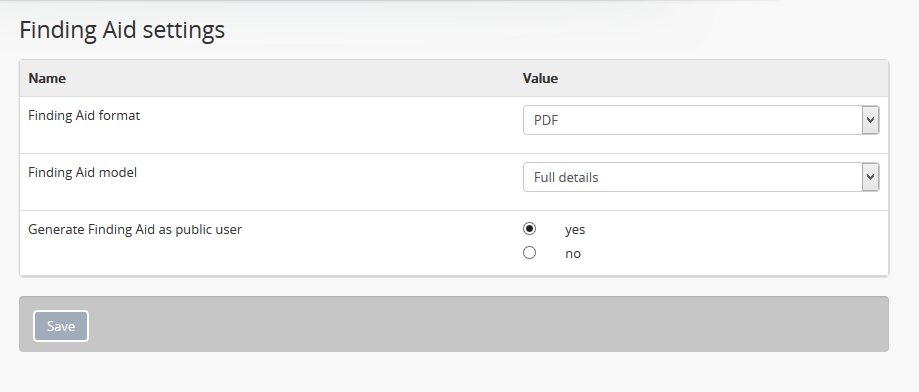
Finding aid
These settings configure how AtoM generates finding aids from archival descriptions. For more information, see Print finding aids; specifically, Finding aid settings includes a description of each settings field.
Add/Remove languages
AtoM relies on volunteer translators from the community to support new language options. The translations are managed using an Artefactual-hosted instance of Weblate and community members can learn more about contibuting translations here:
With each new major public release, we incorporate community-supplied translations of AtoM’s user interface, which can easily be changed by end users by selecting a different language from the global language menu. The language menu will display the languages that are currently enabled in your AtoM application. This setting determines what languages appear in the language menu.
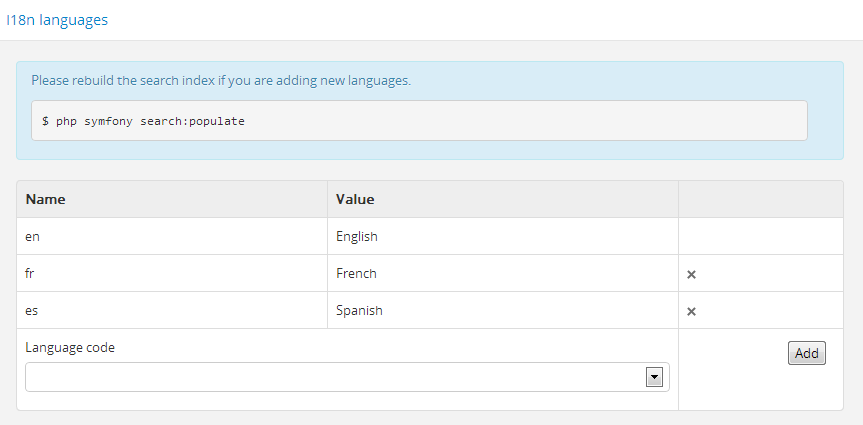
To add a language:
- Select a language from the drop-down menu located under “Language code”.
- Click the “Add” button.
- AtoM adds the language and refreshes the page; the added language will now
appear in the “Add/remove language” section in “Settings”, as well as in the
drop-down menu of the
 language navigation menu located at the top right corner of the header bar.
Important
If you are adding a new language to the AtoM user interface, you must re-index your site for the new language to work as expected after adding it via the settings page. Using the command-line, a system administrator will need to run the following command from the root directory of your AtoM installation:
php symfony search:populate
See: Populate search index for more information.
Note
Many languages appear in the “Add/remove language” section in “Settings”, but the translations for all languages are not completed. If a language is selected from the Language menu in the header bar, content that has not yet been translated will remain in English.
To continue adding languages, repeat these steps as required.
Note
If a user selects a language that is not currently supported, AtoM will refresh the settings screen without implementing any changes.
To remove a language:
- Click the delete
 located in the third (blank) column next to the
language.
located in the third (blank) column next to the
language. - AtoM will delete the language and refresh the page; the deleted language will
no longer appear in the “Add/remove language” section in “Settings”, nor in
the drop-down menu of the language navigation menu located at the top right corner of the header bar.
To continue removing languages, repeat these steps as required.
See also
Identifier settings
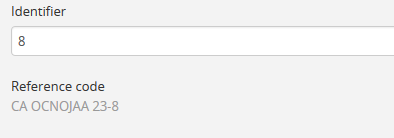
Settings in this section relate to archival description identifiers, as well as accession record numbers. AtoM can automatically generate unique identifiers for these entities based on a configurable mask. Users can also set reference code behavior for descriptions in this section of the settings.
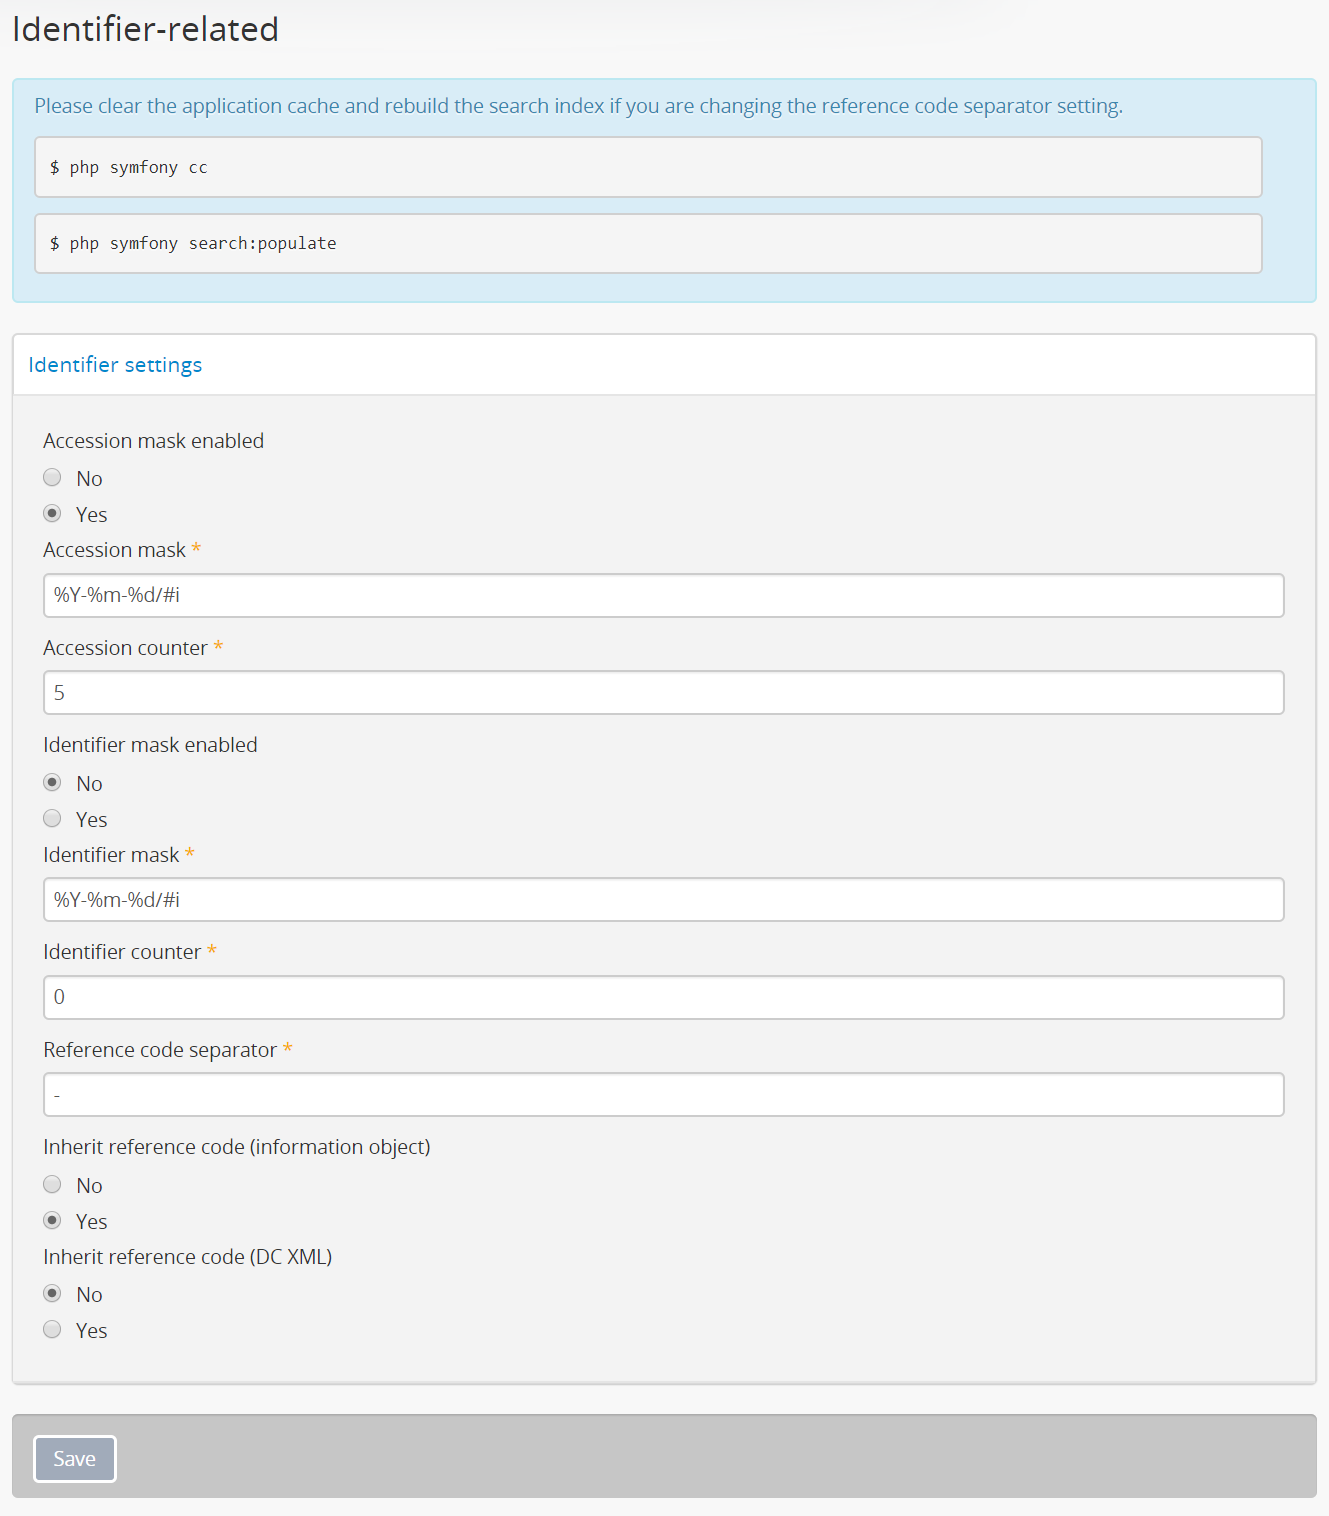
The identifier-related settings in AtoM. These affect descriptions and accession records
Jump to:
- Enable accession mask
- Accession mask
- Accession counter
- Enable identifier mask
- Identifier mask
- Identifier counter
- Reference code separator
- Inherit reference code (information object)
- Inherit reference code (DC XML)
Enable accession mask
This setting controls whether or not the Accession mask (described in the section below) is enabled or not.
When this setting is set to “yes,” then when a user creates a new accession record, the Accession number field will be prepopulated with the next unique value based upon the Accession mask settings - users can still manually edit the pre-populated value provided by the mask, so long as a unique number is used.
When this setting is set to “no,” then the accession mask will not be used, and when creating a new accession record, the accession number field will be blank.
See:
Note
In a new installation, the accession mask is enabled by default. An administrator can use this setting to disable it if desired.
Accession mask
When working with an accession record, AtoM requires that a unique Accession number be added - for more information, see: Add a new accession record. To help ensure that accession record numbers are created in a consistent and unique manner, AtoM includes an accession mask, which can define a pattern by which the next unique accession number is generated. Turning the mask on or off is controlled by the setting described above, Enable accession mask.
On installation, the accession mask is enabled by default, and prepopulated
with a suggested value that will generate unique accession numbers. Expressed
in the mask setting as %Y-%m-%d/#i, this value will generate a unique
accession number for every new accession record compiled from the following
elements: YEAR-MONTH-DAY/Incremental#. So for example with the default
mask setting, the first accession you create, if it was generated on January
01, 2018, would have an accession number of 2018-01-01/1.
This mask, or default counter, can be changed by an administrator to
suit institutional needs, using text strings and
PHP strftime parameters.
To add leading zeroes to the unique incrementing number for example, you can
add more i characters to the mask setting - so for example %Y-%m-%d/#iii
would lead to incremental numbers like 001, 002, 003, etc.
The value of the incremental number is based on the Accession counter value, described below. An administrator can choose to manually change or reset the counter number if desired.

For more information on accession records, see Accessions.
Accession counter
AtoM provides you with the number of accessions created. If you delete an accession, it will still be included in the Accession counter total value. If this number is changed by an administrator, the next accession created will receive the next number in sequence. The value of this counter is used to inform the incremental value used in the Accession mask, described above.
Note
A CSV import of accession records will not increment this value - AtoM can only automatically track and increment the number based on accessions created manually via the user interface. This is another reason why the accession counter is an editable value - if you perform a CSV import of accessions, you may wish to manualy increment the counter to the correct value, to ensure consistency.
Enable identifier mask
This setting controls whether or not the Identifier mask (described in the section below) is enabled or not.
When this setting is set to “yes,” then when a user creates a new archival description, the Identifier field will be prepopulated with the next unique value based upon the Identifier mask settings - users can still manually edit the pre-populated value provided by the mask. AtoM does not enforce the uniqueness of archival description identifier values.
When this setting is set to “no,” then the identifier mask will not be used to pre-populate identifier values, and when creating a new archival description, the identifier field will be blank. However, a Generate identifier option will still be provided below the field - if clicked, then the settings defined in the Identifier mask will be used to populate the field.
See:
Note
In a new installation, the identifier mask is disabled by default. An administrator can use this setting to enable it if desired.
Identifier mask
The Identifier mask can be used to manage the creation of unique archival description identifier values when creating new descriptins. By enabling the identifier mask, all descriptions created through the user interface will be assigned an identifier based on a pre-defined pattern.
On installation, the identifier mask is disabled by default - to change this, use the Enable identifier mask setting described above.
The identifier mask is prepopulated with a suggested value that will generate
unique identifiers. Expressed in the mask setting as %Y-%m-%d/#i, this
value will generate a unique identifiers for every new
archival description created, comprised of the following elements:
YEAR-MONTH-DAY/Incremental#. So for example with the default mask setting,
the first description you create, if it was created on January 01, 2018, would
have an identifier of 2018-01-01/1. The value of the parameter, #i,
represents the Identifier counter value.
This mask, can be changed by an administrator to suit institutional
needs, using text strings and PHP strftime parameters.
To add leading zeroes to the unique incrementing number for example, you can
add more i characters to the mask setting - so for example %Y-%m-%d/#iii
would lead to incremental numbers like 001, 002, 003, etc.
The value of the incremental number is based on the Identifier counter value, described below. An administrator can choose to manually change or reset the counter number if desired.
It is also possible to replace an existing archival description identifier with one based on the identifier mask by editing a description and selecting Generate identifier below the identifier field.
For more information on creating archival descriptions, see:
Identifier counter
The identifier counter defines incremental integer at the end of a generated identifier, represented in the identifier mask as #i. AtoM provides you with a count of the number of archival description records created via the user interface. This value is then used as part of the Identifier mask as the incrementing number value.
Deleting an archival description will not affect the counter - it simply adds the next integer, rather than looking for unused integers. If this number is changed by an administrator, the next accession created will receive the next number in sequence.
Note
A CSV import of archival descriptions will not increment this value - AtoM can only automatically track and increment the number based on records created manually via the user interface. This is another reason why the identifier counter is an editable value - if you perform a CSV import of descriptions, you may wish to manualy increment the counter to the correct value, to ensure consistency.
Reference code separator
The reference code separator is the character separating hierarchal elements
in a reference code (see Inherit reference code,
below).The default reference code separator
appears as a dash - in AtoM, which can be changed by an
administrator to suit institutional practices.
Tip
If you intend to use a / slash as your reference code separator, we
recommend you review the following setting! See:
Important
If you change this setting, it will be applied immediately on view pages. However, to see these changes take effect in search and browse results pages, a system administrator will need to clear the application cache, restart services, and populate the search before they are visible.
If you continue to see the previous reference code separator in search/browse results after performing the above tasks, be sure to clear your web browser cache as well.
Inherit reference code (information object)
In AtoM, a reference code is a unique identifier string associated with an archival description, created through the combination of inherited identifiers from other related entities. While an individual description identifier is rarely globally unique (and is often not unique even in the same AtoM instance), by combining additional elements such as a the country code, repository code, and any parent identifiers, a unique reference code can be created, which facilitates international discovery and exchange.
When this setting is set to “yes”, the reference code string will be built using the archival description identifier plus the identifier of all its ancestors (parent records), as well as the repository identifier and country code if they have been entered. The string will appear in this order with the applicable elements:
- Country code (derived from the country code of the country entered into the contact information of the related archival institution)
- Repository identifier (derived from the identifier field on the related archival institution)
- Fonds/Collection level identifier
- Series identifier
- Subseries identifier
- File identifier
- Item identifier
- etc.
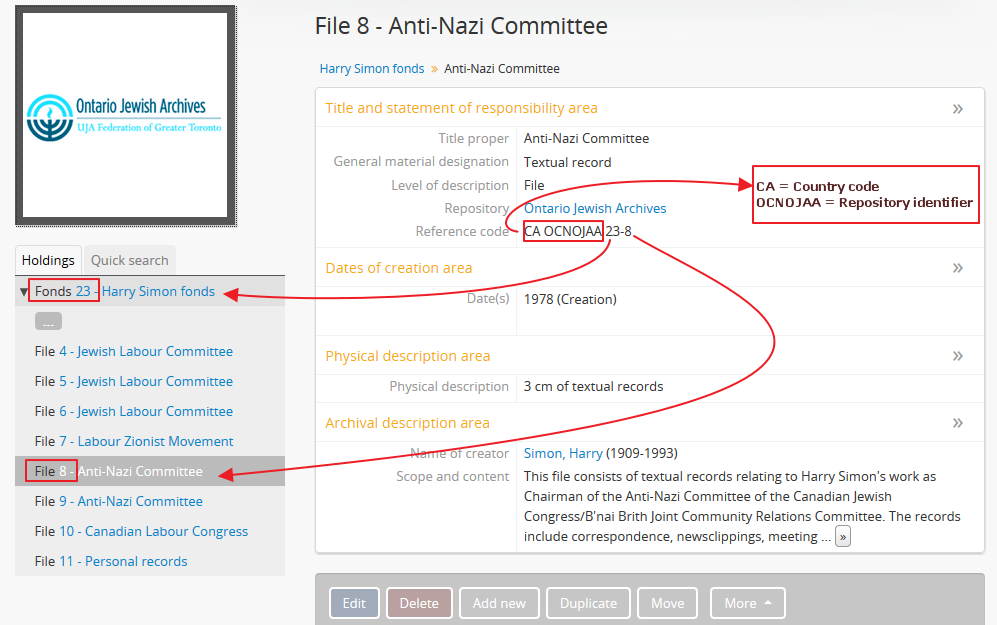
When reference code inheritance is enabled, AtoM will also display the full reference code in the edit page for archival descriptions, as contextual information to help orient the user.
Important
This setting also determines how the <unitid> element in the EAD XML is
populated. If the inheritance is turned on, then AtoM will populate all
descendant records in the EAD XML with the full inherited reference code.
If inheritance is turned off, AtoM will only add the identifier for that
record in the <unitid> on export. This allows users exporting to a
different source system that does not have a reference code inheritance
setting to maintain a full reference code at all levels in the target
system. However, if you are exporting from one AtoM instance to another
(for example, from a local institution to a portal site), you might want to
consider how this will impact your record display in the target system - if
you have reference code inheritance turned on when you export, and the
target AtoM instance also has the setting turned on, you may end up with
duplication in the display!
Note as well, this setting does not affect the behavior of DC XML exports. This behavior can be managed separately via a different setting - see below:
Inherit reference code (DC XML)
This setting controls whether an individual archival description’s identifier or its full inherited reference code is used when a description is exported as Dublin Core XML (including when exposed via AtoM’s OAI Repository module.
See also
- For more information on reference codes in AtoM and how inheritance works, see above: Inherit reference code (information object)
- To set the default separator character used in inherited reference codes, see: Reference code separator
- To learn more about Dublin Core in AtoM, see: Dublin Core Metadata Element Set, Version 1.1 (DC)
- For more on XML export, see: Export XML
- To learn more about how Dublin Core XML is used in AtoM’s OAI repository module, see: OAI Repository
When set to “No,” only the current description’s identifier will be included in
DC XML exports. When set to “Yes,” AtoM will use the reference code inheritance
model described above in Inherit reference code (information object), meaning in addition to
the description’s local identifier, the <dc:identifer> will also include:
- The country code of any related archival institution (derived from the country added in the address section of the related repository record)
- The repository identifier of any related archival institution
- Identifiers of any parent descriptions, separated by the default separator defined in the Reference code separator setting
By default, this setting is set to “No” in new installations.
Important
This setting does not alter the behavior of how identifiers / reference codes are displayed on description view pages, nor does it affect how identifiers are handled in EAD 2002 XML exports.
Both of these are instead affected by the Inherit reference code (information object) setting, described above.
Inventory
The Inventory list allows an administrator to make a page of lower- level descriptions contained within a parent record available on a separate inventory page formatted as a table with sortable columns. For more information, screenshots, and instructions for end users, see: Using the Inventory list.
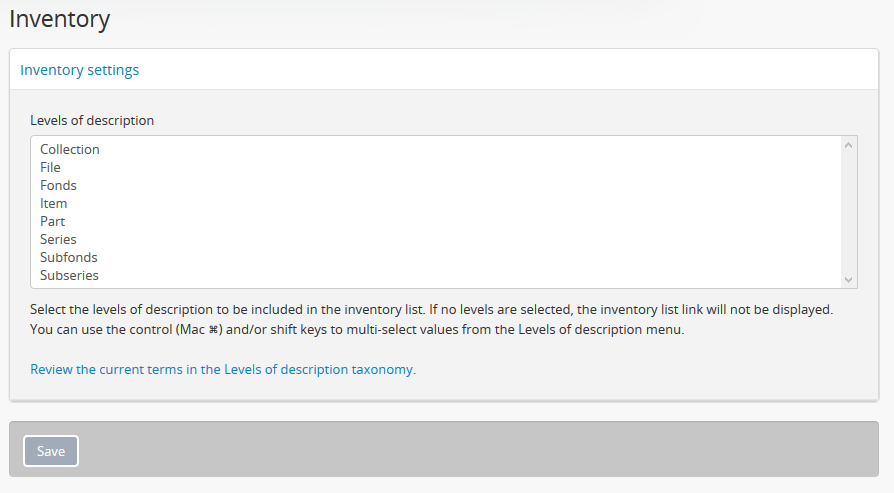
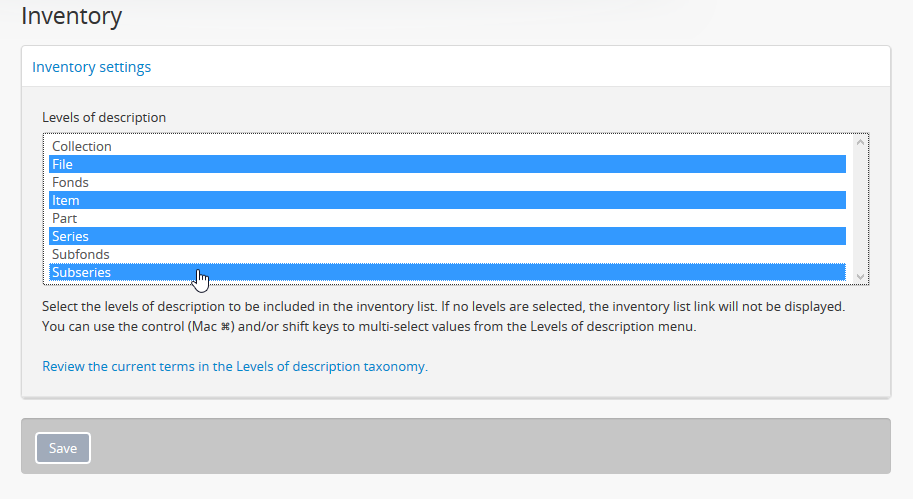
The selections an administrator makes in this section of the settings will determine what levels of description are included in the inventory list when accessed by users.
To multi-select multiple levels of description for inclusion in the inventory list, hold down the CTRL key (or the Command key on a Mac) while clicking the target levels.
Any level not selected will not appear in the inventory list results when a user clicks the inventory link.
Because level of description terms are included in a taxonomy that can be configured by users with the appropriate permissions, a hyperlink to the Levels of description taxonomy is also provided - an administrator can customize available terms by adding new ones, removing unused ones, or editing existing terms (for more information, see: Terms). Any new term added to the Levels of description taxonomy will show up in the Inventory settings page the next time an administrator returns to the settings page.
When you have selected the levels of description you want included in the Inventory list, remember to click the “Save” button located in the button block at the bottom of the page.
Important
Configuring the Inventory settings in a multilingual environment
If you have multilingual content in your AtoM instance, or you expect users to be browsing in different cultures (using the Language menu), you will need to configure the Inventory settings for each target culture. For example, to configure the settings for English, French, and Spanish:
- Make sure the user interface is set to “English” using the language menu - see Language menu for more information.
- Configure the inventory settings as described above for English, and save.
- Using the language menu, flip the user interface to French.
- Repeat steps 1-2.
- Using the language menu, flip the user interface to Spanish, and repeat steps 1-2 again.
Markdown settings
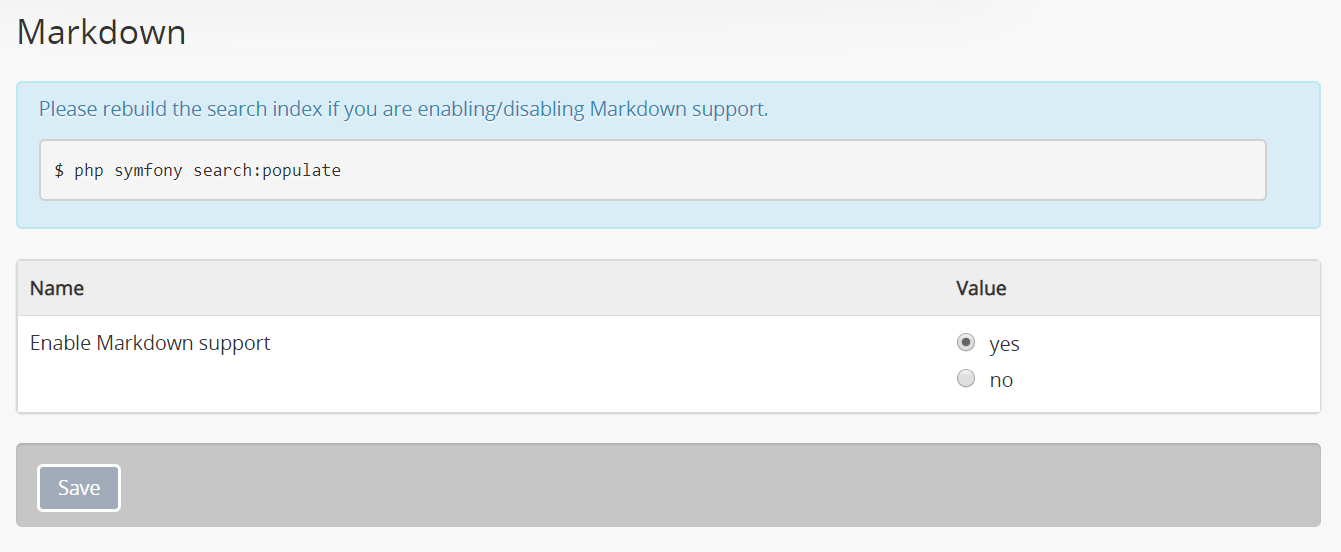
Markdown is a lightweight markup syntax for text formatting, originally created by John Gruber. As of the 2.5 release, AtoM supports the use of Markdown in both edit pages and static pages, via a PHP library known as Parsedown.
This setting enables Markdown support in AtoM, which will allow for content added to edit and static pages to be styled using Markdown syntax. For more information on using Markdown in AtoM, see: Formatting.
Important
After enabling or disabling this setting, a system administrator must rebuild the search index for the changes to take effect. For more information on how to rebuild AtoM’s search index, see:
To ensure you are seeing the most up-to-date results, you may also want to clear the application cache and restart services (such as PHP-FPM and Memcached if you are using it for additional caching), and clear your web browser cache.
Markdown is also used in the default text of the Privacy notification banner in new installations. If you are using the privacy notification and intend to disable Markdown in AtoM, be sure to review and update your notification message!
OAI repository
Open Archives Initiative, or OAI, is a protocol for metadata harvesting that allows automatic data harvesting and crawling within other systems that support OAI harvesters.
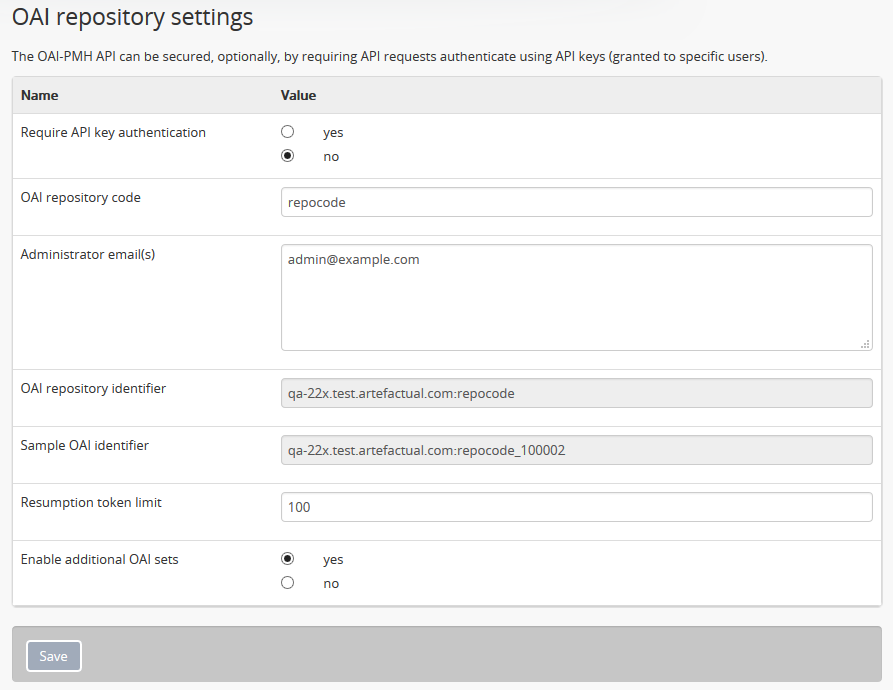
Comprehensive documentation on each field in the OAI repository settings is included in the OAI repository documentation, here:
Tip
To use the OAI repository functionality in AtoM and to see the related settings, you must first make sure that the arOAIPlugin is turned on. For more information, see:
If the arOAIPlugin is not turned on, then you won’t see the OAI repository tab on the settings page menu!
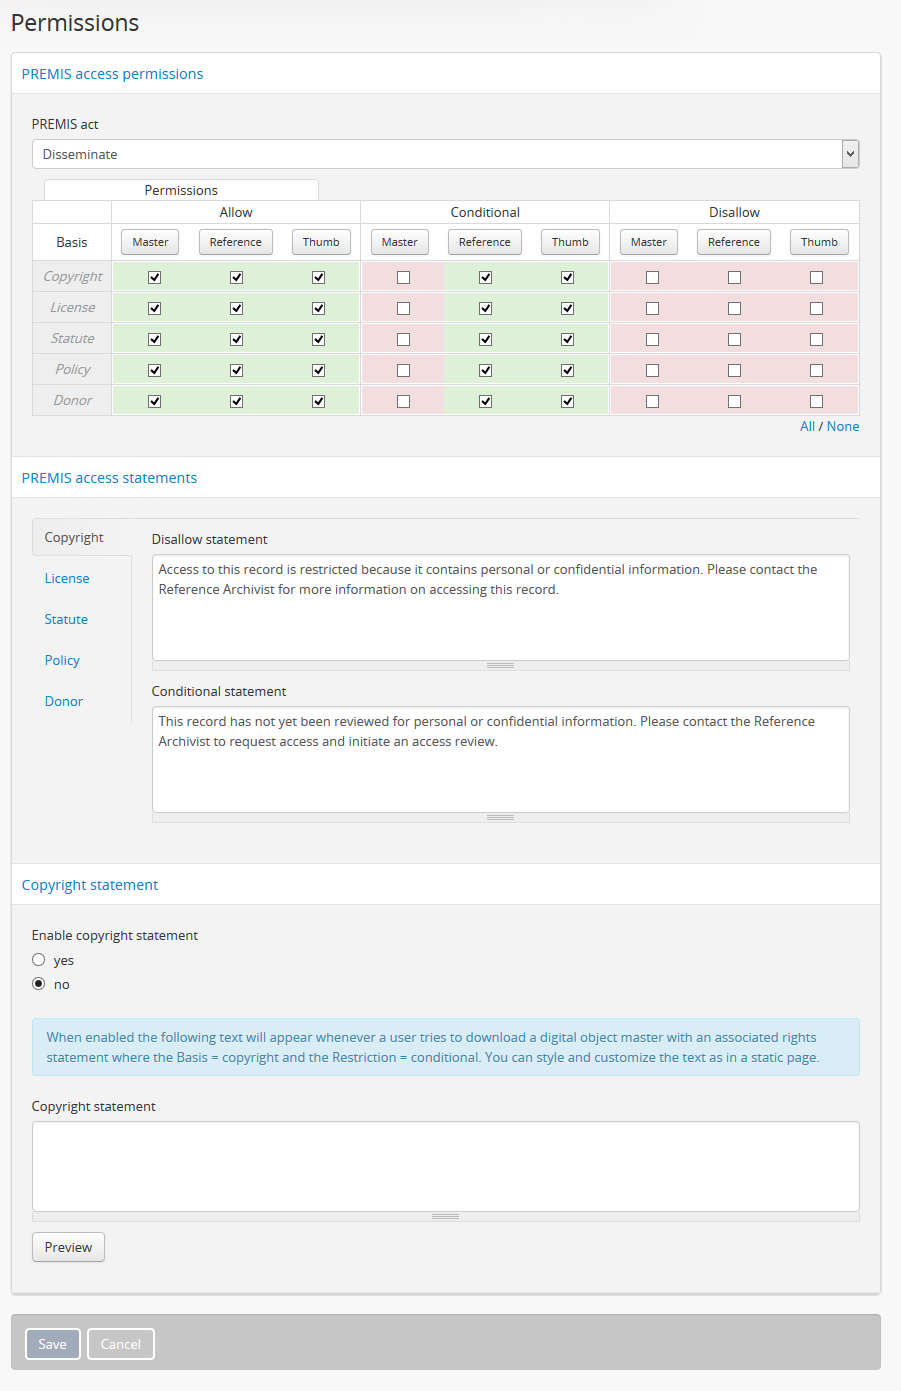
Permissions
Permissions settings are used by administrators to make PREMIS rights records in archival descriptions actionable on attached digital objects. See Rights for more information on working with rights in AtoM.
The permissions settings page is divided into 3 sections - PREMIS access permissions, PREMIS access statements, and the Copyright statement.
For information on configuring the PEMIS access permissions, see: Make rights actionable on digital objects (and for an example use case, see: Example: Configuring copyright permissions). For information on configuring the PREMIS access statements, see: Configure Disallowed and Conditional access statements. For information on configuring and using the Copyright statement, see: Add a Copyright statement before allowing access to a master digital object.
Privacy notification
The Privacy notification provides administrators with a configurable notification banner that, when enabled, will be shown to all users when first visiting AtoM in a session. It was designed to assist site administrators in complying with proactive privacy policy disclosure regulations such as the European Union’s General Data Protection Regulation (GDPR), which requires that any information collected about a user through the use of a website must be disclosed to the user in advance, with the option to opt out and/or leave the site. However, the notification message is entirely customizable and could be repurposed for any use.
Note
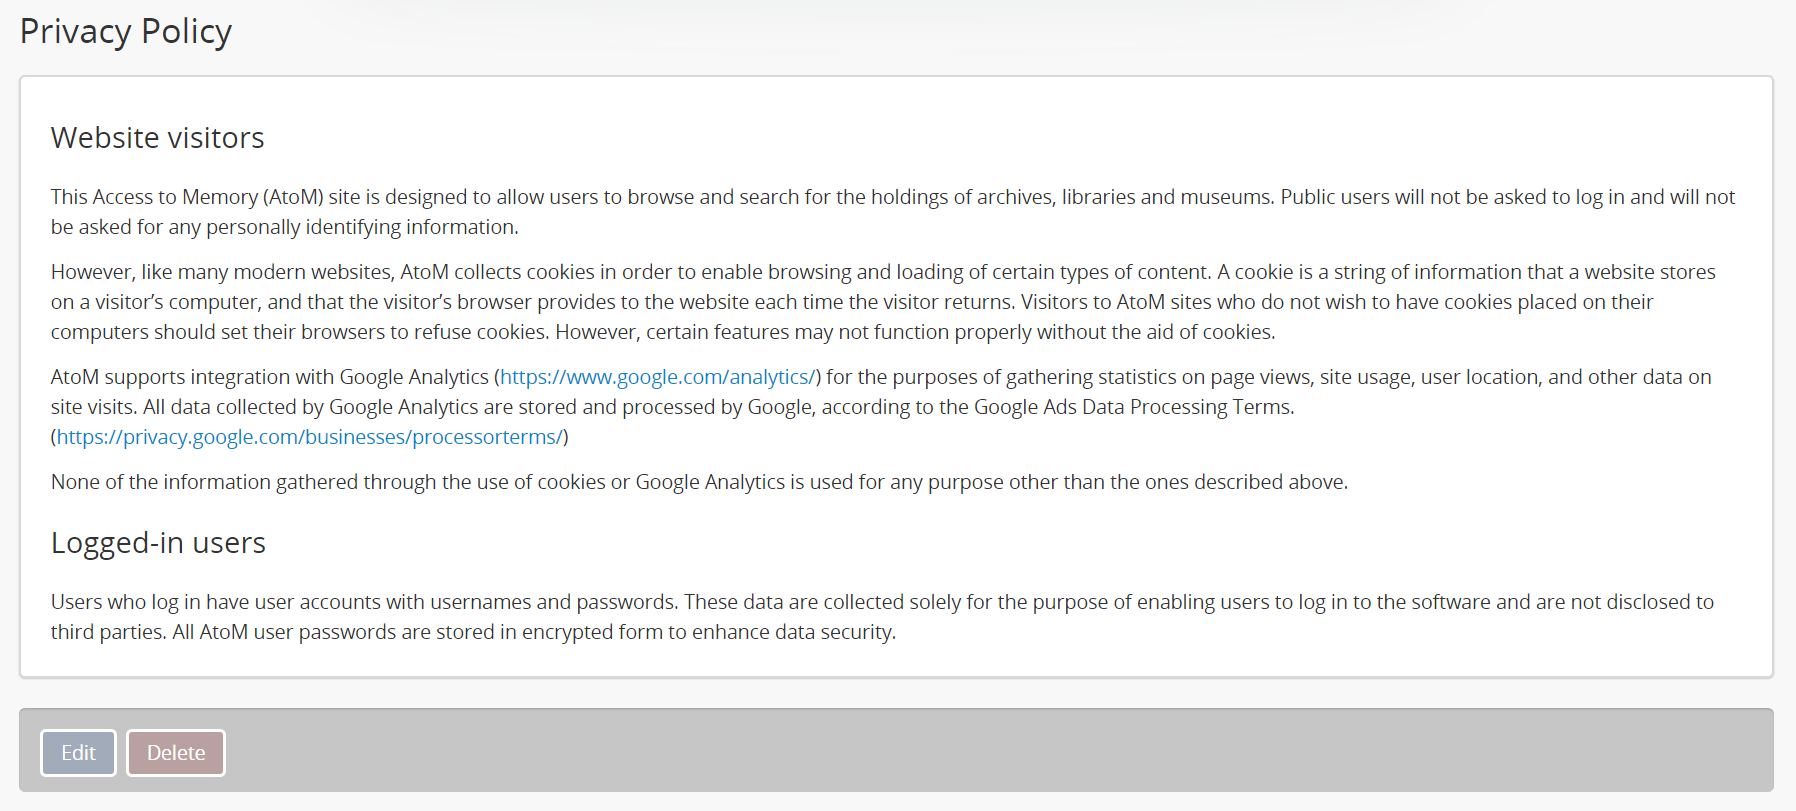
AtoM’s data collection
AtoM collects cookies in order to enable browsing and loading of certain types of content. Visitors to AtoM sites who do not wish to have cookies placed on their computers can set their browsers to refuse cookies. However, certain features (such as the Clipboard) may not function properly without the aid of cookies.
AtoM supports integration with Google Analytics for the purposes of gathering statistics on page views, site usage, user location, and other data on site visits. All data collected by Google Analytics are stored and processed by Google, according to the Google Ads Data Processing Terms.
None of the information gathered through the use of cookies or Google Analytics is used for any purpose other than the ones described here.
Users who log in have user accounts with usernames and passwords. These data are collected solely for the purpose of enabling users to log in to the software and are not disclosed to third parties. All AtoM user passwords are stored in encrypted form to enhance data security.
To support the use of the notification banner in proactive privacy disclosure, AtoM includes a default Privacy Policy static page which contains a slightly more detailed version of the text in the note above about AtoM’s data collection.
A link to the page is also included in the Quick links menu as “Privacy Policy.” The static page and the Quick links menu node can both be customized or deleted by an administrator - for more information on working with menus and static pages, see:
Enabling the Privacy notification
By default in new installations, the Privacy notification banner will be turned
off, meaning it will not display unless an administrator enables it.
To enable the setting, log in and navigate to Admin > Settings >
Privacy Notification.
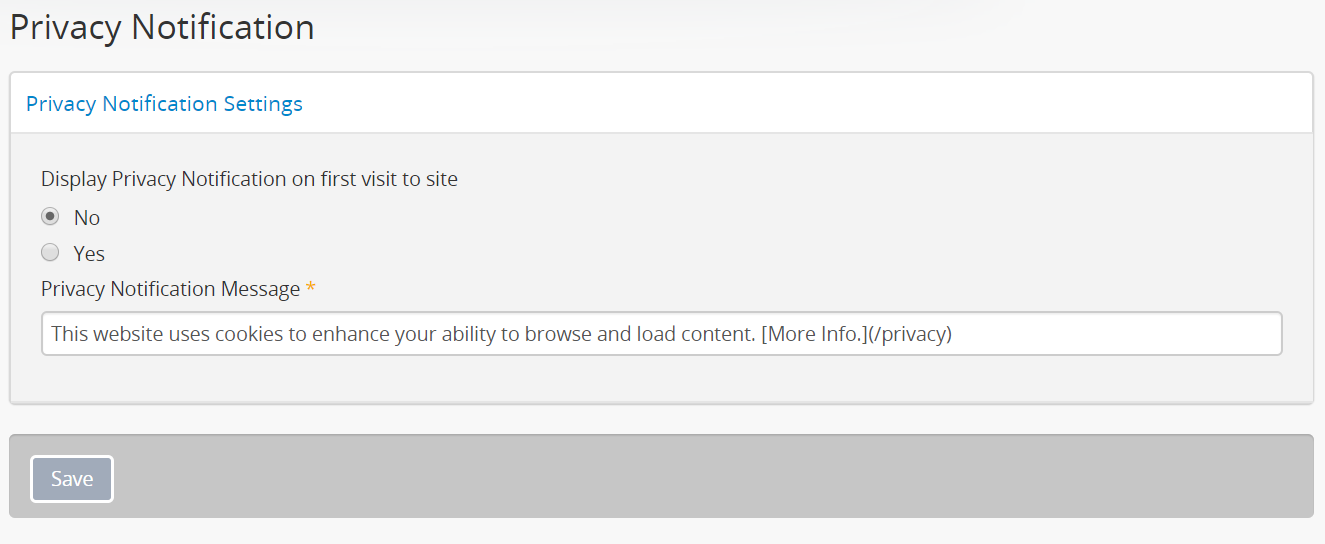
In the Privacy notification settings page, set the radio button to “Yes” to enable the privacy notification banner. Once you click Save in the button block at the bottom of the settings, the banner will immediately become visible. When users visit the site, the banner will remain persistently visible until the “Ok” button in the notification banner is clicked.
Customizing the Privacy notification message
Administrators can customize the content shown in the notification banner by editing the text included in the “Privacy Notification Message” field. The default text included in this field in new installations is:
This website uses cookies to enhance your ability to browse and load
content. [More Info.](/privacy)
The [More Info.](/privacy) text, when saved, will render as a hyperlink to
the Privacy policy static page. This hyperlink is created using Markdown
- for more information on using Markdown for text formatting in AtoM, see:
Important
If you are using AtoM with a custom theme, a developer or system administrator may need to make some changes to your custom theme plugin to ensure that the Privacy notification displays properly. Further details are included in the Upgrading documentation - see:
Security panel
This section includes settings that administrators can enable to enhance the security of AtoM.
Jump to:
- Limit administrator functionality by IP address
- Require SSL for all administrator functionality
- Require strong passwords
See also
The Administrator’s manual has some further suggestions on security for site administrators. See:
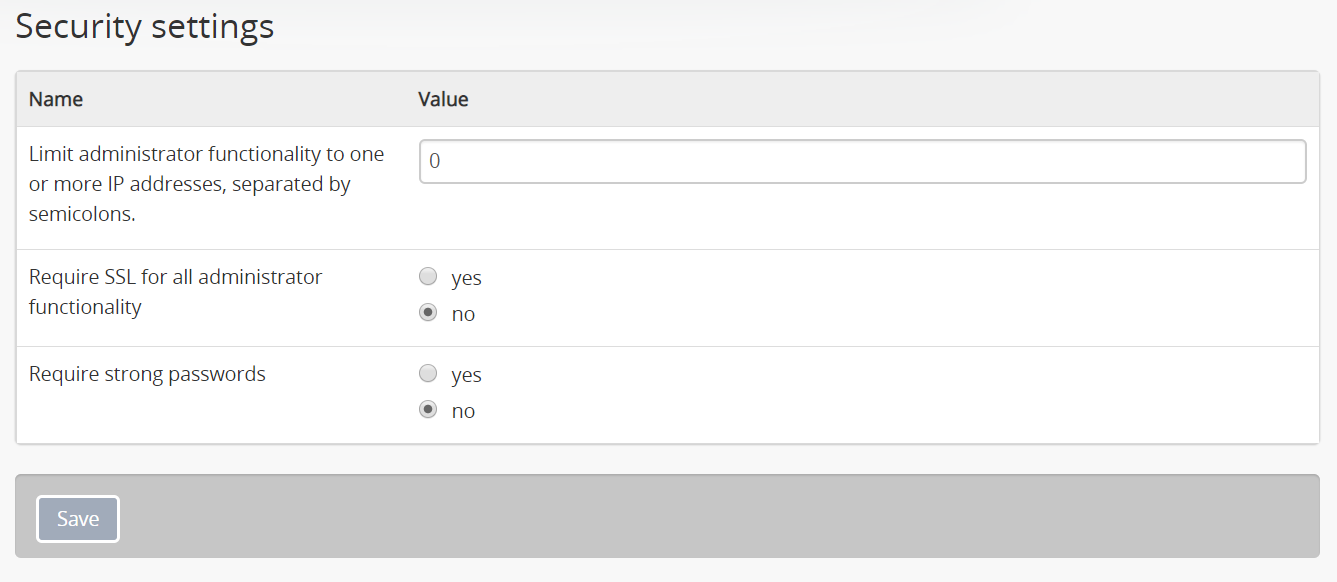
Limit administrator functionality by IP address
This feature allows administrators to limit administrator functionality to one or more IP addresses or IP ranges. Separate multiple IP address or ranges by semicolons, and use a dash to indicate an IP range. For example:
- 192.168.0.1 (single IP address)
- 192.168.0.1;192.168.0.255 (multiple unique IP addresses)
- 192.168.0.1-192.168.0.255 (IP range)
Require SSL for all administrator functionality
This feature allows administrators the option to enable the Hypertext Transfer Protocol Secure (HTTPS), which is a protocol for security over a computer network. It works by layering the Hypertext Transfer Protocol (HTTP) with the SSL/TLS protocol (Secure Sockets Layer/Transport Layer Security).
Warning
To use this setting, you must first ensure that your server is configured to support SSL! If you enable this setting and haven’t first acquired and installed and SSL certificate and updated your site to use HTTPS, then you will end up locking yourself out of your site!
Select yes to require all HTTP requests to be redirected to the HTTPS server, changing the URI scheme from “http” to “https.” This will only apply to users who are authenticated (logged-in) or visiting the login page. Any attempts to log in without using proper HTTPS will redirect to the home page.
Tip
If you have accidentally enabled this setting and locked yourself out of your AtoM site, a system administrator can use SQL to turn off the setting in the database. For more information, see:
Require strong passwords
This feature allows administrators to enhance login validation by requiring the use of strong passwords. Strong passwords use least 8 characters, and contain characters from 3 of the following classes:
- Upper case letters
- Lower case letters
- Numbers
- Special characters
Choose “yes” to require authenticated (logged-in) users to have strong passwords.
Site information
In this section, administrators can change the site title and site description, and set a Base URL for the application.
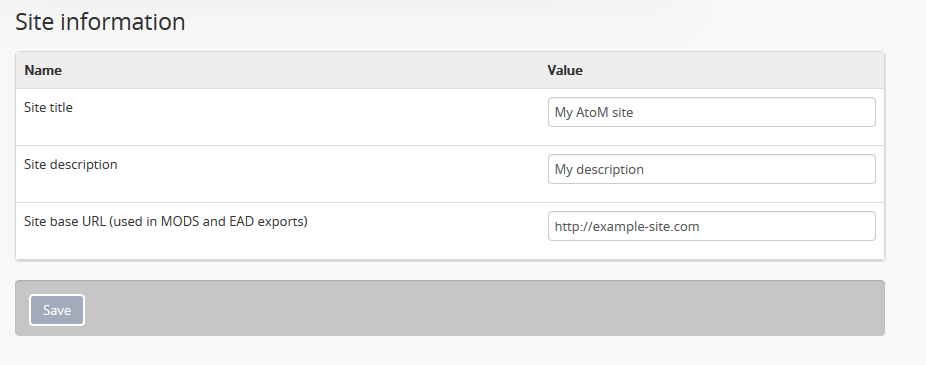
The site title and description will appear in the AtoM header bar, if they are included in the default page elements. See Default page elements for an image of where the Title and description appear, and more about setting the visibility of default page elements. These are also used when your site is indexed by web crawlers for public results in search engines such as Google, Yahoo, Bing, etc. You can choose to hide them from public view via the Default page elements settings, but we recommending adding site information here even if you decide not to display the title and description publicly.
The base URL is used to create absolute URLs included in exports (e.g. MODS
and EAD exports, and the digitalObjectURI column in CSV exports). For
example, your AtoM site is made up a series of web pages. Each page has a full
Uniform Resource Locator (URL) something like
http://www.your-atom-site.com/your-description. The Base URL is the part
of this URL that does not change - in this example,
http://www.your-atom-site.com.
Setting this value will ensure that links included in your XML exports will be
properly formed. Do not include a slash / at the end of your base URL -
AtoM will automatically add this when building the absolute URLs.
To save any modifications, click the “Save” button located below the “Site Description” field.
Treeview settings
The treeview is a user interface element designed to assist with hierarchical navigation. The settings in this section relate to the treeview as it is displayed and used on archival description view pages. For more information on navigation with and use of the treeview, see: Treeview.
Jump to:
- Treeview type
- Make full width treeview collapsible on description pages
- Show browse hierarchy page
- Sidebar treeview settings
- Full-width treeview settings
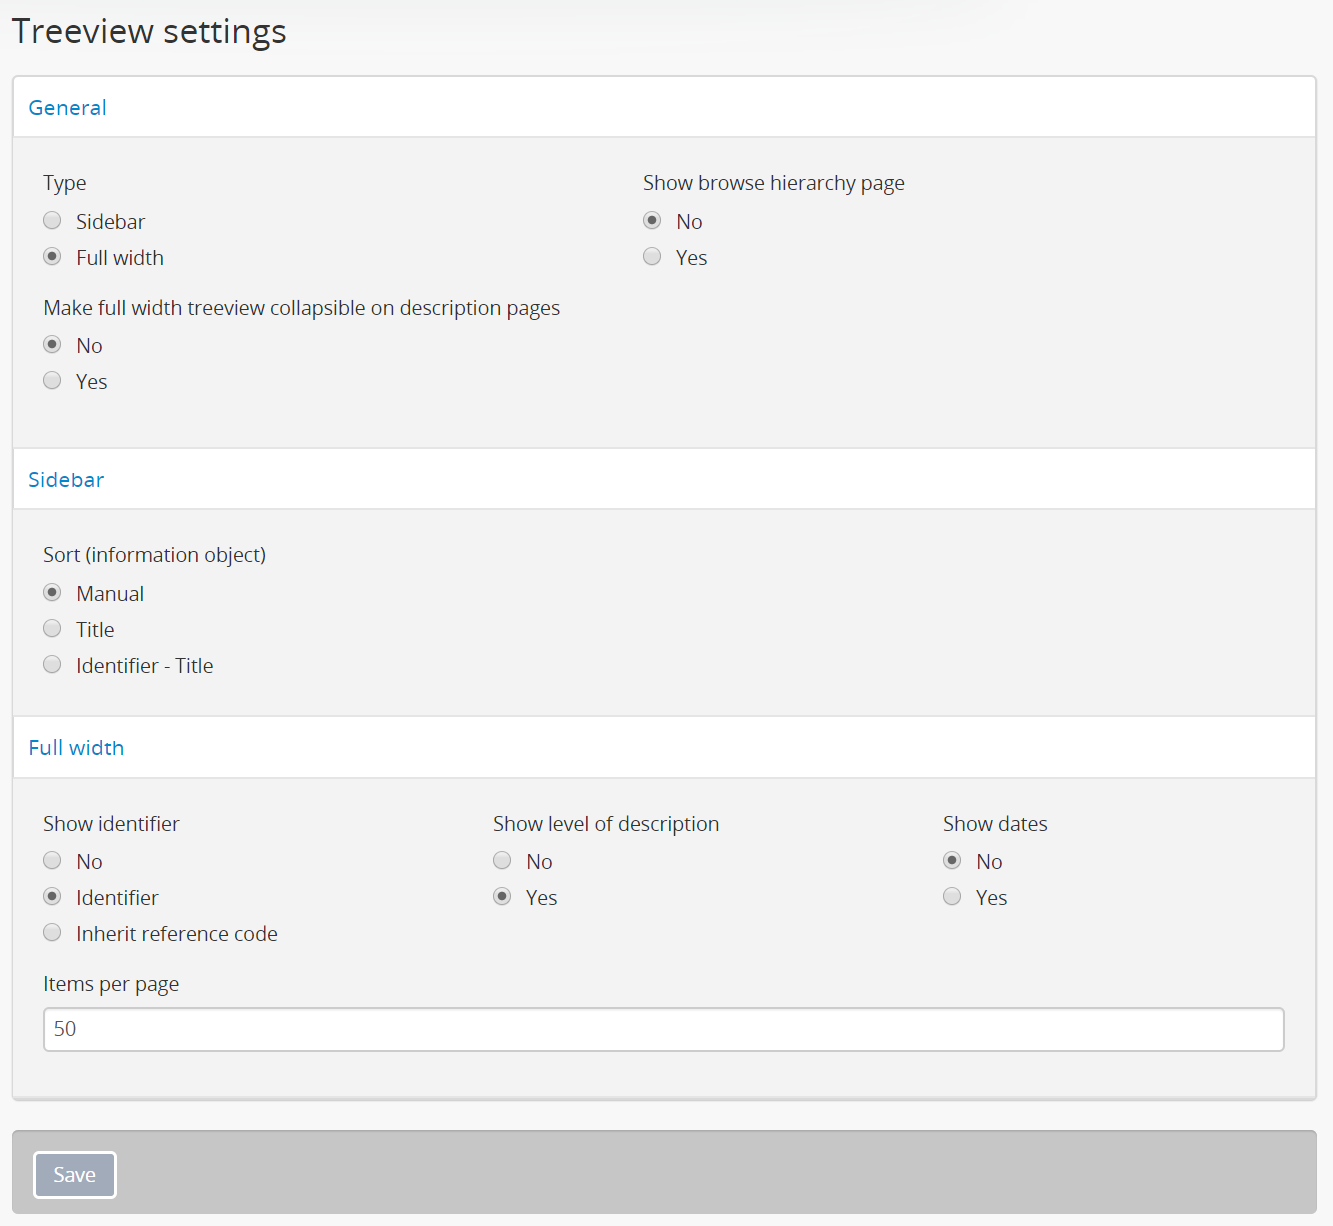
Treeview type
This setting allows administrators to choose between two different display formats for the treeview. For more information about the treeview in AtoM, see: Treeview.
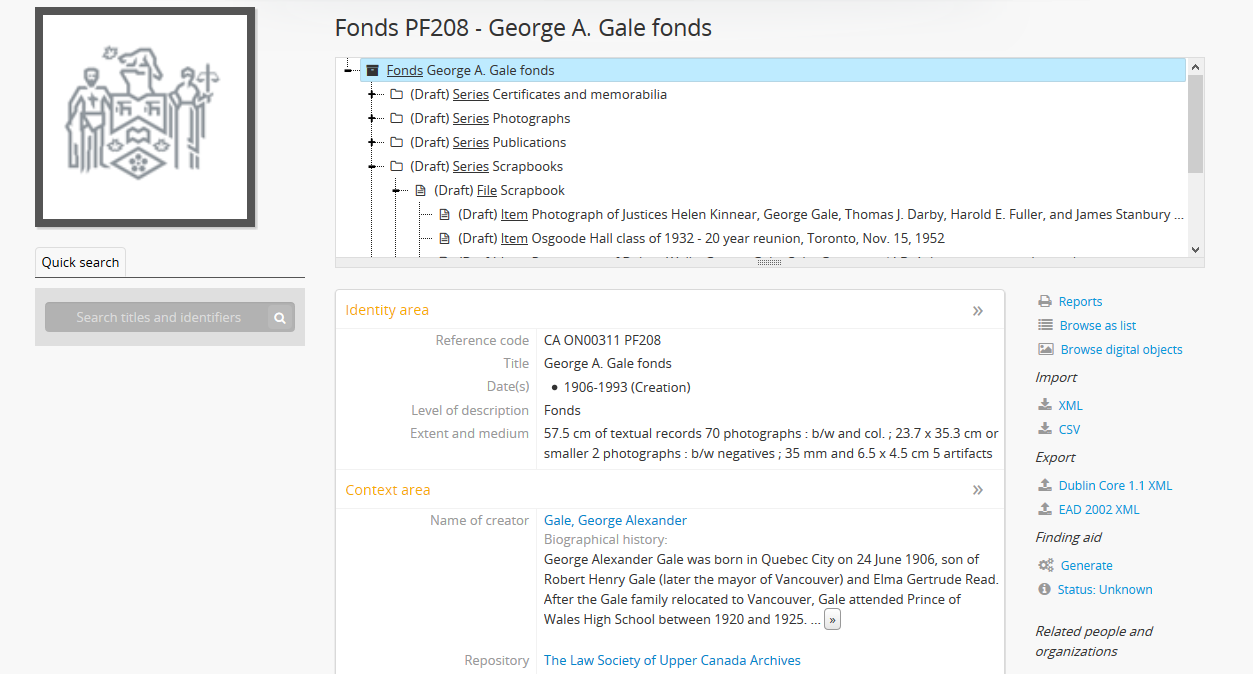
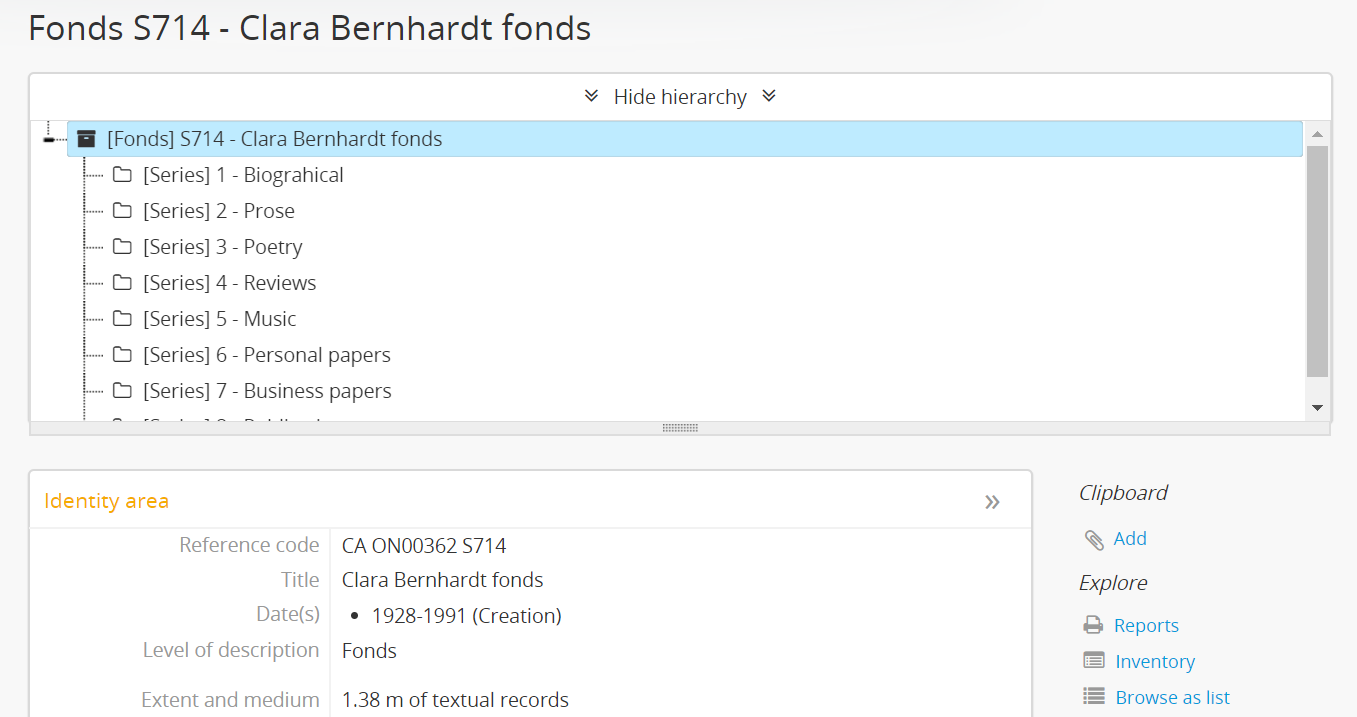
The Sidebar setting refers to the classic treeview that appears in the left-hand context menu of an archival description. The Full width treeview, introduced in the AtoM 2.3 release, will display below the description title, and above the first information area of the description. The display space of the full-width treeview can be expanded by users by gripping and dragging the bottom bar of the treeview downwards to expand the viewing area.
Other differences include:
- The sidebar version does not indent lower-levels, while indentation is used in the full width treeview
- The Identifier is included in the sidebar treeview nodes. With the full-width treeview, users can configure which elements are included in each node - for more information, see below: Full-width treeview settings.
- The results in the sidebar treeview are truncated - the first 5-6 nodes in the hierarchy are displayed by default, after which an approximate count of remaining nodes in the current level is provided, with the option to expand the results to display more. All nodes are shown in the full-width treeview.
Below are screenshots of the same fonds, shown with each version of the treeview enabled, for comparison.
Sidebar treeview

Full width treeview
For more information on each treeview type, see:
With the 2.5 release, administrators can also choose to show a browse hierarchy option on the archival descriptions browse page. This new feature will provide users with an additional way of browsing records held in AtoM - via a full-page version of the full-width treeview that contains all descriptions.
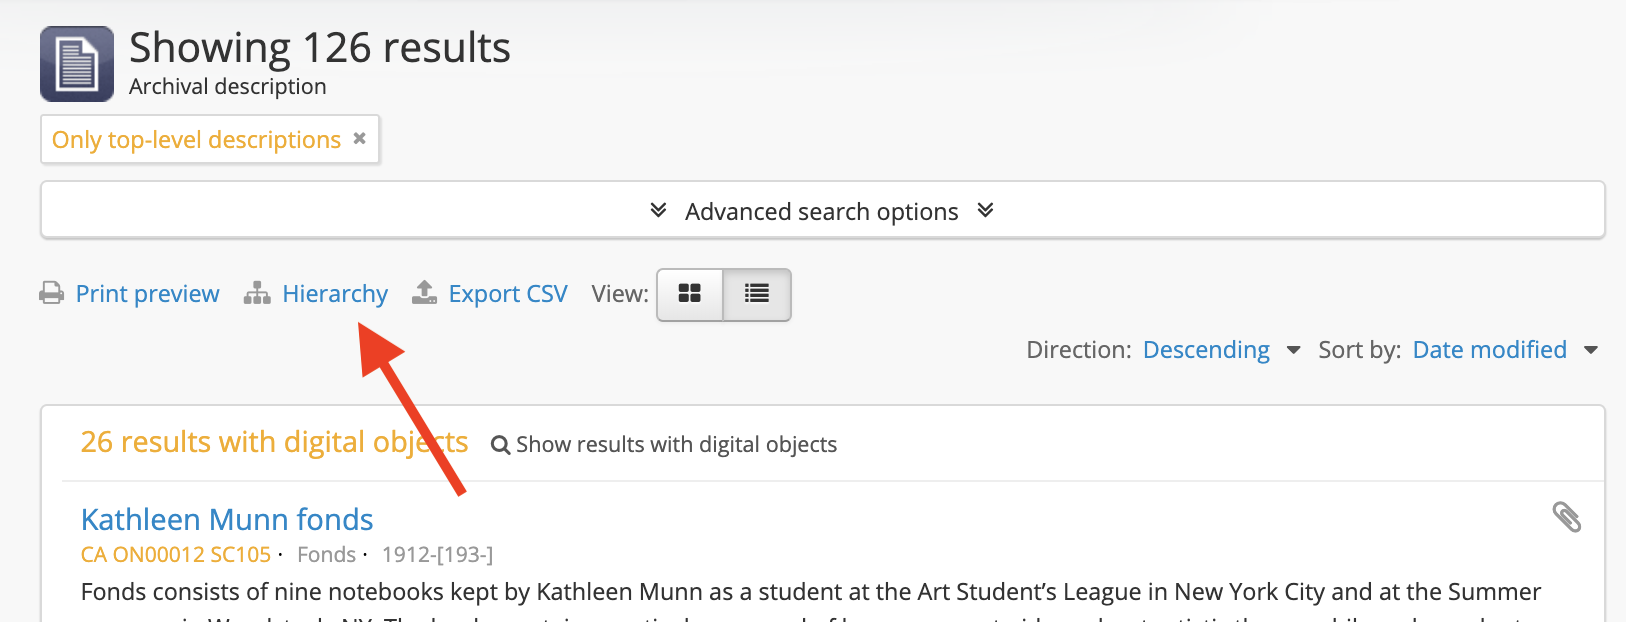
This new browsing mode will be disabled by default in new installations. To offer that option to users, an administrator can enable this feature by choosing ‘Yes’ to ‘Show browse hierarchy page’ in the treeview settings. When enabled, a new link will appear on the archival description search/browse page, labelled “Browse by hierarchy.”
For more information on browsing with this option, see:
Make full width treeview collapsible on description pages
This setting affects the default display of the full width treeview when users first arrive on the view page of an archival description. See Treeview type above for more information on the different treeview types available in AtoM.
By default in new AtoM installations, this setting will be disabled (i.e. set to “no”). When this setting is enabled (i.e. set to “yes”), the full-width treeview will be wrapped in a collapsible section, similar to The Advanced search panel on archival description search and browse pages.
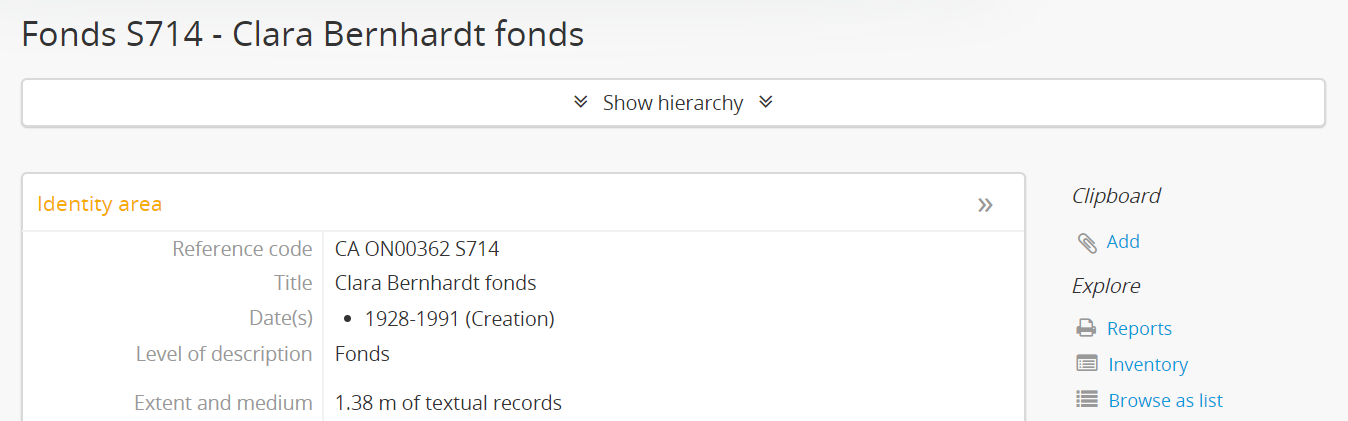
Once the setting is enabled, the treeview collapsible section will be closed when users first arrive on a view page, but users can click to expand it, and it will maintain its open state as users navigate to different descriptions in the hierarchy via the treeview nodes.
Users can click the container heading again at any time to collapse or expand the treeview. Navigating elsewhere or triggering a full page refresh will result in the treeview widget returning to its default collapsed state.
An administrator can also customize the labels used on the widget - the default text included during installation reads “Show hierarchy” when collapsed, and “Hide hierarchy” when expanded. To customize these default labels, see:
Show browse hierarchy page
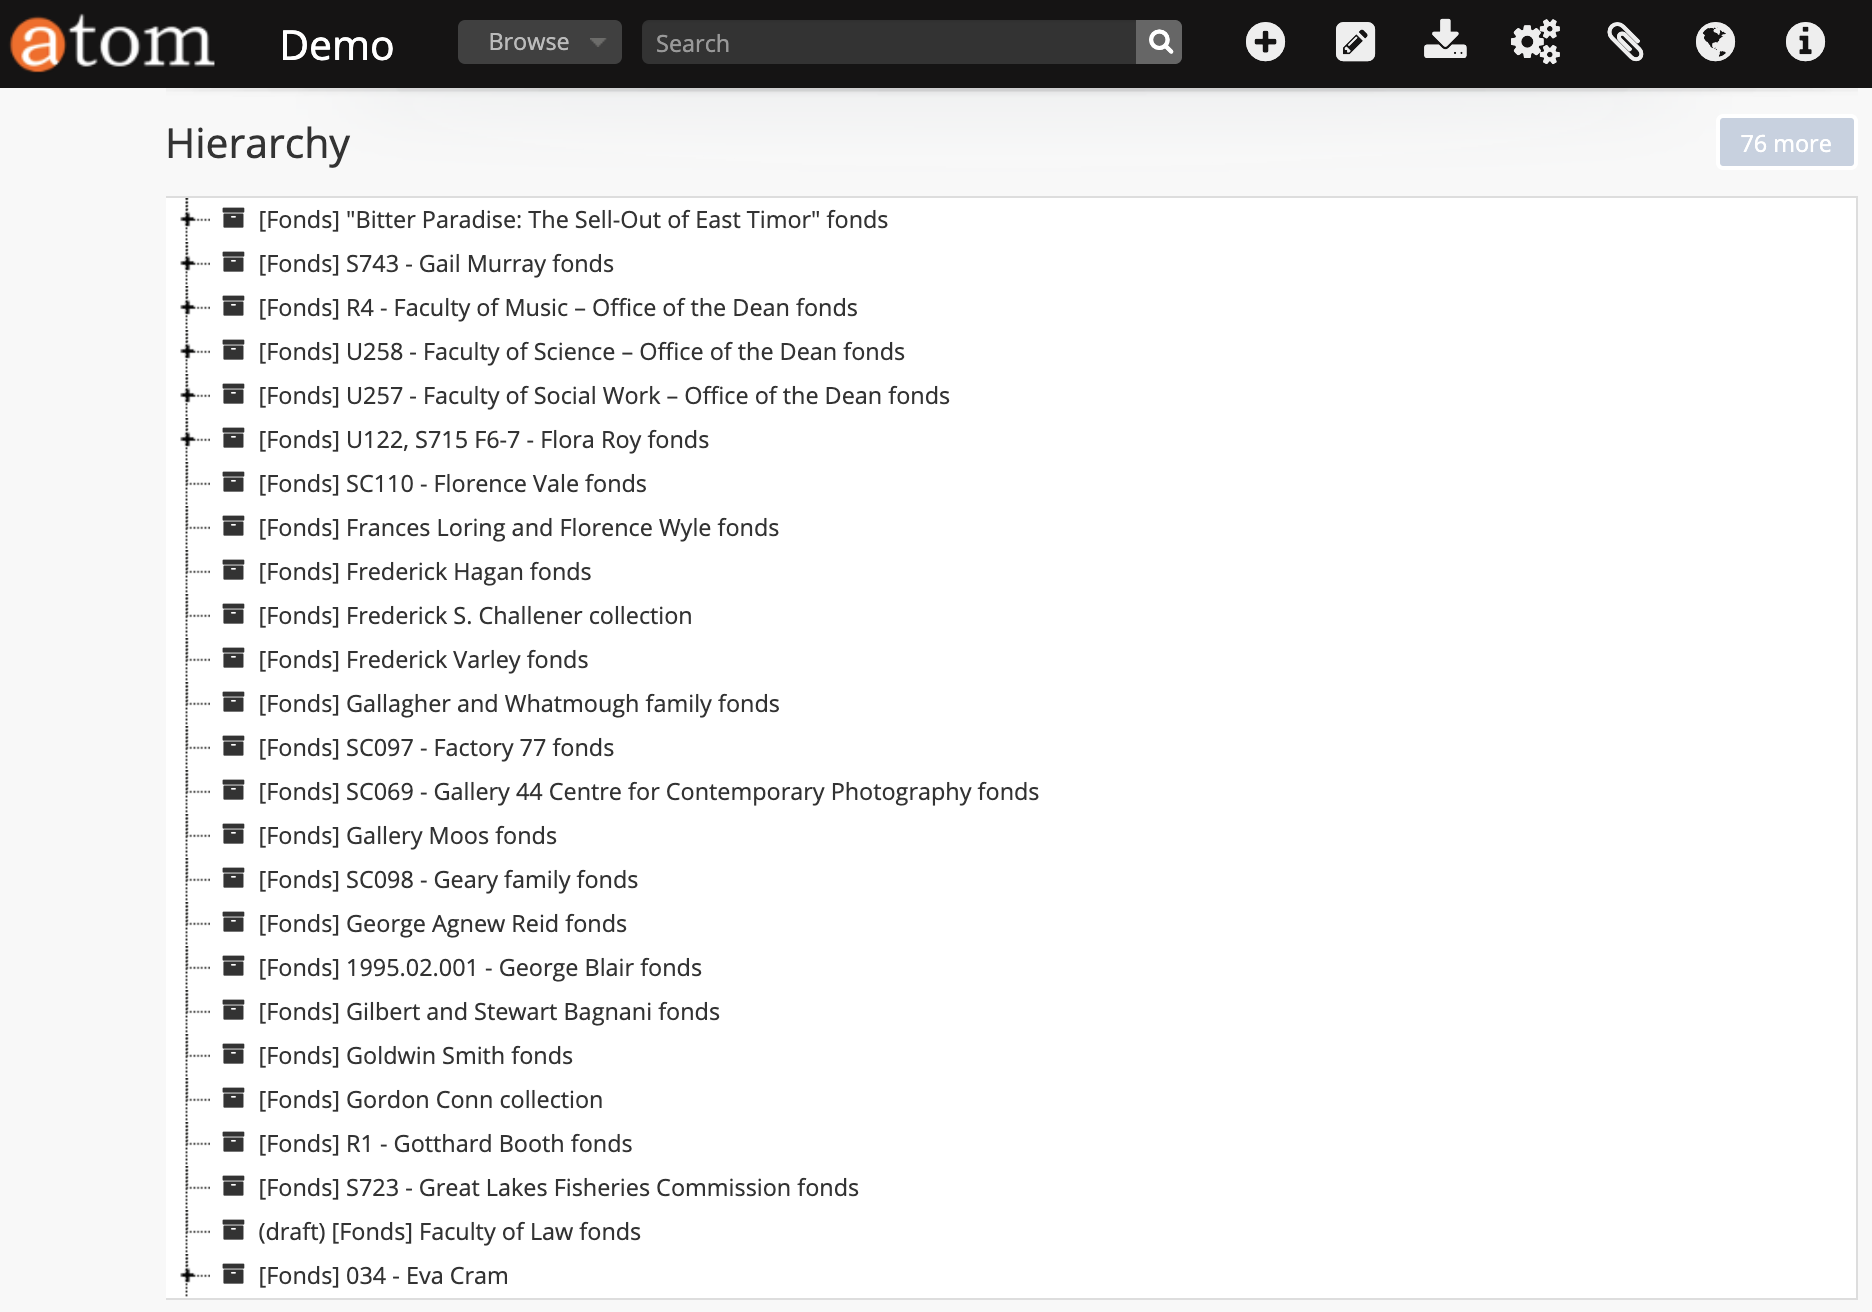
The hierarchy browser is a user interface element that can be enabled or disabled by an administrator. When enabled, it provides end users with a full-width treeview of all of AtoM’s archival description holdings. Users can expand and collapse individual nodes in the treeview to explore the hierarchical arrangement of a specific archival unit; however, clicking any node in the hierarchy browser will redirect the user to the related description’s view page. For more information on using the hierarchy browser, see: Using the Hierarchy browser.
When “Show browse hierarchy page” is set to yes, a new option will be added to the archival description browse page, above the results:
This option will be available to all users, including unauthenticated (i.e. public, or not logged in) users. When clicked, users will be taken to a full-page, full-width treeview containing all top-level descriptions in AtoM, which can be used for high-level browsing:
See the related browse documentation for further information on the hierarchy browser’s behavior and use.
When the setting is set to no, the hierarchy browser will not be created, and the link on the browse page will not be shown.
Sidebar treeview settings
Settings in this area relate only to the sidebar treeview. They will not affect the behavior of the full-width treeview.
Sort treeview (information object)
This setting determines how lower-level descriptions are sorted in an archival description’s context menu.
- Selecting “manual” means the descriptions will appear in the order in which they were entered into AtoM. If manual sort is selected, editors can also drag and drop descriptions within the treeview to re-order.
- Selecting “title” sorts the descriptions by title.
- Selecting “identifier - title” sorts the descriptions by identifier, then by title.
In new installations, the default sort order is Manual. Note that when the treeview sort is set to Manual, an authenticated (i.e. logged in) user with edit permissions can re-order sibling descriptions in the treeview by dragging and dropping them. This ability only works when the treeview sort setting is set to “Manual.” For more information, see:
Tip
AtoM’s search index is based on Elasticsearch, which sorts characters based on the order of the in the ASCII character encoding scheme. This can result in seemingly wrong orders when sorting by identifier- for example, 1-1 will be followed by 1-10 instead of 1-2. The solution is to use leading zeroes when forumulating identifiers that you wish to sort in a human- readable order, e.g. 1-01, 1-02, etc.
Full-width treeview settings
Settings in this area relate to the functionality and display of the full-width treeview. They do not affect the behavior of the sidebar treeview.
Currently all elements in this section relate to what information is displayed in the treeview for each node. Users can configure whether the identifier/reference code, level of description, and/or dates of creation are included in each node’s display.
When all elements are displayed, the ordering of the metadata elements is as follows:
[Level] ID - Title of description, dates
So for a Series level description with an identifier of 004 called “Photographs” and created in 1959, the display with all elements would be:
[Series] 004 - Photographs, 1959
Each configurable element is described further below.
Show identifier
This setting controls whether or not an identifier or full inherited reference code is included in the treeview display for each node.
For more information on how reference codes are formed in AtoM and the difference between an identifier and a full reference code, see above, Inherit reference code (information object).
Show level of description
This setting determines whether or not the level of description assigned to the current description is included in the treeview node display or not.
Show dates
This setting determines whether or not dates of creation are included in the treeview node display or not. Where there are multiple dates of creation, only the first will be shown. Other event type dates (for example, dates of accumulation, or dates of broadcast, etc.) are not included regardless of the setting.
Items per page
This setting controls how many immediate child descriptions are loaded below the top-level description when users first visit a hierarchical description’s view page. It also controls the number of top-level descriptions that are added to the hierarchy browser on first load
Like the sidebar treeview, for performance reasons AtoM may not load all available descriptions at once in the full-width treeview, when there are many immediate children below the top-level description in the archival unit. The default value for this behavior is 50 - meaning, if there are more than 50 immediate children below the parent description, AtoM will add a count of the number of remaining records not immediately displayed to a button in the top right corner.
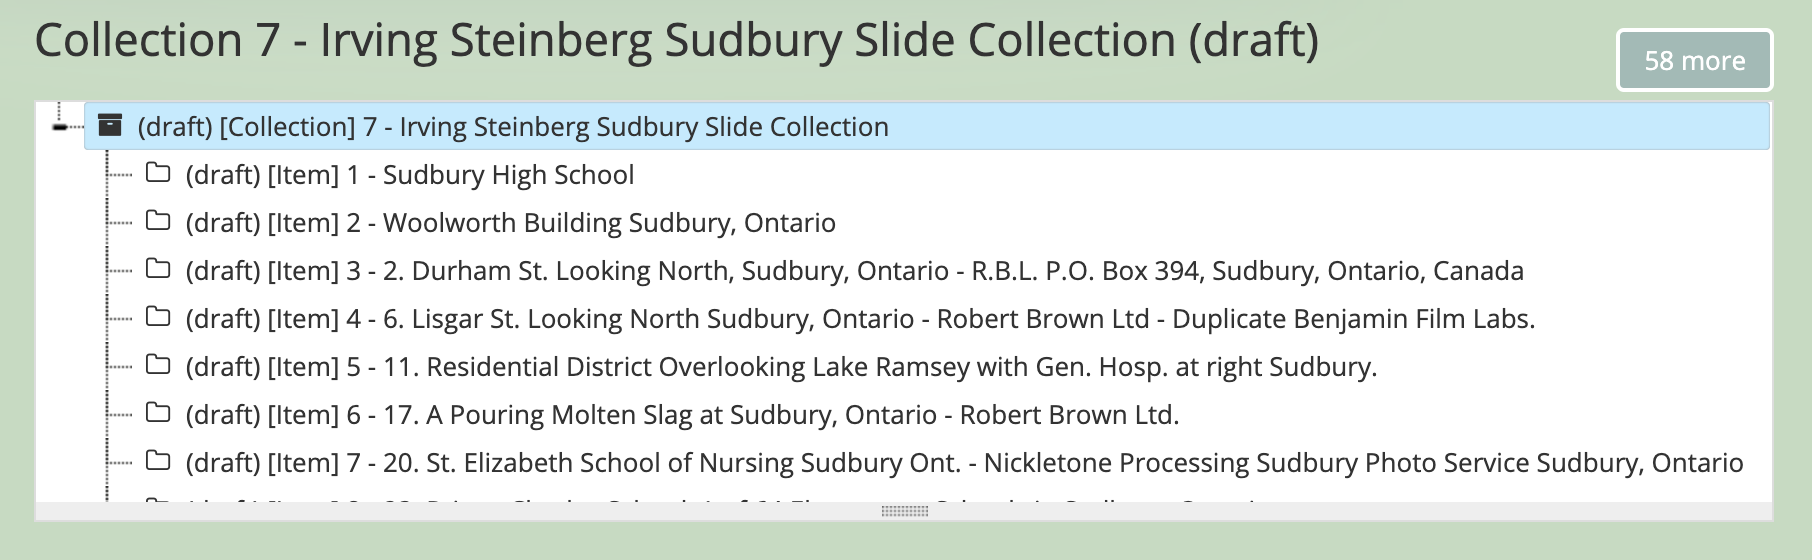
Clicking on that button will load the next set of records, using this “items per page” setting value to determine how many to load at once. If there are still more records not displayed, the number of remaining records will be shown and the user can choose to see the next set, or return to the beginning by choosing “reset”.
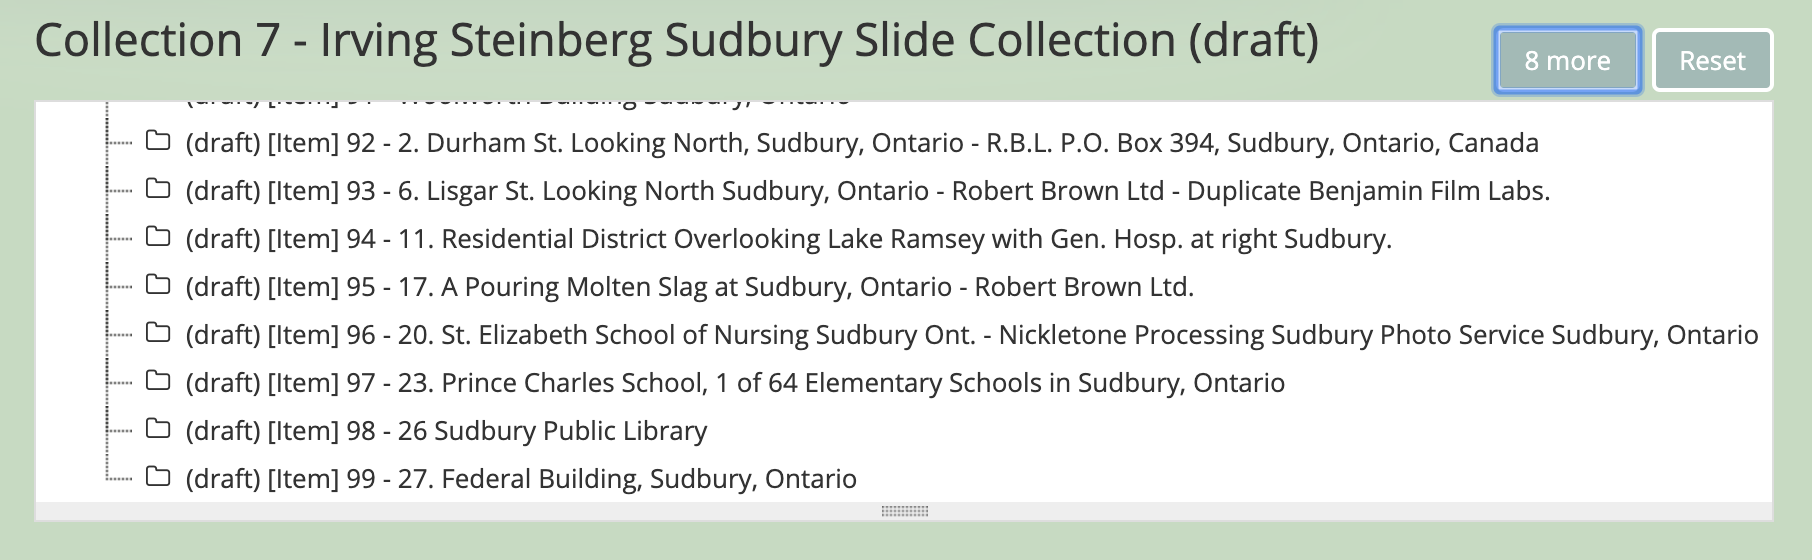
To allow for more records to be loaded initially, and with each subsequent click of the “More” button, an administrator can adjust this “Items per page” value. The minimum value is 10, and the maximum value that can be set via the user interface is 10,000.
Tip
If your site has very large hierarchies and you need to set the initial page
load value higher than 10,000 records, a system administrator can modify this
max value in the configuration file found at config/app.yml.
Look for the following line in the file:
treeview_items_per_page_max: 10000
After the change, you will need to clear the application cache, and restart PHP-FPM. For more information, see:
The behavior is similar for the hierarchy browser, though instead of affecting the number of children loaded below the top-level archival description, here the setting will determine how many top-level descriptions are loaded in the initial view. See Using the Hierarchy browser for more information.
User interface labels
Users of AtoM interact with six main entities: accession records, archival descriptions, authority records, archival institutions, functions and terms.
See also
AtoM is flexible enough to support descriptions a variety of cultural materials such as archival, library, museum, and art gallery collections. The code, therefore, uses generic terms for entities. Administrators can specify how they want these terms to appear in the user interface labels to suit the institution’s collections. The default labels that ship with AtoM are terms typically used by archival institutions, but can be customized as desired. Additionally, some of the user interface label settings allow an administrator to customize the display labels on particular user interface elements, such as the text shown for collapsing and expanding the full width treeview when the Make full width treeview collapsible on description pages is enabled.
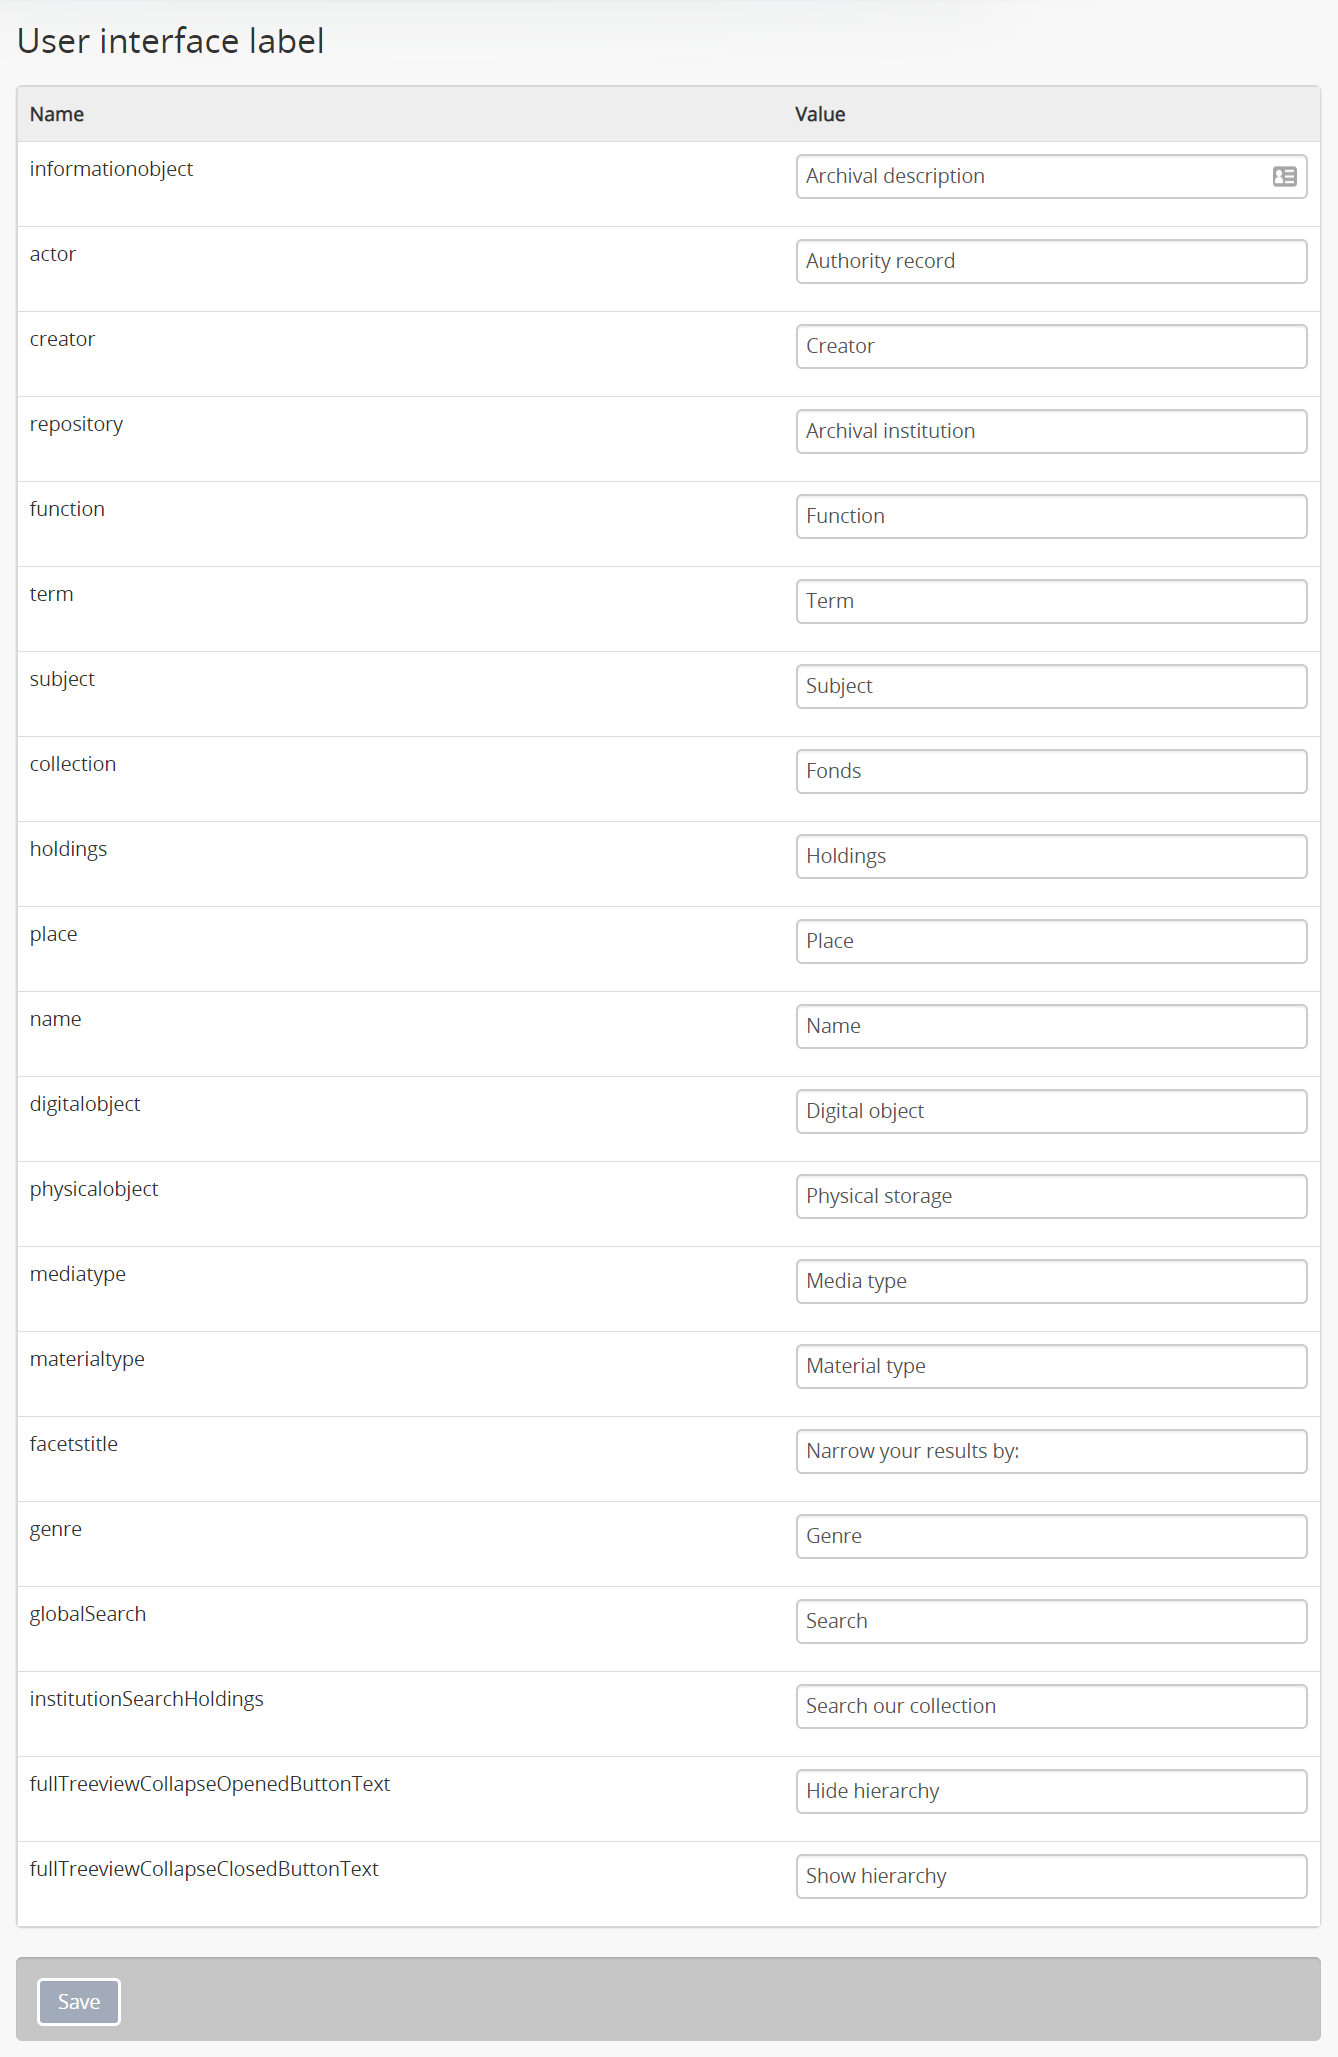
The “Name” column shows the generic entity name and the “Value” column shows AtoM’s default user interface labels. The following is a list of the generic terms and their AtoM user interface labels. Click on each label below to see glossary definitions and descriptions of how the terms are used in AtoM.
- informationobject: archival description
- actor: Authority record
- creator: Creator
- repository: Archival institution
- function: Function
- term: Term
- subject: Subject
- collection: Fonds
- holdings: Holdings
- place: Place
- name: Name
- digitalobject: Digital object
- physicalobject: Physical storage
- mediatype: Media type
- materialtype: Material type (general material designations used in the Canadian Rules for Archival Description).
- facetstitle: facets title
- genre: Term for the Genre access point taxonomy, currently only available on the RAD template. It appears as a facet filter in the archival description browse and search pages - this label will change the display in the facet headers.
- globalSearch: the placeholder help text that will appear in the global search box.
- institutionSearchHoldings: only visible if institutional scoping is enabled - when enabled, this is the default placeholder help text that will appear in the per-institution search box included in the institution block. For more information, see: Enable institutional scoping
- fullTreeviewCollapseOpenedButtonText: Text used in the setting to Make full width treeview collapsible on description pages. This text will be displayed on the collapsible widget when the widget is expanded, showing the descriptions. The text used should suggest to users that clicking it will cause the widget to collapse, hiding the treeview.
- fullTreeviewCollapseClosedButtonText: Text used in the setting to Make full width treeview collapsible on description pages. This text will be displayed on the collapsible widget when the widget is collapsed, hiding the descriptions. The text used should suggest to users that clicking it will cause the widget to expand, showing the treeview.
User interface labels can be changed by administrators by entering a new label(s) into the field(s) under the “Value” column. Changes will only be saved once the “Save” button is clicked. Changing the label will change its appearance throughout AtoM for both authenticated (logged-in) and public users.
Note
Changing the user interface labels will not automatically change the
corresponding labels in the navigation menus. To change these menus, go to
Admin > Menus. See the Manage menus page
for more information.